Note
March 2026 update: We are working on a new blog post reflecting all the recent changes to MaaS. In the meantime, some URLs and commands in this article are no longer valid. For the latest installation and configuration instructions, refer to the official quick start guide.
This article explains how to deploy and manage Models-as-a-Service (MaaS) on Red Hat OpenShift, now available in developer preview. We'll begin by discussing the benefits of MaaS, highlighting how it enables organizations to share AI models at scale. Then, we'll guide you through the process of setting it up on OpenShift, deploying a sample model, and demonstrating how rate limiting protects your resources.
What is Models-as-a-Service (MaaS)?
With Models-as-a-Service (MaaS), you can deliver AI models as shared resources that users within an organization can access on demand. MaaS provides a ready-to-go AI foundation using standardized API endpoints, enabling organizations to share and access private, faster AI at scale.
Red Hat OpenShift AI already lets you run AI models by exposing them via APIs and sharing. When sharing models with a large user base, though, you might find it hard to maintain quality-of-service by limiting excessive usage. OpenShift AI 3 introduces the Models-as-a-Service pattern, using Red Hat's Connectivity Link capabilities. This gives OpenShift AI admins better control over model access and rate limiting.
Quick setup
Let's prepare your environment for the Models-as-a-Service deployment.
Prerequisites
Ensure you have the following components available:
- An OpenShift cluster (4.19.9 or later)
- Red Hat OpenShift AI Operator 3
- Red Hat Connectivity Link 1.2
- CLI tools:
oc,kubectl,jq,kustomize
Deploy the MaaS infrastructure
You can deploy the entire platform with a single script. Run the following commands while logged into your OpenShift cluster as a cluster administrator:
curl -sSLo deploy-rhoai-stable.sh \
https://raw.githubusercontent.com/opendatahub-io/maas-billing/refs/tags/0.0.1/deployment/scripts/deploy-rhoai-stable.sh
chmod +x deploy-rhoai-stable.sh
MAAS_REF="0.0.1" ./deploy-rhoai-stable.sh
The deployment script creates a new Gateway object named maas-default-gateway, which serves as the ingress point for the MaaS system.
oc describe Gateway maas-default-gateway -n openshift-ingress # View Gateway Info
oc get Gateway maas-default-gateway -n openshift-ingress -o jsonpath='{.spec.listeners[0].hostname}' # Gateway's Hostname
You can find more information on the MaaS architecture here.
Deploy a sample model and test rate limiting
Now let's deploy a lightweight GPU model and demonstrate how MaaS enforces rate limits.
Deploy the IBM Granite model
Enter the following to start the deployment:
# Deploy and immediately watch the pod status (one line)
kustomize build
"https://github.com/opendatahub-io/maas-billing//docs/samples/models/ibm-granite-2b-gpu" \
  | kubectl apply -f - && kubectl get pods -n llm -w
This model is MaaS-enabled through its Gateway reference to maas-default-gateway. You can find more information about this configuration in the model setup documentation.
Retrieve access token
Create an access token for authentication:
CLUSTER_DOMAIN=$(kubectl get ingresses.config.openshift.io cluster -o jsonpath='{.spec.domain}')
TOKEN=$(curl -sSk -X POST "https://maas.${CLUSTER_DOMAIN}/maas-api/v1/tokens" \
  -H "Authorization: Bearer $(oc whoami -t)" \
  -H "Content-Type: application/json" \
  -d '{"expiration": "10m"}' | jq -r '.token')
echo "Token: ${TOKEN:0:50}..."
Call the model
Make a simple inference request to validate authentication:
# List available models
curl -sSk "https://maas.${CLUSTER_DOMAIN}/maas-api/v1/models" \
  -H "Authorization: Bearer $TOKEN" | jq
# Send an inference request
curl -sSk -X POST "https://maas.${CLUSTER_DOMAIN}/llm/ibm-granite-2b-gpu/v1/chat/completions" \
  -H "Authorization: Bearer $TOKEN" \
  -H "Content-Type: application/json" \
  -d '{
    "model": "ibm-granite/granite-3.1-2b-instruct",
    "messages": [{"role": "user", "content": "Hello! What is your name?"}],
    "max_tokens": 50
  }' | jq
View tier information
Tier information for the Developer Preview is stored in a ConfigMap within the maas-api namespace. You can view this configuration by using the following command. Additional details are available in the tier overview documentation.
oc describe cm tier-to-group-mapping -n maas-apiUser groups are mapped to tiers. By default, the free tier includes the system:authenticated group, which is automatically granted to all authenticated users. This means your current user is assigned to the free tier.
Experience rate limiting
You can view the free tier rate limits by using the following commands:
oc get TokenRateLimitPolicy gateway-token-rate-limits -n openshift-ingress -o jsonpath='{.spec.limits.free-user-tokens.rates}'
oc get RateLimitPolicy gateway-rate-limits -n openshift-ingress -o jsonpath='{.spec.limits.free.rates}'
We can see the rate limits are:
- 5 requests per 2 minutes (request-based limit)
- 100 tokens per minute (token-based limit)
To demonstrate rate limiting in action, execute the following commands to exceed the request limit:
# Send 10 rapid requests (free tier allows only 5 per 2 minutes)
for i in {1..10}; do
  HTTP_CODE=$(curl -sSk -o /dev/null -w "%{http_code}" -X POST \
    "https://maas.${CLUSTER_DOMAIN}/llm/ibm-granite-2b-gpu/v1/chat/completions" \
    -H "Authorization: Bearer $TOKEN" \
    -H "Content-Type: application/json" \
    -d '{"model": "ibm-granite/granite-3.1-2b-instruct", "messages": [{"role": "user", "content": "Hello"}], "max_tokens": 100}')

  echo "Request $i: HTTP $HTTP_CODE (should be 200 for first 5)"
done
Expected output:
Request 1: HTTP 200
Request 2: HTTP 200
Request 3: HTTP 200
Request 4: HTTP 200
Request 5: HTTP 429 ← Rate limited!
Request 6: HTTP 429
Request 7: HTTP 429
Request 8: HTTP 429
Request 9: HTTP 429
Request 10: HTTP 429
The HTTP 429 response indicates that the rate limit has been reached. Note that rate limiting is based on the total number of tokens reported by the LLM, so the number of successful requests might vary depending on response token counts. The quota resets after 2 minutes, demonstrating the fair usage controls in action.
Different tier
To create and test an additional tier, follow this example:
# Edit the tier configuration to match your organization's needs:
kubectl edit configmap tier-to-group-mapping -n maas-api
# Create premium group
oc adm groups new premium-group 2>/dev/null
# Add current user to premium group
CURRENT_USER=$(oc whoami)
oc adm groups add-users premium-group $CURRENT_USER
# Verify membership
oc get group premium-group
CLUSTER_DOMAIN=$(kubectl get ingresses.config.openshift.io cluster -o jsonpath='{.spec.domain}')
TOKEN=$(curl -sSk -X POST "https://maas.${CLUSTER_DOMAIN}/maas-api/v1/tokens" \
  -H "Authorization: Bearer $(oc whoami -t)" \
  -H "Content-Type: application/json" \
  -d '{"expiration": "10m"}' | jq -r '.token')
# Test PREMIUM tier (20 requests allowed)
echo "Testing PREMIUM tier (20 requests per 2 minutes):"
for i in {1..25}; do
  HTTP_CODE=$(curl -sSk -o /dev/null -w "%{http_code}" -X POST \
    "https://maas.${CLUSTER_DOMAIN}/llm/ibm-granite-2b-gpu/v1/chat/completions" \
    -H "Authorization: Bearer $TOKEN" \
    -H "Content-Type: application/json" \
    -d '{"model": "ibm-granite/granite-3.1-2b-instruct", "messages": [{"role": "user", "content": "Hi"}], "max_tokens": 5}')

  if [ "$HTTP_CODE" = "429" ]; then
    echo "Request $i: HTTP $HTTP_CODE ❌ (Rate limit hit)"
    break
  else
    echo "Request $i: HTTP $HTTP_CODE ✅"
  fi
done
Available UI
For your convenience you can deploy a model using the MaaS user interface (UI). For more information on how to enable the UI, refer to the official repo.
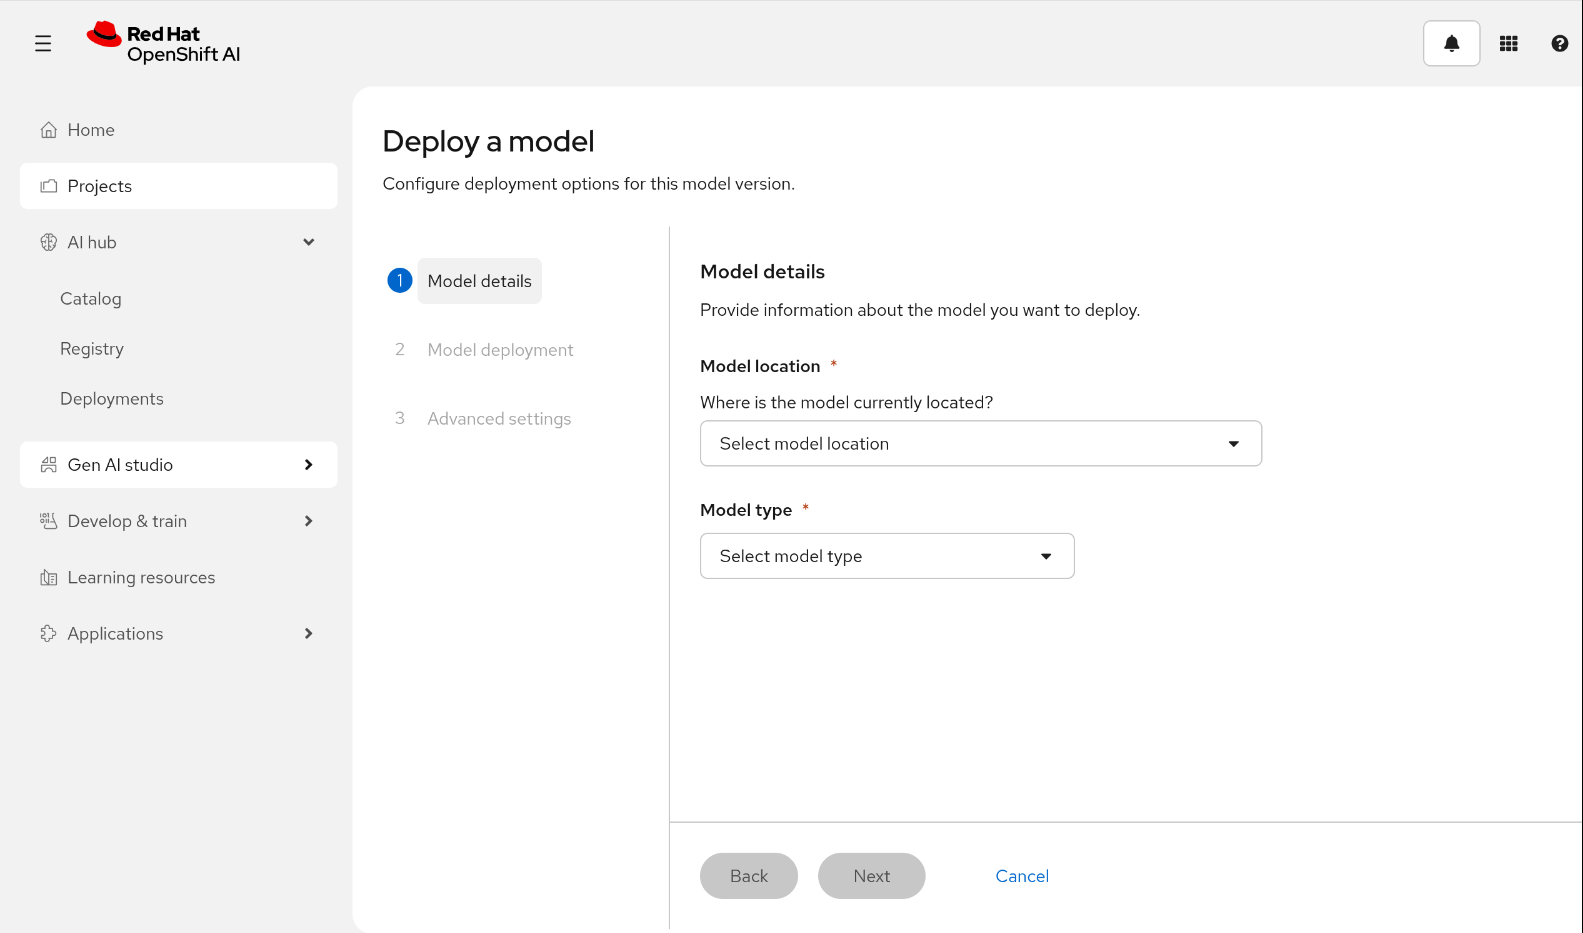
First, you have to create a project. Inside it, you will find a Deployments tab (Figure 1). There you can deploy your model, specifying the model location, model type, and other important information.
Note that you can deploy MaaS only on distributed runtime. Select it from the Serving runtime drop-down (Figure 2).

What's next?
You now have a working MaaS deployment with a sample model under governance. Here are resources to explore next:
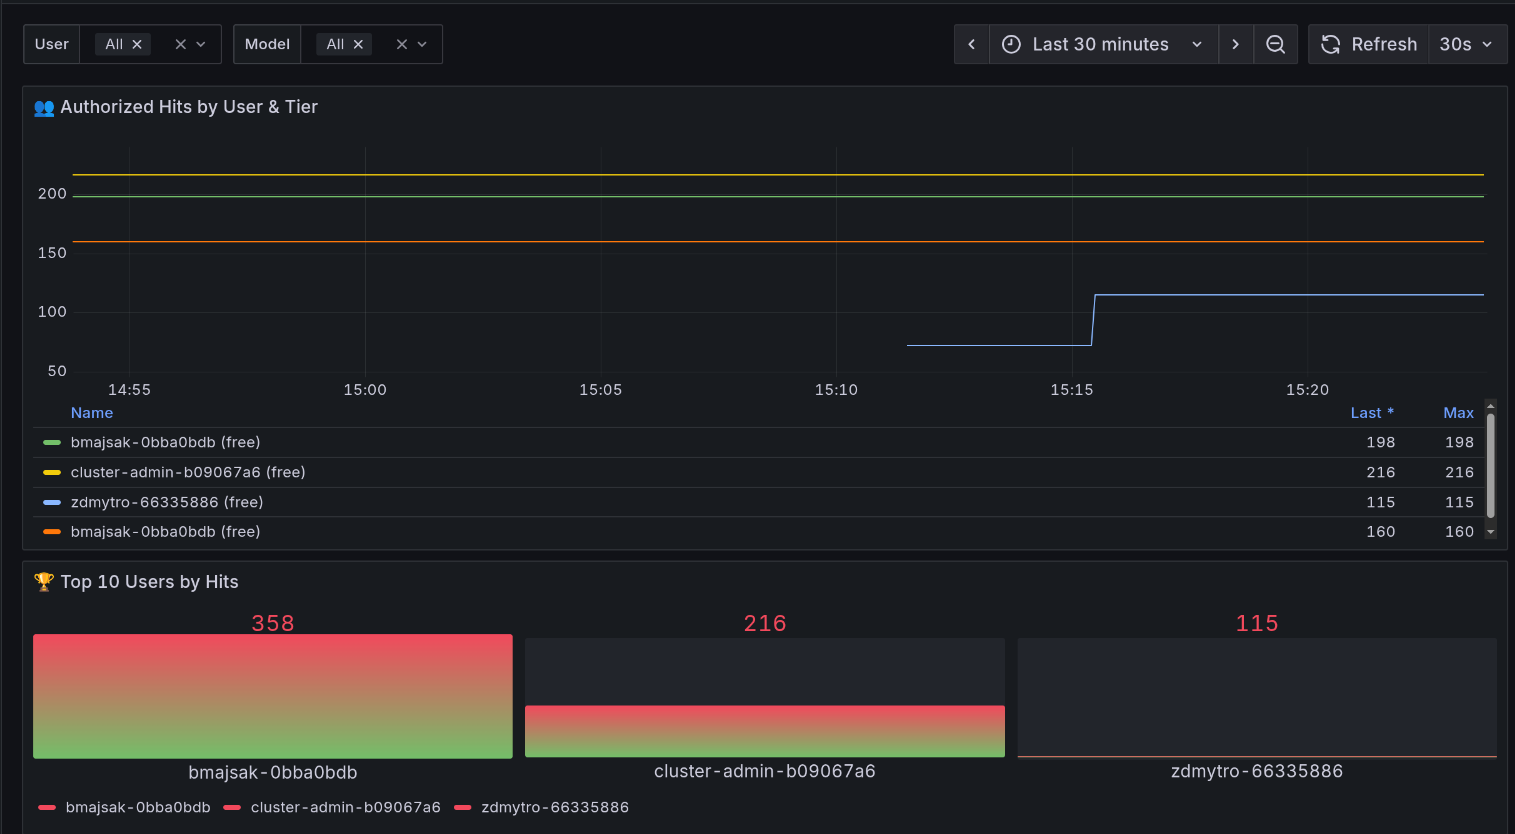
We've also set up observability on the cluster for you. You can build your dashboards in Grafana and connect it to the metrics in Prometheus, or use our default dashboard shown in Figure 3.
We encourage you to try the developer preview version of Models-as-a-Service and give us your feedback (refer to the Contributing section in our repo).
For detailed documentation, visit the MaaS community documentation.
Last updated: April 7, 2026