Quarkus is a full-stack, Java-based framework for building, deploying, and running applications, including building and deploying applications in containers without manually creating YAML files. It offers a zero-configuration database container using its dev services feature, enabling rapid development and testing. However, having an external database for your application is vital for regulatory compliance. It brings benefits such as isolation, a simplified development workflow, and independence from the development environment.
This article refers to a fictitious company called Pedal. Pedal is a commerce application platform with a microservices architecture for listing and selling bicycles.
In this tutorial, you’ll build the Pedal bike service, using Quarkus to retrieve all listed bikes from the database. You’ll gain valuable insights into using an external database with Quarkus, understanding dev services, configuring data source features, and linking the Pedal application to an external Microsoft SQL Server database.
Let’s get started.
Prerequisites
To follow along, ensure you have:
- A basic understanding of the Java programming language
- Java installed on your computer
- The Quarkus command-line interface (CLI) installed
- An active Red Hat OpenShift cluster
- The OpenShift CLI (
oc) authenticated and configured on your computer. - The odo CLI installed and configured on your computer
Overview of the external SQL Server setup
The external SQL Server for this tutorial runs within a separate single-pod container, using the lightweight Azure SQL Edge image. This SQL server hosts an additional Bike database specifically for this demo. Its container configuration enables all external inbound connections to access the SQL instance on port 1433 via the public route hostname.
When designing containerized applications that rely on external databases, consider network security in a production environment. To ensure security, set up a firewall for the database container that only allows inbound connections from the dependent application container and prevents public accessibility outside the cluster’s virtual private cloud (VPC).
Implementing encryption using SSL/TLS certificates is also crucial to secure data transmission between the application and the external database. Lastly, configure a hostname resolution to access the database through a specific host or IP address endpoint.
Accessing an external SQL Server from OpenShift
Various network policies, security, and connectivity configurations are essential for managing the networking requirements of a database running within OpenShift.
To access the external database, define a service resource using either an IP address—or, due to the transient nature of IP addresses, preferably a domain name.
Kubernetes offers the Firewall, Router, and Iptables features, enabling precise network control between database and application workloads. You can use these features through OpenShift. Using an egress firewall, an administrator can restrict a database pod from initiating network requests to the public internet, confining its accessibility solely to other pods within the cluster.
Secrets in OpenShift also enable the secure storage and injection of database connection credentials into dependent workloads.
Setting up a Quarkus OpenShift application
OpenShift provides a quickstart template for running a Quarkus application in a container within an OpenShift cluster. Within this tutorial, you’ll use and modify the quickstart template application to interact with a Microsoft SQL Server database.
Execute the following Git command to install the quickstart template. Or, download the folder from this GitHub repository.
git clone https://github.com/devfile-samples/devfile-sample-code-with-quarkus.git
RHEL UBI
The Red Hat Enterprise Linux (RHEL) Universal Base Image (UBI) lets you build and distribute your containerized applications across various environments. When constructing Java applications with Source-to-Image (S2I) for OpenJDK, using RHEL UBI provides a consistent and certified foundation for your development via a lightweight yet complete RHEL base image with preinstalled language frameworks.
Deploying container images created with RHEL UBI to an OpenShift cluster combines the benefits of OpenShift and RHEL UBI. Tools like Podman and OpenShift (oc) CLIs facilitate generating and applying configuration files for your containers.
Adding a database resource to your application container is straightforward, but it’s important to note that containers are temporary, posing a risk to your data. Ensuring data persistence is vital. Additionally, you can connect your RHEL UBI application to an external database for better data management.
Configuring database credentials securely
As an engineering best practice, it’s crucial to avoid hard coding sensitive data such as passwords or tokens into your application’s source code. When running your application in an OpenShift cluster, use secrets to separate and store credentials independently, keeping them outside your application’s pods.
For the Quarkus application, you’ll manage the Microsoft SQL database credentials by storing them using secrets.
First, create a db-secrets.yaml file with the following code to define an opaque secret object named quarkus-app-credentials. It contains variables for the database host, password, user, and host.
Info alert: NoteNote
Replace YOUR_NAMESPACE, YOUR_DB_NAME, YOUR_DB_PASSWORD, YOUR_DB_USER, and YOUR_DB_HOST placeholder values with their actual values.
kind: Secret

apiVersion: v1

metadata:

 name: quarkus-app-credentials

 namespace: YOUR_NAMESPACE

type: Opaque

stringData:

 database-name: "YOUR_DB_NAME"

 database-password: "YOUR_DB_PASSWORD"

 database-user: "YOUR_DB_USER"

 database-host: "YOUR_DB_HOST"
Execute the following command to create the secret object using the object definition within db-secrets.yaml. This action automatically encodes the plain text variables in the secret into base64.
oc create -f db-secrets.yaml
Navigate to Secrets → quarkus-app-credentials on your OpenShift cluster to view the secret details in a user interface, as shown in Figure 1.
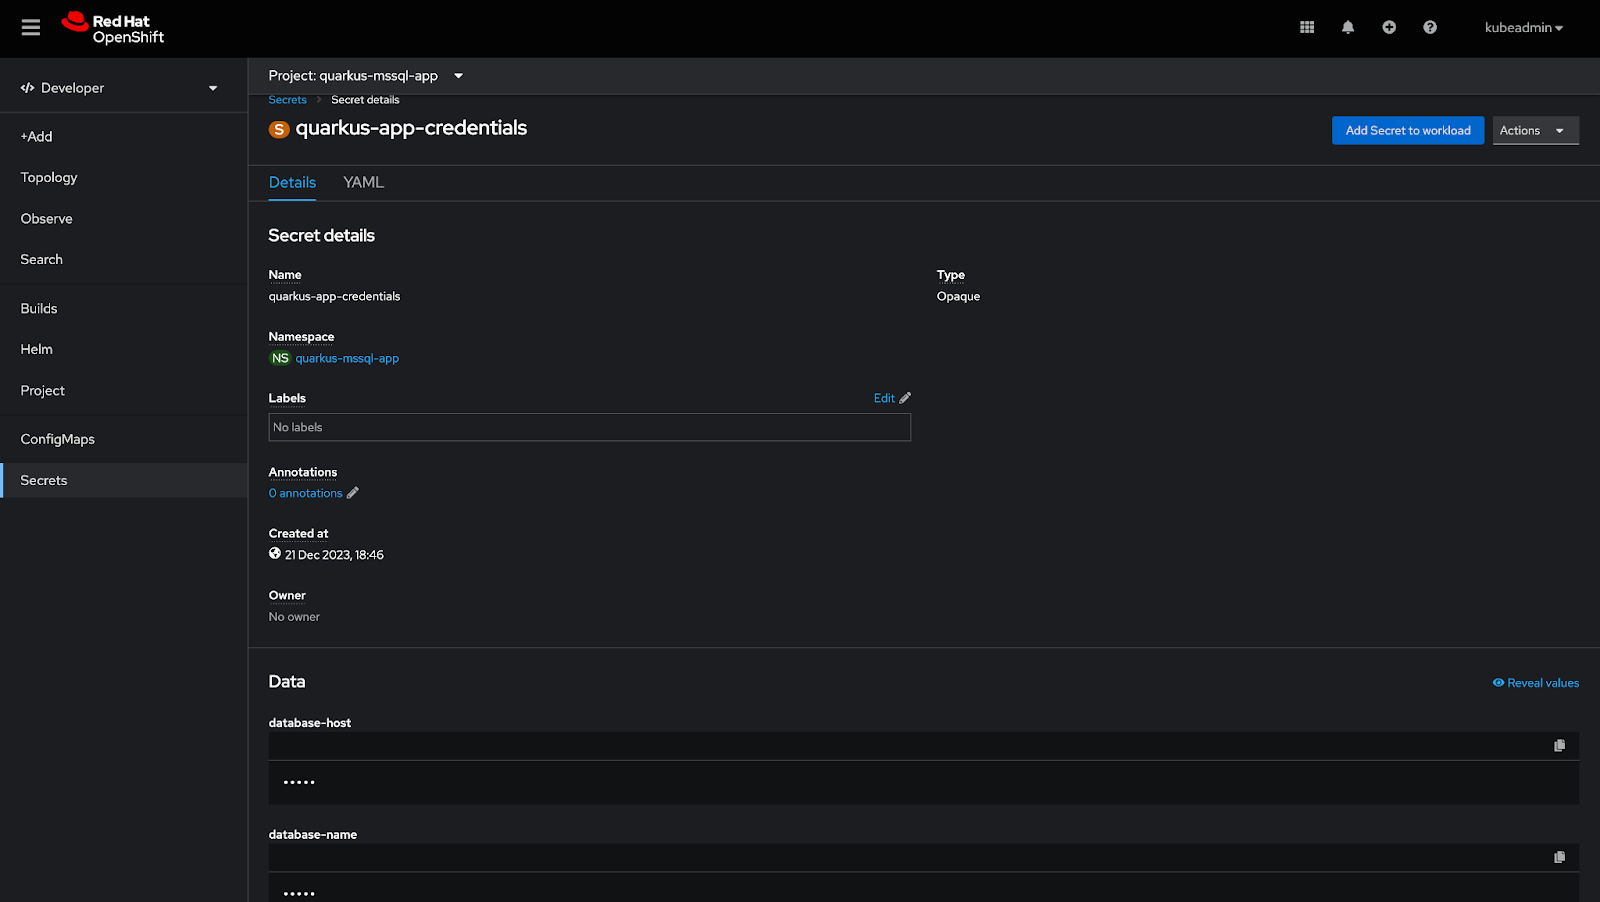
To make this secret data available to your pods, inject it into your workload, either as environment variables or as a volume. The OpenShift cluster console simplifies this process with the Add secret to workload feature.
Click Add secret to workload on the Secrets → quarkus-app-credentials page to launch a modal (Figure 2).
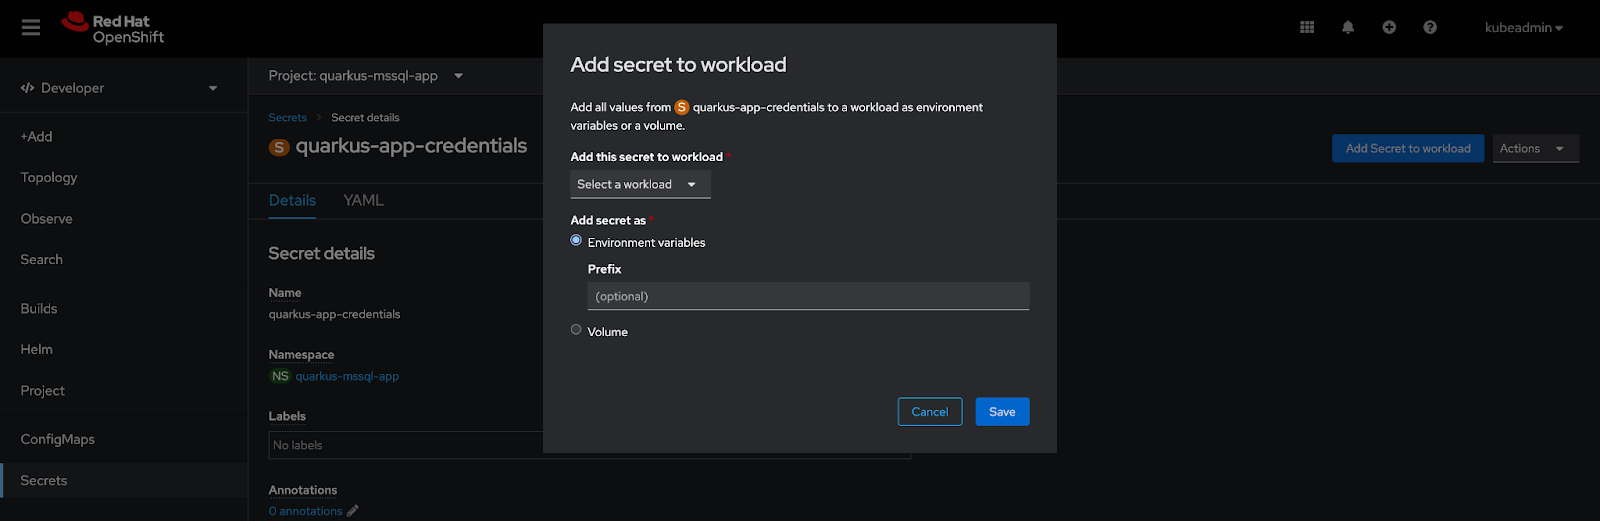
Select the Quarkus application’s workload from the drop-down menu and save. This action updates the Quarkus deployment configuration and restarts the pods to apply the change.
Alternatively, manually edit the deployment configurations to mount the secret volume, or use the envFrom key to inject secrets into your workload.
Configuring the Quarkus datasource for the external SQL Server
To start using an external Microsoft SQL Server database, integrate the following extensions into your Quarkus application:
- quarkus-kubernetes-config: To read environment variables from the quarkus-app-credentials secret object.
- hibernate-orm-panache: To use the Hibernate ORM.
- quarkus-jdbc-mssql: To connect with a Microsoft SQL Server via Java Database Connectivity (JDBC).
- quarkus-resteasy-reactive-qute: To render static templates using data from your Microsoft SQL database via the Qute template engine.
- io.quarkus:quarkus-smallrye-health: To add health checks for application monitoring.
Execute the following command, which adds the extension elements to the pom.xml file, to install these extensions:
quarkus ext add io.quarkus:quarkus-kubernetes-config io.quarkus:quarkus-hibernate-orm-panache io.quarkus:quarkus-jdbc-mssql io.quarkus:quarkus-resteasy-reactive-qute io.quarkus:quarkus-smallrye-health
Establishing the database connection
First, add the following variables to the src/main/resources/application.properties file to define the SQL Server connection properties.
quarkus.hibernate-orm.database.generation=drop-and-create

quarkus.hibernate-orm.log.format-sql=true

quarkus.hibernate-orm.log.sql=true

quarkus.kubernetes-config.secrets.enabled=true


quarkus.data source.jdbc.max-size=16

quarkus.data source.db-kind=mssql


quarkus.data source.jdbc.url=jdbc:sqlserver://${database-host}:1433;databaseName=${database-name};integratedSecurity=false;encrypt=false;trustServerCertificate=true;

quarkus.data source.username=${database-user}

quarkus.data source.password=${database-password}
These variables customize the Hibernate tool, read the database credentials from the injected environment variables, and use them in the Quarkus Microsoft SQL data source.
Next, create an import.sql file within the src/main/resources/ folder and add the following SQL statements to seed the database with five bike entries when the application runs.
-- insert dummy data

insert into Bike(id, name, price, warranty_status, model) values(1, 'Yamaha', 203, 'Covered', 'XC209');

insert into Bike(id, name, price, warranty_status, model) values(2, 'Bajaj', 450, 'Covered', 'XQ991');

insert into Bike(id, name, price, warranty_status, model) values(3, 'Suzuki', 790, 'Covered', 'BT450');

insert into Bike(id, name, price, warranty_status, model) values(4, 'Honda', 150, 'Covered', 'XR10');

insert into Bike(id, name, price, warranty_status, model) values(5, 'Toyota', 620, 'Covered', 'ZY9091');
Now, you can begin using the Hibernate ORM to interact with your database.
Create a Bike.java file within the java/org/acme package and add the following contents. It defines a Bike entity representing all bikes in the database.
package org.acme;


import io.quarkus.hibernate.orm.panache.PanacheEntity;

import jakarta.persistence.Column;

import jakarta.persistence.Entity;


import java.util.Date;


@Entity

public class Bike extends PanacheEntity {


   @Column(name="name")

   public String name;


   @Column(name="warranty_status")

   public String warranty_status;


   @Column(name="model")

   public String model;


   @Column(name="price")

   public int price;


   @Column(name="date_created")

   public Date date_created;

}
Now, create a second BikeResource.java file within the java/org/acme package and add the following contents. This file defines a new endpoint in the application, retrieving all bikes in the database and rendering them in a template.
package org.acme;


import io.quarkus.hibernate.orm.panache.PanacheEntityBase;

import io.quarkus.qute.Template;

import io.quarkus.qute.TemplateInstance;

import io.smallrye.common.annotation.Blocking;

import jakarta.inject.Inject;

import jakarta.ws.rs.*;

import jakarta.ws.rs.core.MediaType;


import java.util.List;


@Path("/bike")

@Consumes(MediaType.APPLICATION_JSON)

public class BikeResource {

   @Inject

   Template bikes;


   @GET

   @Produces(MediaType.TEXT_HTML)

   @Blocking

   public TemplateInstance listAllBikes() {

       List<PanacheEntityBase> allBikes = Bike.findAll().list();


       return bikes.data("allBikes", allBikes);

   }

}
The code above executes the findAll() method on the Bike entity when a GET request is made to the /bike endpoint, injecting the returned list into a bike template for customers to see. The listAllBikes() method’s @Blocking annotation tells Quarkus to use a worker thread to fetch data. This approach avoids blocking the IO thread while retrieving data.
Next, create a bike.html file inside src/main/resources to define the static template for rendering all available bikes.
Add the HTML code below to use the Qute template engine syntax to loop over the bike data in an unordered list (UL). This code also uses TailwindCSS utility classes to style the list items displaying the bike data.
{@Bike allBikes}

<!DOCTYPE html>

<html lang="en">

<head>

   <meta charset="UTF-8">

   <title>Pedal Quarkus SQL Openshift</title>

   <script src="https://cdn.tailwindcss.com"></script>

</head>


<style>

   .bikesGrid {

       display: grid;

       grid-template-columns: repeat(auto-fit, minmax(250px, 1fr));

       gap: 2rem 3rem;

   }

</style>


<body>

<div class="h-24 flex items-center justify-center w-full bg-gray-600">

   <p class="text-3xl text-white text-center"> Pedal Bike Sales </p>

</div>


<div class="max-w-[1440px] m-auto">

   <div>

       <div class="mt-8 mb-16">

           <p class="text-2xl pb-4"> All Available Bikes </p>

           <hr/>

       </div>


       <ul class="bikesGrid">

           {#for bike in allBikes}

               <li >

               <div class="border border-2 rounded-lg px-8 py-4" >


               <div class="flex justify-between items-center mb-4 " >

                   <div class="flex items-center" >

                       <p class="text-xl" >{bike.name }</p>


                       <span class="text-italic ml-2 text-gray-500" > - {bike.model } </span>

                   </div>


                   <div>

                       <p class="text-lg font-semibold" > ${bike.price} </p>

                   </div>

               </div>


               <div>

                       <p>Warranty Status: {bike.warranty_status }</p>

                       <p>Manufactured in {bike.date_created }</p>

               </div>


               </div>

               </li>

           {/for}

       </ul>

   </div>

</div>

</body>

</html>
Securing the connection
An SSL/TLS certificate is one way to encrypt the connection between your Quarkus app and an external database. To do this, install the certificate on the Microsoft SQL Server and modify the configuration to force encryption. Next, supply and use the certificate in the Quarkus application.
To avoid embedding certificate contents into code files or environment variables, use a volume with secret data to store the certificate securely. Then, mount this volume in the Quarkus application container.
The OpenShift cluster interface lets you create a key/value secret type and upload your certificate file into the secret, as illustrated in Figure 3.
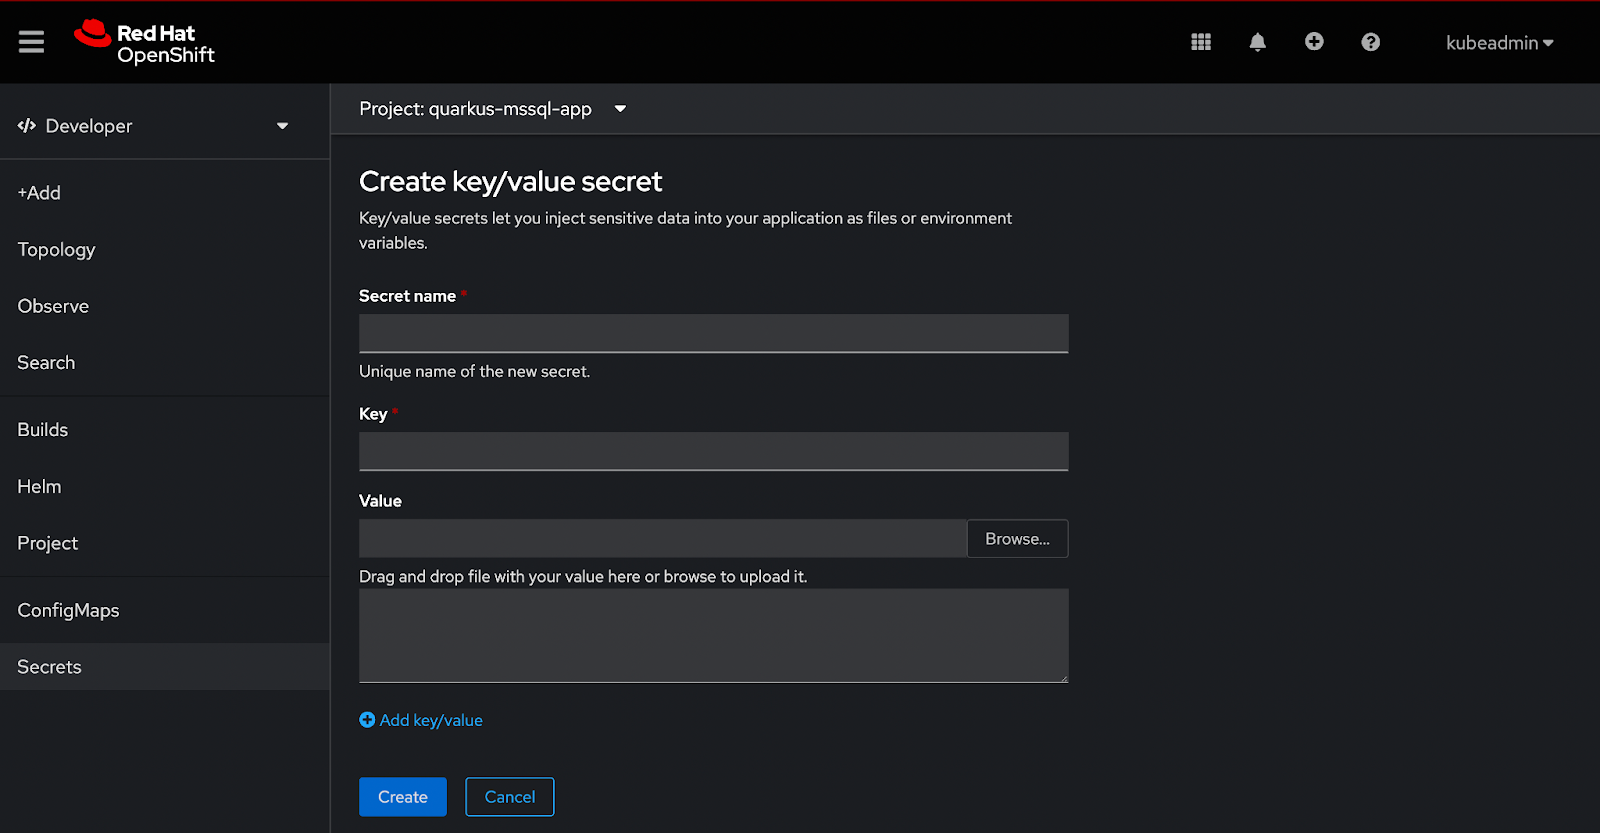
After creating the secret, select Volume and specify a mount path to mount it into your application workload (Figure 4).
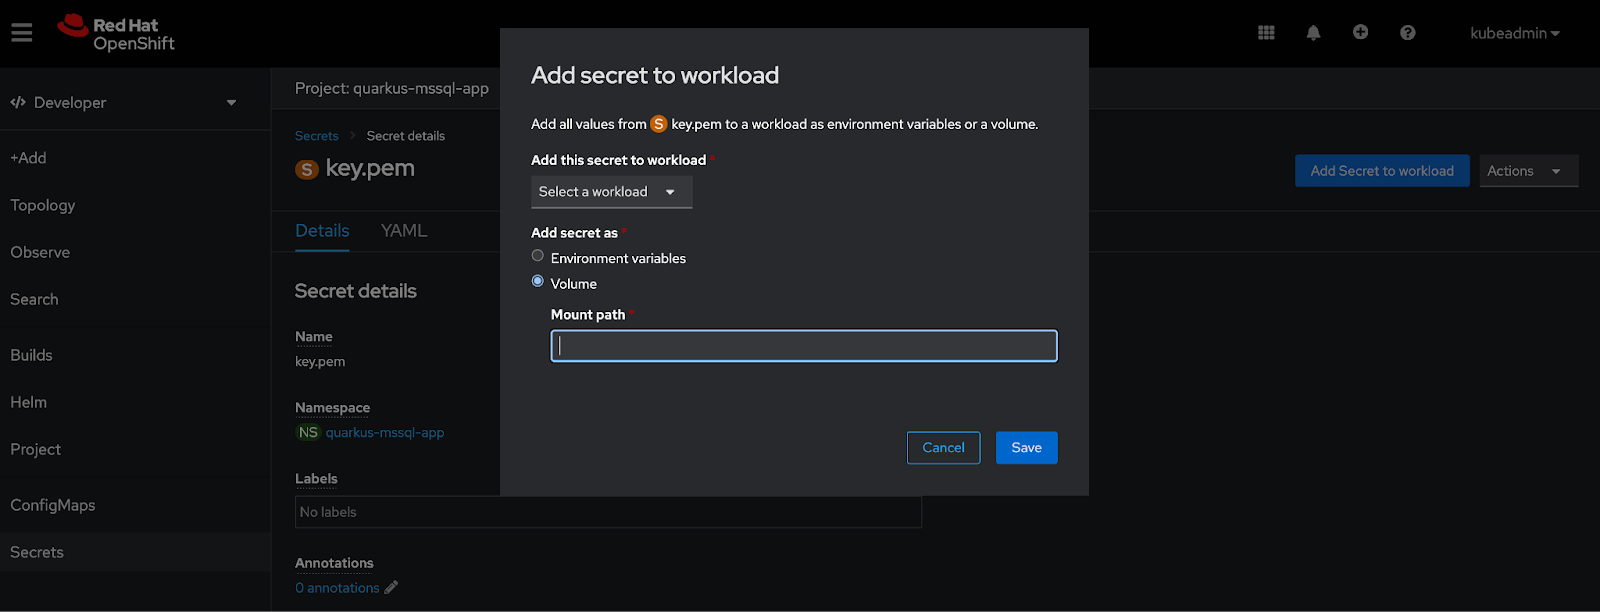
Update the database credentials in the application.properties file to specify the volume mount path for Quarkus TrustStore.
Next, modify the quarkus.data source.jdbc.url property to contain the trustServerCertficate, encrypt, and integratedSecurity and trustStore parameters, like the following code:
quarkus.data source.jdbc.url=jdbc:sqlserver://${database-host}:1433;databaseName=${database-name};integratedSecurity=true;encrypt=true;trustServerCertificate=true;trusStore=MOUNT_PATH;
You’ve now successfully added an external Microsoft SQL Server data source to a Quarkus application running within OpenShift.
Testing the connectivity
Next, you can test the application to confirm that it connects, retrieves, and renders the bike entries from your external database.
Run the following command to start and test the Quarkus cluster in development mode:
odo dev
This command uses the existing devfile and Docker configurations to start a temporary workload, watching the local source code for changes, like in Figure 5.
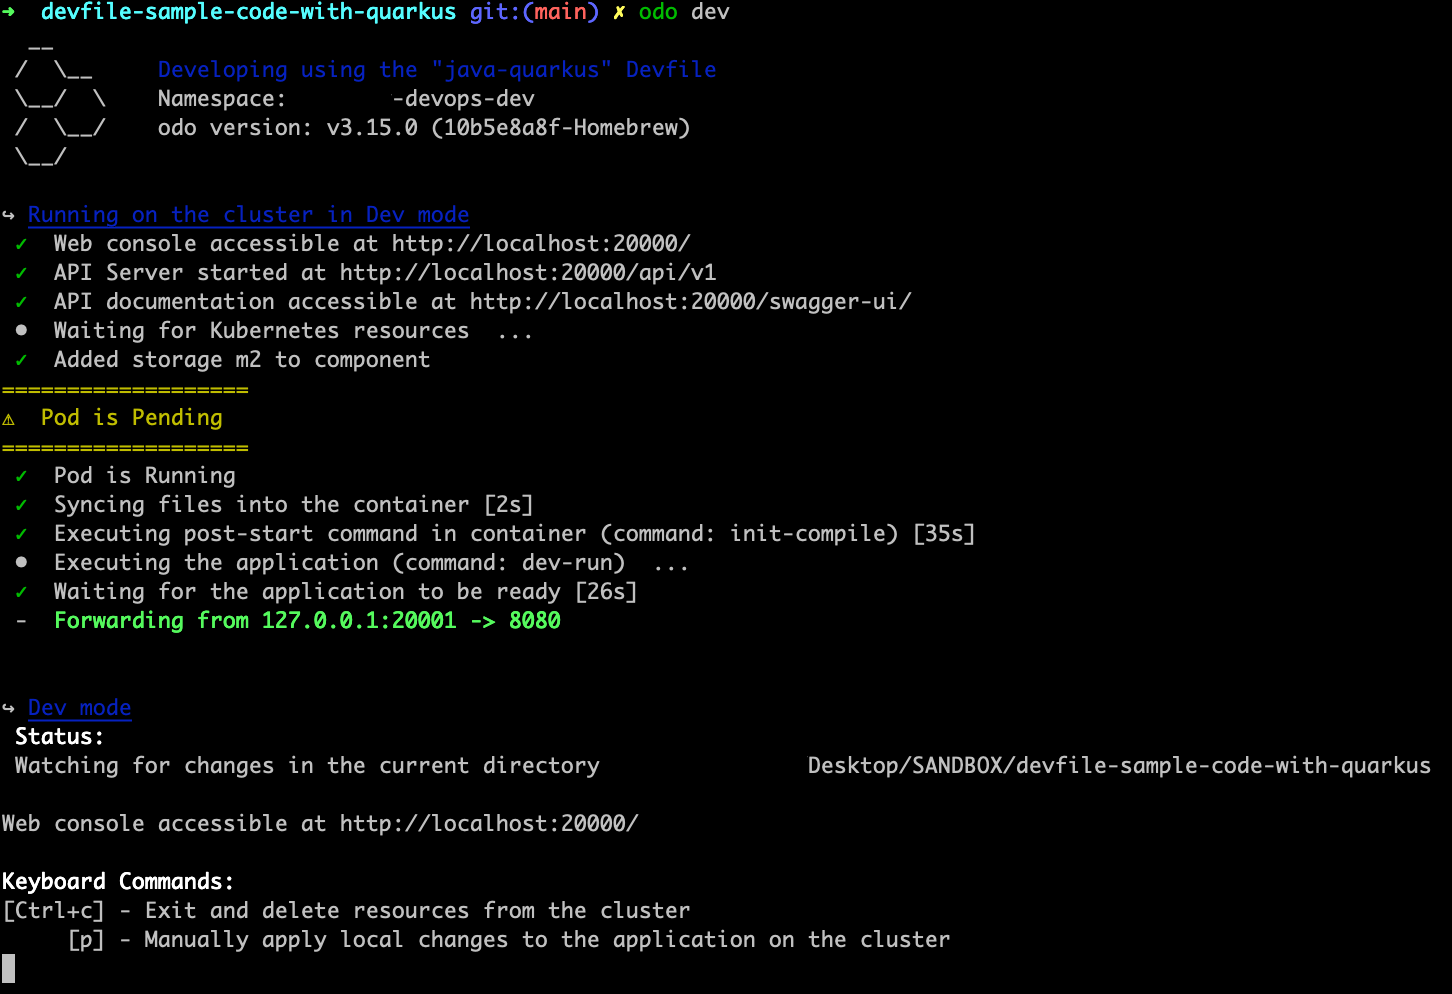
Note: Add quarkus-app-credentials from the OpenShift console to the dev cluster to enable access to database values.
Execute the command below to make the new workload accessible outside the OpenShift cluster VPC:
oc expose service java-quarkus-app --insecure-skip-tls-verify
This command generates a route with a host for navigation.
Next, you can go ahead and execute the following command to view the host URL generated for the cluster:
oc get route java-quarkus-app
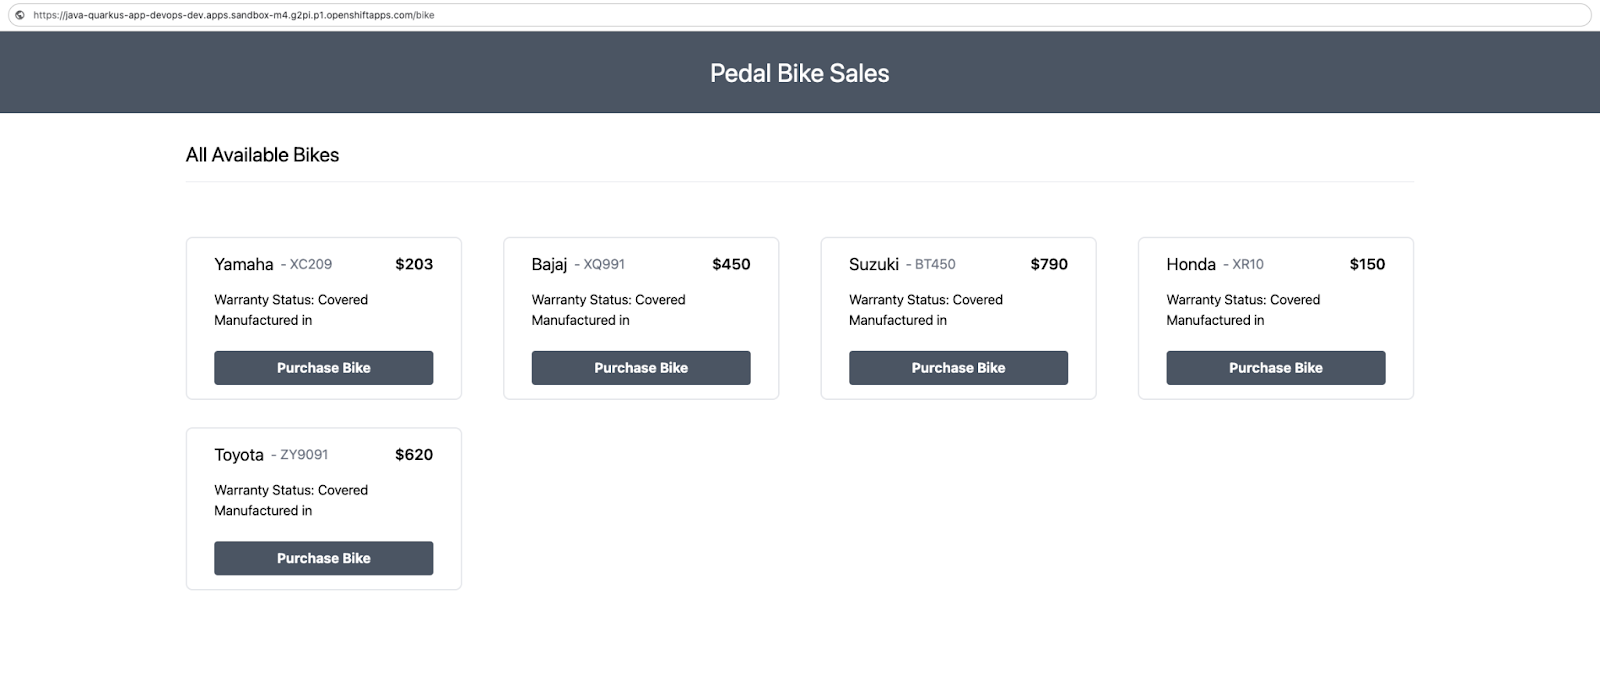
In the results from the command above, the HOST/PORT value serves as the URL for accessing the running application.
You can just navigate to the route generated for the dev cluster to view the application. It should look similar to Figure 6, with available bikes and their information.
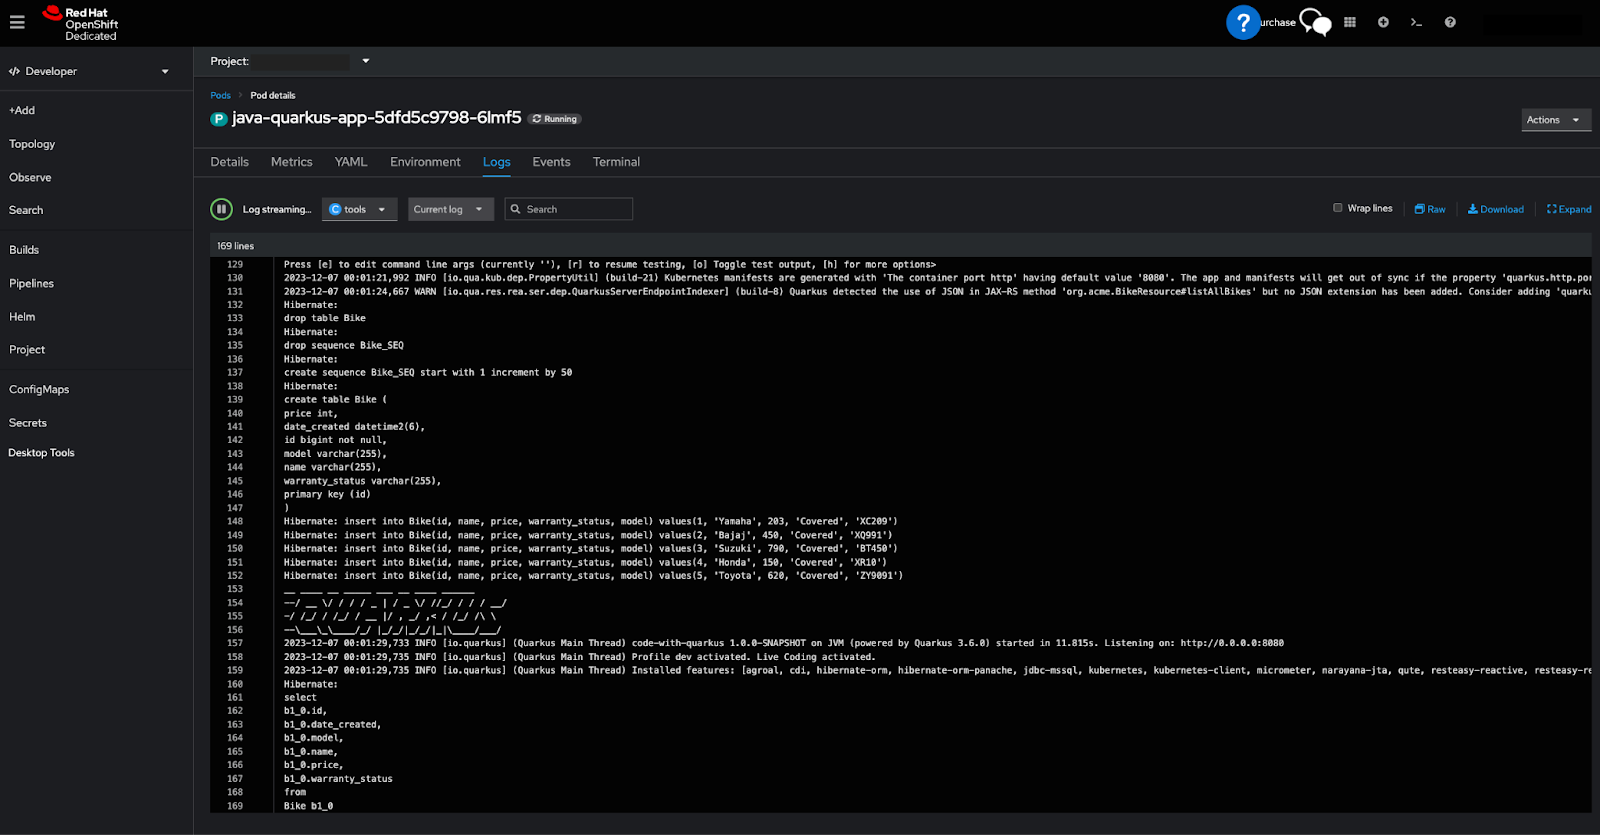
Optionally, you'll be able to view the logs from the pod running the Quarkus application. These logs include SQL statements logged from the Hibernate ORM, accessible via the oc CLI or the OpenShift cluster, like in Figure 7.
Using health checks
Health checks are vital for containerized applications, providing insight into their functionality. They confirm that the external services are initiated, running, and ready to process requests.
Quarkus provides the SmallRye Health extension to automatically handle dependent services' health checks within your application. The extension creates endpoints like /q/health/ready, /q/health/live, and /q/health/started to check the data source’s readiness, liveness, and startup, respectively.
A GET request to /q/health/ready returns a JSON object showing the list of health checks for the database, like the following.
{

"status": "DOWN",

"checks": [

{

"name": "Reactive MS SQL connections health check",

"status": "DOWN",

"data": {

"<default>": "UP"

}

},

}

"name": "Database connections health check",

"status": "UP",

"data": {

"<default>": "UP"

}

}

]

}
Additionally, use the extension’s health checks endpoint to automatically restart or stop receiving ingress connections when specific health checks fail.
You can configure health checks using the oc CLI or the OpenShift cluster console UI.
To begin adding health checks, you can navigate to the Topology -> Container page of the OpenShift console in the Developer view.
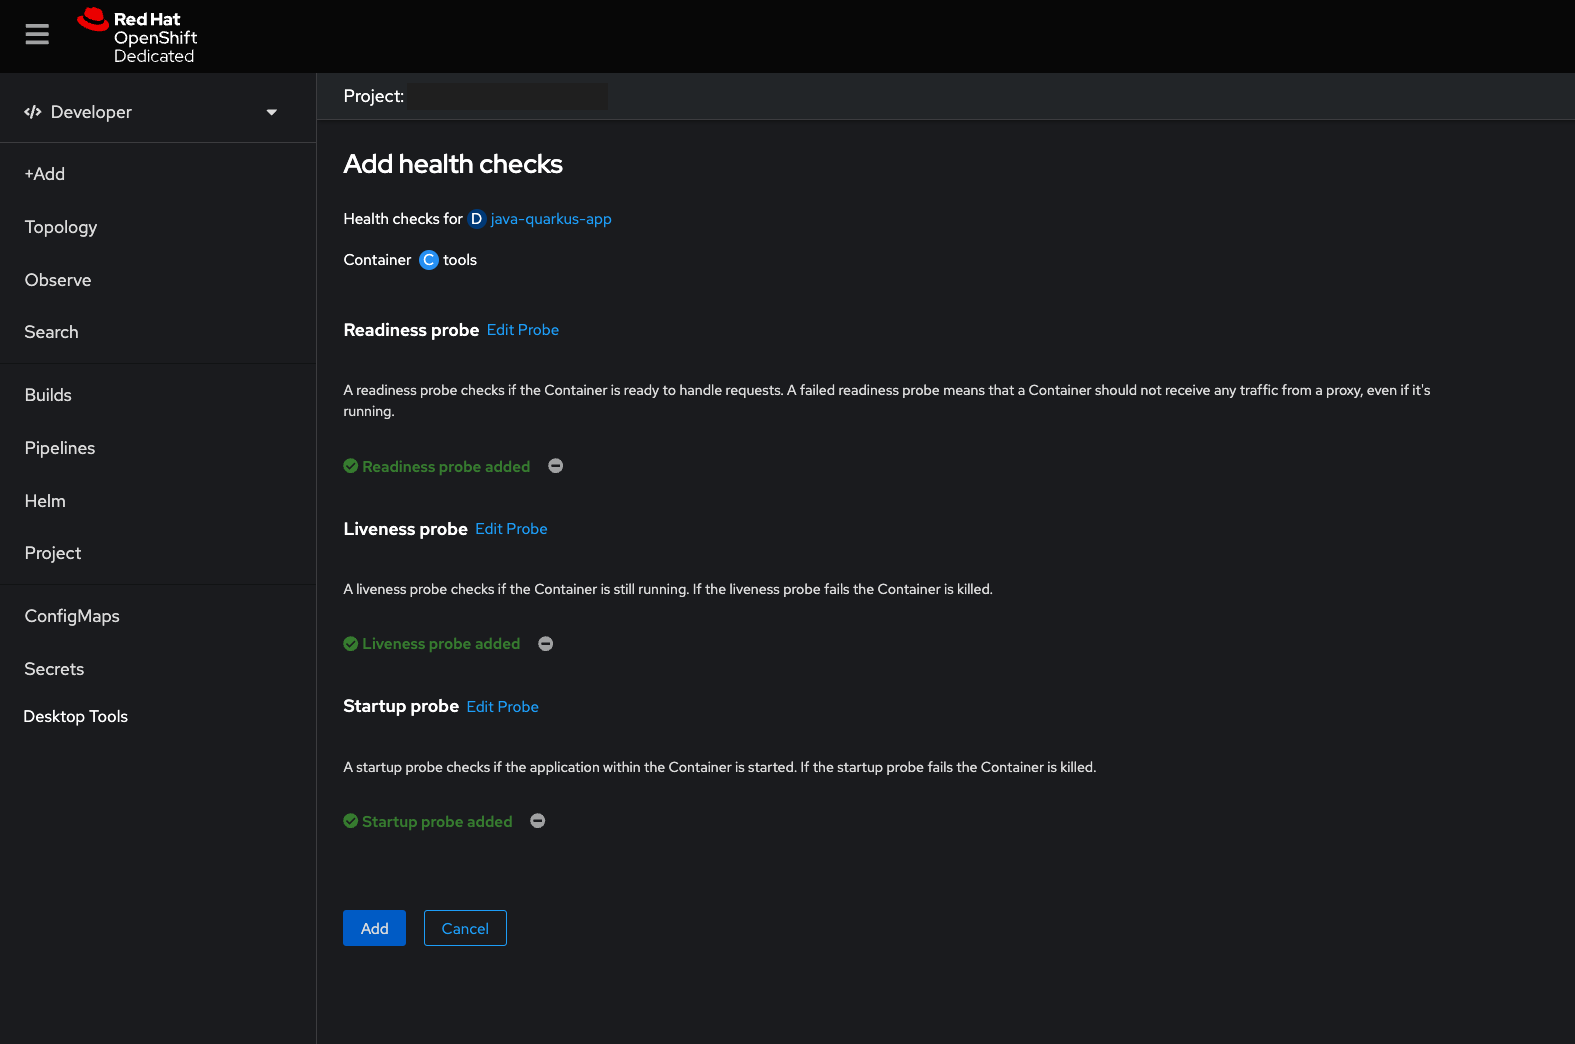
Click Add Health Checks to add your first health check for the container, like in Figure 8.

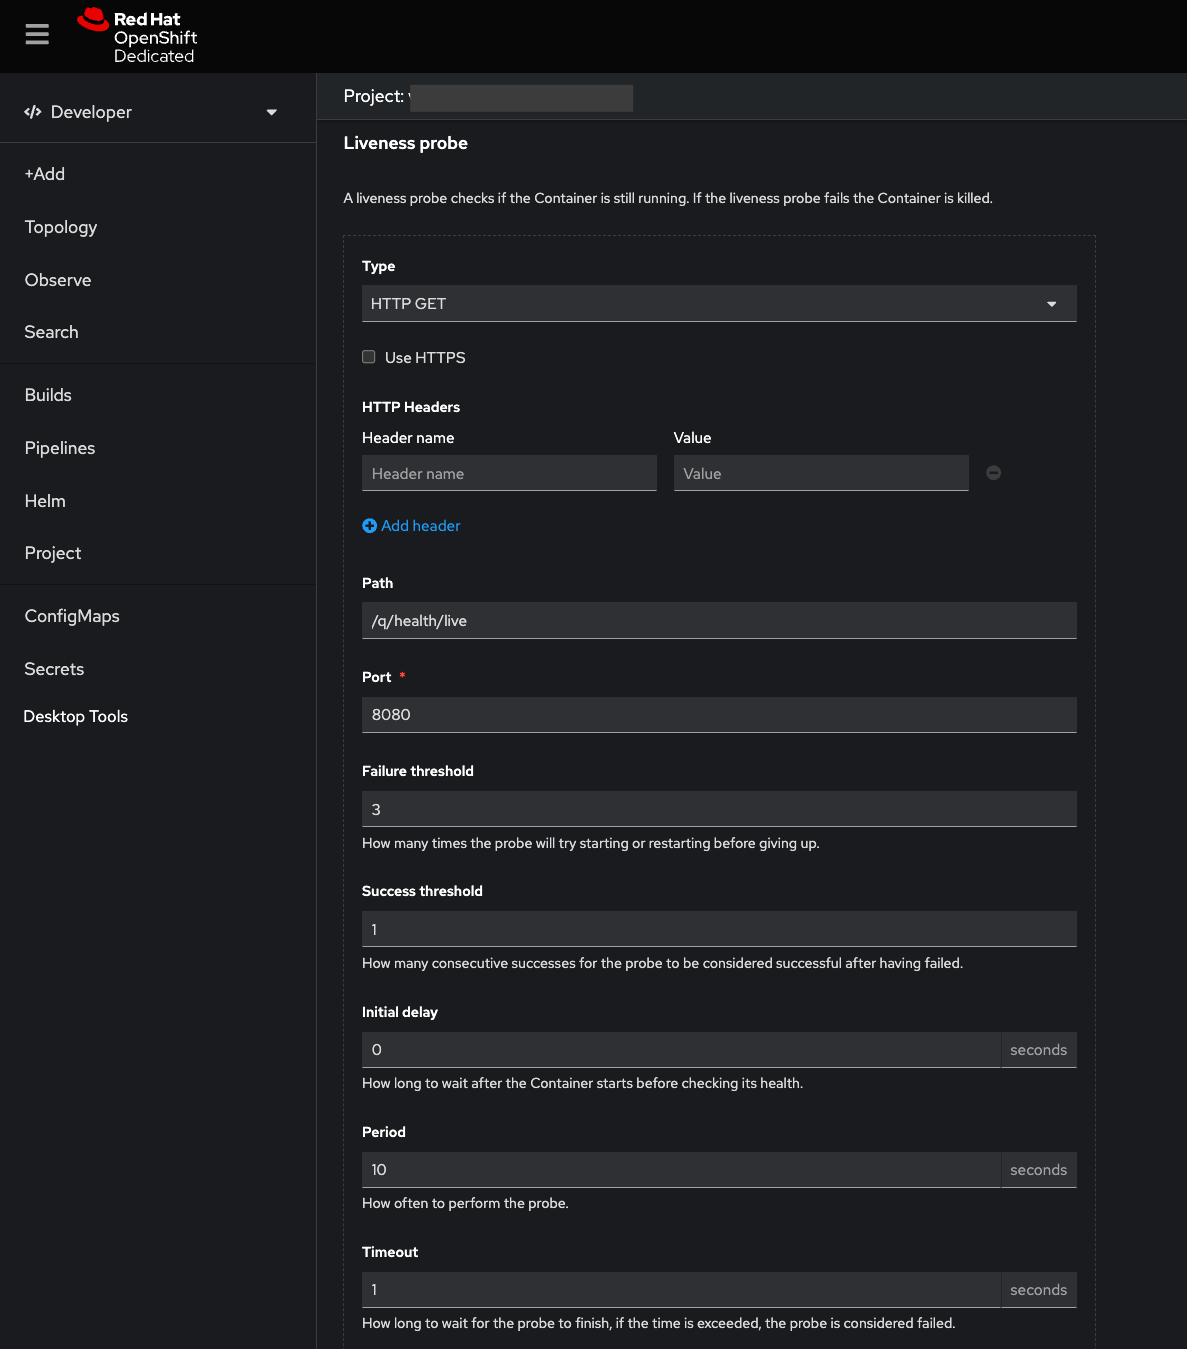
Specify the corresponding health check endpoint from the smallrye-health extension in the Path field to define the Readiness, Liveness, and Startup probes. Customize additional default configurations like maximum retries count and intervals for each probe as required.
Figure 9 shows an example of the Liveness probe using the /q/health/live endpoint.
Click Add to save each probe after adding it. OpenShift will restart the container after configuring the health check, as in Figure 10.
Conclusion
Containerized applications risk data loss due to their transient nature. However, integrating external databases significantly mitigates this risk. Quarkus offers diverse data source extensions for installation, enabling your application to use an external database.
This tutorial guided you through adding a Microsoft SQL Server database to a Quarkus application on OpenShift. You modified the OpenShift quickstart devfile-sample-code-with-quarkus application to incorporate the quarkus-jdbc-mssql extension with Hibernate ORM for database connectivity. You securely injected the database’s connection credentials into the Quarkus application container using OpenShift secrets.
By exploring the OpenShift Cluster UI functionalities, you gained insights into simplifying your Kubernetes operations. You’ve learned to create secrets, perform health checks, and view pod logs across your cluster—valuable skills for efficient cluster management. Apply these new skills to your applications and continue exploring Red Hat resources.