Redhat Developers  Logo
  • AI

    Get started with AI

    • Red Hat AI
      Accelerate the development and deployment of enterprise AI solutions.
    • AI learning hub
      Explore learning materials and tools, organized by task.
    • AI interactive demos
      Click through scenarios with Red Hat AI, including training LLMs and more.
    • AI/ML learning paths
      Expand your OpenShift AI knowledge using these learning resources.
    • AI quickstarts
      Focused AI use cases designed for fast deployment on Red Hat AI platforms.
    • No-cost AI training
      Foundational Red Hat AI training.

    Featured resources

    • OpenShift AI learning
    • Open source AI for developers
    • AI product application development
    • Open source-powered AI/ML for hybrid cloud
    • AI and Node.js cheat sheet

    Red Hat AI Factory with NVIDIA

    • Red Hat AI Factory with NVIDIA is a co-engineered, enterprise-grade AI solution for building, deploying, and managing AI at scale across hybrid cloud environments.
    • Explore the solution
  • Learn

    Self-guided

    • Documentation
      Find answers, get step-by-step guidance, and learn how to use Red Hat products.
    • Learning paths
      Explore curated walkthroughs for common development tasks.
    • Guided learning
      Receive custom learning paths powered by our AI assistant.
    • See all learning

    Hands-on

    • Developer Sandbox
      Spin up Red Hat's products and technologies without setup or configuration.
    • Interactive labs
      Learn by doing in these hands-on, browser-based experiences.
    • Interactive demos
      Click through product features in these guided tours.

    Browse by topic

    • AI/ML
    • Automation
    • Java
    • Kubernetes
    • Linux
    • See all topics

    Training & certifications

    • Courses and exams
    • Certifications
    • Skills assessments
    • Red Hat Academy
    • Learning subscription
    • Explore training
  • Build

    Get started

    • Red Hat build of Podman Desktop
      A downloadable, local development hub to experiment with our products and builds.
    • Developer Sandbox
      Spin up Red Hat's products and technologies without setup or configuration.

    Download products

    • Access product downloads to start building and testing right away.
    • Red Hat Enterprise Linux
    • Red Hat AI
    • Red Hat OpenShift
    • Red Hat Ansible Automation Platform
    • See all products

    Featured

    • Red Hat build of OpenJDK
    • Red Hat JBoss Enterprise Application Platform
    • Red Hat OpenShift Dev Spaces
    • Red Hat Developer Toolset

    References

    • E-books
    • Documentation
    • Cheat sheets
    • Architecture center
  • Community

    Get involved

    • Events
    • Live AI events
    • Red Hat Summit
    • Red Hat Accelerators
    • Community discussions

    Follow along

    • Articles & blogs
    • Developer newsletter
    • Videos
    • Github

    Get help

    • Customer service
    • Customer support
    • Regional contacts
    • Find a partner

    Join the Red Hat Developer program

    • Download Red Hat products and project builds, access support documentation, learning content, and more.
    • Explore the benefits

Fine-tune large language models using OpenShift Data Science

June 19, 2023
Robin Bobbitt
Related topics:
Data scienceArtificial intelligenceAutomation and management
Related products:
Red Hat OpenShift AI

    As an Ansible Lightspeed engineer, my team works on the cloud service that interacts with Watson Code Assistant large language models for Ansible task generation. Curious to learn more about the mechanics of training such a model, I set out to create my own, very basic Ansible tasks model. I decided to do this using Red Hat OpenShift Data Science, which made it easy to configure and launch an environment pre-configured with everything I needed to train my model. I’ll walk through the steps I took here.

    Training a basic Ansible tasks model for fun over a weekend on a single GPU would be an impossible task if not for the concept of “transfer learning.” Thanks to transfer learning, we can take an existing pre-trained model and fine-tune it on something new. In this case, we will use the HuggingFace Transformers API to fine-tune the BigCode SantaCoder model. SantaCoder is used for code generation and is trained on Python, Java, and JavaScript. Because Ansible playbooks are YAML, we’ll first fine-tune the model on YAML and then fine-tune it on Ansible content specifically.

    To complete the steps below, you will need to ensure you have sufficient, dedicated compute available on your cluster. I provisioned a new g5.8xlarge AWS EC2 instance to support this project.

    Creating an OpenShift Data Science project

    To get started, we’ll create a data science project in Red Hat OpenShift Data Science. From the OpenShift Data Science dashboard, click Data Science Projects and then Create data science project. Provide a name, such as Ansible Playbooks Model, and Create.

    From the newly created project, click Create workbench. You will see the Create workbench page shown in Figure 1.

    The Create workbench page, with notebook image and version selection, container size, and number of GPUs
    Figure 1: Create a workbench for your data science project.

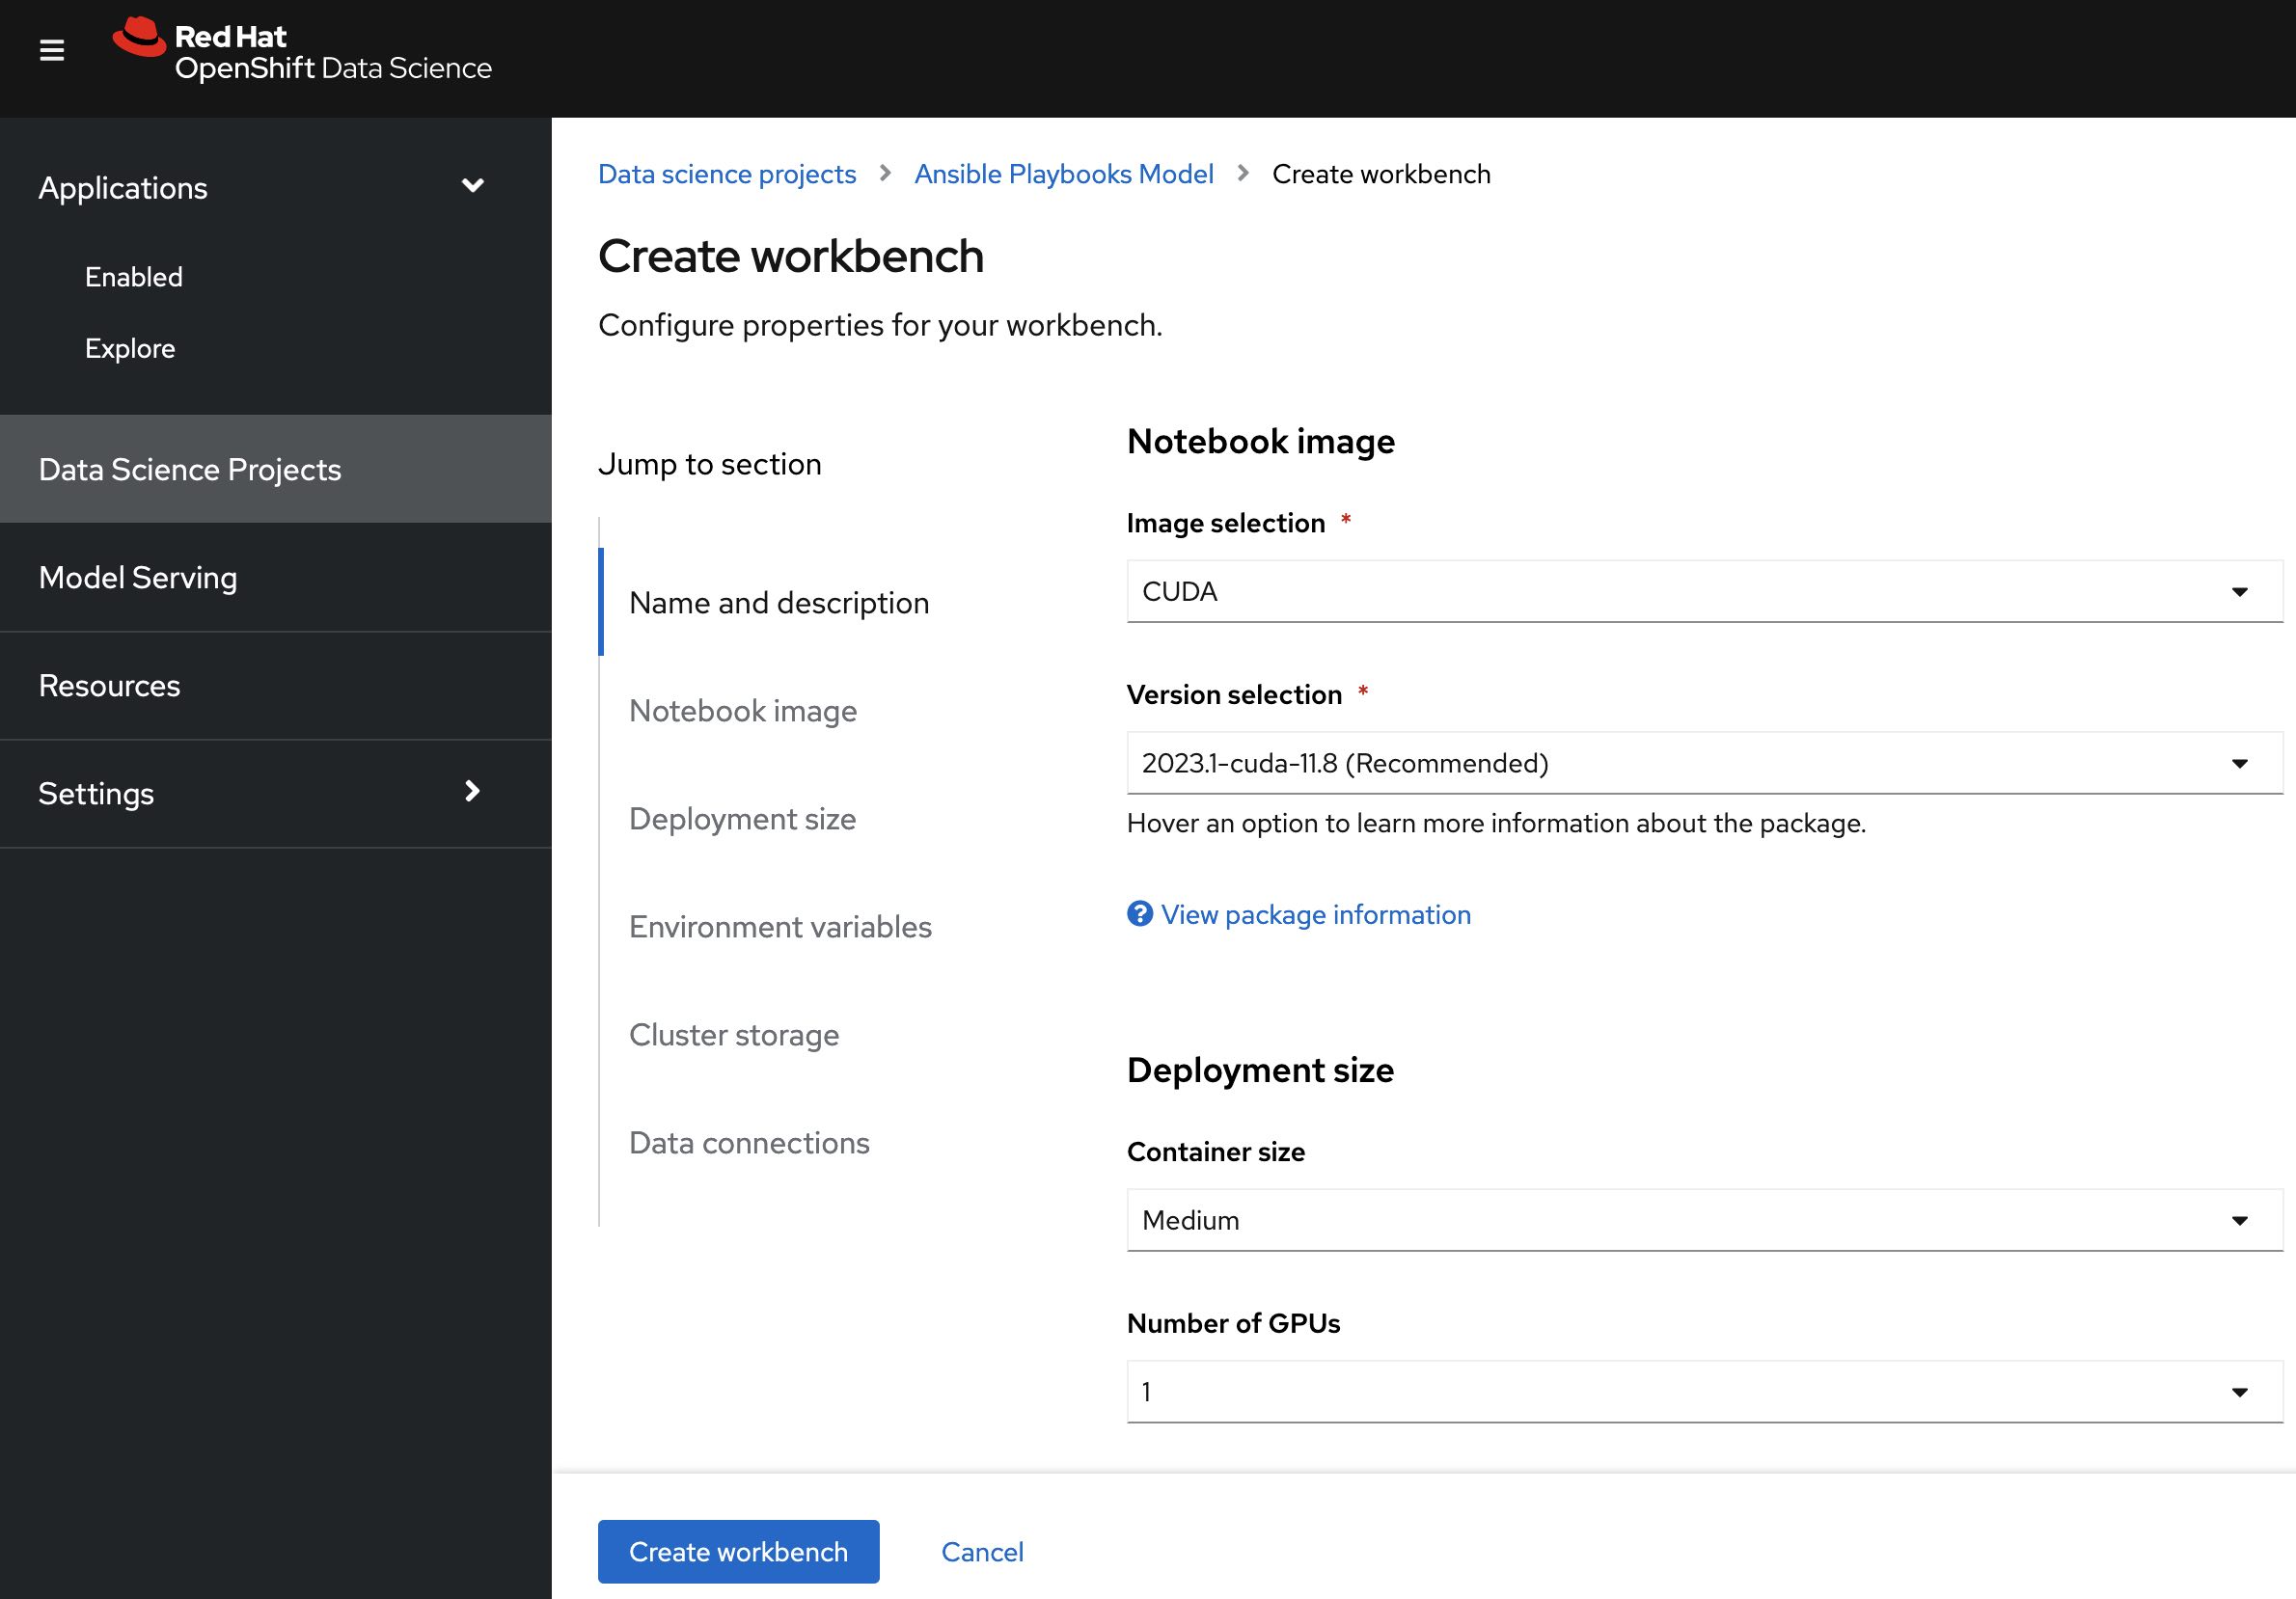
    Create your workbench with the following parameters (order of parameters may vary with your OpenShift Data Science version):

    • Image selection: CUDA
    • Deployment size>Container size: Medium
    • Deployment size>Number of GPUs: 1
    • Persistent storage size: 200 GiB
    • Environment variables>Secret>Key/value: HUGGINGFACE_TOKEN

    For the HUGGINGFACE_TOKEN environment variable value, retrieve your HuggingFace access token from https://huggingface.co/settings/tokens. You will need to be authenticated with HuggingFace in order to use The Stack dataset.

    Once created, launch the workbench to begin fine-tuning.

    Note: As you are working through the steps below, you might find at some points that your notebook fails with Out of Memory errors. I worked around this by shutting down the kernel of any notebooks I was not currently using.

    Fine-tuning on YAML

    With your workbench configured and launched, it is time to fine-tune SantaCoder on YAML. For this, we will use the YAML subset of The Stack dataset from BigCode. You can find two great code samples for fine-tuning SantaCoder in the santacoder-finetuning repo and this Google Colab, which fine-tunes on shell/bash. The GitHub repository provided for use with this tutorial is based on these two samples.

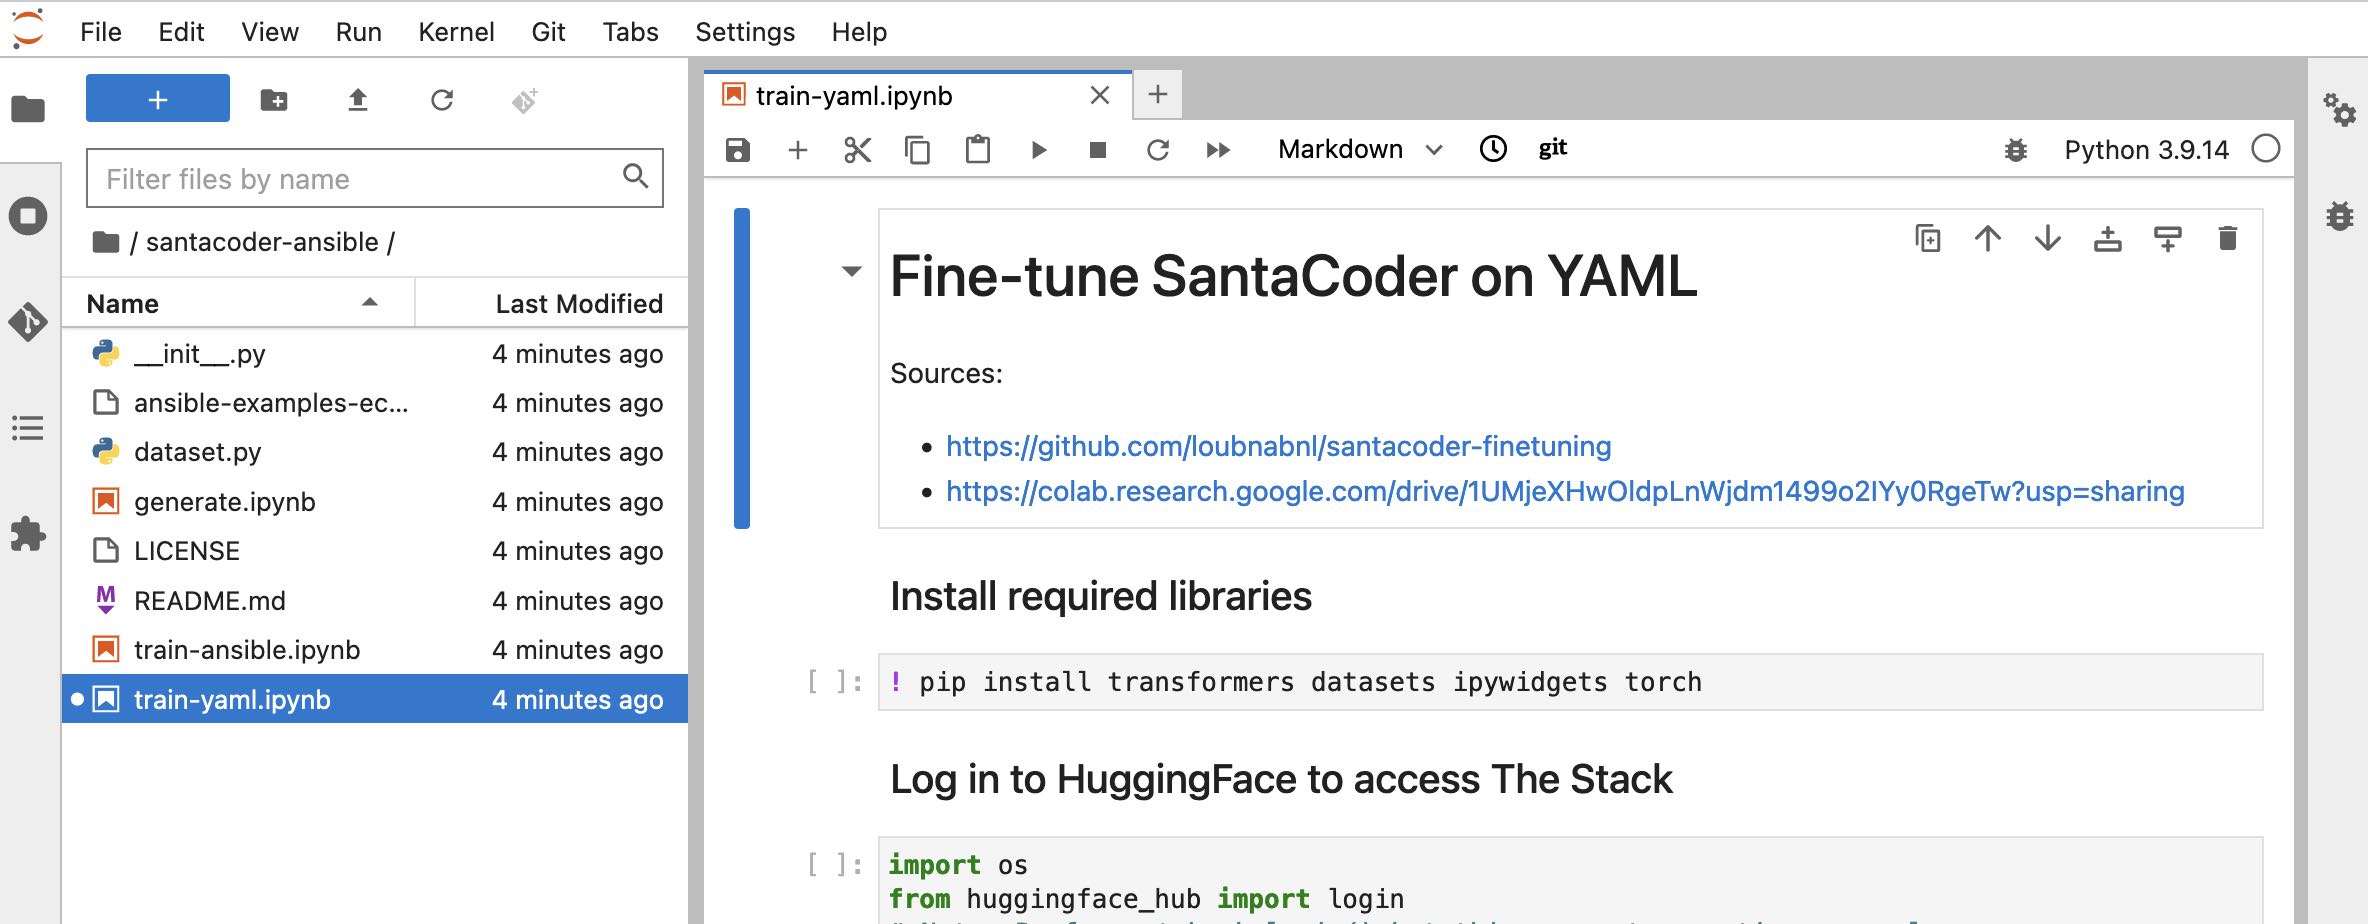
    To clone the sample repository, click the Git icon in the OpenShift Data Science workbench left sidebar and click Clone a Repository. Specify the following URL and click Clone: https://github.com/robinbobbitt/santacoder-ansible.git

    With the repo cloned, double-click into the santacoder-ansible folder, then double-click the train-yaml.ipynb Jupyter notebook file. You should see the contents of the santacoder-ansible repo in your File Browser and the Fine-tune SantaCoder on YAML Jupyter notebook opened and ready to run, as shown in Figure 2.

    Workbench with File Browser showing cloned git repo files and opened Jupyter notebook
    Figure 2: Data science project workbench with Jupyter notebook from cloned Git repo.

    Run the file cell-by-cell, taking your time to understand each step and explore the various parameters involved. The trainer.train() step should take approximately one hour to complete. Once it's done, you'll see a new folder named santacoder-finetuned-the-stack-yaml has been created. This contains a local copy of your newly trained model, which now can generate YAML code. 

    To test your new model, open the generate.ipynb Jupyter notebook. Notice the first two code cells are for testing YAML or testing Ansible. You'll want to run the Test YAML cell and skip over the Test Ansible cell for now. After running this notebook, you'll see that YAML is successfully generated  based on the test_input string specified in the Test YAML cell. You can switch up this variable to see different generated YAML results.

    Fine-tuning on Ansible

    Now that we have a model that generates YAML, our last step is to fine-tune it on Ansible content. This step is very similar to the previous one, except we will create our own dataset from scratch this time. While the models used to power Ansible Lightspeed are trained on many thousands of Ansible samples, here we are exercising a HuggingFace capability to generate a data set from the contents of a text file, in this case containing a very small number of example Ansible tasks.

    Double-click and run the train-ansible.ipynb Jupyter notebook. As with the previous step, it should take about an hour to train your new model. Once complete, you'll see another folder created called santacoder-finetuned-the-stack-ansible-ec2.

    Open the generate.ipynb Jupyter notebook again, this time skipping the Test YAML cell and running the Test Ansible cell. After running this notebook, you'll see that an Ansible task is successfully generated  based on the test_input string specified in the Test Ansible cell (see Figure 3).

    An Ansible task is generated from the model in the Jupyter notebook
    Figure 3: Generated Ansible task.

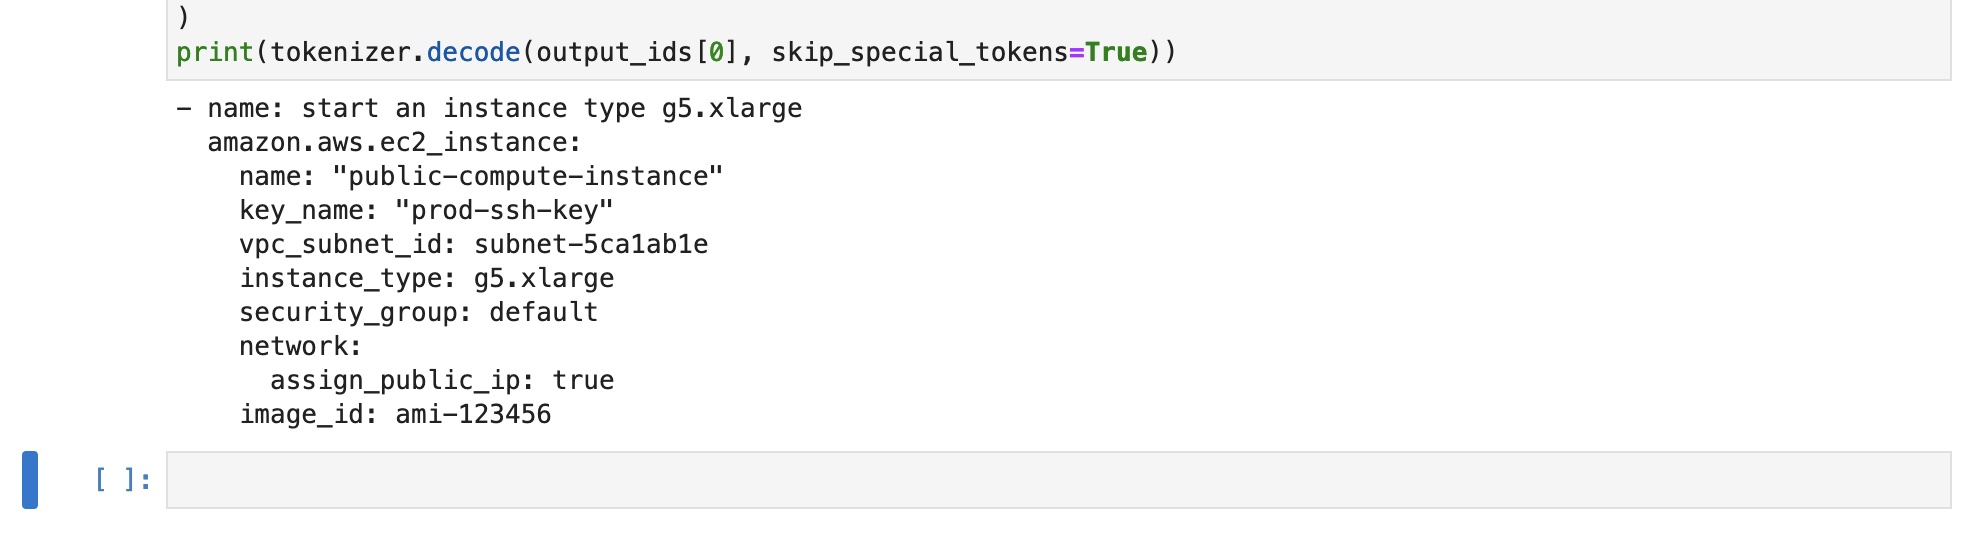
    You can see in the ansible-examples-ec2.txt file that the sample tasks are all based off the amazon.aws.ec2_instance Ansible module and are nearly identical. You can try adding more interesting examples and additional modules to this file, re-training your model, and seeing what outputs you receive.

    While creating a model from this extremely small set of Ansible examples is a bit contrived, I hope this article has given you an easy way to get some beginner experience with fine-tuning large language models.

    OpenShift Data Science learning resources

    Explore learning paths to get started with OpenShift Data Science, including:

    • Configure a Jupyter notebook to use GPUs for AI/ML modeling

    • How to create a PyTorch model

    • Install Red Hat OpenShift Data Science in Red Hat OpenShift Service on AWS

    • Model serving in RHODS
    Last updated: August 14, 2023

    Related Posts

    • More machine learning with OpenShift Data Science

    • Build and deploy an object detection model using OpenShift Data Science

    • Boost OpenShift Data Science with the Intel AI Analytics Toolkit

    • Sensitive information detection using the NVIDIA Morpheus AI framework

    • AI/ML pipelines using Open Data Hub and Kubeflow on Red Hat OpenShift

    Recent Posts

    • Tekton joins the CNCF as an incubating project

    • Federated identity across the hybrid cloud using zero trust workload identity manager

    • Confidential virtual machine storage attack scenarios

    • Introducing virtualization platform autopilot

    • Integrate zero trust workload identity manager with Red Hat OpenShift GitOps

    What’s up next?

    Follow along with this learning path to install OpenShift Data Science on Red Hat OpenShift Service on AWS, a fully managed application platform for building and deploying applications.

    Start learning
    Red Hat Developers logo LinkedIn YouTube Twitter Facebook

    Platforms

    • Red Hat AI
    • Red Hat Enterprise Linux
    • Red Hat OpenShift
    • Red Hat Ansible Automation Platform
    • See all products

    Build

    • Developer Sandbox
    • Developer tools
    • Interactive tutorials
    • API catalog

    Quicklinks

    • Learning resources
    • E-books
    • Cheat sheets
    • Blog
    • Events
    • Newsletter

    Communicate

    • About us
    • Contact sales
    • Find a partner
    • Report a website issue
    • Site status dashboard
    • Report a security problem

    RED HAT DEVELOPER

    Build here. Go anywhere.

    We serve the builders. The problem solvers who create careers with code.

    Join us if you’re a developer, software engineer, web designer, front-end designer, UX designer, computer scientist, architect, tester, product manager, project manager or team lead.

    Sign me up

    Red Hat legal and privacy links

    • About Red Hat
    • Jobs
    • Events
    • Locations
    • Contact Red Hat
    • Red Hat Blog
    • Inclusion at Red Hat
    • Cool Stuff Store
    • Red Hat Summit
    © 2026 Red Hat

    Red Hat legal and privacy links

    • Privacy statement
    • Terms of use
    • All policies and guidelines
    • Digital accessibility

    Chat Support

    Please log in with your Red Hat account to access chat support.