The growth of cloud-native applications has driven an explosion of east-west network traffic within a datacenter where applications can create hundreds of thousands of network connections among virtual machines and containers. As a consequence, the ability to track, monitor, and secure a datacenter in a timely manner has risen above that of any individual or team, thus requiring the help of AI and machine learning (AI/ML) to enable ITOps, infrastructure security, and DevSecOps teams to manage the complexity of modern cloud-native applications and the underlying platforms.
Red Hat and NVIDIA have been working together to bring the security analytics capabilities of the NVIDIA Morpheus AI application framework to Red Hat infrastructure platforms for cybersecurity developers. This article provides a set of configuration instructions to Red Hat developers working on applications that use the NVIDIA Morpheus AI application framework and NVIDIA BlueField data processing units (DPUs) to secure interservice communication.
Prerequisites
- Free Red Hat Developer account
- Active Amazon Web Services (AWS) account
- NVIDIA Morpheus Early Access program (EAP) account
- A server with NVIDIA BlueField-2 DPU
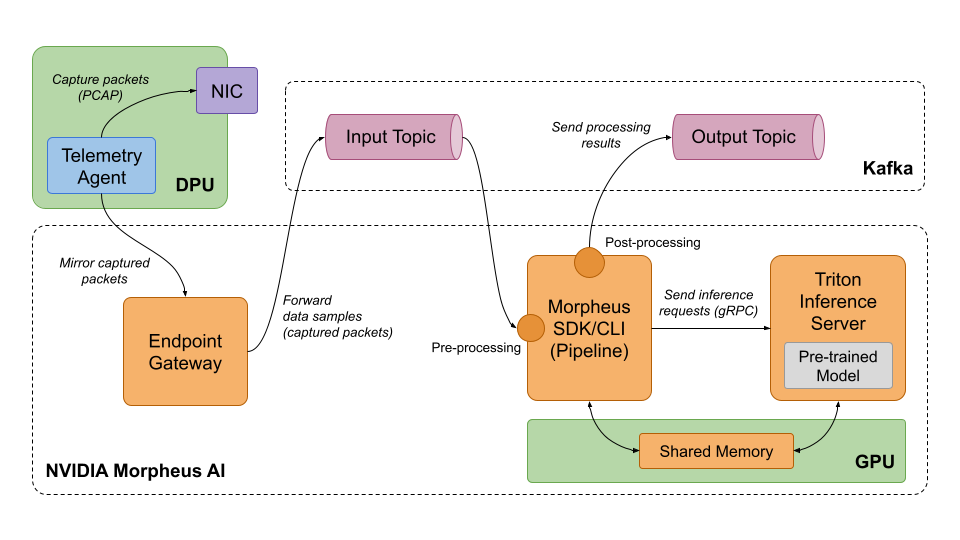
Architecture overview
This architecture consists of several software and hardware components.
NVIDIA's Morpheus AI Cybersecurity Framework is at the heart of the system. The software runs on Red Hat OpenShift and uses AI/ML to continuously inspect network and server telemetry at scale. As a quick refresher, the NVIDIA Morpheus AI application framework is built on the RAPIDS libraries, deep learning frameworks, and NVIDIA Triton Inference Server. It can run on site or in the cloud, and simplifies the analysis of logs and telemetry to help detect and mitigate security threats so that developers can create and deploy AI-powered security solutions more quickly. The framework helps clean, filter, and pre-process the telemetry data before sending it to the NVIDIA Triton server for inference. The framework also post-processes inference results before returning them to a client application such as a monitoring dashboard.
The telemetry is gathered by the NVIDIA NetQ Agent running on the NVIDIA BlueField-2 DPU installed on the local server and running Red Hat Enterprise Linux. The agent captures network packets from the DPU on the server and sends them to the NVIDIA Morpheus AI framework for inspection.
An Apache Kafka broker is used for streaming telemetry data from data sources to the NVIDIA Morpheus AI engine and sending inspection output from the engine, via a Kafka output topic, to a client application (e.g., monitoring dashboard).
Note: This guide does not cover a client application for consuming inspection output. Instead, we will be directly monitoring the Kafka output topic.
The particular case of collecting telemetry using the NVIDIA NetQ Agent requires the NVIDIA Endpoint Gateway (also part of the NVIDIA Morpheus AI framework) that allows sending telemetry samples to a gRPC endpoint and forwarding them to the input topic of the Apache Kafka broker.
The architecture is depicted at a high level in Figure 1.
It is possible to deploy NVIDIA Morpheus AI with Red Hat OpenShift on both physical and cloud infrastructures. However, to simplify the access for a wide variety of developers, we are using AWS infrastructure to host the NVIDIA Morpheus AI software and selecting an EC2 instance type that includes NVIDIA GPU resources. Additionally, we are going to assume that the developer has access to a physical server running Red Hat Enterprise Linux that has a NVIDIA BlueField-2 data DPU installed.
Installing and running NVIDIA Morpheus AI on Red Hat OpenShift
Now that you have all the prerequisites and requirements, let's get going! In the next few steps, you will:
- Install a Red Hat OpenShift cluster on AWS, including configuration of an AWS account, connecting the installation program to AWS, and customizing installation files.
- Install the NVIDIA GPU Operator on the OpenShift cluster. You will also obtain a cluster entitlement and install the Node Feature Discovery (NFD) Operator as part of this procedure.
- Install the NVIDIA Morpheus AI Engine with an Apache Kafka broker and Endpoint Gateway, and deploy the sensitive information detection (SID) ML model.
- Configure required Kafka topics.
- Configure and install the NVIDIA Morpheus SDK CLI.
- Install Red Hat Enterprise Linux on the NVIDIA BlueField-2 DPU on a local server.
- Install and configure NVIDIA NetQ Agent on the DPU.
- Simulate a Web server that receives sensitive data over HTTP, and observe how the NVIDIA Morpheus AI Framework performs sensitive information detection.
Installing Red Hat OpenShift cluster
First, we are going to install an OpenShift cluster on AWS using a preselected EC2 instance type with appropriate NVIDIA GPU resources.
- To prepare for installing Red Hat OpenShift on AWS, follow the Preparing to install on AWS and Configuring an AWS account guides.
- Proceed to Installing a cluster on AWS with customizations. In step 2 of Creating the installation configuration file, modify the worker instance type and replicas count in the generated
install-config.yamlas follows:compute: - architecture: amd64 hyperthreading: Enabled name: worker platform: aws: type: g4dn.xlarge replicas: 1 controlPlane: - Deploy the cluster.
- Note the location of kubeconfig once the cluster deployment has completed. Example:
INFO To access the cluster as the system:admin user when using 'oc', run 'export KUBECONFIG=/home/iris/iris-20210825/auth/kubeconfig'
- Install the OpenShift CLI client.
- Verify that the cluster is up and running. Run:
export KUBECONFIG=<path to your kubeconfig file>Then, run:
oc get clusterversionNAME VERSION AVAILABLE PROGRESSING SINCE STATUS version 4.8.10 True False 20m Cluster version is 4.8.10
- Verify that the cluster has a single worker:
oc get node --selector=node-role.kubernetes.io/workerNAME STATUS ROLES AGE VERSION ip-10-0-133-217.eu-central-1.compute.internal Ready worker 42m v1.21.1+9807387
Installing NVIDIA GPU operator
The NVIDIA GPU Operator automates the management of all NVIDIA software components needed to provision GPUs within OpenShift or Kubernetes. Follow the NVIDIA Cloud Native Technologies documentation to install the NVIDIA GPU Operator and its prerequisites on the Red Hat OpenShift cluster, and verify the installation.
Deploying the NVIDIA Morpheus AI framework
As described in the Architecture overview section, NVIDIA's Morpheus AI Framework has multiple components that need to be set up and configured. The NVIDIA Morpheus AI Engine is installed using a Helm chart that contains NVIDIA Triton Inference Server, a Kafka broker, and an Endpoint Gateway.
Note: In this example, the cluster must have a single GPU-enabled worker node for the NVIDIA Morpheus AI Engine to function properly. Also, both the NFD Operator and NVIDIA GPU Operator must already be installed, according to instructions provided in the previous section.
Here are the steps:
- Run:
export KUBECONFIG=<path you copied in the cluster installation step> - Assuming you have registered and have been selected to participate in the NVIDIA Morpheus Early Access program (EAP), generate an API key as explained in Generating Your NGC API Key. If you already have an API key, you can copy it from https://ngc.nvidia.com/setup.
- Run:
export API_KEY=<your API key> - Install Helm. At the time of writing, version 3.7.0 is available, but any 3.x version should work.
- Download the NVIDIA Morpheus AI Engine Helm chart:
helm fetch https://helm.ngc.nvidia.com/ea-nvidia-morpheus/charts/morpheus-ai-engine-0.1.14.tgz --username='$oauthtoken' --password=$API_KEY --untar - Create a
morpheus-ainamespace:oc create namespace morpheus-ai - Switch to the
morpheus-aiproject:oc project morpheus-ai - Deploy the chart:
helm install --set ngc.apiKey="$API_KEY",serviceAccount.create=true,platform.openshift=true,gateway.enabled=true,loadBalancer.enabled=true morpheus-ai-engine ./morpheus-ai-engine
Note: Setting gateway.enabled=true tells Helm to include the Endpoint Gateway in the installation. As already mentioned, the gateway is needed in this example so that the NVIDIA NetQ Agent could send traffic samples to the NVIDIA Morpheus AI framework. In order for the gateway to have a publicly accessible DNS name on AWS, we specify loadBalancer.enabled=true in the preceding command. Without this argument, or with loadBalancer.enabled=false, the gateway will be exposed via a NodePort.
- Verify the deployment. The engine might take several minutes to start, so use the
watchcommand:watch -n5 oc get podNAME READY STATUS RESTARTS AGE ai-engine-7c694bc64c-hgnxl 1/1 Running 0 62m broker-9f8bf48b8-ph9qs 1/1 Running 0 62m endpoint-gateway-5cdb9f8f9d-qshht 1/1 Running 0 62m zookeeper-54f5cc7d8c-frgsj 1/1 Running 0 62m
Configuring Kafka topics
Apache Kafka is installed as a part of the Helm chart that also installs the NVIDIA Morpheus AI framework and is used to send input data (telemetry) and receive output (inspection results).
To use the Kafka broker with this use case, you need to create the input and output topics as follows:
netq_message_Packet_rawis read from by the NVIDIA Morpheus SDK CLI, and written to by the endpoint gateway.morpheus-outputis used by the NVIDIA Morpheus SDK CLI to stream post-processed inference output that contains the results of sensitive information detection.
export KAFKA_POD=$(oc get pods -l=app.kubernetes.io/name=broker -o jsonpath='{.items[0].metadata.name}')
oc exec $KAFKA_POD -- kafka-topics \
    --create \
    --bootstrap-server broker:9092 \
    --replication-factor 1 \
    --partitions 1 \
    --topic netq_message_Packet_raw
oc exec $KAFKA_POD -- kafka-topics \
    --create \
    --bootstrap-server broker:9092 \
    --replication-factor 1 \
    --partitions 1 \
    --topic morpheus-output
Verify that Kafka topics have been successfully created by running:
oc exec $KAFKA_POD -- kafka-topics --list --bootstrap-server broker:9092
morpheus-output
netq_message_Packet_raw
You can then monitor the output topic in a new terminal window:
-
export KUBECONFIG=<path to the kubeconfig> -
export KAFKA_POD=$(oc get pods -l=app.kubernetes.io/name=broker -o jsonpath='{.items[0].metadata.name}') -
oc exec $KAFKA_POD -- kafka-console-consumer -topic morpheus-output --bootstrap-server broker:9092 --from-beginning
Deploying SID model
The SID model is one of the pre-trained models that comes with the NVIDIA Morpheus AI framework. In this example, we need the model to detect sensitive data in packets captured by the NVIDIA NetQ Agent. The model must be loaded into the NVIDIA Triton Server and requires a GPU to run successfully. Here is how you can deploy the model:
- Install NGC CLI as described in NVIDIA NGC CLI Install.
- Run
ngc config setand follow the prompt. - Create a directory for ML models:
mkdir -p models - Run:
ngc registry resource download-version "ea-nvidia-morpheus/sid_bert_triton_package:sid-minibert-20211002-t4" - Then, run:
unzip sid_bert_triton_package_vsid-minibert-20211002-t4/sid-minibert-trt-t4.zip -d models - Verify that the target directory now contains the SID model:
ls -R modelsmodels: sid-minibert-trt models/sid-minibert-trt: 1 config.pbtxt models/sid-minibert-trt/1: README.md sid-minibert-trt_b1-8_b1-16_b1-32.engine
- Copy the SID model to Triton's models repository:
-
MORPHEUS_POD=$(oc get pods -l=app.kubernetes.io/name=ai-engine -o jsonpath='{.items[0].metadata.name}') -
oc rsync models/sid-minibert-trt $MORPHEUS_POD:/common/triton-model-repo
-
- List all available models:
oc exec -ti $MORPHEUS_POD -- curl -f -X POST http://localhost:8000/v2/repository/index | jq[ { "name": "sid-minibert-trt" } ]
- Load the SID model into Triton:
oc exec -ti $MORPHEUS_POD -- curl -f -X POST http://localhost:8000/v2/repository/models/sid-minibert-trt/load - Verify that the model has been successfully loaded:
oc exec -ti $MORPHEUS_POD -- curl -f -X POST http://localhost:8000/v2/repository/index | jq[ { "name": "sid-minibert-trt", "version": "1", "state": "READY" } ]
Deploying NVIDIA Morpheus SDK CLI with SID pipeline
The NVIDIA Morpheus SDK CLI pre-processes input data before sending it for inference to the NVIDIA Triton Inference Server and is installed using a separate Helm chart. The Helm chart is instructed to deploy the pipeline on the same OpenShift worker node as the NVIDIA Morpheus AI engine because they share GPU memory for better inference performance. One of the pipeline types supported by the SDK is Natural Language Processing (NLP). It is used here with the SID model.
- Download the Helm chart to install and configure NVIDIA Morpheus SDK CLI:
helm fetch https://helm.ngc.nvidia.com/ea-nvidia-morpheus/charts/morpheus-sdk-client-0.1.8.tgz --username='$oauthtoken' --password=$API_KEY --untar - Deploy the Helm chart:
helm install --set ngc.apiKey="$API_KEY" --set sdk.args="morpheus --debug --log_level=DEBUG run --num_threads=8 --pipeline_batch_size=1024 --model_max_batch_size=32 pipeline-nlp --model_seq_length=256 from-kafka --input_topic netq_message_Packet_raw --bootstrap_servers broker:9092 buffer deserialize preprocess --vocab_hash_file=./data/bert-base-uncased-hash.txt --do_lower_case=True monitor --description='Preprocessing rate' buffer inf-triton --force_convert_inputs=True --model_name=sid-minibert-trt --server_url=ai-engine:8001 monitor --description='Inference rate' --smoothing=0.001 --unit inf add-class filter serialize --exclude '^ts_' to-kafka --output_topic morpheus-output --bootstrap_servers broker:9092",platform.openshift=true morpheus-sid-pipeline morpheus-sdk-client
Let’s take a closer look at the arguments used in sdk.args. The pipeline runs NLP using the sid-minibert-trt model (--model_name). It reads input from thenetq_message_Packet_raw Kafka topic (--input_topic), and calls the NVIDIA Triton Inference Server at ai-engine:8001 (--server_url). Finally, it writes output into the morpheus-output Kafka topic (--output_topic).
- Wait until the pipeline pod has started:
watch -n5 oc get pods -l=app.kubernetes.io/name=sdk-cli-morpheus-sid-pipelineNAME READY STATUS RESTARTS AGE sdk-cli-morpheus-sid-pipeline-69b49c654d-qrc9d 1/1 Running 0 9m20s
- Verify that there are no errors in the pipeline log:
oc logs $(oc get pods -l=app.kubernetes.io/name=sdk-cli-morpheus-sid-pipeline -o jsonpath='{.items[0].metadata.name}')Configuring Pipeline via CLI ... Added stage: <to-kafka-11; WriteToKafkaStage(bootstrap_servers=broker:9092, output_topic=morpheus-output)> └─ List[str] -> List[str] ====Building Pipeline Complete!==== ====Starting Pipeline==== ...
Setting up NVIDIA NetQ agent on NVIDIA BlueField-2 DPU
Now we'll walk through the steps to set up the NVIDIA NetQ agent.
Installing Red Hat Enterprise Linux on NVIDIA BlueField-2 DPU
In our testing, we used a Dell EMC PowerEdge R740 server in the following configuration:
- 40 core Intel Xeon Silver 4210 CPU at 2.20GHz
- 92GB memory
- NVIDIA BlueField-2 DPU (model MT42822)
To install Red Hat Enterprise Linux on both the server and the DPU, the respective installation images must be obtained using a free Red Hat Developer subscription, as detailed in this guide.
Note: The provisioning scripts have only been tested with Red Hat Enterprise Linux 8.4, so we recommend that you use this version.
In order to start installing Red Hat Enterprise Linux on the Dell PowerEdge R740 server, follow this installation guide.
To start installing Red Hat Enterprise Linux on the NVIDIA BlueField-2 card, run these commands:
-
git clone https://github.com/kwozyman/rhel-on-bf2 -
cd rhel-on-bf2 -
export RHEL_ISO=/path/to/redhat_iso_file -
bash bluefield_provision.sh -a
The preceding commands will, in order:
- Prepare the host system and install dependencies.
- Update BlueField-2 firmware.
- Enable SR-IOV on the host.
- Prepare and boot PXE.
This README file contains important information on installing Red Hat Enterprise Linux on DPUs.
After dependencies are installed, you will see this output for the firmware update:
Complete!
== STATUS === Performing firmware update
-2021-05-20 10:22:18--  https://www.mellanox.com/downloads/BlueField/BlueField-3.5.1.11601/BlueField-3.5.1.11601_install.bfb Resolving www.mellanox.com (www.mellanox.com)... 151.101.2.133
Connecting to www.mellanox.com (www.mellanox.com)|151.101.2.133|:443... connected.
HTTP request sent, awaiting response... 302 Found
Location: https://content.mellanox.com/BlueField/BlueField-3.5.1.11601/BlueField-3.5.1.11601_install.bfb [following] -2021-05-20 10:22:19-- https://content.mellanox.com/BlueField/BlueField-3.5.1.11601/BlueField-3.5.1.11601_install.bfb
Resolving content.mellanox.com (content.mellanox.com)... 107.178.241.102
Connecting to content.mellanox.com (content.mellanox.com)...107.178.241.102:443... connected.
HTTP request sent, awaiting response... 200 OK
Length: 528205736 (504M) [application/octet-stream]
Saving to: ‘BlueField-3.5.1.11601_install.bfb’

BlueField-3.5.1.11601_install.bf 100%[==========>] 503.74M 97.6MB/s in 6.9s

2021-05-20 10:22:27 (72.9 MB/s) - ‘BlueField-3.5.1.11601_install.bfb' saved [528205736/528205736]

== STATUS === Sending firmware to BF2. Please wait.
You might see the following message for more than 10 seconds; stand by:
Welcome to minicom 2.7.1
OPTIONS: I18n
Compiled on Aug 13 2018, 16:41:28.
Port /dev/rshim0/console, 10:22:16

Press CTRL-A Z for help on special keys
Yocto boot will commence:
Welcome to minicom 2.7.1
OPTIONS: I18n Compiled on Aug 13 2018, 16:41:28.
Port /dev/rshimO/console, 10:22:16

Press CTRL-A Z for help on special keys

[5.228955] mlxbf_gige MLNXBF17:00 oob_net0: renamed from eth0 [5.295481] virtio_net virtio1 tmfifo_netO: renamed from eth0
[5.370656] mlx5_core 0000:03:00.0: Rate limit: 127 rates are supported, range: 0Mbps to 97656Mbps
[5.388735] mlx5_core 0000:03:00.0: E-Switch: Total vports 18, per vport: max uc(1024) max mc(16384)
[5.410144] mlx5_core 0000:03:00.0: Part module event: module 0, Cable plugged
[5.424763] mlx5_core 0000:03:00.0: mlx5_pcie_event:286:(pid 7): PCIe slot power capability was not advertised.
[5.431846] mlx5_core 0000:03:00.1: enabling device (0400 -> 0402)
[5.457855] mlx5_core 0000:03:00.1: firmware version: 24.29.2002
[5.469980] mlx5_core 0000:03:00.1: 252.048 Gb/s available PCIe bandwidth (16 GT/s x16 link)
[5.736384] mlx5_core 0000:03:00.1: Rate limit: 127 rates are supported, range: 0Mbps to 97656Mbps
[5.754472] mlx5_core 0000:03:00.1: E-Switch: Total vports 18, per vport: max uc(1024) max mc(16384)
[5.776826] mlx5_core 0000:03:00.1: Port module event: module 1, Cable unplugged
[5.791805] mlx5_core 0000:03:00.1: mlx5_pcie_event:2861(pid 266): PCIe slot power capability was not advertised.
[5.799161] mlx5_core 0000:03:00.0: MLX5E: StrdRq(1) RqSz(8) StrdSz(2048) RxCqeCmprss(0)
[6.084276] mlx5_core 0000:03:00.1: MLX5E: StrdRq(1) RqSz(8) StrdSz(2048) RxCqeCmprss(0)
[7.074338] random: dd: uninitialized urandom read (512 bytes read)
[7.104375] random: rngd: uninitialized urandom read (16 bytes read)
[7.117171] random: rngd: uninitialized urandom read (4 bytes read)
[9.211564] urandom_read: 1 callbacks suppressed
[9.211568] random: rngd: uninitialized urandom read (2500 bytes read)
[9.234163] random: crng init done
The firmware upgrade will take place automatically, and the PXE server setup will follow:
************************************************************                                                      ***                                                      ***
***         Platform firmware updates complete.          ***
***                                                      ***
************************************************************

root@localhost:-# /lib/firmware/mellanox/mlxfwmanager_sriov_dis_aarch64_41686
Querying Mellanox devices firmware ...

Device #1:
Device Type: BlueField2
Part Number: MBF2H516A-CEEO_Ax_Bx
Description: BlueField-2 DPU 100GbE Dual-Port QSFP56; PCIe Gen4 x16; Crypto; 16GB on-board DDR; 1GbE OOB management; FHHL
PSID: MT 0000000702
PCI Device Name: 0000:03:00.0
Base GUID: b8cef603003dd0le
Base MAC: b8cef63dd0le
Versions: Current        Available
       FW 24.29.2002     24.29.2002
     NVMe 20.1.0003      20.1.0003
      PXE 3.6.0204       3.6.0204
     UEFI 14.22.0016     14.22.0016

Status: Up to date


=== STATUS === Checking usability of SRIOV for PCI 0000:af:00.0
SRIOV enabled
EMBEDDED_CPU mode enabled
=== STATUS === Checking usability of SRIOV for PCI 0000:af:00.1
SRIOV enabled
EMBEDDED_CPU mode enabled
=== STATUS === Setting up PXE environment
--2021-05-20 10:25:17--  http://download.eng.bos.redhat.com/released/rhel-8/RHEL-8/8.4.0-Beta-1/Base0S/aarch64/iso/RHEL-8.4.0-20210309.1-aarch64-dvdl.iso
Resolving download.eng.bos.redhat.com (download.eng.bos.redhat.com)... 10.19.43.4
Connecting to download.eng.bos.redhat.com (download.eng.bos.redhat.com)[10.19.43.4]:80... connected.
HTTP request sent, awaiting response... 200 OK
Length: 7368329216 (6.9G) [application/octet-stream] Saving to: '/tmp/RHEL-8.4.0-20210309.1-aarch64-dvdl.iso'

.1-aarch64-dvdl.iso      40%[======            ]2.77G 77.8MB/s eta 61s
Then BlueField-2 DPU will PXE boot from the network interface:
Done
Next step: PXE boot from target (make sure to select the correct port!)
=== INFO === The BF2 is about to be rebooted and minicom console
=== INFO === started. You must manually select the PXE boot device.
=== INFO === This can't be fully automated because the list of
=== INFO === options is not consistent.
=== INFO ===
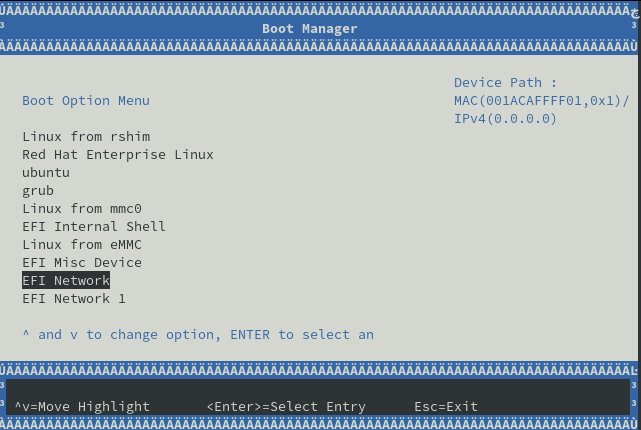
=== INFO === ACTION: When you see the "Boot Option Menu" select the
=== INFO === option with following device path (and press enter):
=== INFO === MAC(001ACAFFFF01,0x1)/
=== INFO === IPv4(0.0.0.0)
=== INFO === In most cases, this is "EFI NETWORK 4". After that the
=== INFO === automation picks up again. Let it take over. The console
=== INFO === and reboot are slow. Have patience.
=== INFO ===
=== INFO === Press enter when you're read .
Note: The device name can vary in your particular case, but it will follow the naming convention of EFI NETWORK X (i.e., EFI NETWORK 4).
Press Enter and wait until you see the screen shown in Figure 2.
You should shortly see a successful PXE boot:
»Start PXE over IPv4.
  Station IP address is 172.31.100.10

  Server IP address is 172.31.100.1
  NBP filename is /BOOTAA64.EFI
  NBP filesize is 857984 Bytes
 Downloading NBP file...

  NBP file downloaded successfully.
Fetching Netboot Image
=== INFO === The RHEL install has been started. This is the end of the automation.
=== INFO === I will reattach the minicom console to see the install progress.
=== INFO === You can drop it anytime with key sequence: ctrl-a X
=== INFO ===
=== INFO === Press enter when you're ready.
You can exit the script at this point or watch the installation take place by pressing Enter.
There are two ways to get the DPU IP address:
- Log in via console from the host to the DPU:
minicom --color on --baudrate 115200 --device /dev/rshim0/consoleUsing user
rootand password defined in the installation kickstart.You can now simply use Linux standard tools, for example:
ip aTo exit the console, you can press Ctrl-A and then Q.
-
Examine DHCPD lease files on the host:
cat /var/lib/dhcpd/dhcpd.leasesBe sure to look for the lease that is in binding state "active" and has the hardware address of
00:1a:ca:ff:ff:01.
Configuring NVIDIA NetQ agent for packet mirroring
Next, we will install an NVIDIA NetQ agent on the DPU, configure it to capture packets on a network interface, and mirror them to the Morpheus endpoint gateway.
Open a terminal session to the DPU, either via SSH or minicom console.
- Install the ARM64 version of the NGC CLI as described in the documentation.
- Configure the CLI by running:
ngc config set - Download a RPM of the NVIDIA NetQ Agent for ARM64:
ngc registry resource download-version "ea-nvidia-morpheus/morpheus_telemetry:netq4-rhel8" - Install the RPM:
rpm -i morpheus_telemetry_vnetq4-rhel8/netq-agent-4.0.0-rh8u34~1626785319.908c36d5.aarch64.rpm - Create
/etc/netq/pcap.ymlusing the name of your DPU's network interface, e.g.,eth0:netq-pcap-config: interface: <network-interface> filter: "tcp port 80"
- Find out the DNS name of the endpoint gateway:
oc get svc netq-endpoint-gatewayNAME TYPE CLUSTER-IP EXTERNAL-IP PORT(S) AGE netq-endpoint-gateway LoadBalancer 172.30.254.220 a0...elb.amazonaws.com 31980:31357/TCP 128m
- Modify the
/etc/netq/netq.ymlconfiguration file to point to the endpoint gateway. For instance:netq-agent: port: 31980 server: a0...elb.amazonaws.com vrf: default is-pcap-enabled: True suppress-sub-agents: all
- Start the agent:
sudo systemctl start netq-agent - Verify that the agent is running and can connect to the endpoint gateway:
sudo systemctl status -l netq-agentAug 26 05:54:10 agent.redhat.com netq-go-agent[160240]: INFO: Initializing Client Connection to gateway.example.com:31980 Aug 26 05:54:10 agent.redhat.com netq-agent[160211]: 2021/08/26 05:54:10.550318 agent.redhat.com netq-go-agent[160240]: INFO: Reading Live Capture Started Aug 26 05:54:10 agent.redhat.com netq-go-agent[160240]: INFO: Reading Live Capture Started Aug 26 05:54:10 agent.redhat.com netq-agent[160211]: 2021/08/26 05:54:10.722425 agent.redhat.com netq-go-agent[160240]: INFO: Connection Successful to OPTA Aug 26 05:54:10 agent.redhat.com netq-go-agent[160240]: INFO: Connection Successful to OPTA Aug 26 05:54:10 agent.redhat.com netq-agent[160211]: Successfully Connected to gateway.example.com:319802021/08/26 05:54:10.722519 agent.redhat.com netq-go-agent[160240]: INFO: starting stream to gateway.example.com:31980
Simulating an application service
Let's simulate an application that runs on the DPU and exchanges sensitive data in JSON payloads over HTTP. For this purpose, we will use Python's SimpleHTTPServer to echo headers and body of the incoming HTTP requests to stdout.
- Open a new terminal session to the DPU because the server will run in the foreground.
- Change to your home directory:
cd $HOME - Create a file named
echo-server.pywith the following content:#!/usr/bin/env python3 from http.server import BaseHTTPRequestHandler, HTTPServer import logging class PostHandler(BaseHTTPRequestHandler): def do_POST(self): self.send_response(200) self.send_header('Content-Type', 'application/json') self.end_headers() logging.info(f'-- Headers --:\n{self.headers}') content_len = int(self.headers.get('Content-Length')) logging.info(f'-- Body --:\n{self.rfile.read(content_len)}') return logging.basicConfig(level=logging.INFO) server = HTTPServer(('', 80), PostHandler) server.serve_forever()
- Make the file executable:
sudo chmod u+x echo-server.py - Open a new terminal window (the server runs in the foreground).
- Execute:
sudo ./echo-server.py
Detecting sensitive information through ML inference
Finally, to test sensitive information detection, we will send a request that contains sensitive data using a cURL command (you can send the request from the host to the DPU if the DPU does not have an external IP address):
curl -X POST http://agent.redhat.com -H 'Content-Type: application/json' --data-binary '{"user": "Teresa Bruce"}'
See inference results on the output topic (the messages have been formatted for readability):
{"timestamp": 1633448662, "host_ip": "agent.redhat.com", "data_len": 183, "data": "POST / HTTP/1.1Host: agent.redhat.comUser-Agent: curl/7.69.1Accept: */*Content-Type: application/jsonContent-Length: 24{\"user\": \"Teresa Bruce\"}", "src_mac": "14:58:d0:58:95:92", "dest_mac": "3c:94:d5:4f:d9:c1", "protocol": "TCP", "src_ip": "10.8.2.97", "dest_ip": "10.35.206.159", "src_port": 80, "dest_port": 39932, "flags": 32784, "si_address": false, "si_bank_acct": false, "si_credit_card": false, "si_email": false, "si_govt_id": false, "si_name": true, "si_password": false, "si_phone_num": false, "si_secret_keys": false, "si_user": false}
As you can see in the preceding output, Teresa Bruce has been correctly identified as a person's name ("si_name": true). While this is a relatively simple example, the model is continuously refined to improve the accuracy of detection.
Try sending other types of sensitive data to the server to see SID in action. For example:
curl -X POST http://agent.redhat.com -H 'Content-Type: application/json' --data-binary '{"email": "tbruce@acme.com"}'
curl -X POST http://agent.redhat.com -H 'Content-Type: application/json' --data-binary '{"phone": "+1-609-361-2775x8385"}'
curl -X POST http://agent.redhat.com -H 'Content-Type: application/json' --data-binary '{"home": "9951 Miller Street Apt. 113, Laurenshire, IA 67656"}'
And more than one sensitive item:
curl -X POST http://agent.redhat.com -H 'Content-Type: application/json' --data-binary '{"user": "Teresa Bruce", "email": "tbruce@acme.com", "home": "9951 Miller Street Apt. 113, Laurenshire, IA 67656", "phone": "+1-609-361-2775x8385"}'
Deployment cleanup
Follow the instructions at Uninstalling a cluster on AWS to delete the cluster and all associated AWS resources.
How to avoid common issues
During such a complex installation and configuration process that involves multiple software and infrastructure components, there is a good chance that certain things might not work right away or at all. We've seen several such errors in our deployment and are providing them here as a courtesy. We hope that avoiding these issues will help you to get up and running sooner.
- The Triton server might complain that the model requires a GPU while the node does not have one. This could be because the operator has not fully started yet. Just wait for the NVIDIA GPU Operator to complete initialization, then delete the
ai-enginepod and let OpenShift recreate it.Poll failed for model directory 'sid-minibert-trt': instance group sid-minibert-trt_0 of model sid-minibert-trt has kind KIND_GPU but no GPUs are available - You might see a message that the pipeline cannot connect to Kafka. This could be because Kafka service is not up yet, the topics were not created, or their names were misspelled.
- If there are no messages on the Kafka input topic, that is likely because the topic name was misspelled.
- If the pipeline complains about the model not being available, the model might not have been loaded yet, or failed to load.
Traceback (most recent call last):s] File "/opt/conda/envs/morpheus/lib/python3.8/threading.py", line 932, in _bootstrap_inner self.run() File "/opt/conda/envs/morpheus/lib/python3.8/threading.py", line 870, in run self._target(*self._args, **self._kwargs) File "/opt/conda/envs/morpheus/lib/python3.8/site-packages/morpheus/pipeline/inference/inference_triton.py", line 615, in main_loop self.init(loop) File "/opt/conda/envs/morpheus/lib/python3.8/site-packages/morpheus/pipeline/inference/inference_triton.py", line 459, in init assert self._triton_client.is_model_ready(self._model_name), \ AssertionError: Triton model sid-minibert-trt is not ready - Another common issue is when the NVIDIA NetQ agent cannot connect to the endpoint gateway or the agent tries to initialize the client connection, but never reaches
Connection Successful to OPTA. This could be happening because the gateway specified in/etc/netq/netq.yamlis unreachable (e.g., no routing to the gateway's host, the gateway is down, or the port is incorrect or blocked by the firewall).Aug 26 06:00:37 agent.redhat.com netq-go-agent[160446]: INFO: Initializing Client Connection to gateway.example.com:31980 Aug 26 06:00:37 agent.redhat.com netq-agent[160415]: 2021/08/26 06:00:37.670319 agent.redhat.com netq-go-agent[160446]: INFO: Reading Live Capture Started Aug 26 06:00:37 agentredhat.com netq-go-agent[160446]: INFO: Reading Live Capture Started
Conclusion
Congratulations—if you are reading this, then you are likely to have successfully set up, configured, and tested the NVIDIA Morpheus AI application framework and NVIDIA BlueField-2 data processing units (DPUs) with Red Hat OpenShift and Red Hat Enterprise Linux.
The model supplied with the Morpheus SDK for testing purposes is just one example of how to build an application for a particular use case using this powerful AI-enabled software. Additional models are available from NVIDIA, and Morpheus is designed to make it easy for customers to modify GPU-powered data science models or create new ones.
Combining the advanced Kubernetes capabilities of OpenShift, the trusted capabilities of Red Hat Enterprise Linux, and the data sampling power of the BlueField DPU helps you develop and deploy custom cybersecurity applications tailored to your particular organization's needs.
We hope that by going through this set of instructions, you now feel more confident about getting further involved in real-world projects. If you have encountered any issues while working with this configuration guide, please leave a comment on this article.
Last updated: July 25, 2023