Quarkus offers libraries, development tools, and a testing environment for modern Java applications, particularly those aimed at containers and the cloud. This article demonstrates how to implement a Quarkus application that runs on Red Hat Enterprise Linux and connects to a Microsoft SQL Server database. With the help of Podman (a container-building tool similar to Docker), we will also containerize the Quarkus application to become more portable and ready to be deployed on Kubernetes or Red Hat OpenShift.
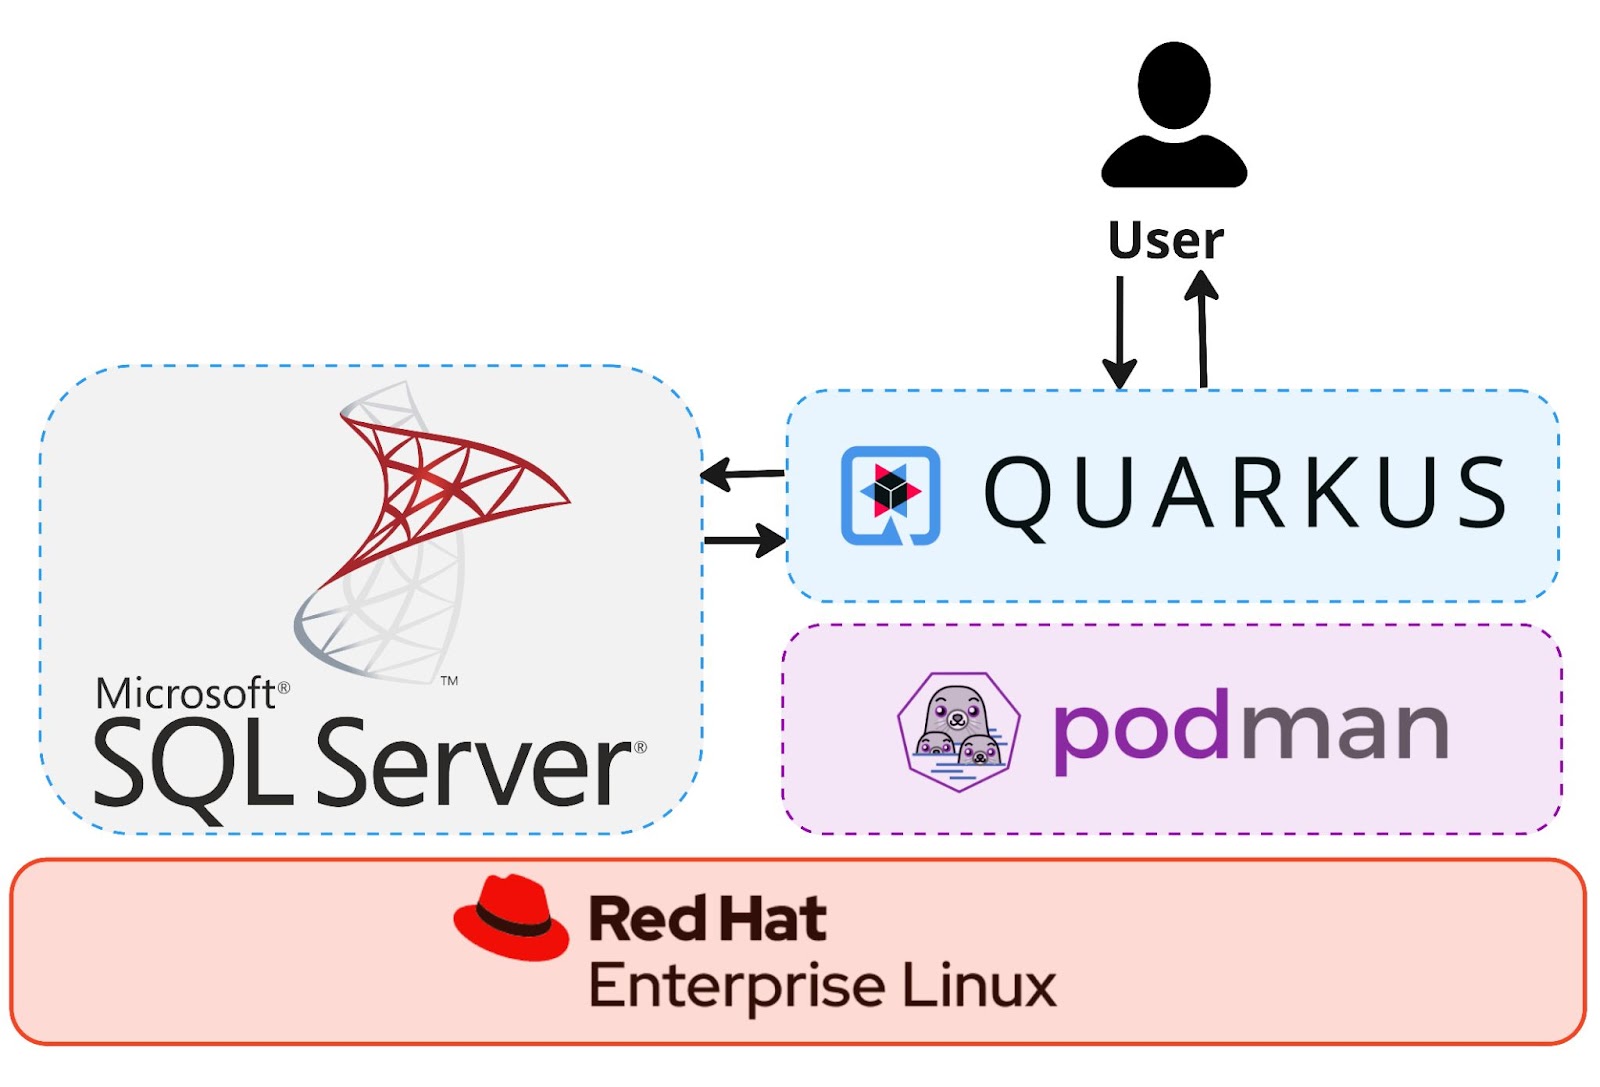
Figure 1 illustrates the main elements of the example in this article. We will implement basic create, read, update, and delete (CRUD) operations.
Prerequisites
You can download the code for the sample application from this GitHub repository. In addition, please have the following installed on your local system (the links take you to installation instructions):
- Red Hat Enterprise Linux 8 or 9
- Open JDK 11
- Quarkus 2.1+
- The Quarkus command-line interface (CLI)
- Maven
- Podman
4 steps of the development process
The following sections will demonstrate these four steps to complete the development process:
- Install and set up Microsoft SQL Server
- Install the Quarkus application
- Create database operations with the Quarkus application API
- Containerize the Quarkus application using Podman
Step 1. Install and set up Microsoft SQL Server
We will install Microsoft SQL Server and its CLI on the local Red Hat Enterprise Linux system.
Install Microsoft SQL Server
Download the 2022 Preview Red Hat repository configuration file for SQL Server:
$ sudo curl -o /etc/yum.repos.d/mssql-server.repo https://packages.microsoft.com/config/rhel/8/mssql-server-preview.repoInstall SQL Server:
$ sudo yum install -y mssql-serverRun
mssql-conf setupusing the full path to the command, and follow the prompts to set the SA user password and choose your edition:$ sudo /opt/mssql/bin/mssql-conf setupVerify that SQL Server is running:
$ systemctl status mssql-serverOpen the SQL Server port on the Red Hat Enterprise Linux firewall. The default SQL Server port is TCP 1433. If you are using FirewallD for your firewall, you can open the port as follows:
$ sudo firewall-cmd --zone=public --add-port=1433/tcp --permanent
$ sudo firewall-cmd --reload
SQL Server is now running on your Red Hat Enterprise Linux machine and is ready to use.
Install the Microsoft SQL CLI
The following steps install sqlcmd, the SQL Server command-line interface.
Download the Red Hat repository configuration file:
$ sudo curl -o /etc/yum.repos.d/msprod.repo https://packages.microsoft.com/config/rhel/8/prod.repoInstall
mssql-toolswith the unixODBC developer package:$ sudo yum install -y mssql-tools unixODBC-develAdd
/opt/mssql-tools/binto yourPATHenvironment variable to makesqlcmdandbcpaccessible from the Bash shell. Modify thePATHenvironment variable in your~/.bash_profilefile with the following command:$ echo 'export PATH="$PATH:/opt/mssql-tools/bin"' >> ~/.bash_profileFor non-interactive sessions, modify the
PATHenvironment variable in your~/.bashrcfile and update your shell with the following commands:$ echo 'export PATH="$PATH:/opt/mssql-tools/bin"' >> ~/.bashrc $ source ~/.bashrc
Connect to the database locally
Run
sqlcmdwith parameters that specify your SQL Server IP address or name (-S), username (-U), and password (-P). In this tutorial, you are connecting locally, so the server name islocalhost. The username for this example issaand the password is the one you provided for the SA account during setup:sqlcmd -S localhost -U sa -P '<password>'At the
sqlcmdprompt, create a new database:CREATE DATABASE TestDB;Write a query to return the name of all of the databases on the server:
SELECT Name from sys.databases;To execute the previous two queries, enter
GO:GO
Step 2. Install the Quarkus application
Create a Quarkus project with the quarkus command:
$ quarkus create app org.acme:quarkus-crud-app --extension=agroal,resteasy-reactive, quarkus-hibernate-orm-panache,quarkus-resteasy-jsonb ,quarkus-jdbc-mssqlThe command creates a directory named quarkus-crud-app , and installs a few extensions needed for a CRUD application. The command prints a lot of lines on your terminal.
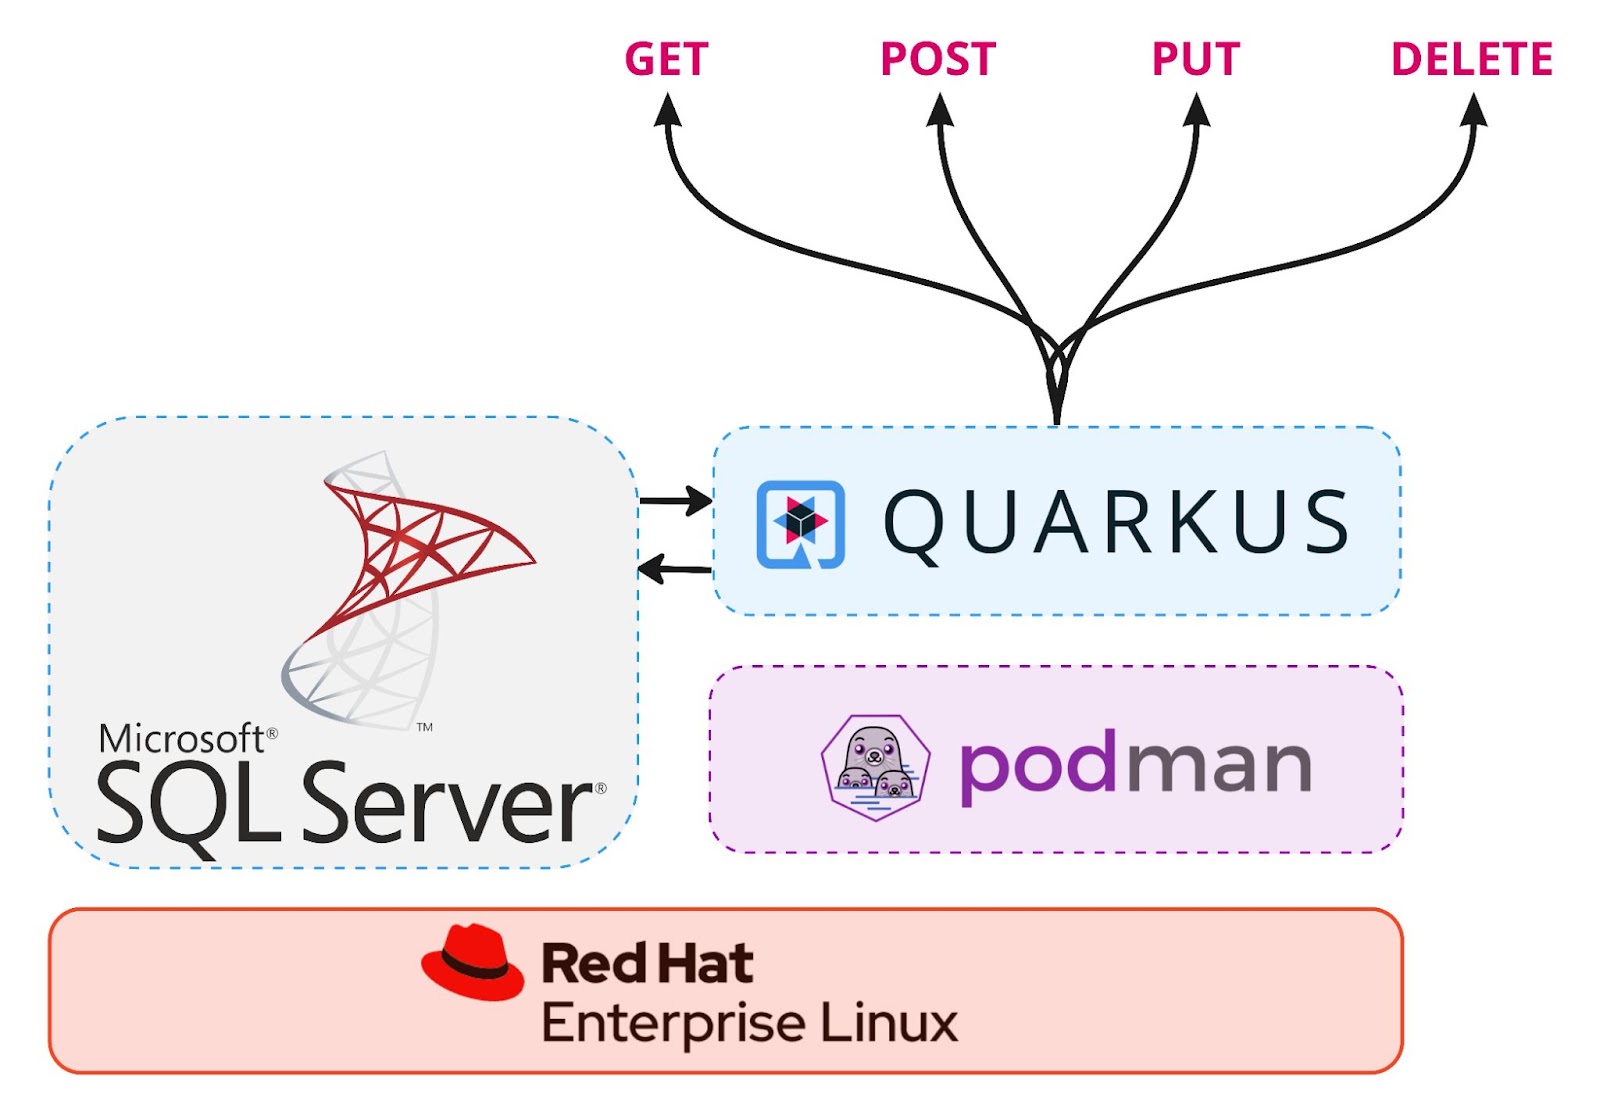
To implement CRUD operations, we'll create an object named Person with API endpoints for GET (read an entry), POST (create an entry), PUT (update an entry), and DELETE (delete an entry), illustrated in Figure 2.
Step 3. Create database operations with the Quarkus application API
As stated earlier, the source code for this application is in this GitHub repository.
Person.java and PersonResource.java files
Because the object on which we perform database operations is called Person, the following Person.java file is in the quarkus-crud-app/src/main/java/org/acme/ directory:
package org.acme;

import javax.persistence.Column;
import javax.persistence.Entity;

import io.quarkus.hibernate.orm.panache.PanacheEntity;

@Entity
public class Person extends PanacheEntity {
@Column(name="first_name")
    public String firstName;

@Column(name="last_name")
    public String lastName;

    public String salutation;
}
The second file you need is PersonResource.java, located in the same directory. This file imports several packages required to make our API work and implements GET, POST, PUT and DELETE endpoints:
package org.acme;

import java.util.List;

import javax.transaction.Transactional;
import javax.ws.rs.Consumes;
import javax.ws.rs.GET;
import javax.ws.rs.POST;
import javax.ws.rs.PUT;
import javax.ws.rs.DELETE;
import javax.ws.rs.Path;
import javax.ws.rs.PathParam;
import javax.ws.rs.Produces;
import javax.ws.rs.WebApplicationException;
import javax.ws.rs.core.MediaType;
import javax.ws.rs.core.Response;

import io.quarkus.panache.common.Sort;

@Path("/person")
@Consumes(MediaType.APPLICATION_JSON)
@Produces(MediaType.APPLICATION_JSON)
public class PersonResource {

    @GET
    public List<Person> getAll() throws Exception {
        return Person.findAll(Sort.ascending("last_name")).list();
    }


    @POST
    @Transactional
    public Response create(Person p) {
        if (p == null || p.id != null)
            throw new WebApplicationException("id != null");
        p.persist();
        return Response.ok(p).status(200).build();
    }


    @PUT
    @Transactional
    @Path("/{id}")
    public Person update(@PathParam("id") Long id, Person p) {
        Person entity = Person.findById(id);
        if (entity == null) {
            throw new WebApplicationException("Person with id of " + id + " does not exist.", 404);
        }
        if(p.salutation != null ) entity.salutation = p.salutation;
        if(p.firstName != null )  entity.firstName = p.firstName;
        if(p.lastName != null)    entity.lastName = p.lastName;
        return entity;
    }

    @DELETE
    @Path("/{id}")
    @Transactional
    public Response delete(@PathParam("id") Long id) {
        Person entity = Person.findById(id);
        if (entity == null) {
            throw new WebApplicationException("Person with id of " + id + " does not exist.", 404);
        }
        entity.delete();
        return Response.status(204).build();
    }
}
The Application.properties file
Application.properties is a configuration file where you specify parameters specific to our environment to connect with the Microsoft SQL database from the Quarkus application. Configuration properties include username, password, endpoint, size, encrypted connection, etc. Create a file with the following properties, but insert your chosen password:
quarkus.datasource.db-kind=mssql
quarkus.datasource.username=sa
quarkus.datasource.password=123@Nagesh
quarkus.datasource.jdbc.driver=com.microsoft.sqlserver.jdbc.SQLServerDriver
quarkus.datasource.jdbc.url=jdbc:sqlserver://127.0.0.1:1433;databaseName=TestDB;integratedSecurity=false;encrypt=false;trustServerCertificate=true;
quarkus.datasource.jdbc.max-size=16
quarkus.hibernate-orm.scripts.generation=drop-and-create
quarkus.hibernate-orm.scripts.generation.create-target=import.sql

quarkus.hibernate-orm.log.format-sql=true
quarkus.hibernate-orm.log.sql=true
quarkus.hibernate-orm.sql-load-script=import.sql
quarkus.datasource.users.new-connection-sql=CREATE TABLE IF NOT EXISTS Person (id int8 not null, first_name varchar(255),last_name varchar(255),salutation varchar(255), PRIMARY KEY ( id ))
The structure of the Quarkus project directory is as follows:
├── mvnw
├── mvnw.cmd
├── pom.xml
├── README.md
├── src
│   ├── main
│   │   ├── docker
│   │   │   ├── Dockerfile.jvm
│   │   │   ├── Dockerfile.legacy-jar
│   │   │   ├── Dockerfile.native
│   │   │   └── Dockerfile.native-micro
│   │   ├── java
│   │   │   └── org
│   │   │       └── acme
│   │   │           ├── GreetingResource.java
│   │   │           ├── Person.java
│   │   │           └── PersonResource.java
│   │   └── resources
│   │       ├── application.properties
│   │       ├── container-license-acceptance.txt
│   │       ├── import.sql
│   │       └── META-INF
│   │           └── resources
│   │               └── index.html
│   └── test
│       └── java
│           └── org
│               └── acme
│                   ├── GreetingResourceIT.java
│                   └── GreetingResourceTest.java
└── target
Run the Quarkus application
To run the Quarkus application, go to the quarkus-crud-app application folder on your system as follows:
$ cd quarkus-crud-appThen start Quarkus's Dev Services through the quarkus dev command:
$ quarkus dev[INFO] Scanning for projects...
[INFO]
[INFO] ------------------------< org.acme:mssql-try1 >-------------------------
[INFO] Building mssql-try1 1.0.0-SNAPSHOT
[INFO] --------------------------------[ jar ]---------------------------------
[INFO]
[INFO] --- quarkus-maven-plugin:2.12.3.Final:dev (default-cli) @ mssql-try1 ---
[INFO] Invoking org.apache.maven.plugins:maven-resources-plugin:2.6:resources) @ mssql-try1
[INFO] Using 'UTF-8' encoding to copy filtered resources.
[INFO] Copying 4 resources
[INFO] Invoking io.quarkus.platform:quarkus-maven-plugin:2.12.3.Final:generate-code) @ mssql-try1
[INFO] Invoking org.apache.maven.plugins:maven-compiler-plugin:3.8.1:compile) @ mssql-try1
[INFO] Nothing to compile - all classes are up to date
[INFO] Invoking org.apache.maven.plugins:maven-resources-plugin:2.6:testResources) @ mssql-try1
[INFO] Using 'UTF-8' encoding to copy filtered resources.
[INFO] skip non existing resourceDirectory /home/narathod/Downloads/RHEL_2nd_project/quarkus-crud-mssql-/src/test/resources
[INFO] Invoking io.quarkus.platform:quarkus-maven-plugin:2.12.3.Final:generate-code-tests) @ mssql-try1
[INFO] Invoking org.apache.maven.plugins:maven-compiler-plugin:3.8.1:testCompile) @ mssql-try1
[INFO] Nothing to compile - all classes are up to date
Listening for transport dt_socket at address: 5005
__ ____ __ _____ ___ __ ____ ______
--/ __ \/ / / / _ | / _ \/ //_/ / / / __/
-/ /_/ / /_/ / __ |/ , _/ ,< / /_/ /\ \
--\___\_\____/_/ |_/_/|_/_/|_|\____/___/
2022-12-02 09:46:09,608 INFO [io.quarkus] (Quarkus Main Thread) mssql-try1 1.0.0-SNAPSHOT on JVM (powered by Quarkus 2.12.3.Final) started in 2.719s. Listening on: http://localhost:8080
2022-12-02 09:46:09,625 INFO [io.quarkus] (Quarkus Main Thread) Profile dev activated. Live Coding activated.
2022-12-02 09:46:09,626 INFO [io.quarkus] (Quarkus Main Thread) Installed features: [agroal, cdi, hibernate-orm, hibernate-orm-panache, jdbc-mssql, narayana-jta, reactive-mssql-client, resteasy, resteasy-jsonb, smallrye-context-propagation, vertx]
--
Tests paused
[INFO] ------------------------------------------------------------------------
[INFO] BUILD SUCCESS
[INFO] ------------------------------------------------------------------------
[INFO] Total time: 21.712 s
[INFO] Finished at: 2022-12-02T09:46:23+05:30
[INFO] ------------------------------------------------------------------------
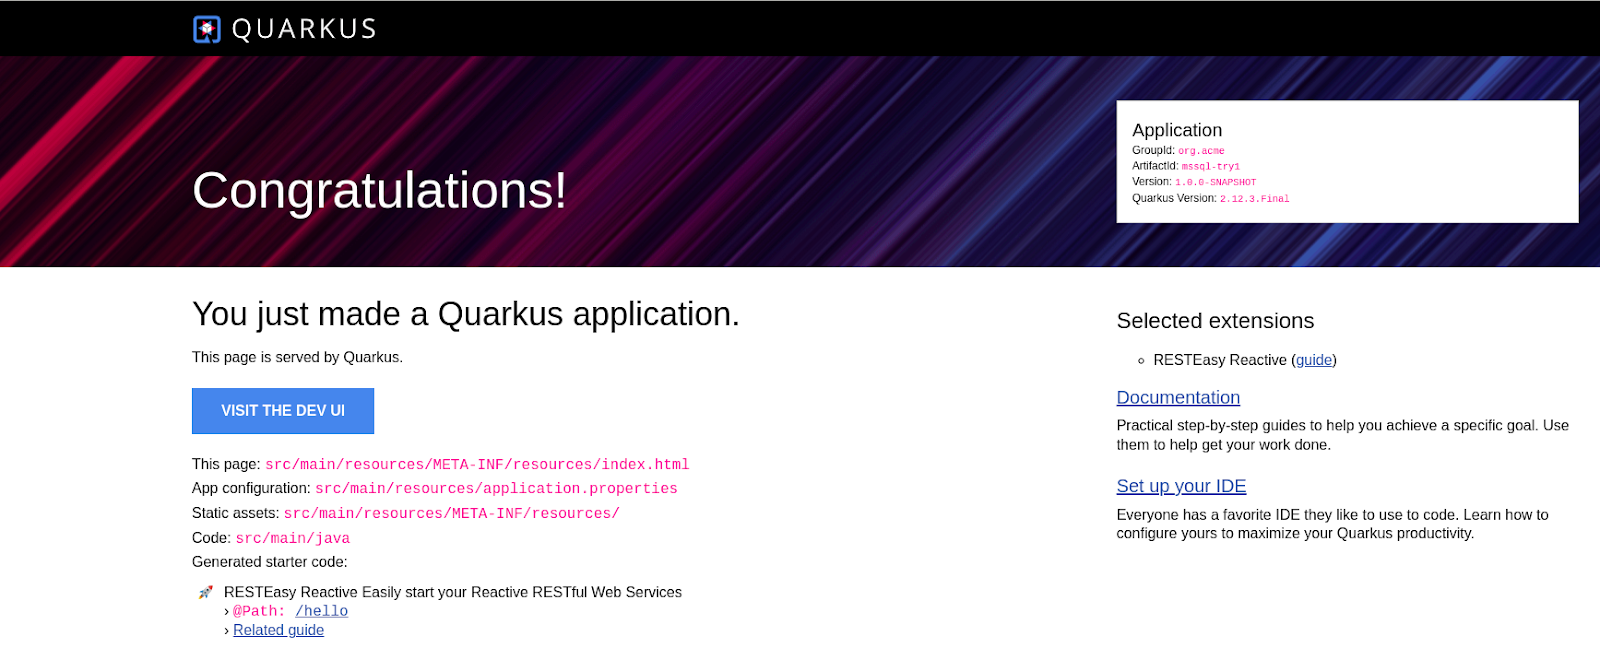
Open your browser and enter this URL: http://localhost:8080. Figure 3 shows the screen that will indicate if your application is running:
Now that the application is running, check out the four CRUD API endpoints. You can use the http or curl command to invoke each operation.
List the information on a person as follows (the implicit command is GET):
$ http :8080/personThe output appears as follows:
HTTP/1.1 200 OK
Content-Type: application/json
Content-length:67

[
   {
       "firstName": "karan",
       "id": 8,
       "lastName": "singh"
       "salutation": "Mr"
   }
]
Create a new person as follows:
$ http POST :8080/person firstName=Carlos lastName=Santana salutation=MrThe output:
HTTP/1.1 200 OK
Content-Type: application/json
Content-length: 68

[
   {
      "firstName": "Carlos",
      "id": 9,
      "lastName": "Santana"
      "salutation": "Mr"
   }
]
You can confirm that the person was created by listing the person as follows:
$ http :8080/personThe output:
HTTP/1.1 200 OK
Content-Type: application/json
Content-length: 136

[
   {
      "firstName": "Carlos",
      "id": 9,
      "lastName": "Santana"
      "salutation": "Mr"
   },
   {
      "firstName": "Karan",
      "id": 8,
      "lastName": "Singh"
      "salutation": "Mr"
   }
]
Update an existing person as follows:
$ http PUT :8080/person/9 firstName=Jimi lastName=HendrixThe output:
HTTP/1.1 200 OK
Content-Type: application/json
Content-length: 66

[
   {
      "firstName": "Jimi",
      "id": 9,
      "lastName": "Hendrix"
      "salutation": "Mr"
   }
]
Confirm that the person's fields were updated by listing the person:
$ http :8080/personThe output looks like this:
HTTP/1.1 200 OK
Content-Type: application/json
Content-length: 134

[
   {
      "firstName": "Jimi",
      "id": 9,
      "lastName": "Hendrix"
      "salutation": "Mr"
   },
   {
      "firstName": "Karan",
      "id": 8,
      "lastName": "Singh"
      "salutation": "Mr"
   }
]
Delete a person as follows:
$ http DELETE :8080/person/9The output appears as follows:
HTTP/1.1 204 No Content

[user@user ~]$ http :8080/person
HTTP/1.1 200 OK
Content-Type: application/json
Content-length: 67

[
   {
      "firstName": "Karan",
      "id": 8,
      "lastName": "Singh"
      "salutation": "Mr"
   }
]
The application sees what we expect it to see after our changes, but to verify the changes in the database, you have to cross-verify them by following these steps:
1. Log into the Microsoft SQL database using this sqlcmd CLI installed earlier:
$ sqlcmd -S localhost -U sa -P '<password>'2. Select the sample database created earlier:
USE TestDB
GO
3. List all rows:
SELECT * FROM Person
GO
The previous statement should produce the result in your terminal shown in Figure 5.
1> USE TestDB
2> GO
Changed database context to 'TestDB'.
1> SELECT * FROM Person
2> GO

id 	first_name	last_name	salutation
----------------------------------------------------------------------------------------------------
----------------------------------------------------------------------------------------------------
----------------------------------------------------------------------------------------------------
8	karan		singh		Mr


(1 rows affected)
1>
Step 4. Containerize the Quarkus application using Podman
Now you can prepare the application for a Kubernetes cloud deployment.
Build the application image
Run the following Maven command to create the image with the dependencies needed by the application:
./mvnw packageYou can use the resulting Dockerfile to build a container that runs the Quarkus application in JVM, native, native-micro, or legacy-jar mode, as needed in your environment. To support these different deployments, Quarkus creates multiple Dockerfiles:
├── mvnw
├── mvnw.cmd
├── pom.xml
├── README.md
├── src
│   ├── main
│   │   ├── docker
│   │   │   ├── Dockerfile.jvm
│   │   │   ├── Dockerfile.legacy-jar
│   │   │   ├── Dockerfile.native
│   │   │   └── Dockerfile.native-micro
Build the container image in JVM mode using Podman:
$ podman build -f src/main/docker/Dockerfile.jvm -t quarkus/quarks-crud-app .Run the Quarkus container
Run the container with podman run on port 8080. Specify the host network through the --network=host option:
$ podman run -it -p 8080:8080 --network=host quarkus/quarks-crud-app:latestFigure 4 shows that the Podman container is running:

Just as you tested all the API endpoints earlier, issue the GET, POST, PUT, and DELETE commands against the container as follows:
To read an entry, issue a GET:
$ http :8080/personTo create an entry, issue a POST:
$ http POST :8080/person firstName=Carlos lastName=Santana salutation=MrTo update an entry, issue a PUT:
$ http PUT :8080/person/1 firstName=Jimi lastName=HendrixTo delete an entry, issue a DELETE:
$ http DELETE :8080/person/1Quarkus provides built-in tools for database applications
Using Quarkus dramatically reduces the lines of code for common activities such as database queries. This article has demonstrated how easy it is to create a simple REST CRUD service. Moving your application to Kubernetes is just a matter of adding another extension to the build process. Thanks to Quarkus's Dev Services, you can even quickly prototype without installing extra services such as databases. Minimizing the amount of boilerplate code makes your application easier to maintain and allows you to focus on implementing the business case. This is why I fell in love with Quarkus.
You can find more information about creating database applications with Quarkus by reading the following articles:
Last updated: October 8, 2024