Kubernetes is great at automating the deployment, monitoring, and scaling of applications. Whatever you want Kubernetes to control—a service, deployment, etc.—is called a resource. This article shows you how to extend Kubernetes's capabilities by writing a Custom Resource Definition (CRD) and an Operator in Java.
CRDs specify how to install, monitor, and manage resources, whereas Operators are agents that actually carry all that out. The usual language for writing an Operator is Go. But most Java teams prefer to keep all their code in Java: they want to avoid doing a deep dive into a new language, and to maintain a unified environment without supporting two sets of tools and practices.
This article explains how to create a CRD and Operator in Java, complete with sample Java code and YAML specification files. We'll use the Java Operator SDK, the Fabric8 Kubernetes Java client, and a brand new CRD-to-Java mapping generator.
If you'd like to extend Kubernetes with Java, you are in the right place. If you are just curious about the concepts described so far, you are also welcome to continue.
You can find the code sample used in this article in the jdevspace Github project.
What is a Custom Resource Definition?
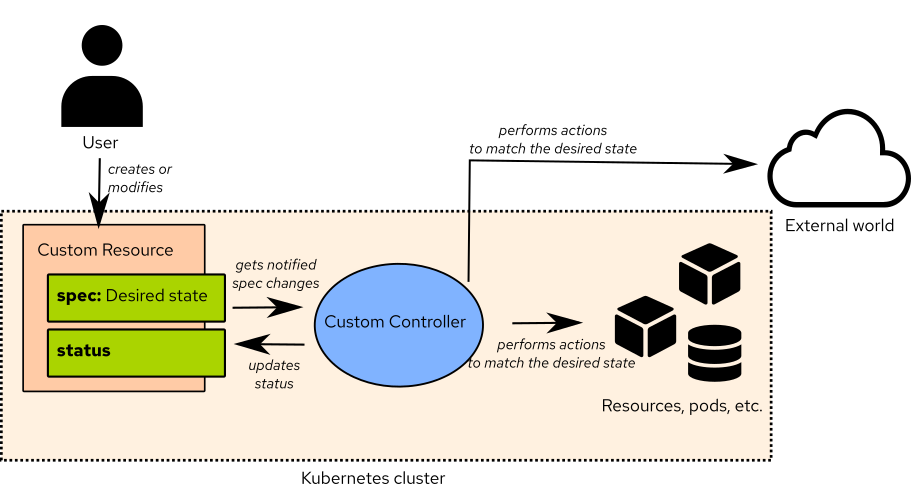
When deploying an application to a Kubernetes cluster, you create a Deployment resource and Kubernetes auto-magically starts your pods and containers in your cluster. The magic is actually executed through controllers, which are processes run by Kubernetes to track the creation and updates of resources. A controller executes the business logic defined by the developer in the resources' specifications, which are normally written in YAML. Controllers can create new pods or perform any other action requested by the developer.
Usually, each controller is in charge of tracking specific kinds of resources. Kubernetes provides built-in resources and built-in controllers. But you can install custom resources and custom controllers on top of Kubernetes. The custom controller is typically provided by an Operator.
Your custom resource (CR) works the same way as the built-in resources. Kubernetes, thanks to its custom controller, auto-magically starts pods or containers or does whatever you say your application needs.
The custom resources are usually defined in Custom Resource Definition (CRD) files that provide schemas written in YAML and describe the structure of a custom resource type. The CRD specifies the desired state of a resource. The custom controller has the responsibility of applying the changes requested by the CRD to the cluster or even outside the cluster.
A CRD can then be registered in the cluster, usually identified by a name. The developer creates a custom resource based on a registered CRD type.
Each custom resource is composed of a spec section written by the developer and a status section updated at runtime by the custom controller to reflect the resource's status or the result of the CRD's actions.
Figure 1 shows how the whole system fits together in a Kubernetes cluster.
CRDs and Operators
As the previous section has shown, Kubernetes is highly customizable. It is possible to extend Kubernetes with CRDs and custom controllers, which in turn are usually bundled into a Kubernetes Operator.
The CRD is the key part of an Operator. The CRD defines the contract between the developer and the Operator—that is, it lays out what a developer can provide to the Operator and what information the Operator returns to the developer.
There are many advantages to a "design by contract" approach in which CRDs are specified independently from the controller implementations. This division of labor makes a system more flexible, interoperable, and modular. CRDs can be used not only by controllers, but also by graphical user interfaces, command-line tools, and other resources.
The developer workspace application
In this article, our goal is to create a custom controller that tracks changes and updates custom resources. For our demo example, I have chosen the DevWorkspace CRD, specified as part of the Devfile API. There is already a DevWorkspace Operator, written in Go. In this article, we will not simply rewrite the Go Operator in Java, but instead will build a fresh Java Operator using the "design by contract" approach.
The DevWorkspace Operator and the Devfile API come from the Eclipse Che project. These Operators allow developers to generate on-demand developer environments in a Kubernetes cluster with a Kubernetes resource that describes a workspace. When a developer creates a DevWorkspace resource in a cluster, the DevWorkspace Operator starts a pod, clones the project, and starts containers for the developer environment, including a web IDE.
A DevWorkspace resource contains information such as the projects to clone, the containers that build and run your cloud-native application, the Web IDE, etc. More information about the DevWorkspace Operator can be found in CodeReady Workspaces scales up, is now Red Hat OpenShift Dev Spaces, an article on Red Hat Developer from Mario Loriedo.
In this article, you will register the DevWorkspace CRDs and start a custom controller in Quarkus development mode. The custom controller doesn't implement a complete DevWorkspace controller, but demonstrates how to perform the basic operations a controller should be able to do on creation or update of a DevWorspace resource:
- Read the content from the
DevWorkspaceresourcespecsection. - Update the
statussection of theDevWorkspaceresource.
Registering the Java CRD
To start, set up your development cluster. To work on a custom controller, the CRDs have to be registered in your cluster. Note that this step would be automated for downstream developers during the installation phase of the Operator.
To register the CRDs on my freshly installed minikube installation, I run:
$ kubectl apply -f https://github.com/devfile/api/raw/main/crds/workspace.devfile.io_devworkspacetemplates.yaml
$ kubectl apply -f https://github.com/devfile/api/raw/main/crds/workspace.devfile.io_devworkspaces.yaml
After you have the CRDs on your cluster, you should be able to create a new DevWorkspace resource based on the corresponding CRD as follows.
- Create a new file named
mydevworkspace.yamlwith the following content:kind: "DevWorkspace" apiVersion: "workspace.devfile.io/v1alpha2" metadata: name: mydevworkspace spec: started: true routingClass: 'openshift-auth' template: projects: - name: "devworkspace-spec" git: remotes: origin: "https://github.com/che-incubator/devworkspace-api" checkoutFrom: revision: "master" - Create the custom resource in the cluster:
$ kubectl apply -f mydevworkspace.yaml - Display the created custom resource:
$ kubectl get DevWorkspace -o yamlapiVersion: v1 items: - apiVersion: workspace.devfile.io/v1alpha2 kind: DevWorkspace metadata: annotations: kubectl.kubernetes.io/last-applied-configuration: | {"apiVersion":"workspace.devfile.io/v1alpha2","kind":"DevWorkspace","metadata":{"annotations":{},"name":"mydevworkspace","namespace":"default"},"spec":{"routingClass":"openshift-auth","started":true,"template":{"projects":[{"git":{"checkoutFrom":{"revision":"master"},"remotes":{"origin":"https://github.com/che-incubator/devworkspace-api"}},"name":"devworkspace-spec"}]}}} creationTimestamp: "2022-09-15T08:28:54Z" generation: 1 name: mydevworkspace namespace: default resourceVersion: "111514" uid: b8d37753-1352-4e55-9d02-143ef2b72004 spec: routingClass: openshift-auth started: true template: projects: - git: checkoutFrom: revision: master remotes: origin: https://github.com/che-incubator/devworkspace-api name: devworkspace-spec kind: List metadata: resourceVersion: ""
The output of the previous command shows that the DevWorkspace resource has been created, but nothing is happening. The created resource looks like the one you defined in the mydevworkspace.yaml file., but some annotations have been added and there is no status section. This result is normal, because you don't have any controller installed for that kind of resource.
So your next step is to create a custom controller. The controller registers the CR creation and modification events. It then acts according to the CR specifications. Finally, it updates the CR status section.
The Java Operator SDK
Normally, a custom controller is created using the Kubernetes Operator SDK. There are several ways to achieve this using Go, Helm, or Ansible. But none of these methods is easy for developers coming from the Java world. It should be possible to run the controller in any language because the controller interacts with Kubernetes through a REST API.
In the Java landscape, the Fabric8 Kubernetes Java client is the best Java interface to the Kubernetes API. However, that client offers a quite low-level API, so you would have to implement a lot of plumbing.
An important advance is described in the excellent article Write Kubernetes in Java with the Java Operator SDK by my colleague at Red Hat, Chris Laprun. His team is working on the Java Operator SDK, which is the equivalent of the default Go-based Operator SDK. The Java Operator SDK uses the Fabric8 Kubernetes Java client behind the scenes and should help you write your custom Operator very easily, with style, and in Java. Let's give it a try.
Your first custom controller in Java
After installing the Operator SDK, let's bootstrap a new project as described in Chris's article. In the following examples, I take the version v1alpha1 and the domain workspace.devfile.io from the DevWorkspace CRD files.
Generate the project skeleton by using the Operator SDK Quarkus plugin:
$ operator-sdk init --plugins quarkus --domain workspace.devfile.io --project-name jdevspace
Create new DevWorkspace resource Java types:
$ operator-sdk create api --version v1alpha1 --kind DevWorkspace
The directory structure of our new DevWorkspace Java Operator project should look like this:
.
├── Makefile
├── pom.xml
├── PROJECT
└── src
└── main
├── java
│ └── jdevspace
│ └── eclipse
│ └── org
│ ├── DevWorkspace.java
│ ├── DevWorkspaceReconciler.java
│ ├── DevWorkspaceSpec.java
│ └── DevWorkspaceStatus.java
└── resources
└── application.properties
7 directories, 8 files
You should now take the special step of disabling generation of the container image, because you don't need it during development. Simply set quarkus.container-image.build to false in src/main/resources/application.properties.
Now edit the DevWorkspaceReconciler.java file. The reconciler object is the core part of the controller, responsible for enforcing the desired state in the custom resource state on the actual state of the system. The reconcile method is triggered each time a modification or creation of a Custom Resource is invoked. For now, include just a trivial method that prints the name of the custom resource to your terminal:
package io.devfile.workspace;
import io.fabric8.kubernetes.client.KubernetesClient;
import io.javaoperatorsdk.operator.api.reconciler.Context;
import io.javaoperatorsdk.operator.api.reconciler.Reconciler;
import io.javaoperatorsdk.operator.api.reconciler.UpdateControl;
public class DevWorkspaceReconciler implements Reconciler<DevWorkspace> {
private final KubernetesClient client;
public DevWorkspaceReconciler(KubernetesClient client) {
this.client = client;
}
@Override
public UpdateControl<DevWorkspace> reconcile(DevWorkspace resource, Context context) {
System.out.println("Hello " + resource.getMetadata().getName());
return UpdateControl.noUpdate();
}
}
To give the controller a try, start Quarkus in dev mode. The runtime should run your controller locally and use your existing kubectl session to interact with the Kubernetes API. (In the real world, the controller would run in its own pod and container.)
$ mvn quarkus:dev
Unfortunately, at this point you'll encounter an exception at startup:
Caused by: com.fasterxml.jackson.databind.exc.UnrecognizedPropertyException: Unrecognized field "routingClass" (class io.devfile.workspace.DevWorkspaceSpec), not marked as ignorable (0 known properties: ])
This error arises because the CRD requires a routingClass field that is not implemented in your CRD Java mapping. We will fix this problem later on.
To proceed in the absence of the solutions, load an empty DevWorkspace resource:
# deleting the existing DevWorkspace resource
kubectl delete DevWorkspace mydevworkspace
# creating a new one with just the name
cat <<EOF | kubectl apply -f -
kind: "DevWorkspace"
apiVersion: "workspace.devfile.io/v1alpha2"
metadata:
name: simpledevworkspace
EOF
Restart Quarkus dev mode by pressing the Space key in the appropriate terminal. You should see output like the following:
__ ____ __ _____ ___ __ ____ ______
--/ __ \/ / / / _ | / _ \/ //_/ / / / __/
-/ /_/ / /_/ / __ |/ , _/ ,< / /_/ /\ \
--\___\_\____/_/ |_/_/|_/_/|_|\____/___/
2022-07-11 14:46:45,365 INFO [io.jav.ope.Operator] (Quarkus Main Thread) Registered reconciler: 'devworkspacereconciler' for resource: 'class io.devfile.workspace.DevWorkspace' for namespace(s): [all namespaces]
2022-07-11 14:46:45,365 INFO [io.qua.ope.run.AppEventListener] (Quarkus Main Thread) Quarkus Java Operator SDK extension 3.0.7 (commit: 22fed83 on branch: 22fed8391b7b153616bd79c5f829cdd8a7edd5bd) built on Thu Apr 07 16:13:21 CEST 2022
2022-07-11 14:46:45,366 INFO [io.jav.ope.Operator] (Quarkus Main Thread) Operator SDK 2.1.4 (commit: 5af3fec) built on Thu Apr 07 10:31:06 CEST 2022 starting...
2022-07-11 14:46:45,366 INFO [io.jav.ope.Operator] (Quarkus Main Thread) Client version: 5.12.2
2022-07-11 14:46:45,517 INFO [io.quarkus] (Quarkus Main Thread) jdevspace 0.0.1-SNAPSHOT on JVM (powered by Quarkus 2.7.5.Final) started in 0.725s. Listening on: http://localhost:8080
2022-07-11 14:46:45,518 INFO [io.quarkus] (Quarkus Main Thread) Profile dev activated. Live Coding activated.
2022-07-11 14:46:45,519 INFO [io.quarkus] (Quarkus Main Thread) Installed features: [cdi, kubernetes, kubernetes-client, micrometer, openshift-client, operator-sdk, smallrye-context-propagation, smallrye-health, vertx]
2022-07-11 14:46:45,519 INFO [io.qua.dep.dev.RuntimeUpdatesProcessor] (Aesh InputStream Reader) Live reload total time: 0.758s
Hello simpledevworkspace
The Hello simpledevworkspace message is logged from our controller, showing that it is working.
CRD-to-Java type mapping with the Fabric8 Kubernetes client
Your controller is currently working with an empty DevWorkspace resource. Now you face a big job: To implement the DevWorkspace resource.
Done manually, this task is enormous. For instance, to support just the isStarted field of the specification, your DevWorkspaceSpec class would look like this:
package io.devfile.workspace;
public class DevWorkspaceSpec {
private Boolean started;
public Boolean getStarted() {
return started;
}
public void setStarted(Boolean started) {
this.started = started;
}
}
It looks like it would be too complicated to implement the whole Java class mapping for your custom resource. Luckily, there are a few options to cut down on development effort.
One option is to create a fabric8-kubernetes-client extension. An extension consists of a Go script that converts the CRD types to Java. Each extension would generate its own Maven artifact to be used in the project. Some examples can be found in the Kubernetes client extensions repository.
This article doesn't pursue this option; remember, we've decided that we don't want to write or maintain any Go code. Furthermore, if your CRD is already implemented as an extension in fabric8-kubernetes-client, you would need to follow the release cadence to get changes.
The option adopted in this article is to use the very new CRD-to-Java type generator in the 6.0.0 release of the Fabric8 Kubernetes client. Kudos to Andrea Peruffo for this amazing contribution. The 6.0.0 version has just been released, and the CRD-to-Java type generator is just one of its great features. You can learn more about these features in the article New HTTP clients, a Java generator, and more in Fabric8 6.0.0 by Steven Hawkins.
This article deploys the new CRD-to-Java type generator as a Maven plugin and attaches it to the generate-sources phase of your project to auto-magically generate the Java types for your CRD files.
The CRD-to-Java type generator in action
In this section, we follow the guide provided to generate the Java types from the DevWorkspace CRD files.
Download the DevWorkspace CRD files to src/main/resources/kubernetes:
$ mkdir src/main/resources/kubernetes
$ cd src/main/resources/kubernetes
$ wget https://github.com/devfile/api/raw/main/crds/workspace.devfile.io_devworkspacetemplates.yaml
$ wget https://github.com/devfile/api/raw/main/crds/workspace.devfile.io_devworkspaces.yaml
$ cd -
Add the generator Maven plugin to the project's build/plugins section of pom.xml:
<plugin>
<groupId>io.fabric8</groupId>
<artifactId>java-generator-maven-plugin</artifactId>
<version>6.0.0</version>
<executions>
<execution>
<goals>
<goal>generate</goal>
</goals>
</execution>
</executions>
<configuration>
<source>src/main/resources/kubernetes</source>
</configuration>
</plugin>
<plugin>
<!-- a hint for IDE's to add the java sources to the classpath -->
<groupId>org.codehaus.mojo</groupId>
<artifactId>build-helper-maven-plugin</artifactId>
<executions>
<execution>
<id>generate-sources-config</id>
<phase>generate-sources</phase>
<goals>
<goal>add-source</goal>
</goals>
<configuration>
<sources>
<source>${project.build.directory}/generated-sources/java/</source>
</sources>
</configuration>
</execution>
</executions>
</plugin>
Also list the plugin in the dependencies:
<dependency>
<groupId>javax.validation</groupId>
<artifactId>validation-api</artifactId>
<version>2.0.1.Final</version>
<scope>provided</scope>
</dependency>
Now run one of the following commands:
$ mvn java-generator:generate
$ mvn clean package
You should see the appropriate files generated in the target/generated-sources/java folder. A subset of the generated files is shown in the following tree:
target/generated-sources/java/io/devfile/workspace/v1alpha1/
├── DevWorkspace.java
├── devworkspacespec
│ ├── template
│ └── Template.java
├── DevWorkspaceSpec.java
├── devworkspacestatus
│ └── Conditions.java
├── DevWorkspaceStatus.java
├── DevWorkspaceTemplate.java
├── devworkspacetemplatespec
│ ├── commands
│ ├── Commands.java
│ ├── components
│ ├── Components.java
│ ├── Events.java
│ ├── parent
│ ├── Parent.java
│ ├── projects
│ ├── Projects.java
│ ├── starterprojects
│ └── StarterProjects.java
└── DevWorkspaceTemplateSpec.java
9 directories, 13 files
The extent of generated files is enormous. The procedure in this section is certainly a big improvement over creating the whole CRD-to-Java mapping manually.
Custom controller with the generated Java types
Now that you have generated Java types from the CRDs, you no longer need the types created initially, so you can remove the DevWorkspace, DevWorkspaceSpec, and DevWorkspaceStatus Java files from src/main/java. You can also update the DevWorkspaceReconciler class to use the newly generated DevWorkspace classes:
package io.devfile.workspace;
import io.devfile.workspace.v1alpha1.DevWorkspace; <!-- importing the generated class -->
import io.fabric8.kubernetes.client.KubernetesClient;
import io.javaoperatorsdk.operator.api.reconciler.Context;
import io.javaoperatorsdk.operator.api.reconciler.Reconciler;
import io.javaoperatorsdk.operator.api.reconciler.UpdateControl;
public class DevWorkspaceReconciler implements Reconciler<DevWorkspace> {
private final KubernetesClient client;
public DevWorkspaceReconciler(KubernetesClient client) {
this.client = client;
}
@Override
public UpdateControl<DevWorkspace> reconcile(DevWorkspace resource, Context context) {
System.out.println("Hello " + resource.getMetadata().getName() + " started: " + resource.getSpec().getStarted());
return UpdateControl.noUpdate();
}
}
Reconciling a complete custom resource
Start Quarkus dev mode again. The controller should work as previously, but you can now also create a complete DevWorkspace resource:
cat <<EOF | kubectl apply -f -
kind: "DevWorkspace"
apiVersion: "workspace.devfile.io/v1alpha2"
metadata:
  name: mydevworkspace
spec:
  started: true
  routingClass: 'openshift-auth'
  template:
    projects:
      - name: "devworkspace-spec"
        git:
          remotes:
            origin: "https://github.com/che-incubator/devworkspace-api"
          checkoutFrom:
            revision: "master"
EOF
The following message should be logged:
Hello mydevworkspace started: true
A custom controller in Java
Remember, our goal in this article is to implement a custom controller for existing CRDs in Java. That controller should be able to read the resource's spec section and write to its status section. Update your controller accordingly:
package io.devfile.workspace;

import io.devfile.workspace.v1alpha1.DevWorkspace;
import io.devfile.workspace.v1alpha1.DevWorkspaceStatus;
import io.fabric8.kubernetes.client.KubernetesClient;
import io.javaoperatorsdk.operator.api.reconciler.Context;
import io.javaoperatorsdk.operator.api.reconciler.Reconciler;
import io.javaoperatorsdk.operator.api.reconciler.UpdateControl;

public class DevWorkspaceReconciler implements Reconciler<DevWorkspace> {
  private final KubernetesClient client;

  public DevWorkspaceReconciler(KubernetesClient client) {
    this.client = client;
  }

  @Override
  public UpdateControl<DevWorkspace> reconcile(DevWorkspace resource, Context context) {
    if (resource.getSpec().getTemplate() == null || resource.getSpec().getTemplate().getProjects().isEmpty()) {
      return UpdateControl.noUpdate();
    }

    DevWorkspaceStatus status = new DevWorkspaceStatus();
    status.setMessage(
        "Project source " + resource.getSpec().getTemplate().getProjects().get(0).getGit().getRemotes().get("origin"));
    status.setWorkspaceId("my workspace");
    resource.setStatus(status);
    return UpdateControl.updateStatus(resource);
  }
}
This controller will:
- Read the
specsection - Look for the project Git URL
- Write the project Git URL in the resource
statussection
Once you save the file, Quarkus dev mode should automatically retrigger the controller and update the DevWorkspace resources in your cluster. Check for success as follows:
$ kubectl get DevWorkspaces

NAME                   DEVWORKSPACE ID   PHASE   INFO
mydevworkspace                                   Project source https://github.com/che-incubator/devworkspace-api
started-devworkspace
This message shows that the controller works as expected. The output shows the project's Git URL, defined in the spec session and logged in the status of the same resource (INFO is displaying the content of the status section).
Custom resource definitions and Operators can be written fairly easily in Java
To sum up this article, we have written a Kubernetes Operator in Java from existing CRDs as follows:
- We used the Java Operator SDK to write a custom controller.
- Following a contract-first approach, we used the generator from the Fabric8 Kubernetes client to generate the Java types from existing CRDs.
- We implemented a very basic controller with read and write capabilities on a custom resource.
However, many aspects of a custom Operator weren't covered in this article. These tasks include:
- The Operator Lifecycle Manager (OLM), which extends Kubernetes to provide a declarative way to install, manage, and upgrade Operators on a cluster.
- The Operator scope: Should it be covering the resource in a cluster scope or a namespace scope?
- RBAC to manage permissions that an Operator can have on built-in resources or custom resources.
- Starting pods, services, and so on through the DevWorkspace Operator. These functions could be added using the Fabric8 Kubernetes client.
Writing an Operator in Java with a contract-first approach is one of the use cases for the CRD-to-Java type generator. But there are other situations in which the generator could be useful, such as a remote command-line interface (CLI) to manage or configure an Operator, and a Java IDE plugin to browse and edit custom resources in a remote cluster.
We would love to get feedback from you. You can create an issue on the Github repos for the CRD to Java generator or the Java Operator SDK. You could also post a comment on this article or just let us know that you love our work in our community Gitter channel.
Last updated: September 19, 2023