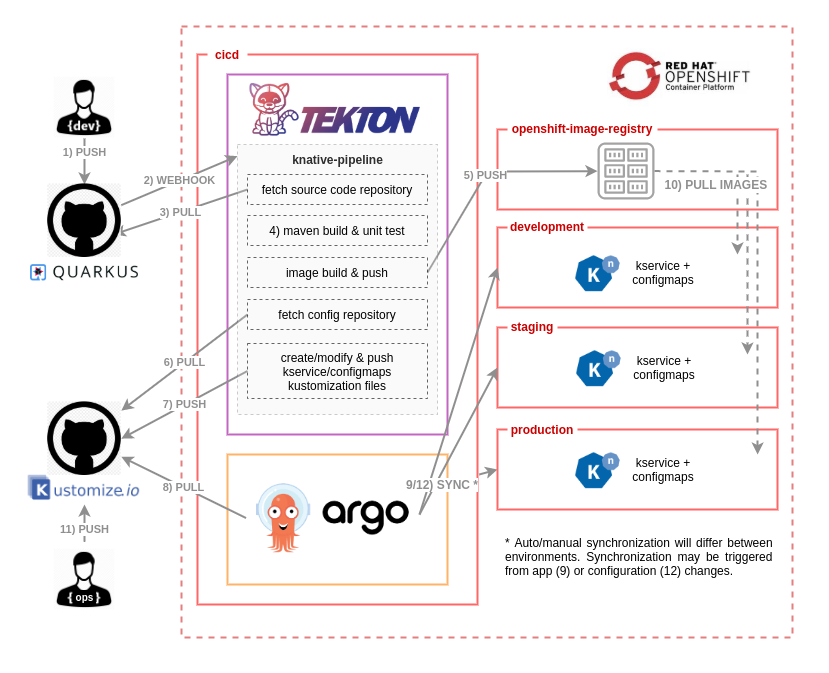
In the first half of this article, I introduced Tekton as a framework for cloud-native CI/CD pipelines, and Argo CD as its perfect partner for GitOps on Red Hat OpenShift. Our example for the demonstration is a Knative service that deploys and serves a Quarkus application. Our goal is to develop a complete continuous integration and delivery process, which begins when a commit is initiated in the application’s GitHub repository and ends with the new application version deployed in the development, staging, and production environments.
In Part 1, we used Tekton to implement the workflow's continuous integration (CI) tasks. Now, we will complete the CI/CD process by implementing the continuous delivery (CD) tasks with Argo CD. As a refresher, consider the CI/CD workflow diagram in Figure 1.
Note: I recommend reading the first half of this article before continuing with Part 2. All of the discussions and examples here are based on the demo application and workflow that we developed in Part 1.
In Part 2, we will add the power of Argo CD to fully automate the deployment of the application. Argo CD will pull the changes from the Kustomize files that were pushed by the CI pipeline into the -deployment repository, and synchronize those changes in the target namespaces. As the last step of our automation, we will define a Tekton Trigger that will ignite the CI/CD workflow.
Get started with Argo CD
Argo CD is becoming popular these days. As a first-class citizen in the Kubernetes ecosystem, it facilitates the adoption of GitOps, where teams leverage declarative configuration and infrastructure definitions from Git as the single source of truth. We've already developed the Tekton tasks for our CI/CD workflow. Could Argo CD be the perfect fit for what is missing in our current workflow?
Install Argo CD
Open your OpenShift web console and navigate to the cicd namespace for our demonstration workflow. Use the following script to install the Argo CD Operator:
$ ./bootstrap-argo.sh cicd
------------------------------
Installing argo operator
Release "argocd" does not exist. Installing it now.
NAME: argocd
LAST DEPLOYED: Thu Sep 10 18:37:23 2020
NAMESPACE: default
STATUS: deployed
REVISION: 1
TEST SUITE: None
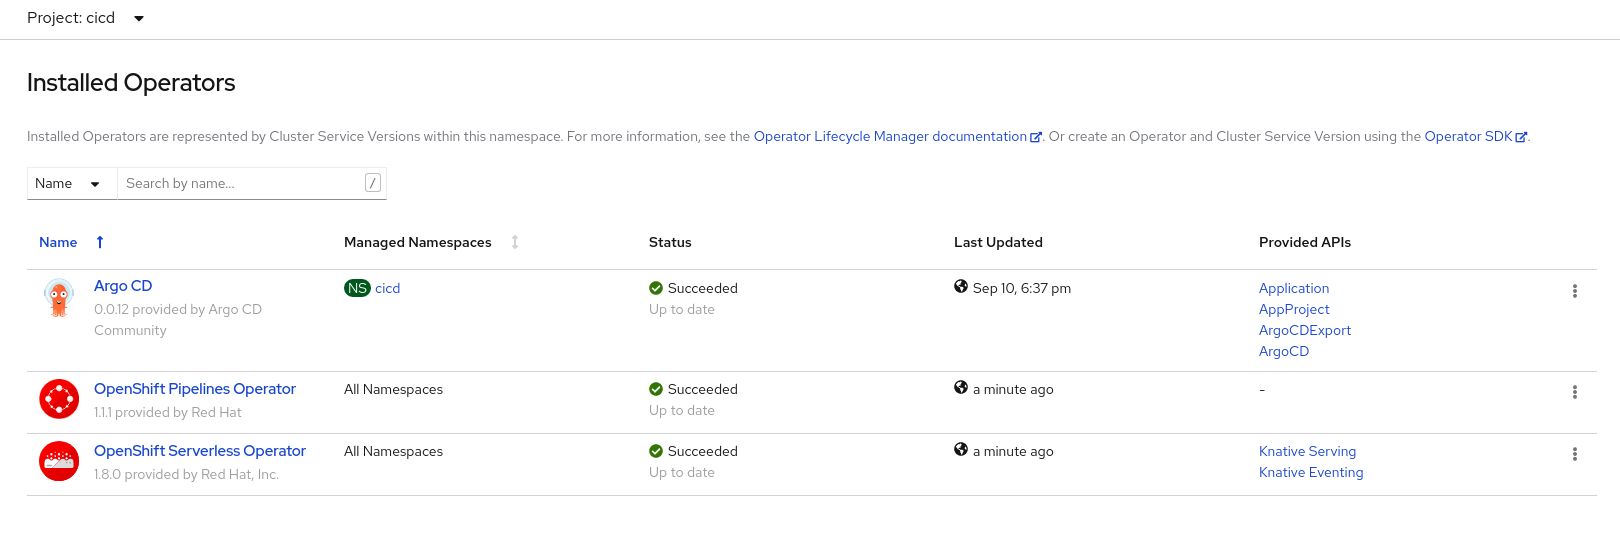
As shown in Figure 2, you should see a new Operator installed in the cicd namespace:
Create an Argo CD instance
Next, create an Argo CD instance. This instance will manage all of the AppProjects and Applications that we've created under the cicd namespace. Running the following script creates:
- An Argo CD instance in the
cicdnamespace. - An AppProject called
rh-developers. - Three applications under the
rh-developersAppProject. Each application references the deployment repository in the master branch. The applications are aligned with the development, staging, and production folders, respectively.
Execute the following (do not forget to use your own quarkus-hello-world-deployment repository):
$ ./add-argo-apps.sh cicd rh-developers https://github.com/dsanchor/quarkus-hello-world-deployment.git master
----------------------------------------------------------------------------------------------------------------
Installing basic Argo CD server instance
argocd.argoproj.io/argocd created
Adding edit role to argocd-application-controller ServiceAccount in projects development, staging and production
rolebinding.rbac.authorization.k8s.io/edit-rh-developers-dev created
rolebinding.rbac.authorization.k8s.io/edit-rh-developers-staging created
rolebinding.rbac.authorization.k8s.io/edit-rh-developers-production created
Creating rh-developers AppProject in namespace cicd
appproject.argoproj.io/rh-developers created
Creating Applications in namespace cicd in rh-developers AppProject
application.argoproj.io/quarkus-hello-world-development created
application.argoproj.io/quarkus-hello-world-staging created
application.argoproj.io/quarkus-hello-world-production created
Enter the Argo CD route, which you need in order to access the main Argo CD dashboard:
$ oc get routes argocd-server -n cicd
---------------------------------------
NAME            HOST/PORT                                             PATH   SERVICES        PORT    TERMINATION            WILDCARD
argocd-server   argocd-server-cicd.apps.ocp4.mydomain.com          argocd-server   https   passthrough/Redirect   None
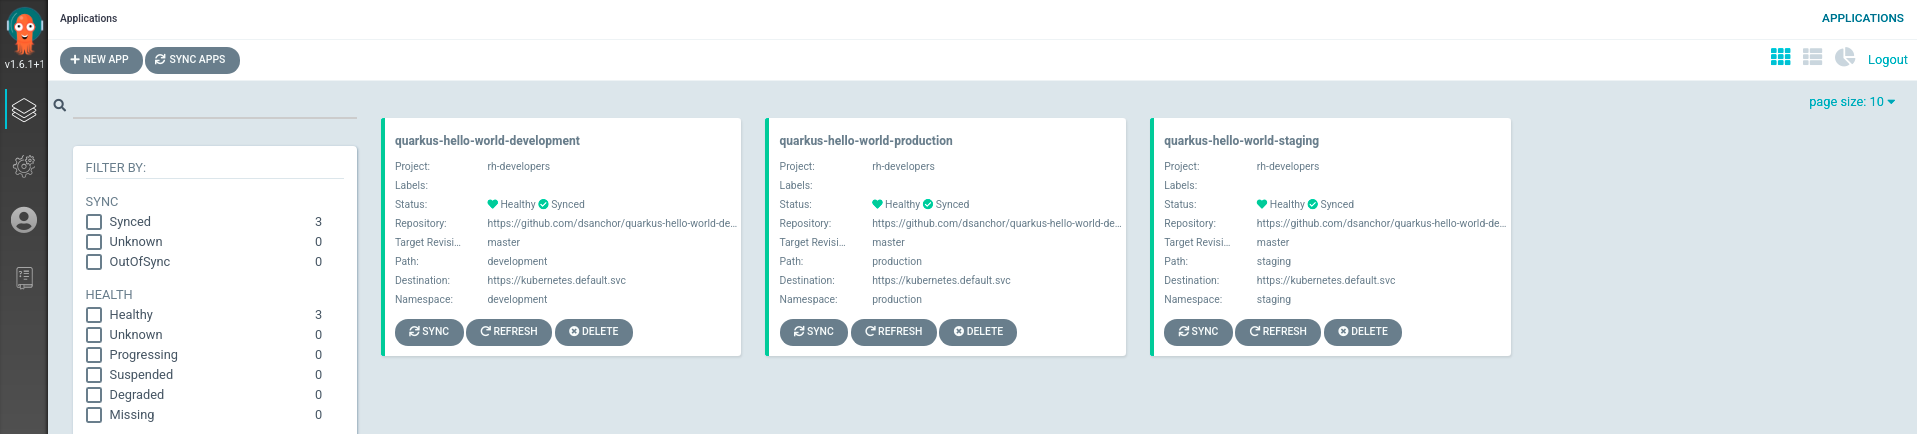
Wait until the Argo CD server is running, then log in using your OpenShift credentials. And, voilà! You should receive the current status of your applications, as shown in Figure 3.
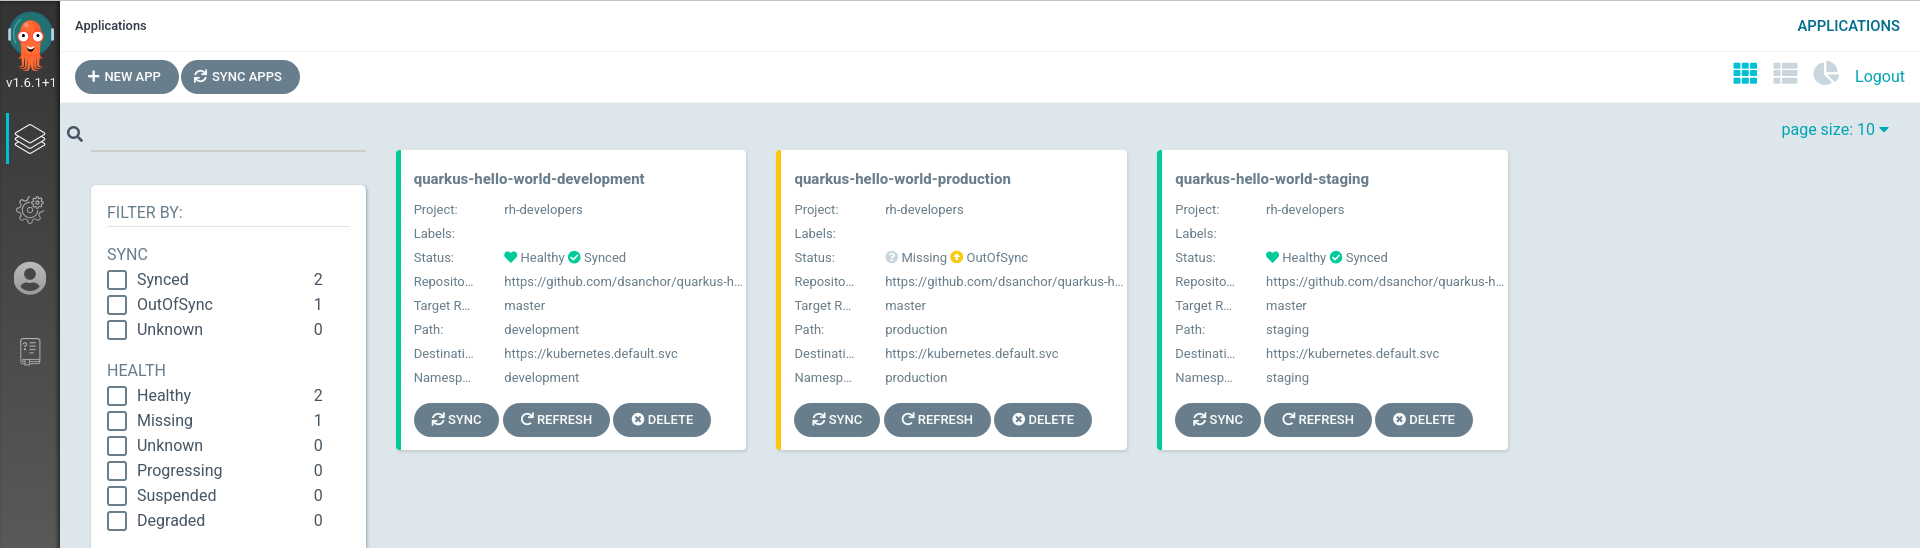
Note: You might observe that both the development and staging applications show their status as Synced, while the production application is OutOfSync. While the first two are configured with auto-sync enabled, we will use manual configuration for production.
Deploy the first application version
In the next sections, we will take our example quarkus-hello-world application through several revisions, which we'll sync through the development, staging, and production stages of the deployment cycle. See Part 1 for more information about the Quarkus application that we are using for this demonstration.
Application version 1 in the development environment
Click on the quarkus-hello-world-development application and you will see that every object in this version has been synced, as shown in Figure 4.

Having all of the objects synced means that the first version of the application was successfully deployed. Now, get the routes, so that we can access the service (notice that the ingress routes for Knative services are automatically created in the knative-serving-ingress namespace):
$ oc get routes -n knative-serving-ingress | grep development
--------------------------------------------------------------
route-e387d9ca-9f1b-4c15-9b83-7bea4d2d290c-313361326363   quarkus-hello-world-development.apps.ocp4.mydomain.com                   kourier    http2   edge/Allow    None
route-e387d9ca-9f1b-4c15-9b83-7bea4d2d290c-613962613835   r9ce9024-quarkus-hello-world-development.apps.ocp4.mydomain.com          kourier    http2   edge/Allow    None
The get routes command should return at least two routes: The main route (quarkus-hello-world-development.apps.ocp4.mydomain.com) and one for the new revision that we've just deployed (r9ce9024-quarkus-hello-world-development.apps.ocp4.mydomain.com). Note that the main route could have several revisions behind it, but because this is our first deployment, it has only one.
Test both routes and observe the results. If no pod is running, it is because Knative downscales inactive pods. The first request could take longer than usual if it's necessary to re-create the pod.
Add /hello., then use curl to test the endpoint:
$ curl http://quarkus-hello-world-development.apps.ocp4.mydomain.com/hello
hola dev! Yeap!

$ curl http://r9ce9024-quarkus-hello-world-development.apps.ocp4.mydomain.com/hello
hola dev! Yeap!
You can now navigate to the Serverless menu in the OpenShift web console, select the development project, and explore it, as shown in Figure 5.

Application version 1 in the staging environment
Re-enter the Argo CD dashboard and take a look at the staging application. Currently, you should see a single ConfigMap, which is shown in Figure 6.
We only have the ConfigMap because we have not yet created the kustomization.yaml. You might remember from Part 1 that we do have a file named kustomization-REVISION.yaml. In order to synchronize the changes in the REVISION file, you must rename that file and push the changes to Git.
Navigate to the folder where you checked out the deployment repository and run:
$ git pull && \
mv staging/kustomization-r9ce9024.yaml staging/kustomization.yaml && \
git add  staging && git commit -m "Revision 9ce9024 is now active in staging" && \
git push
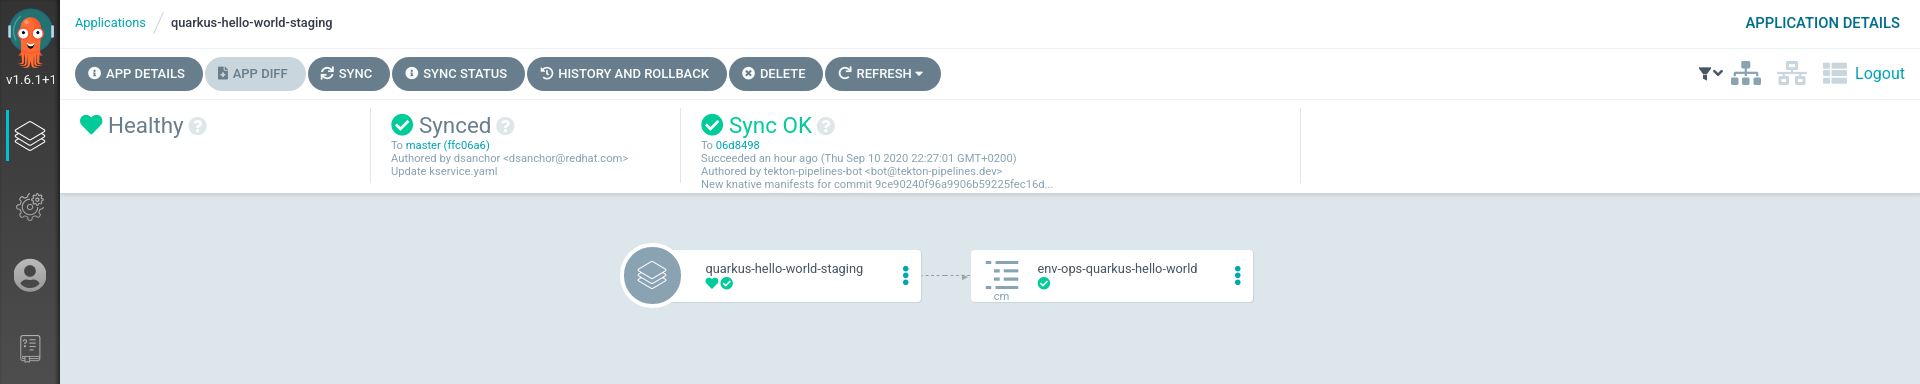
Wait a couple of minutes to let Argo CD synchronize the changes. If you are impatient, you can click Sync to have the revision automatically deployed in staging, as shown in Figure 7.

Just like we did with the development application, get the routes and run a few tests against the staging endpoints:
$ oc get routes -n knative-serving-ingress | grep staging
------------------------------------------------------------
route-fd38a613-ea42-4809-af13-cd02503980bf-346238393864   quarkus-hello-world-staging.apps.ocp4.mydomain.com                       kourier    http2   edge/Allow    None
route-fd38a613-ea42-4809-af13-cd02503980bf-623763373761   r9ce9024-quarkus-hello-world-staging.ocp4.mydomain.com              kourier    http2   edge/Allow    None

$ curl http://quarkus-hello-world-staging.apps.ocp4.mydomain.com/hello
hola staging! Yeap!
$ curl http://r9ce9024-quarkus-hello-world-staging.apps.ocp4.mydomain.com/hello
hola staging! Yeap!
Application version 1 in the production environment
Now, we move the application to production, where we have not set the auto-sync. All of the application candidate's objects are thus OutOfSync, as shown in Figure 8.

Figure 8: Objects in the production environment must be manually synchronized.">
We need manual approval to make the new application version available for synchronization. Execute the same steps we took for the application in staging:
$ git pull && \
mv production/kustomization-r9ce9024.yaml production/kustomization.yaml && \
git add production && git commit -m "Revision 9ce9024 is now ready to be sync in production" && \
git push
Wait a minute or two and you will see the new objects, which are currently marked as OutOfSync, as shown in Figure 9.

If the changes are what you expected, you can do a manual synchronization to deploy the new version in production. Click the Sync button and you will finally get the new version, ready to be tested. That screen is shown in Figure 10.

Now, run a few tests against the production routes, following the same procedure that you used for the development and staging cycles:
$ oc get routes -n knative-serving-ingress | grep production
------------------------------------------------------------
route-8c948175-70a8-4c1c-ae70-846aa3b2081f-643262313638   quarkus-hello-world-production.apps.ocp4.mydomain.com                    kourier    http2   edge/Allow    None
route-8c948175-70a8-4c1c-ae70-846aa3b2081f-663561353830   r9ce9024-quarkus-hello-world-production.apps.ocp4.mydomain.com           kourier    http2   edge/Allow    None

$ curl http://quarkus-hello-world-production.apps.ocp4.mydomain.com/hello
hola production! Yeap!
$ curl http://r9ce9024-quarkus-hello-world-production.apps.ocp4.mydomain.com/hello
hola production! Yeap!
As shown in Figure 11, all of the Argo CD applications are now in sync.
Deploy a new version of the application
Now, let's see what happens when we deploy a new version of our quarkus-hello-world application. In this case, we will simply run the CI/CD pipeline again with a different commit ID. Note that we're still triggering the pipeline manually for now. We will introduce webhooks to the pipeline in the last part of the article.
Navigate to the rh-developers-cicd repo and trigger the pipeline using the following parameters:
$ cat tekton/pipelines/knative-pipeline-run.yaml | \
  SOURCE_REPO=https://github.com/dsanchor/quarkus-hello-world.git \
  COMMIT=c076ee940b1f1d9576b7af3250bbbd7114e82263 \
  SHORT_COMMIT=c076ee9 \
  DEPLOYMENT_REPO=https://github.com/dsanchor/quarkus-hello-world-deployment.git \
  IMAGES_NS=cicd envsubst | \
  oc create -f - -n cicd
------------------------------------------------------------------------------------
pipelinerun.tekton.dev/knative-pipeline-run-j5knc created
If you prefer to start the pipeline using the tkn CLI, run the following:
$ tkn pipeline start knative-pipeline -p application=quarkus-hello-world \
  -p source-repo-url=https://github.com/dsanchor/quarkus-hello-world.git \
  -p source-revision=c076ee940b1f1d9576b7af3250bbbd7114e82263 \
  -p short-source-revision=c076ee9 \
  -p deployment-repo-url=https://github.com/dsanchor/quarkus-hello-world-deployment.git \
  -p deployment-revision=master \
  -p dockerfile=./src/main/docker/Dockerfile.jvm \
  -p image-registry=image-registry.openshift-image-registry.svc.cluster.local:5000 \
  -p image-repository=cicd \
  -w name=source,claimName=source-pvc \
  -w name=maven-settings,config=maven \
  -w name=knative-kustomize-base,config=knative-kustomize-base \
  -w name=knative-kustomize-environment,config=knative-kustomize-environment \
  -n cicd
Note: The pipeline's execution could take up to five minutes. In the meantime, I recommend reading this article about speeding up Maven builds in Tekton.
When the pipeline has finished, we will have pushed a new image—quarkus-hello-world:c076ee940b1f1d9576b7af3250bbbd7114e82263—into the OpenShift internal registry under the cicd namespace. We'll also have pushed the new Kustomization files to the quarkus-hello-world-deployment repository.
Execution logs
Checking the pipeline's execution logs lets us see the changes that we are pushing to Git. Notice the logs for the push-knative-manifest task, in particular:
add 'development/kustomization.yaml'
remove 'development/r9ce9024/configmap.yaml'
remove 'development/r9ce9024/revision-patch.yaml'
remove 'development/r9ce9024/routing-patch.yaml'
add 'development/rc076ee9/configmap.yaml'
add 'development/rc076ee9/revision-patch.yaml'
add 'development/rc076ee9/routing-patch.yaml'
add 'production/kustomization-rc076ee9.yaml'
add 'production/rc076ee9/configmap.yaml'
add 'production/rc076ee9/revision-patch.yaml'
add 'production/rc076ee9/routing-patch.yaml'
add 'staging/kustomization-rc076ee9.yaml'
add 'staging/rc076ee9/configmap.yaml'
add 'staging/rc076ee9/revision-patch.yaml'
add 'staging/rc076ee9/routing-patch.yaml'
In summary:
- The new revision is accessible in
developmentby overriding thekustomization.yamlfile, which references the new revision resources. Notice that there is no change in thetraffic-routing.yaml, so we will keep any existing routing rules. (As an example, we might keep the blue/green or canary routing rules configured from previous iterations, if any.) - We only add a new route for the new revision, and we remove any references to previous routes. The main route might still contain a reference to the previous revision, in which case that revision would be temporarily accessible through the main route. Once a revision becomes non-routeable, Knative eventually (after a predetermined amount of time) garbage collects it. Using Knative serving means less maintenance and operation, which makes us happier.
- We also create the necessary Kustomize files for this new revision in the staging and production environments, but they are not yet referenced by the
kustomization.yaml.
Application version 2 in the development environment
We have a new Knative service revision, but the main route still targets the previous application, as shown in Figure 12.

Get the current routes for the application running in the development environment:
$ oc get routes -n knative-serving-ingress | grep development
--------------------------------------------------------------
route-e387d9ca-9f1b-4c15-9b83-7bea4d2d290c-313361326363   quarkus-hello-world-development.apps.ocp4.mydomain.com                   kourier    http2   edge/Allow    None
route-e387d9ca-9f1b-4c15-9b83-7bea4d2d290c-353136303164   rc076ee9-quarkus-hello-world-development.apps.ocp4.mydomain.com          kourier    http2   edge/Allow    None
Test both and you will notice that the main route targets the previous revision:
$ curl http://quarkus-hello-world-development.apps.ocp4.mydomain.com/hello
hola dev! Yeap!

$ curl rc076ee9-quarkus-hello-world-development.apps.ocp4.mydomain.com/hello
hola dev! Nice to see you back!
If you want to add traffic to the new revision under the main route, simply modify the traffic-routing.yaml. Navigate to the quarkus-hello-world-deployment repository and do a git pull. Then, switch to the development folder and edit the traffic-routing.yaml file.
Change the file from this:
- op: add
  path: /spec/traffic
  value:
    - revisionName: quarkus-hello-world-r9ce9024
      percent: 100
To this:
- op: add
  path: /spec/traffic
  value:
    - revisionName: quarkus-hello-world-r9ce9024
      percent: 50
    - revisionName: quarkus-hello-world-rc076ee9
      percent: 50
Then push the changes:
$ git add development/traffic-routing.yaml && git commit -m "Splitted traffic between r9ce9024 %50 and rc076ee9 50" && \
git push
In two minutes or less, Argo CD will automatically synchronize those changes, or you can force a manual sync if you want to apply the change immediately.
If you check the main route, you will now see that it returns responses from both revisions:
$ watch -n1 curl http://quarkus-hello-world-production.apps.ocp4.mydomain.com/hello
If you want to ensure that traffic does not go to any old application versions, just remove that version from the traffic-routing.yaml file. Knative will eventually garbage collect it, which you can test on your own.
Application version 2 in the staging environment
We have not yet received a new revision or route in the staging environment. The reason is that the CI pipeline has not changed the kustomization.yaml file. Instead, it just created a possible candidate: kustomization-REVISION.yaml.
Let's deploy this new version (mv staging/kustomization-rc076ee9.yaml staging/kustomization.yaml). We'll configure the same routing that we used in development, splitting the traffic between our two current revisions:
$ git pull && \
mv staging/kustomization-rc076ee9.yaml staging/kustomization.yaml && \
cp development/traffic-routing.yaml staging/traffic-routing.yaml && \
rm -rf staging/r9ce9024 && \
git add  staging && git commit -m "Split traffic between r9ce9024 %50 and  rc076ee9 50%" && \
git push
Notice that we also removed an older revision folder (rm -rf staging/r9ce9024). The CI pipeline did this automatically for development, but not for staging or production. Removing that older revision differentiates development from the other two environments in the demo.
The application's final result in staging would be the same as in the development environment, as shown in Figure 13.

Test the main route and you should see that you get responses from both Knative service revisions:
$ watch -n1 curl http://quarkus-hello-world-staging.apps.ocp4.mydomain.com/hello
Application version 2 in the production environment
As previously noted, the production scenario differs from staging because auto-synchronization is not set for production. We will perform exactly the same steps that we did in the staging environment and see the results.
$ git pull && \
mv production/kustomization-rc076ee9.yaml production/kustomization.yaml && \
cp staging/traffic-routing.yaml production/traffic-routing.yaml && \
rm -rf production/r9ce9024 && \
git add production && git commit -m "Split traffic between r9ce9024 %50 and rc076ee9 50%" && \
git push
OutOfSync
When you check the Argo CD dashboard, shown in Figure 14, you should observe that quarkus-hello-world-production application is OutOfSync. The Knative service object is the affected object.

Click on the OutOfSync box under quarkus-hello-world and check the DIFF tab, as shown in Figure 15.

The screen in Figure 15 shows the differences between the live manifest and the desired manifest, with the live version being shown on the left. The differences are what we expected, so let's manually sync and deploy the new revision and routing rules in production.
Once synced, test the main route:
$ watch -n1 curl http://quarkus-hello-world-production.apps.ocp4.mydomain.com/hello
Rollback to a previous state
So far, you have seen how to deploy new application versions in every environment. What if you found an unexpected behavior in the latest revision of the application in production? Let's use Argo CD to rollback to a previous application state.
With Argo CD, we can rollback to any code or application revision in the history of our Git repository. For this example, we'll rollback to the previous revision. From the Argo CD dashboard, click on History and Rollback, as shown in Figure 16.

Once you have found the revision that you want to rollback to, click the dotted menu in the top-right corner of the screen, then select the only action that you have: Rollback.

As shown in Figure 17, the result is that the application status is currently OutOfSync, but it's synced with the revision that we selected for rollback. Validate that the rollback worked by running tests:
$ watch -n1 curl http://quarkus-hello-world-production.apps.ocp4.mydomain.com/hello
You should be able to confirm that the responses are from the previous application version and not the most recent one.
Note: If you had auto-sync enabled for the production environment, you would need to disable it before executing the rollback. Otherwise, you would be auto-synced again to the latest revision.
Closing the loop: Fully automated CI/CD
So far, we have only triggered the pipeline manually. As the final step in this workflow, we will introduce automation to trigger the pipeline.
I have left this part to the end of the article so that we could use the complete source repository to run the pipeline. We will add a webhook to this repository, which triggers the pipeline automatically when new commits are pushed to the repository.
Before starting, fork the source code repository at https://github.com/dsanchor/quarkus-hello-world.git. We will use it for this final example.
Add a Tekton trigger
On the Tekton side, we will create three different kinds of objects that work together:
In the EventListener, we'll add two interceptors:
- The GitHub interceptor adds a simple check based on a shared token.
- The CEL interceptor applies a basic function to shorten the commit ID and make it available to the pipeline.
As your first step, create a secret with a random token:
$ oc create secret generic webhook --from-literal=token=XXXXXXXXXXXXXX -n cicd
Then, create a common TriggerTemplate and TriggerBinding that will be shared between different applications:
$ oc apply -f tekton/webhook/knative-pipeline-trigger.yaml -n cicd
--------------------------------------------------------------------
triggerbinding.triggers.tekton.dev/webhook-body-binding created
triggertemplate.triggers.tekton.dev/knative-pipeline-template created
Next, create the application-specific EventListener and TriggerBinding. Important: Use your own deployment repository in DEPLOYMENT_REPO_URL:
$ cat tekton/webhook/app-custom-trigger.yaml | \
  GITHUB_SECRET=webhook \
  APPLICATION=quarkus-hello-world \
  NS=cicd \
  DEPLOYMENT_REPO_URL=https://github.com/dsanchor/quarkus-hello-world-deployment \
  DEPLOYMENT_REPO_REVISION=master \
  envsubst | oc apply -f - -n cicd
-------------------------------------------------------------------------------------
eventlistener.triggers.tekton.dev/quarkus-hello-world-listener created
triggerbinding.triggers.tekton.dev/quarkus-hello-world-binding created
Expose the event-listener service, which will be the target endpoint for your webhook in GitHub:
$ oc expose svc el-quarkus-hello-world-listener -n cicd
And get the route:
$ oc get route el-quarkus-hello-world-listener -n cicd
--------------------------------------------------------
NAME                              HOST/PORT                                                               PATH   SERVICES                          PORT            TERMINATION   WILDCARD
el-quarkus-hello-world-listener   el-quarkus-hello-world-listener-cicd.apps.ocp4.mydomain.com          el-quarkus-hello-world-listener   http-listener                 None
Configure a webhook in GitHub
Now, go to your application's GitHub repository. Under Settings, click on Webhooks -> Add Webhooks, as shown in Figure 18.

Add the route as the payload URL, set the content type as JSON, and, finally, copy the token content into the secret box, as shown in Figure 19.

Once you've added these final elements, you should see a single webhook on your screen.
Try it out
I will make a simple change in the GreetingResource class. You must apply the same change in your GreetingResourceTest. In my case, I am changing the last part of the message to "Webhooks work."
After all of the tests pass locally, push your changes to the remote repository:
$ git add src  && \
git commit -m "Changed greeting message" && \
git push
The pipeline should have already started. If you encounter an error, you might want to look at the event listener pod that we created to manage events for the EventListener. To obtain the name of the pod, run:
$ oc get pod -l eventlistener=quarkus-hello-world-listener -n cicd
Wait until the pipeline finishes. Once it's done, you should have a new Knative service revision running in your development environment. You can use the new developer perspective in the OpenShift web console to verify that the Knative service is running. Select the development project and check the topology, as shown in Figure 20.

You should see three different revisions running (although they are all scaled down due to inactivity). The two revisions that we deployed during the first steps of this article are under the same main route, with each managing half of the traffic. The last revision has its own route, which our pipeline created. Let's hit it and see the results:
$ curl r1b644f0-quarkus-hello-world-development.apps.ocp4.mydomain.com/hello
hola dev! Webhooks work!
You can also see that Knative automatically scaled up that revision to one pod, as shown in Figure 21.

Conclusion
This second half of my introduction to building modern CI/CD workflows has introduced you to using Argo CD to implement the continuous delivery side of a serverless CI/CD workflow. Combining Tekton with GitOps, implemented by Argo CD, is an increasingly popular option for fully automated CI/CD. I hope that you have enjoyed this demonstration.
Last updated: October 31, 2023