A previous article showed how to debug a .NET application that is running on Kubernetes from Visual Studio Code (VS Code) on your local development machine. In this tutorial, you'll debug an application that is running in a container right on your development machine.
Use cases
If you plan to deploy your application on Kubernetes, the application will run in a container. Debugging the application in a local container can let you see its behavior in a local environment that is fairly close to the production environment.
Even when you don't intend to deploy your application using containers, running it in a container can be a way to reproduce a bug that is reported to occur only in a specific environment, such as a specific Linux distribution.
Choices for building an image
The image for our debug session needs to provide .NET runtime dependencies. You can build an image yourself or base it on images provided by Microsoft (through runtime images or SDK images) or Red Hat (through runtime images or SDK images).
Red Hat provides Universal Base Images (UBI) for .NET. These are enterprise-grade images that can be freely distributed and deployed anywhere. Take a look at the UBI FAQ or read the e-book Red Hat Universal Base Images (UBI) to learn more.
Prerequisites
If you haven't already, install Visual Studio Code using the instructions on the project's website.
Next, launch VS Code and install the C# extension and Docker extension.
You also need to install a container engine such as Docker or Podman. I'm using Podman, which comes pre-installed on Fedora. The VS Code Docker extension doesn't detect Podman automatically, though. The rest of this section shows how you can configure the use of Podman. If you are using Docker, you can skip to the next section.
First, enable the podman.socket service, which provides a Docker-compatible API:
$ sudo dnf install podman-remote
$ systemctl --user enable --now podman.socket
In VS Code, open the Command Palette by pressing Ctrl+Shift+P and choose Preferences: Open Settings (JSON).
Add the following settings:
{
  "docker.dockerPath": "podman",
  "docker.host": "unix:///run/user/1000/podman/podman.sock"
}
The first setting tells the extension to use the podman executable instead of docker. The other setting provides the path to the API socket. The value 1000 needs to match your user ID (UID). You can see your UID by running id -u.
Debug the application
Open your application folder in VS Code. If you don't have an application, you can create one as follows:
$ dotnet new web -o web
$ cd web
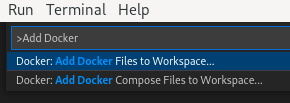
$ code .Now open the Command Palette by pressing Ctrl+Shift+P and choose Docker: Add Docker Files to Workspace.... (Figure 1).
The IDE prompts you with some questions:
- As the application platform, choose .NET ASP.NET Core.
- When prompted to select an operating system, pick your host OS (Windows/Linux).
- Next, specify a comma-separated list of ports to expose. I suggest specifying
5000,8080because those are the ports used by the Microsoft and Red Hat images. - Finally, answer No when asked to add the optional Docker Compose file.
The IDE will add a debug configuration to .vscode/launch.json to launch the application in a container. The .vscode/tasks.json file contains a few tasks that are used in this process:
The docker-run: debugtask launches the container.The docker-build: debugtask builds the container.- The usual
buildtask builds the application on the host.
The docker-build step uses the Dockerfile that was added to the workspace. The base image defined in this file is used for debugging. Change the configuration to use a UBI image by replacing all the lines starting with the FROM … as build line with the following:
FROM registry.access.redhat.com/ubi8/dotnet-60-runtime AS baseIf you're not using .NET 6.0, you need to update the FROM image so it provides the right version.
If you are using the Red Hat image for an earlier .NET version than 6.0, you need to add the following additional line:
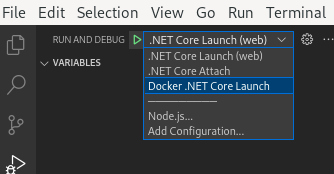
CMD [ "bash" ]You can now launch your application In VS Code's Run and Debug tab. Choose the Docker .NET Core Launch option (Figure 2).
The application will launch in the container with the debugger attached. You can add a breakpoint and hit it in the debugger (Figure 3).

Conclusion
VS Code is designed for .NET and is extremely valuable for developing and debugging .NET applications. It saves a lot of time if you can debug in similar ways on your local system and in the cloud, running your application in a container in both cases. This approach helps you achieve that flexibility.
Last updated: June 3, 2024