Want to learn more about developing applications with Quarkus? Download our free e-book Quarkus for Spring Developers, which helps Java developers familiar with Spring make a quick and easy transition.
The tools available in the Spring ecosystem make it easy to get started with building applications. However, the same is true for Quarkus, which has many additional features and capabilities aimed at improving the developer experience. A Spring developer can quickly get started working with a Quarkus project and immediately become more productive, as we'll see in this article. Plug-ins and tooling are available for most major IDEs, including VSCode, IntelliJ, and Eclipse.
Creating a new project
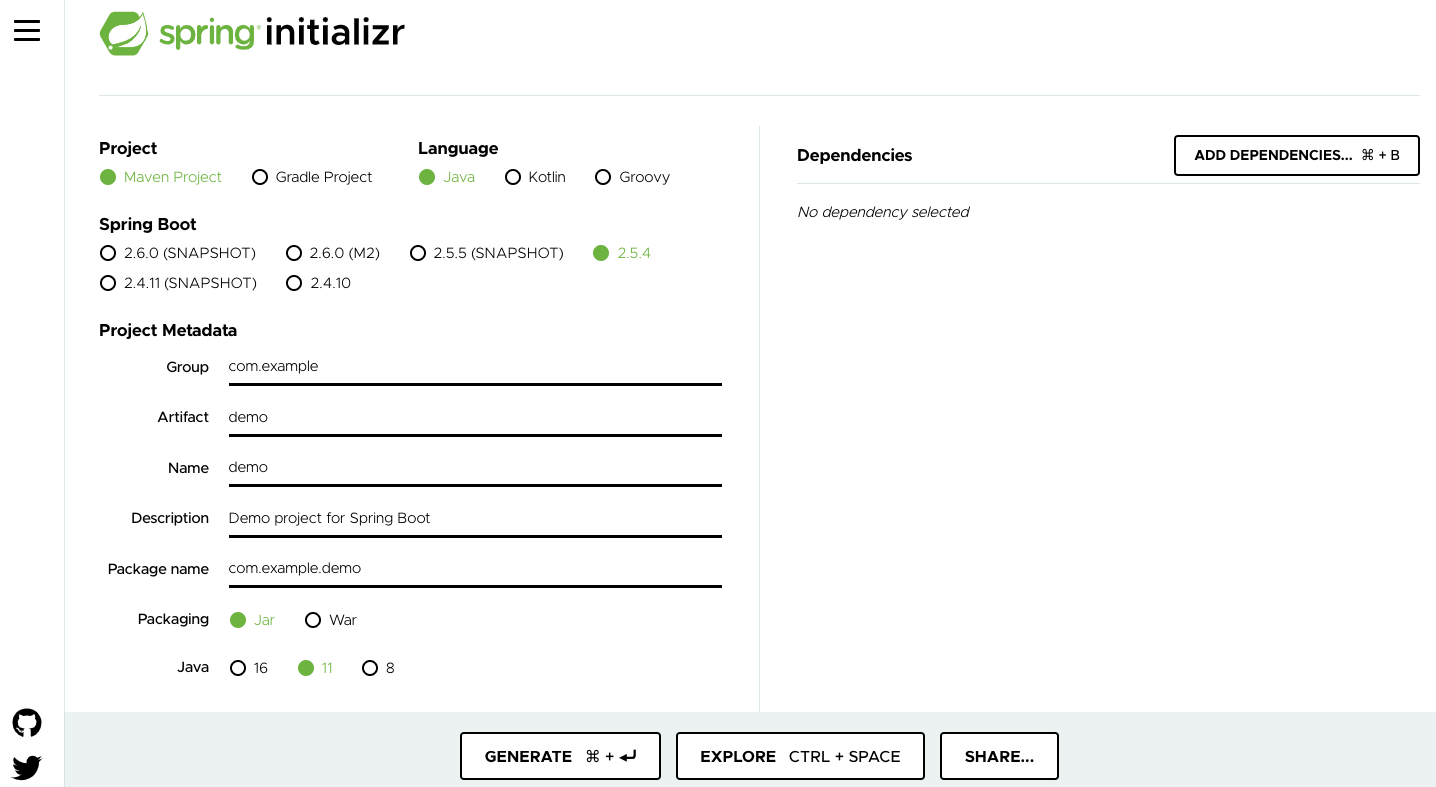
A Spring developer’s starting point is the Spring Initializr, which can be used directly from the website, as shown in Figure 1, or via plug-ins for most major IDEs.

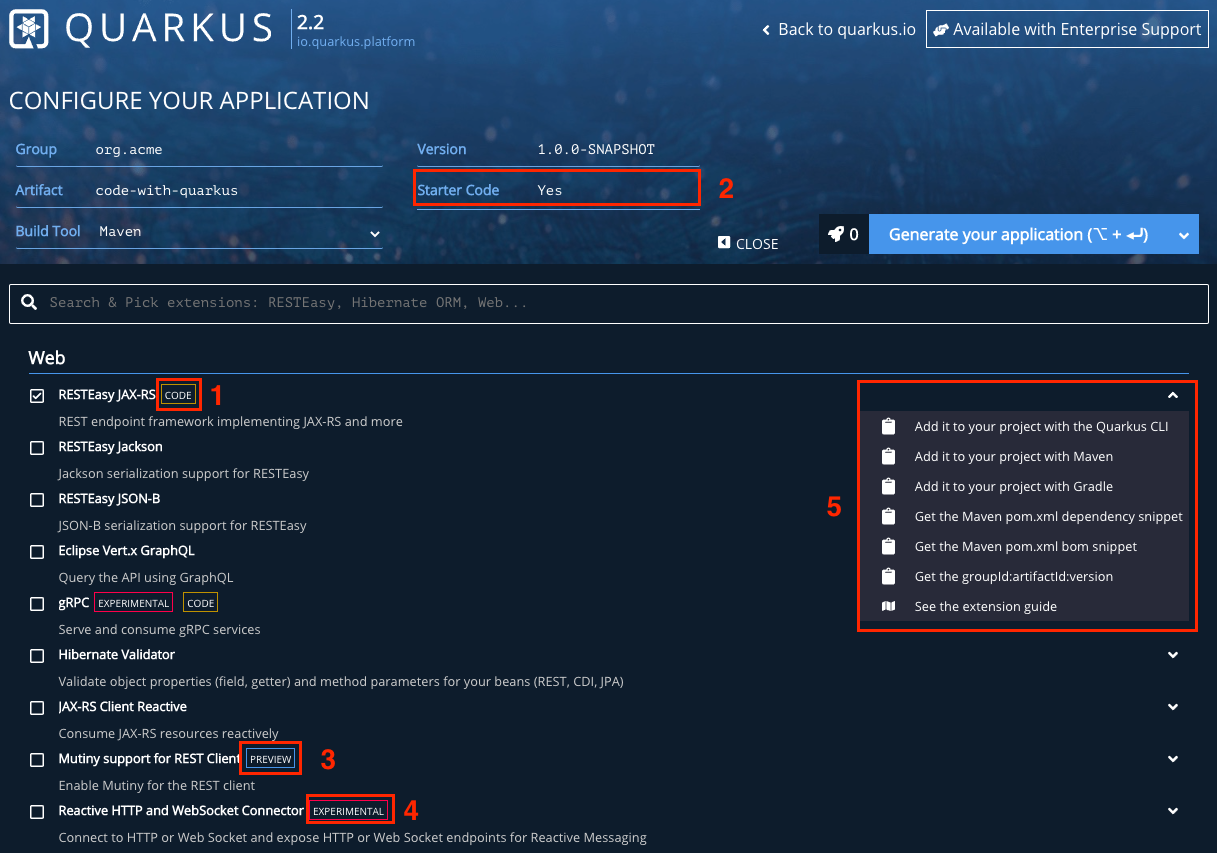
Quarkus projects start at Code Quarkus. The project generator can be used directly from the website, as shown in Figure 2, or via plug-ins for all of the IDEs mentioned previously.

Using Code Quarkus, you can describe the project's Maven coordinates, build tool of choice, and the technologies needed by the application, known as Quarkus extensions. Highlighted in Figure 2 are the following:
- An extension that provides example code.
- Whether or not to include an extension's example code during project generation.
- Extensions newer to the community are marked PREVIEW. Such an extension may have API or configuration changes as it matures.
- Extensions brand new to the community are marked EXPERIMENTAL. Such an extension provides no guarantees of stability or long-term presence until it matures.
- Additional details about each extension, including a link to the guide for the extension and how to add the extension to an existing project.
Project structure
A Quarkus project’s structure is similar to a Spring Boot project’s structure. Table 1 details some files and directories of a Quarkus project.
| File / Directory | Description |
|---|---|
| README.md | Contains instructions on building and running the application, including native image. |
|
pom.xml |
Project build file. |
| src/main/docker | Sample Dockerfiles for use in different modes (JVM, native image). |
| src/main/java | All application source code. |
| src/main/resources | All application resources. |
|
src/main/resources/application.properties |
All application configurations, unified in a single file. |
| src/main/resources/META-INF/resources | All application static content. |
| src/test/java | All application test code. |
Quarkus Dev Mode and live coding
The Quarkus developer experience begins with a simple command: ./mvnw quarkus:dev (for Maven) or ./gradlew quarkusDev (for Gradle). This command will start Quarkus’s Dev Mode, which automatically detects changes made to a project. Changes could involve source files, configuration, static resources, or classpath dependencies. Quarkus transparently recompiles and redeploys detected changes typically in under a second. This feature allows developers to continuously write code and have the underlying platform seamlessly incorporate changes into the running application.
In some instances, it may not be possible or feasible to provision necessary dependent services onto a local developer workstation. In these instances, the only option is to continually deploy the application into an environment where these services are available. Without Quarkus, a developer needs to rebuild and redeploy the application each time a change is made. In some instances, this redeployment could take a minute or more. Running ./mvnw quarkus:remote-dev (for Maven) or ./gradlew quarkusRemoteDev (for Gradle) will enable Remote Dev Mode, extending automatic reloading to applications deployed on remote hosts, typically redeploying and reloading within a second or two. This capability greatly reduces the developer’s inner feedback loop.
Dev Services
Does your application require a running database? Apache Kafka broker? Redis server? AMQP broker? OpenID Connect Authorization Server? API/Schema registry? When running Quarkus Dev Mode, Quarkus Dev Services automatically bootstraps infrastructure needed by an application based on what extensions are present. For example, Quarkus will automatically bootstrap a database container image and set all the required configuration properties if it sees a database extension present and no configuration has been supplied.
Quarkus Dev Services speed up inner-loop development by providing necessary infrastructure without you having to think about it. New services are continually added to the platform.
Continuous testing
Test-driven development is an adopted practice within many development teams. Continuous testing support in Quarkus enables developers to take advantage of this practice. When running Quarkus Dev Mode, you can enable continuous testing with the press of a key, enabling Quarkus to automatically rerun tests affected by a code change in the background.
Quarkus understands which tests are affected by classes and methods within the application. As you make code changes, you get immediate feedback if the change passes your existing test suite. This capability is integrated directly into Quarkus—no IDE or special tooling is required.
Natively native
./mvnw package -Pnative (for Maven) or ./gradlew build -Dquarkus.package.type=native (for Gradle) is all that’s needed to build a Quarkus application into a native image. All the heavy lifting and integration to consume GraalVM is done for you by the Quarkus build tools. Developers or CI/CD systems simply need to run a build, just like any other Java build, to produce a native executable. Tests can even be run against the built artifact.
Quarkus’s design accounted for native compilation from the onset. A Quarkus native executable starts much faster and uses far less memory than a traditional JVM. Similar native image capabilities in Spring are still considered experimental or beta.
Kubernetes native
Quarkus was designed with low memory optimization and fast startup times in mind, making it a perfect fit for containers and container orchestration platforms such as Kubernetes. Quarkus performs as much processing as possible at build time, reducing the size and footprint of the application running on the JVM. Many more Quarkus applications can be deployed than other Java or Spring applications.
Simply adding the Quarkus Kubernetes extension (or the Quarkus OpenShift extension, if using Red Hat OpenShift Container Platform) will automatically generate Kubernetes (or OpenShift) resources based on the project. Want to run your application serverless? The Kubernetes (or OpenShift) extension can also generate Knative resources, enabling you to deploy your application in a serverless fashion, whether it's on the JVM or a native image. Combined with previously-mentioned capabilities like Remote Dev Mode or continuous testing, Quarkus gives you a Kubernetes-native development experience.
Where to learn more
There are many free resources available for learning about and getting started with Quarkus. Why wait for the future? Since its inception in 2019 and continuing today and into the future, Quarkus has provided a familiar and innovative framework for Java developers, supporting capabilities developers need and want today.
Check out these other available resources:
- Read Quarkus for Spring Developers to learn about what challenges led to Quarkus and see side-by-side examples of familiar Spring concepts, constructs, and conventions.
- Learn why you should choose Quarkus over Spring for microservices development.
- Explore Quarkus quick starts in the Developer Sandbox for Red Hat OpenShift, which offers a free and ready-made environment for experimenting with containerized applications.
- Try free 15-minute interactive learning scenarios.
- Get started with Quarkus on your own.
- Learn about Quarkus's Spring compatibility features.
- In some instances, there might not be any code changes needed to run a Spring application on Quarkus.
- Get hands-on converting a Spring Boot application to Quarkus with little-to-no code changes.
- Attend a Quarkus World Tour event when it comes to a city near you. You can even request a private stop.
