Integrating large language models into applications is an important skill for today's developers. In this blog post we will take you through one of the quickest ways to start experimenting and using large language models with Node.js. We will do this by working through the Node.js chatbot example available In Podman AI lab.
Podman AI lab which integrates with Podman desktop provides everything you need to start developing Node.js applications which integrate large language models and package the components in containers. It includes:
- A model server to run the large language model
- The tools need to build and run containers
- Recipes to get started quickly
Podman desktop provides tooling with a nice graphical interface to build and run containers on Windows, Mac and Linux. To get started first download and install Podman desktop from the instructions on podman-desktop.io.
Once you start Podman desktop you should see a suggestion to install Podman AI lab as follows:

Install the Podman AI lab extension as suggested. If the suggestion does not appear automatically, you can install the extension by going to the extension page (the puzzle piece in the navigation bar on the left) and then search for Podman AI lab on the Catalogue tab.
You should now see an additional icon in the navigation bar on the left:
Podman AI lab Recipes
Now that you have Podman AI lab installed you can look at the available recipes. Select the Podman AI lab icon in the left navigation bar and then select Recipes Catalog under AI APPS. This screenshot shows the recipes available Jan 10 2025. As a heads up we are working on adding additional Node.js recipes so you might want to check the available list occasionally.
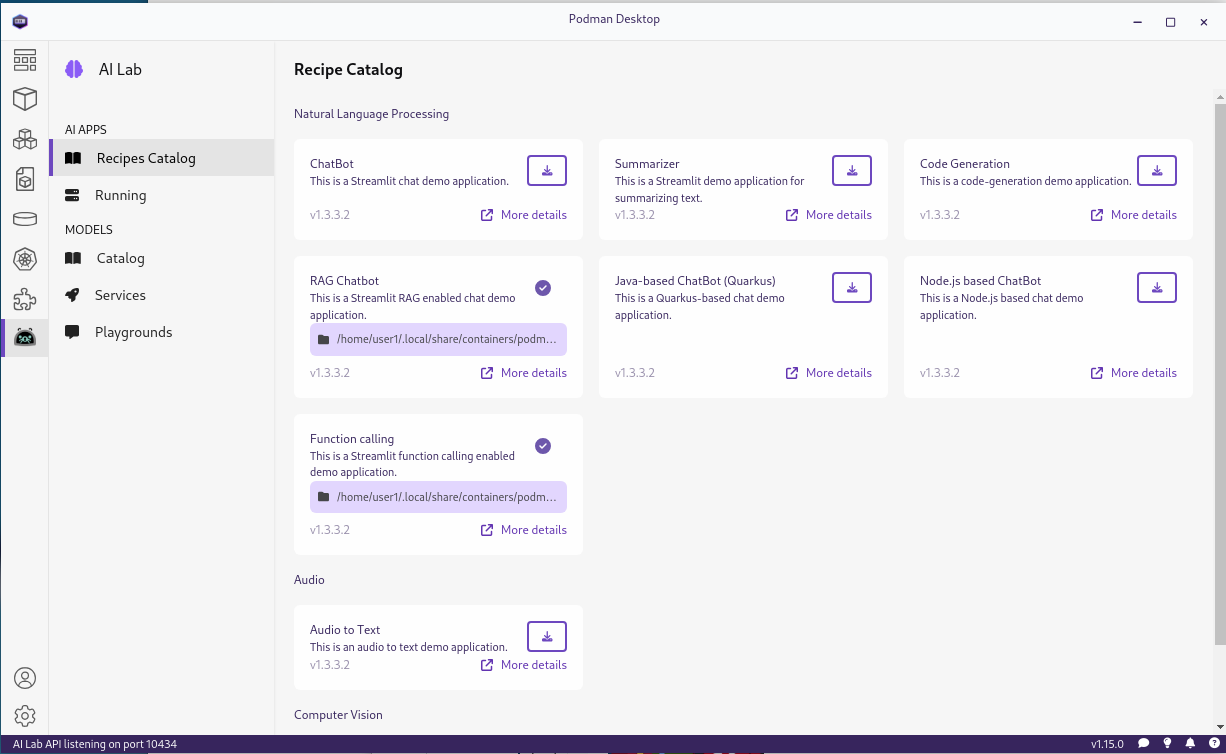
Each recipe provides an easy way to start building an application in a particular category, along with starter code that will let you run, modify and experiment with that application.
Node.js based Chatbot Recipe
The Node.js chatbot recipe lets you quickly get started with an application that integrates a chatbot. Running the recipe will result in two deployed containers:
- A container running a large large language model (Granite by default)
- A container running a Next.js based application using Langchain.js and React Chatbotify that implements the LLM enabled chatbot.
Running the Recipe
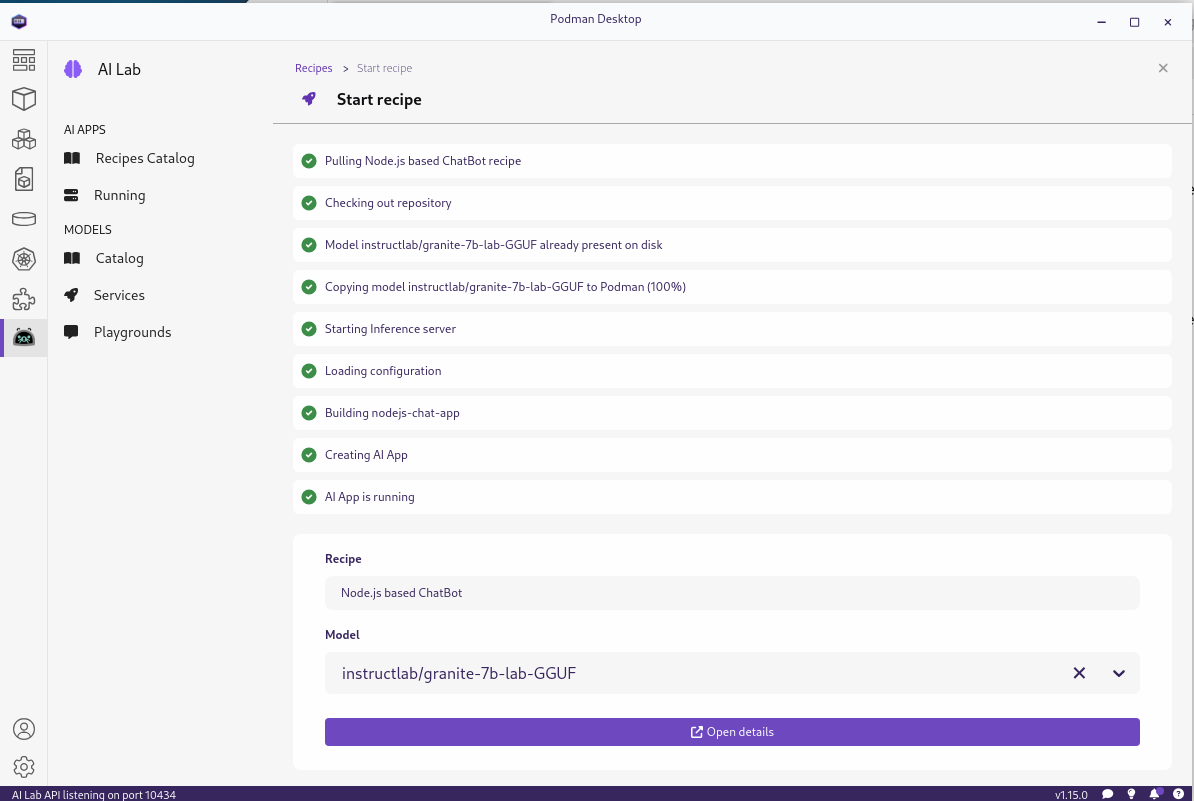
To run the recipe select "More details" on the tile for the recipe, "start" on the main page for the recipe and then "Start Node.js based Chatbot recipe" on the start recipe page:

Note that while Granite is used by default you can download and choose other models if you would like to experiment with other models to see how they perform.
This will build the containers for the application and start them. It may take a little while as it builds the containers. Once started you should see something like this:
We can go to the application from the "Open details" link to get to the summary of the running recipes and then use the link (the box with arrow on the right hand side) to get to the main page of the application:
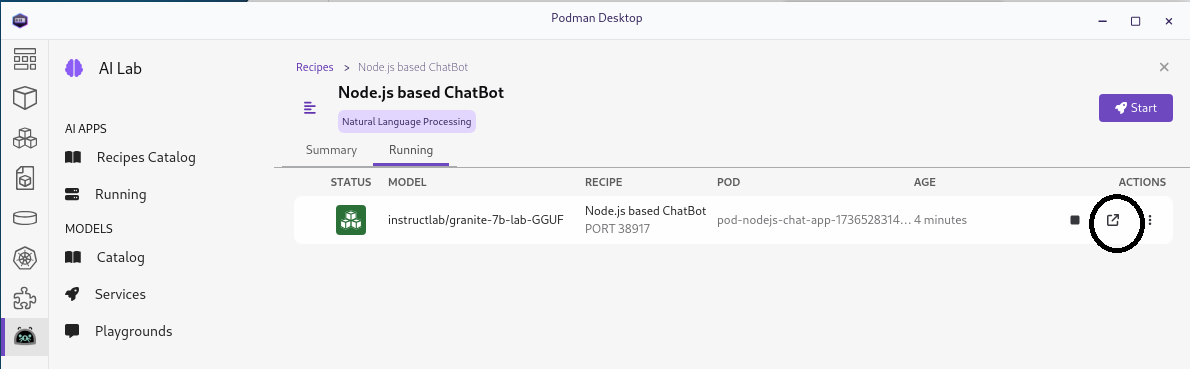
After opening the link you should see something like this:

You can go ahead an interact with the chatbot by asking questions and seeing the responses.
Looking at the Running Containers
Now that we've played with the application lets looks at the containers which are running the application. Podman desktop is great because it gives us an easy way to start, run and inspect containers. Switch to the containers view. You should see 2 containers for the application, one with "nodejs-chat-podified" in the name and one with a more random name, in our case it was "clever_herschel":
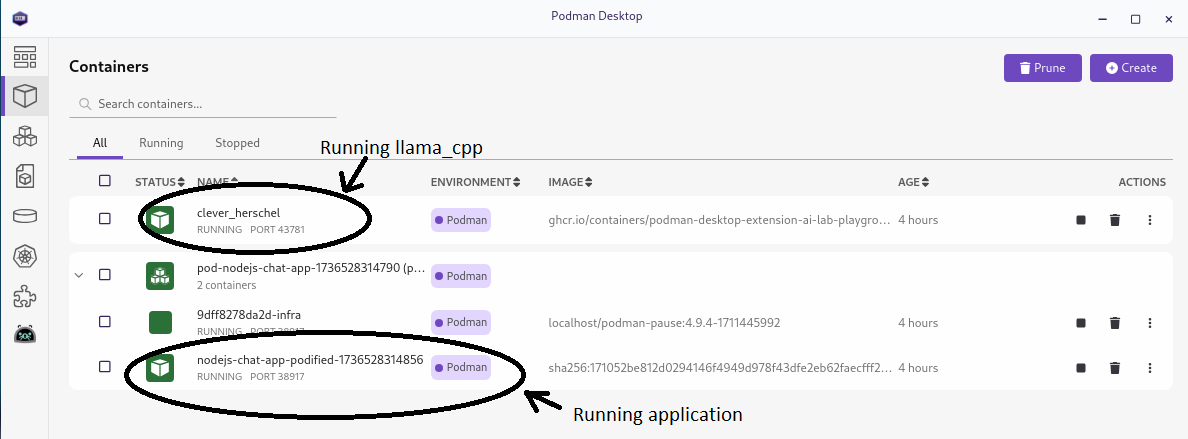
The more random named container is running the large language model using llamacpp_python. The one with "nodejs-chat-podified" is running the Next.js application. Podman has built and started the two containers for you and then ran them passing the information required for the application to use the the large language model. This is driven in part through the information provide by one of the files in the recipe which is in ai-lab-yaml:
version: v1.0
application:
  type: language
  name: ChatBot_nodejs
  description: Chat with a model service in a web frontend.
  containers:
    - name: llamacpp-server
      contextdir: ../../../model_servers/llamacpp_python
      containerfile: ./base/Containerfile
      model-service: true
      backend:
        - llama-cpp
      arch:
        - arm64
        - amd64
      ports:
        - 8001
      image: quay.io/ai-lab/llamacpp_python:latest
    - name: nodejs-chat-app
      contextdir: app
      containerfile: Containerfile
      arch:
        - arm64
        - amd64
      ports:
        - 8501
      image: quay.io/ai-lab/chatbot-nodejs:latest
Podman desktop also makes it easy to inspect the containers and view the logs. For example, we can take a look at the application log:
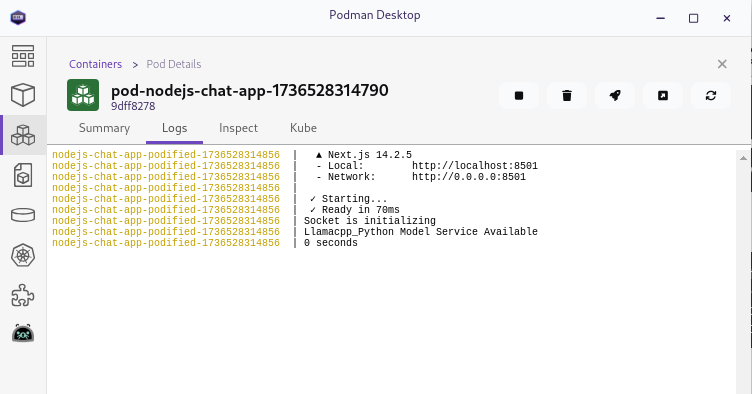
This makes it a lot easier to investigate what the application in the container is doing if you have problems. Go ahead and poke around to explore the information that is easily available.
Looking at the Recipe
The Node.js chatbot recipe is part of the AI lab recipes. Each recipe includes the same main ingredients: models, model servers, and AI interfaces. These are combined in various ways, packaged as container images, and can be run as pods with Podman. The recipes are grouped into different categories based on the AI functions. The current recipe groups are audio, computer vision, multimodal, and natural language processing.
The Node.js chatbot recipe is under the "natural language processing" group - nodejs-chatbot.
The following article dives into the details of recipes and the different ingredients that they contain - AI Lab Recipes. We recommend that you read through that article before looking at the ingredients in the nodejs-chatbot recipe as it will help you understand the common ingredients and let you focus on the Node.js application specifics as you go through the nodejs-chatbot recipe.
As mentioned before, the recipe for the Node.js chatbot application builds and deploys 2 containers, one for the large language model served by llama_cpp and one for the Next.js based application.
You can go to the recipe in GitHub () but even easier you can open it in VScode easily from the Start page for the recipe:
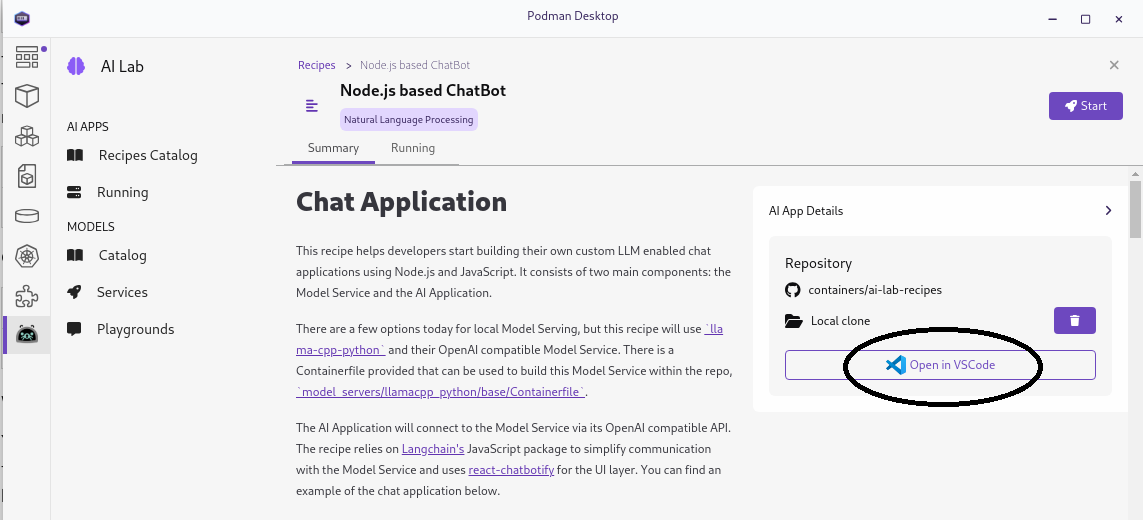
If you edit the copy that is opened, you can then easily redeploy the application with your updates through the running recipes page.
Looking at the Application
The application is a fairly straight forward Next.js application with React Chatbotify in the front end and LangChain.js being used in the back end to connect to the large language model server.
The front end (app/page.js) is as follows:
'use client';
import io from 'socket.io-client';
import { lazy, useEffect, useState } from "react";
const Chatbot = lazy(() => import("react-chatbotify"));

function App() {
  /////////////////////////////////////
  // chatbotify flow definition
  const flow = {
    start: {
      message: 'How can I help you ?',
      path: 'get_question',
    },
    get_question: {
      message: async (params) => {
       return await answerQuestion(params.userInput);

      },
      path: 'get_question'
    },
  };

  /////////////////////////////////////
  // uses socket.io to relay question to back end
  // service and return the answer
  async function answerQuestion(question) {
    return new Promise((resolve, reject) => {
      socket.emit('question', question);
      socket.on('answer', (answer) => {
        resolve(answer);
      });
    });
  };

  /////////////////////////////////////
  // react/next plubming
  const [isLoaded, setIsLoaded] = useState(false);
  const [socket, setSocket] = useState(undefined);
  useEffect(() => {
    setIsLoaded(true);

    // Create a socket connection
    const socket = io({ path: '/api/socket.io'});
    setSocket(socket);

    // Clean up the socket connection on unmount
    return () => {
        socket.disconnect();
    };
  }, [])

  return (
    <>
      { isLoaded && (
        <Chatbot options={{theme: {embedded: true, showFooter: false},
                           header: {title: 'chatbot - nodejs'},
                           chatHistory: {storageKey: 'history'}}} flow={flow}/>
      )}
    </>
  );
};

export default App;
The front end communicates with the back-end through WebSockets. The backend use LangChain.js to send the questions to the large language model being served with llama_cpp and then returns the response to the front end through the WebSocket. The WebSocket id is used as a session key so that history is maintained separately for each client connected to the chatbot. The backend is as follows (pages/api/socket.io/index.js) is as follows:
import { Server } from 'socket.io';
import { RunnableWithMessageHistory } from '@langchain/core/runnables';
import { ChatPromptTemplate, MessagesPlaceholder } from '@langchain/core/prompts';
import { ChatMessageHistory } from 'langchain/stores/message/in_memory';
import { ChatOpenAI } from '@langchain/openai';

const model_service = process.env.MODEL_ENDPOINT ||
                      'http://localhost:8001';

/////////////////////////////////////
// Function to check if/which LLM is available
async function checkingModelService() {
  let server;
  const startTime = new Date();
  while (true) {
    let result = await fetch(`${model_service}/v1/models`);
    if (result.status === 200) {
      server = 'Llamacpp_Python';
      break;
    };

    await new Promise(x => setTimeout(x, 100));
  };

  const endTime = new Date();
  return { details: `${server} Model Service Available\n` +
                    `${(endTime.getSeconds() - startTime.getSeconds()) } seconds`,
           server: server
         };
};

/////////////////////////////////////
// Functions to interact with the LLM

let chainWithHistory;
const sessions = {};

function createLLM(server) {
  if (server === 'Llamacpp_Python') {
    const llm = new ChatOpenAI(
      { openAIApiKey: 'EMPTY' },
      { baseURL: `${model_service}/v1` }
    );
    return llm;
  } else {
    throw new Error('Unknown llm');
  };
};

function createChain(server) {
  const prompt = ChatPromptTemplate.fromMessages([
    [ 'system',
      'You are a helpful chat agent. ' +
      'Answer any questions asked but if you are not certain of the answer say so. ' +
      'Answer only with plain answer do not include any annotations or qualifiers.'
    ],
    new MessagesPlaceholder('history'),
    [ 'human', '{input}' ]
  ]);

  const llm = createLLM(server);
  const chain = prompt.pipe(llm);

  chainWithHistory = new RunnableWithMessageHistory({
    runnable: chain,
    getMessageHistory: (sessionId) => {
      if (sessions[sessionId] === undefined) {
        sessions[sessionId] = new ChatMessageHistory();
      }
      return sessions[sessionId];
    },
    inputMessagesKey: 'input',
    historyMessagesKey: 'history',
  });
};

async function answerQuestion(question, sessionId) {
  const result = await chainWithHistory.invoke(
    { input: question },
    { configurable: { sessionId: sessionId }}
  );
  return result.content;
};

/////////////////////////////////////
// socket.io handler that provides the service to which
// the front end can connect to in order to request
// answers to questions
const SocketHandler = async (req, res) => {
  if (res.socket.server.io) {
  } else {
    console.log('Socket is initializing');
    const io = new Server(res.socket.server, { path: '/api/socket.io'});
    res.socket.server.io = io;

    io.on('connection', (socket) => {
      socket.on('close', () => {
        sessions[socket.id] = undefined;
      });
      socket.on('question', async (question) => {
        const answer = await answerQuestion(question, socket.id);
        socket.emit('answer', answer);
      });
    });

    const result = await checkingModelService();
    console.log(result.details);
    createChain(result.server);
  };
  res.end();
};

export default SocketHandler;
This section in particular lets the recipe provide the application with then endpoint for the model server running in the other container:
const model_service = process.env.MODEL_ENDPOINT ||
                      'http://localhost:8001';
Running the Application for Development
The easiest way to run the application is the way we've shown you through Podman AI Lab and podman desktop. While this is great to get up and running, it's probably not what you want to do when you are in the update/test development cycle. In that case it can be useful to use Podman AI Lab to start the recipe, but then start another instance of the application from the command line. You can do this by:
git clone https://github.com/containers/ai-lab-recipes.git
cd  ai-lab-recipes/recipes/natural_language_processing/chatbot-nodejs/app
npm install
npm run dev
That will get the application up and running, but the application won't be able to connect to the model server. To fix that use Podman desktop to enter the terminal for the application container that was deployed by the recipe and find the value for MODEL_ENDPOINT by running:
echo $MODEL_ENDPOINTOnce you have the model endpoint, stop your local copy of the application and run (or set MODEL_ENDPOINT in the environment for windows):
export MODEL_ENPOINT=YYYYwere YYYY is what was displayed when you ran `echo $MODEL_ENDPOINT`.
You can now restart your local copy of the application and it should connect to the model server. You should then be able to modify the Next.js application and it should be automatically rebuilt/deployed. By default the local copy of the application will be available at http://localhost:8501.
Wrapping Up
We hope this post has given you a good introduction to Podman AI Lab, recipes and in particular the Node.js chatbot recipe. You should now be ready to experiment by extending the recipe to build your own application and to build it into containers using the ingredients provided by the recipe.
If you want to learn more about developing with large language models and Node.js you can look at the articles shared in https://developers.redhat.com/blog/2024/11/20/essential-ai-tutorials-nodejs-developers.
If you want to learn more about what the Red Hat Node.js team is up to in general check these out:
- https://developers.redhat.com/topics/nodejs
- https://developers.redhat.com/topics/nodejs/ai
- https://developers.redhat.com/e-books/developers-guide-nodejs-reference-architecture
- https://github.com/nodeshift/nodejs-reference-architecture