This article illustrates how to configure a browser authentication flow using X.509 user-signed certificates. Once you have set up authentication using X.509 user-signed certificates, your users will not be required to enter a username and password when authenticating against Red Hat's single sign-on technology (SSO). Instead, they will present an X.509 certificate to the SSO instance.
Overview
The main steps for configuring and using X.509 user-signed certificates for single sign-on authentication are:
- Create a local certificate authority (CA).
- Create a user certificate with a private key, a certificate signing request (CSR), and a public key.
- Generate a PFX user certificate and upload it to Chrome.
- Configure the SSO keystore and truststore.
- Create an X.509 browser authentication flow.
- Test the X.509 browser authentication flow.
We will go over each of these steps in detail.
Prerequisites
You will need the following components set up in your development environment:
- A local virtual machine running Red Hat's single sign-on technology 7.
- The OpenSSL toolkit.
- A Chrome web browser.
- JDK 8 or JDK 11.
Step 1: Create a local certificate authority
X.509 user certificates are signed by a certificate authority. The user first sends to a certificate authority a CSR file, then the CA returns a signed certificate and the root CA, both in PEM format.
Below are the instructions to create your certificate authority if you don't have one yet.
openssl genrsa -aes256 -passout pass:<password> -out ca.pass.key 4096
openssl rsa -passin pass:<password> -in ca.pass.key -out ca.key
openssl req -new -x509 -days 3650 -key ca.key -out ca.pem
Here is an example certificate generation request:
genrsa -aes256 -passout pass:password -out ca.pass.key 4096
Generating RSA private key, 4096 bit long modulus (2 primes)
.......................................................................................................................................................................................................++++
..............................++++
e is 65537 (0x010001)

openssl rsa -passin pass:password -in ca.pass.key -out ca.key
writing RSA key
openssl req -new -x509 -days 3650 -key ca.key -out ca.pem
You are about to be asked to enter information that will be incorporated into your certificate request.
What you are about to enter is what is called a Distinguished Name or a DN.
There are quite a few fields but you can leave some blank
For some fields there is a default value,
If you enter '.', the field will be left blank.
-----
Country Name (2 letter code) [XX]:US
State or Province Name (full name) []:Carolina
Locality Name (eg, city) [Default City]:Raleigh
Organization Name (eg, company) [Default Company Ltd]:Red Hat
Organizational Unit Name (eg, section) []:RH-SSO
Common Name (eg, your name or your server's hostname) []:localhost
Email Address []:
Step 2: Create user certificates
Note that our target test user is user1. The test user will also be created in the SSO realm.
The tasks to generate a user certificate are:
- Generate a user private key.
- Generate a user-signed certificate request.
- Generate a user-signed request signed by the CA.
Generate a user private key
The following command generates a user private key:
CLIENT_ID="user1"
CLIENT_SERIAL=01

openssl genrsa -aes256 -passout pass:<password> -out ${CLIENT_ID}.pass.key 4096
openssl rsa -passin pass:<password> -in ${CLIENT_ID}.pass.key -out ${CLIENT_ID}.key
Note: CLIENT_SERIAL represents the serial number. It needs to be unique within the CA. CLIENT_ID corresponds to the username, in this case user1.
Here's an example of a generated user private key:
CLIENT_ID="user1"
CLIENT_SERIAL=01
openssl genrsa -aes256 -passout pass:password -out ${CLIENT_ID}.pass.key 4096
Generating RSA private key, 4096 bit long modulus (2 primes)
........................................................................................................................................................................................................++++
....................++++
e is 65537 (0x010001)
openssl rsa -passin pass:password -in ${CLIENT_ID}.pass.key -out ${CLIENT_ID}.key
writing RSA key
Generate a user-signed certificate request
The following command generates a user-signed certificate request key:
openssl req -new -key ${CLIENT_ID}.key -out ${CLIENT_ID}.csr
Here is an example of a generated user-signed certificate request:
openssl req -new -key ${CLIENT_ID}.key -out ${CLIENT_ID}.csr
You are about to be asked to enter information that will be incorporated into your certificate request.
What you are about to enter is what is called a Distinguished Name or a DN.
There are quite a few fields but you can leave some blank
For some fields there will be a default value,
If you enter '.', the field will be left blank.
-----
Country Name (2 letter code) [XX]:FR
State or Province Name (full name) []:
Locality Name (eg, city) [Default City]:
Organization Name (eg, company) [Default Company Ltd]:
Organizational Unit Name (eg, section) []:
Common Name (eg, your name or your server's hostname) []:user1
Email Address []:

Please enter the following 'extra' attributes
to be sent with your certificate request
A challenge password []:
An optional company name []:
Generate a user-signed request signed by the CA (public certificate)
The CA receives a CSR and in return provides a signed certificate in PEM file format. The certificate is signed by the root CA.
Here is the command to generate a user-signed request signed by the CA:
openssl x509 -req -days 3650 -in ${CLIENT_ID}.csr -CA ca.pem -CAkey ca.key -set_serial ${CLIENT_SERIAL} -out ${CLIENT_ID}.pem
Here is an example response:
openssl x509 -req -days 3650 -in ${CLIENT_ID}.csr -CA ca.pem -CAkey ca.key -set_serial ${CLIENT_SERIAL} -out ${CLIENT_ID}.pem
Signature ok
subject=C = FR, L = Default City, O = Default Company Ltd, CN = user1
Getting CA Private Key
Step 3: Generate a PFX user certificate and upload it to Chrome
Web browsers expect to upload certificates using the PFX (PKCS #12) file format, which contains a private key and a public key. We're using Chrome for this example.
Generate a user PFX file
Enter the following command to generate a user PFX file:
openssl pkcs12 -export -out ${CLIENT_ID}.pfx -inkey ${CLIENT_ID}.key -in ${CLIENT_ID}.pem
Here is an example response:
Enter Export Password:
Verifying - Enter Export Password:
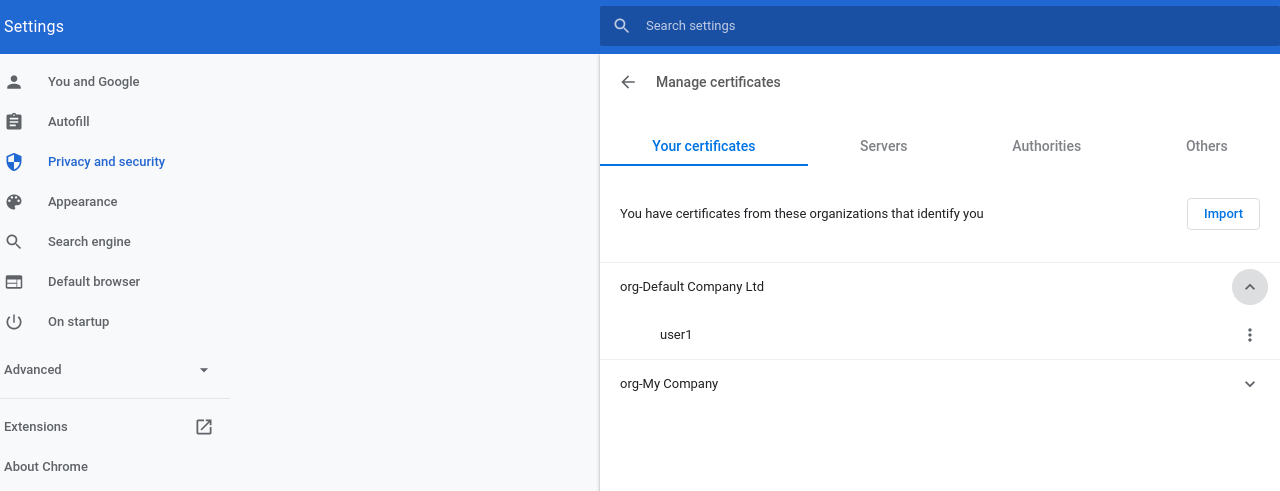
Upload the user certificate to Chrome
Next, go to chrome://settings/certificates and import the user PFX certificate into the Chrome browser, as shown in Figure 1.
Step 4: Configure the SSO keystore and truststore
Red Hat's single sign-on technology requires using a keystore and a truststore for mutual secure socket layer (SSL) authentication. Furthermore, you need to place both the keystore and truststore in your <jboss-home-dir>/standalone/configuration directory. SSO is installed in the <jboss-home-dir> directory.
We will do the following to create and use an X.509 keystore and truststore:
- Create a keystore using the
keytoolutility. - Create a truststore using the
keytoolutility. - Add keystore and truststore to
standalone.xml. - Add
ssl-realmsecurity ashttps-listener.
Note that keytool is a Java SDK command used to create Java keystores.
Create a keystore using keytool
Enter the following command to create a keystore using keytool:
keytool -genkey -alias localhost -keyalg RSA -keystore keystore.jks -validity 10950
Here is an example:
Enter keystore password:
Re-enter new password:
What is your first and last name?
[Unknown]: localhost
What is the name of your organizational unit?
[Unknown]: Keycloak
What is the name of your organization?
[Unknown]: Red Hat
What is the name of your City or Locality?
[Unknown]: Westford
What is the name of your State or Province?
[Unknown]: MA
What is the two-letter country code for this unit?
[Unknown]: US
Is CN=localhost, OU=Keycloak, O=Red Hat, L=Westford, ST=MA, C=US correct?
[no]: yes

Enter key password for <localhost>
(RETURN if same as keystore password):

Warning:
The JKS keystore uses a proprietary format. It is recommended to migrate to PKCS12 which is an industry standard format using "keytool -importkeystore -srckeystore keycloak.jks -destkeystore keycloak.jks -destst
Note: For a more detailed guide to creating the keystore, see Configuring server installation.
Create a truststore using keytool
The following command creates a truststore using keytool. (Note that we create the truststore by importing a PEM certificate. Here, we're using the root CA.)
keytool -import -alias HOSTDOMAIN -keystore truststore.jks -file host-certificate.cer
Here is an example:
keytool -import -alias root-ca -keystore truststore.jks -file ca.pem
Enter keystore password:
Re-enter new password:
Owner: CN=localhost, OU=RH-SSO, O=Red Hat, L=Raleigh, ST=Carolina, C=US
Issuer: CN=localhost, OU=RH-SSO, O=Red Hat, L=Raleigh, ST=Carolina, C=US
Serial number: 22834205f8cb27b0528338669e74c0e4c37f47be
Valid from: Fri Nov 27 14:56:33 CET 2020 until: Mon Nov 25 14:56:33 CET 2030
Certificate fingerprints:
MD5: D0:D1:AC:6F:9E:5C:6B:FF:AD:DD:FA:69:1F:46:2E:D4
SHA1: 54:E9:79:E0:ED:7C:72:F5:3A:C1:88:1A:FA:3D:64:3E:69:16:0C:21
SHA256: 30:FF:C8:5C:D2:DF:0F:16:00:00:DC:1D:CB:85:C2:67:32:FB:E7:66:6C:A6:7C:E1:CB:58:32:F3:61:56:1C:79
Signature algorithm name: SHA256withRSA
Subject Public Key Algorithm: 4096-bit RSA key
Version: 3
Extensions:
#1: ObjectId: 2.5.29.35 Criticality=false
AuthorityKeyIdentifier [
KeyIdentifier [
0000: CA 65 3A 64 27 B7 C9 19 5C 98 8F A2 83 80 45 86 .e:d'...\.....E.
0010: 7A 36 89 00 z6..
]
]

#2: ObjectId: 2.5.29.19 Criticality=true
BasicConstraints:[
CA:true
PathLen:2147483647
]

#3: ObjectId: 2.5.29.14 Criticality=false
SubjectKeyIdentifier [
KeyIdentifier [
0000: CA 65 3A 64 27 B7 C9 19 5C 98 8F A2 83 80 45 86 .e:d'...\.....E.
0010: 7A 36 89 00 z6..
]
]

Trust this certificate? [no]: yes
Certificate was added to keystore
Note: See Outgoing HTTPS Request Truststore for more about creating the truststore.
Add the keystore and truststore to standalone.xml
Next, we need to add a security-realm, ssl-realm/, which contains both the keystore and truststore:
  <security-realm name="ssl-realm">
              <server-identities>
                  <ssl>
                      <keystore path="keystore.jks"
                                relative-to="jboss.server.config.dir"
                                keystore-password=<keystore-password>/>
                  </ssl>
              </server-identities>
              <authentication>
                  <truststore path="truststore.jks"
                              relative-to="jboss.server.config.dir"
                              keystore-password=<trust-store-password>/>
              </authentication>
  </security-realm>
Add ssl-realm security as https-listener
Finally, we will add ssl-realm security as https-listener. Comment out the previous https-listener, which was related to the ApplicationRealm security realm. Then, let https-listener point to the ssl-realm security realm. Here's an example of the required configuration:
<server name="default-server">
<http-listener name="default" socket-binding="http" redirect-socket="https" enable-http2="true"/>
<!--
<https-listener name="https" socket-binding="https" security-realm="ApplicationRealm" enable-http2="true"/>
-->
<https-listener name="https" socket-binding="https" security-realm="ssl-realm" verify-client="REQUESTED"/>
<host name="default-host" alias="localhost">
<location name="/" handler="welcome-content"/>
<http-invoker security-realm="ApplicationRealm"/>
</host>
</server>
Step 5: Create the X.509 browser authentication flow
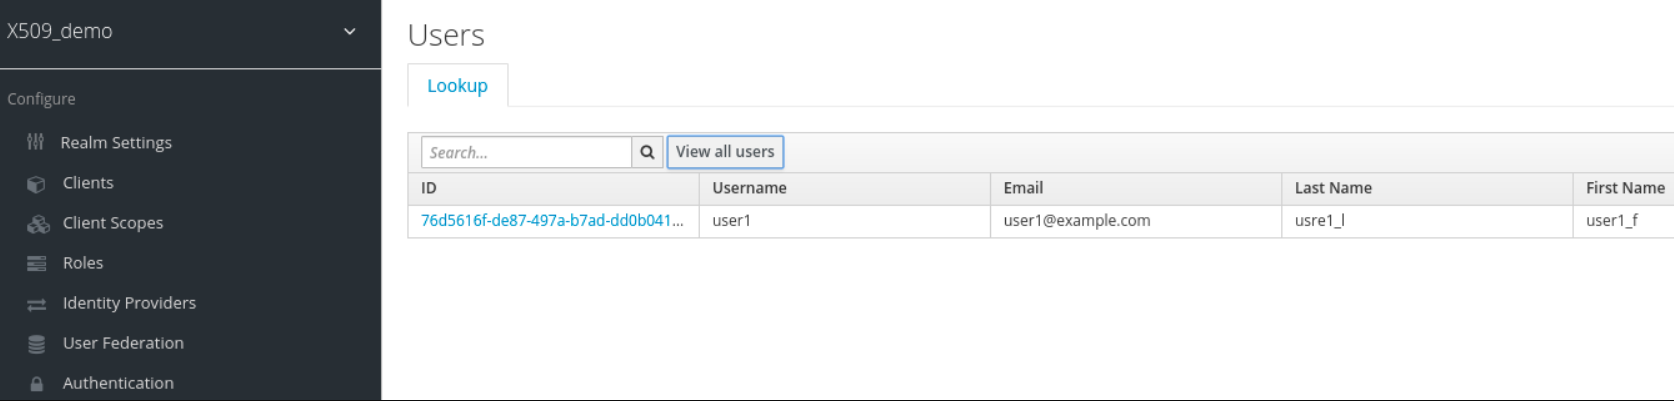
Before we can use the SSO instance, we need to create a new realm named X509_demo.
Go to the left-hand side panel, and clik Add Realm and enter the realm name, X509_demo.
Once the realm name X509_demo is created, you can use the Add User button to a add a new user, user1, as shown in Figure 2.
Now, we can perform the following tasks:
- Create the SSO X.509 browser authentication flow.
- Configure the X.509 certificate within SSO.
- Set the authentication bindings.
Create the SSO X.509 browser authentication flow
We'll use the Authentication page to create the SSO X.509 browser authentication flow, as shown in Figure 3.
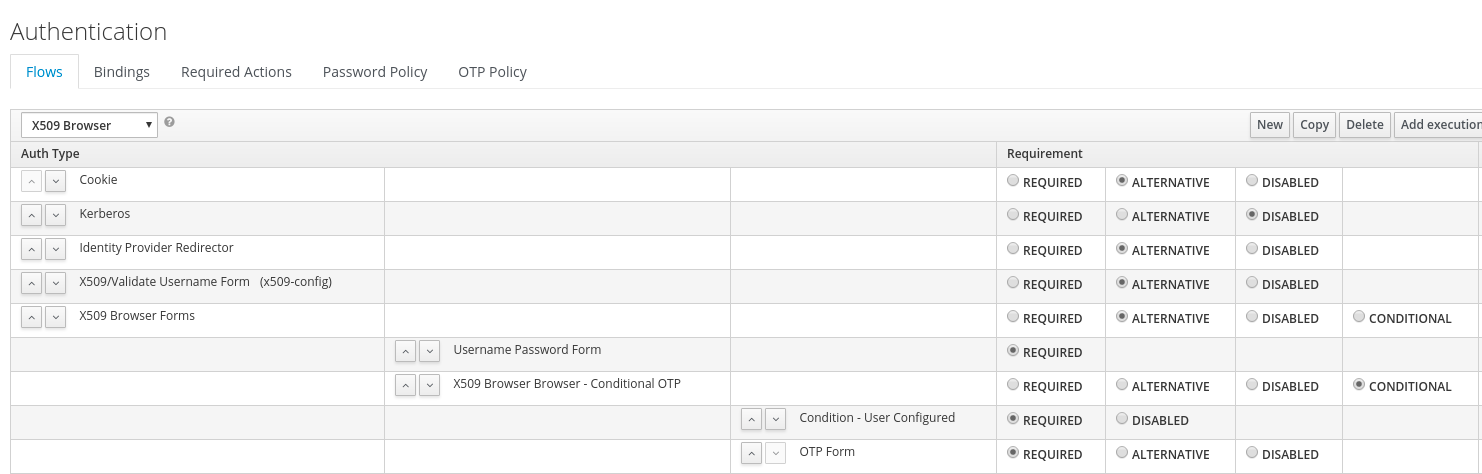
Do the following to set up the SSO browser flow:
- Copy the default browser flow and rename it to X.509 Browser.
- Add
X.509 validate username form (X.509-config)under the Identity Provider Redirector line. - Set this execution step to Alternative.
Note: See Adding X.509 Client Certificate Authentication to a Browser Flow in the SSO documentation for further instructions.
Figure 4 shows the dialog to add the X509 Validate Username Form to the execution flow.

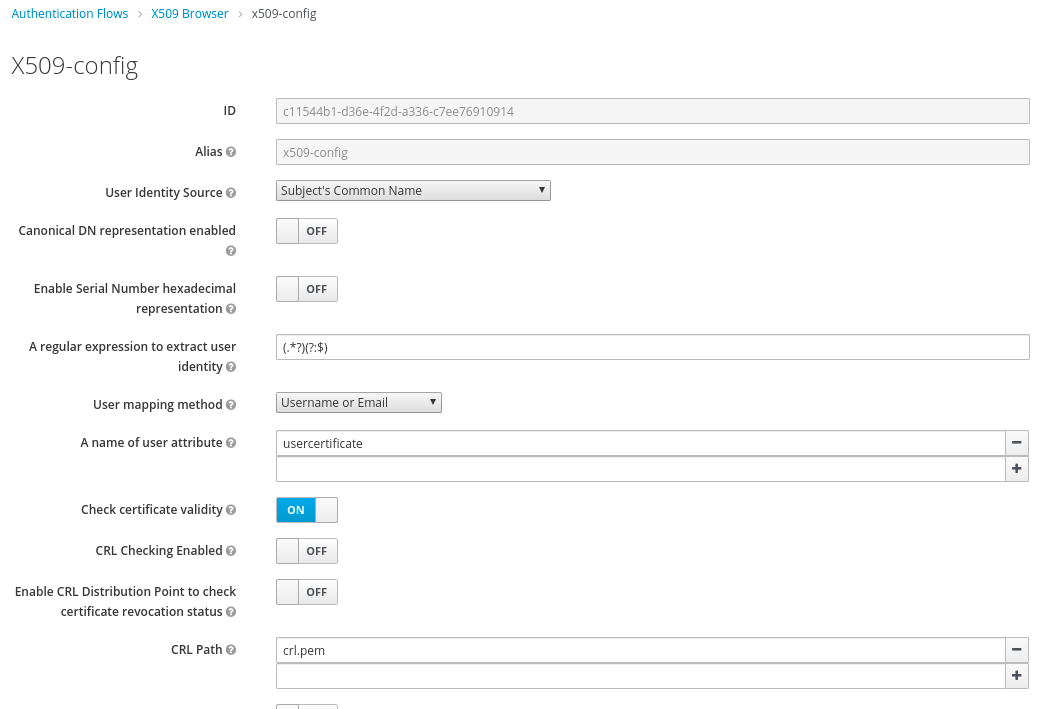
Configure an X.509 certificate within SSO
To set up the X.509 certificate within SSO, go to the X.509 browser flow and select Config Action from the X509 Validate Username Form. You will be redirected to the X509-Config form, where you can complete the certificate authentication using cn=user1 as the username.
On this form, switch the User Identity Source toggle to Subject's Common Name and the User Mapping Method to Username or email. Figure 5 shows these updates.
Set the authentication bindings
On the Authentication page, use the Bindings tab to set the authentication bindings to the new authentication flow you've just created, as shown in Figure 6.

Step 6: Test the X.509 browser authentication flow
To test the authentication flow, go to the test URL: https://localhost:8443/auth/realms/x509_demo/account. You should see the screen shown in Figure 7.
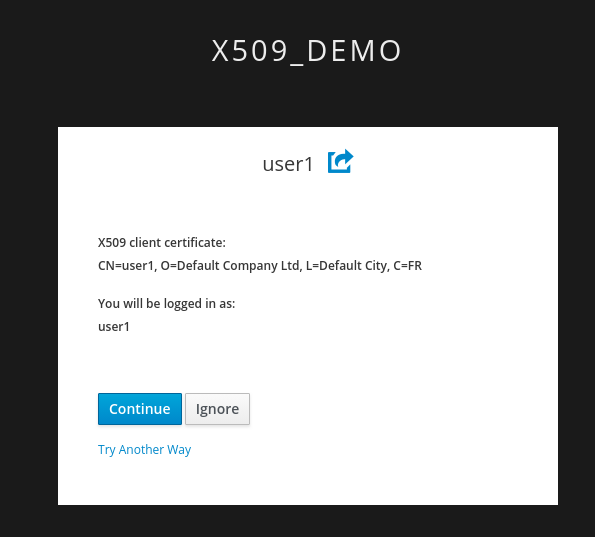
If you click Continue, you should be automatically authenticated through your user1 X.509 certificate, without being prompted to enter a username and password.
Conclusion
Using X.509 certificates for authentication hardens security by authenticating users to the servers, so the username and password are not exposed. If you need to keep your username-password authentication scheme, you can use a second authentication factor such as a one-time password (OTP) provided by SSO. Red Hat's single sign-on technology also provides tech preview support for W3C Web Authentication (WebAuthn).
Last updated: May 31, 2023