In the first part of this series, we saw how effective a platform as a service (PaaS) such as Red Hat OpenShift is for developing IoT edge applications and distributing them to remote sites, thanks to containers and Red Hat Ansible Automation technologies.
Usually, we think about IoT applications as something specially designed for low power devices with limited capabilities. IoT devices might use a different CPU architectures or platform. For this reason, we tend to use completely different technologies for IoT application development than for services that run in a data center.
In part two, we explore some techniques that allow you to build and test contains for alternate architectures such as ARM64 on an x86_64 host. The goal we are working towards is to enable you to use the same language, framework, and development tools for code that runs in your datacenter or all the way out to IoT edge devices. In this article, I'll show building and running an AArch64 container image on an x86_64 host and then building an RPI3 image to run it on physical hardware using Fedora and Podman.
In the previous article, I assumed as a prerequisite that an IoT gateway may be capable of running x86_64 containers, but unfortunately, this is not a common use case due to the various type of IoT gateways available today on the market.
I discovered a very interesting project named “multiarch” with multiple repositories available on GitHub.
The aim of the project is to create a handy way for using a built-in Linux kernel feature named binfmt_misc, which is explained in Wikipedia as follows: “binfmt_misc is a capability of the Linux kernel which allows arbitrary executable file formats to be recognized and passed to certain user space applications, such as emulators and virtual machines. It is one of a number of binary format handlers in the kernel that are involved in preparing a user-space program to run.”
The concepts behind the multiarch project are really simple: Imagine launching a privileged container that is able to interact with the containers’ host and use the binfmt_misc feature for informing the kernel that some other binary’s handlers are available somewhere in the PATH.
Are you guessing about the handlers? They are just QEMU x86_64 executables capable of running the specific architecture binaries: ARM, MIPS, Power, etc.
Keep in mind that QEMU is a generic and open source machine emulator and virtualizer, so it’s the right candidate for this job. It is also used for running KVM virtual machines with near-native performance.
At this point, the only thing you have to do is to place the right QEMU binaries in the containers with a different architecture. Why must they be placed in the containers?
The QEMU executables must be placed in the containers because when the container engine tries to execute some other ARCH binaries, it will trigger in the kernel the binfmt_misc feature, which will then redirect this execution to the binary in the path we specified. Due to the fact that we’re in the container's virtual root filesystem, the QEMU executable must reside in the same environment of the binary that just ran.
The feature activation is really simple. As the multiarch project page states, we need only ensure that multiarch/qemu-user-static:register with the --reset option is used.
The project page suggests using Docker for applying this action and, of course, this feature will be lost on the next machine’s restart, but we can set it as a one-shot systemd service.
For this article, we’re just using a Minishift installation. For this reason, due to the lack of persistence of Minishift’s base operating system, we’ll just run the Docker command once we have logged in:
[alex@lenny ~]$ cdk-minishift ssh
[docker@minishift ~]$ docker run --rm --privileged multiarch/qemu-user-static:register --reset
Setting /usr/bin/qemu-alpha-static as binfmt interpreter for alpha
Setting /usr/bin/qemu-arm-static as binfmt interpreter for arm
Setting /usr/bin/qemu-armeb-static as binfmt interpreter for armeb
Setting /usr/bin/qemu-sparc32plus-static as binfmt interpreter for sparc32plus
Setting /usr/bin/qemu-ppc-static as binfmt interpreter for ppc
Setting /usr/bin/qemu-ppc64-static as binfmt interpreter for ppc64
Setting /usr/bin/qemu-ppc64le-static as binfmt interpreter for ppc64le
Setting /usr/bin/qemu-m68k-static as binfmt interpreter for m68k
Setting /usr/bin/qemu-mips-static as binfmt interpreter for mips
Setting /usr/bin/qemu-mipsel-static as binfmt interpreter for mipsel
Setting /usr/bin/qemu-mipsn32-static as binfmt interpreter for mipsn32
Setting /usr/bin/qemu-mipsn32el-static as binfmt interpreter for mipsn32el
Setting /usr/bin/qemu-mips64-static as binfmt interpreter for mips64
Setting /usr/bin/qemu-mips64el-static as binfmt interpreter for mips64el
Setting /usr/bin/qemu-sh4-static as binfmt interpreter for sh4
Setting /usr/bin/qemu-sh4eb-static as binfmt interpreter for sh4eb
Setting /usr/bin/qemu-s390x-static as binfmt interpreter for s390x
Setting /usr/bin/qemu-aarch64-static as binfmt interpreter for aarch64
Setting /usr/bin/qemu-aarch64_be-static as binfmt interpreter for aarch64_be
Setting /usr/bin/qemu-hppa-static as binfmt interpreter for hppa
Setting /usr/bin/qemu-riscv32-static as binfmt interpreter for riscv32
Setting /usr/bin/qemu-riscv64-static as binfmt interpreter for riscv64
Setting /usr/bin/qemu-xtensa-static as binfmt interpreter for xtensa
Setting /usr/bin/qemu-xtensaeb-static as binfmt interpreter for xtensaeb
Setting /usr/bin/qemu-microblaze-static as binfmt interpreter for microblaze
Setting /usr/bin/qemu-microblazeel-static as binfmt interpreter for microblazeel
As you saw in the previous command, we just registered for the current x86_64 host a bunch of handlers that will receive specific requests for different architectures’ instructions from the host’s kernel.
We’re now ready to test a container build project with an architecture other than x86_64.
For this reason, I prepared a simple test project for building an ARM 64-bit container image and using it with a Raspberry Pi 3: it’s just a web server.
As you’ll see in the project page, the git repo contains just a Dockerfile:
FROM multiarch/debian-debootstrap:arm64-stretch-slim

RUN apt-get update
RUN apt-get install -y apache2
RUN sed -i 's/80/8080/g' /etc/apache2/ports.conf

EXPOSE 8080

CMD ["/usr/sbin/apache2ctl", "-DFOREGROUND"]
It starts from a Debian base image with an ARM64 architecture. It updates the APT repos and installs a web server. After that, it replaces the default listening port and then it sets the right init command.
I bet you’re asking, "Where is the magic?"
Well, the magic happens thanks to /usr/bin/qemu-aarch64-static, which is available in the container image itself. This binary is an x86_64 binary, different from all the others that are AArch64. The Linux Kernel will forward AArch64 binaries executions to this handler!
We’re now ready to create the project and the OpenShift resources for handling the container image’s build:
[alex@lenny ~]$ oc new-project test-arm-project
Now using project "test-arm-project" on server "https://192.168.42.213:8443".

[alex@lenny ~]$ oc new-app https://github.com/alezzandro/test-arm-container
--> Found Docker image 4734ae4 (3 days old) from Docker Hub for "multiarch/debian-debootstrap:arm64-stretch-slim"

    * An image stream tag will be created as "debian-debootstrap:arm64-stretch-slim" that will track the source image
    * A Docker build using source code from https://github.com/alezzandro/test-arm-container will be created
      * The resulting image will be pushed to image stream tag "test-arm-container:latest"
      * Every time "debian-debootstrap:arm64-stretch-slim" changes a new build will be triggered
    * This image will be deployed in deployment config "test-arm-container"
    * Port 8080/tcp will be load balanced by service "test-arm-container"
      * Other containers can access this service through the hostname "test-arm-container"
    * WARNING: Image "multiarch/debian-debootstrap:arm64-stretch-slim" runs as the 'root' user which may not be permitted by your cluster administrator

--> Creating resources ...
    imagestream.image.openshift.io "debian-debootstrap" created
    imagestream.image.openshift.io "test-arm-container" created
    buildconfig.build.openshift.io "test-arm-container" created
    deploymentconfig.apps.openshift.io "test-arm-container" created
    service "test-arm-container" created
--> Success
    Build scheduled, use 'oc logs -f bc/test-arm-container' to track its progress.
    Application is not exposed. You can expose services to the outside world by executing one or more of the commands below:
     'oc expose svc/test-arm-container'
    Run 'oc status' to view your app.
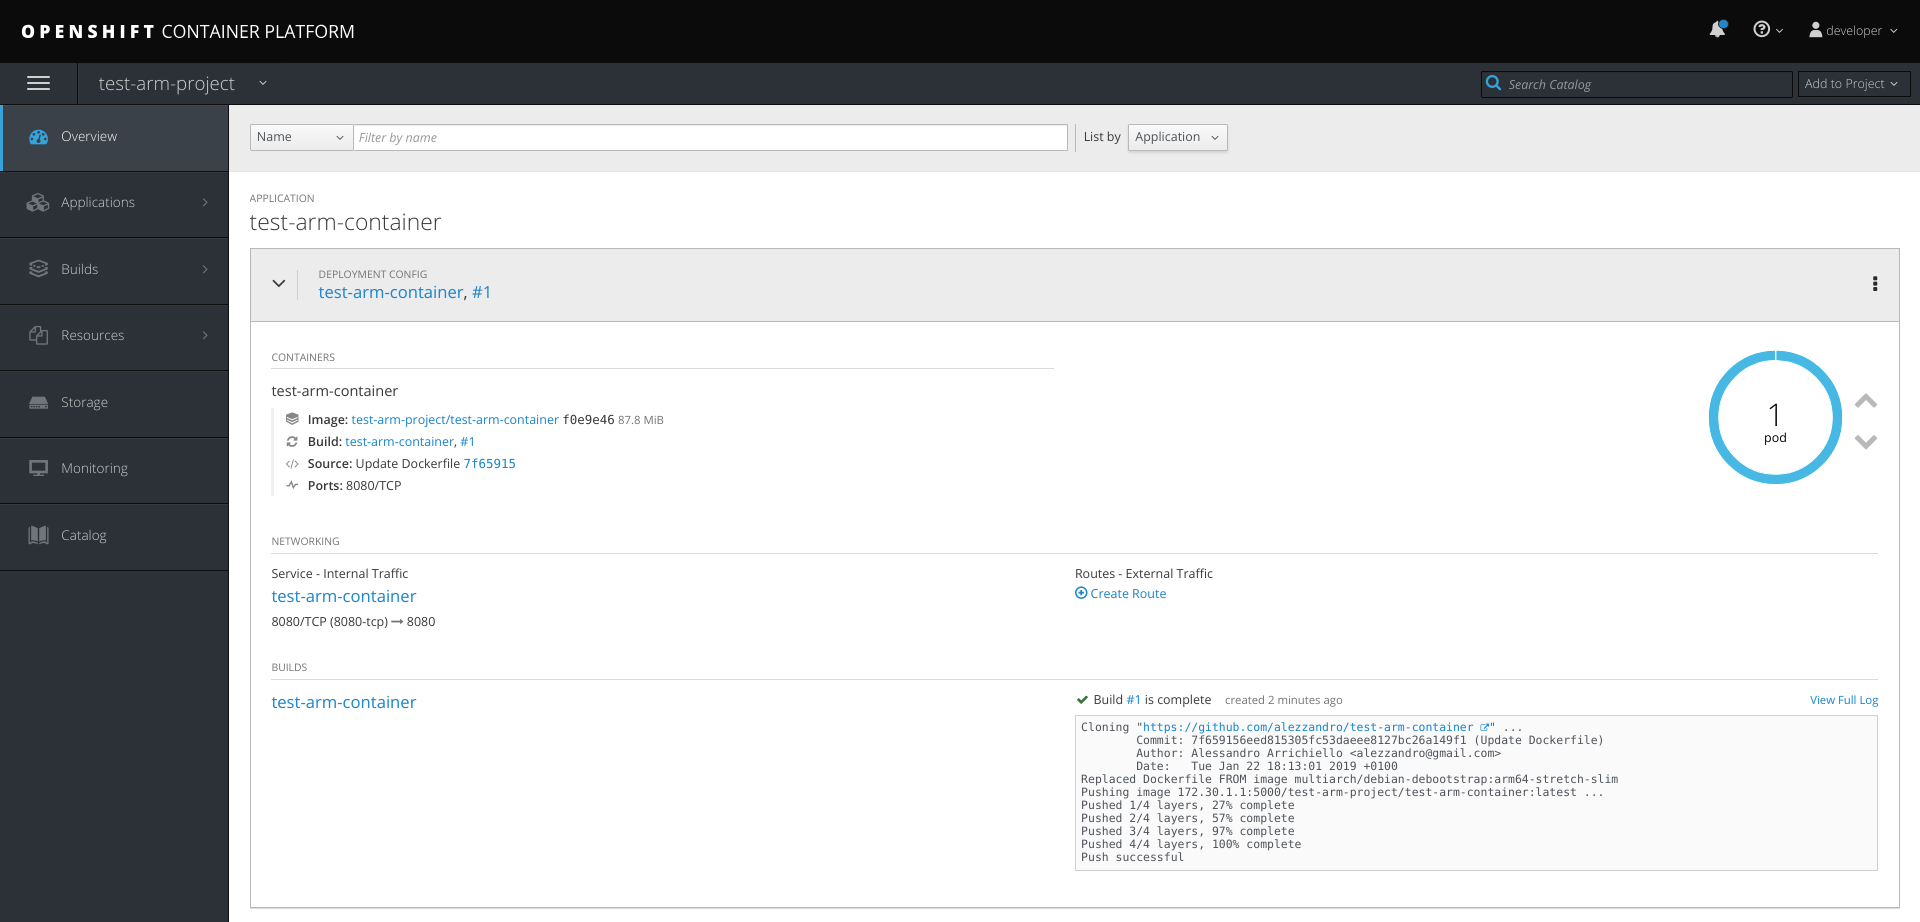
Looking over the OpenShift web interface, we can see that the container image was successfully built and it’s also running:
We can even access the running container and try to execute some commands:
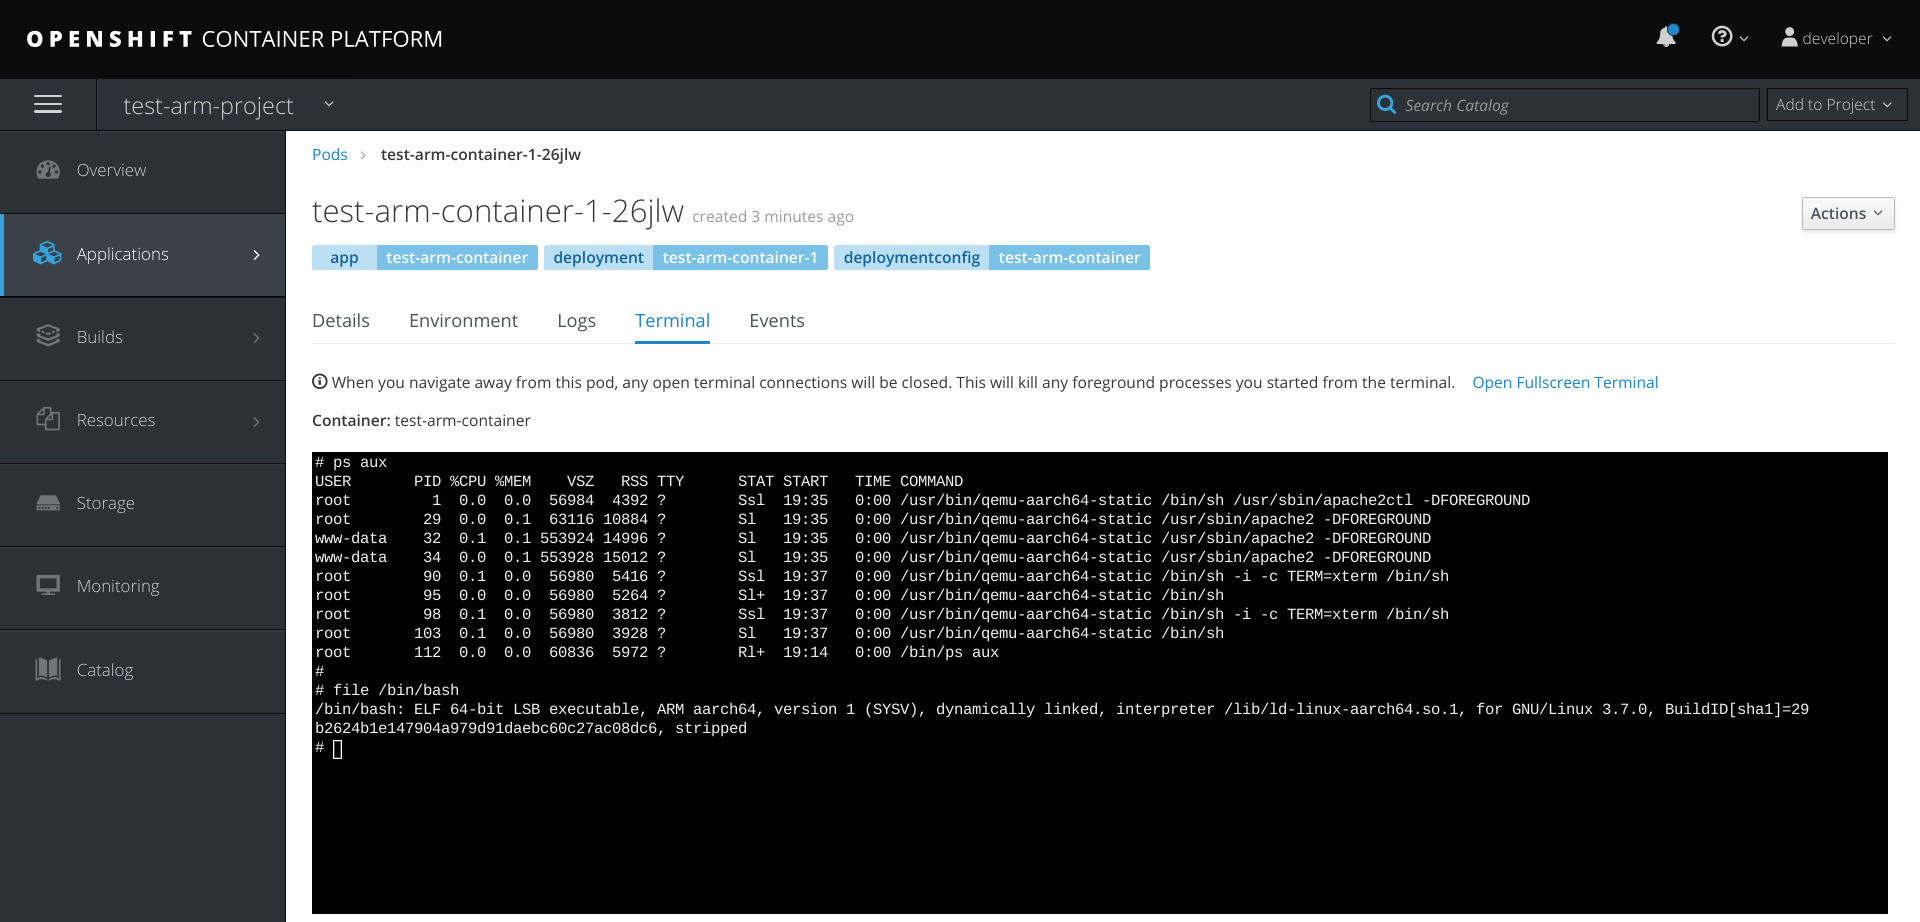
As you can see from the previous command, we attached to the running container and we verified that every command is proxied through /usr/bin/qemu-aarch64-static.
We also checked that the binaries are truly the AArch64 architecture.
We can now try the just-built container image on a Raspberry Pi 3. I chose as the base operating system Fedora ARM Linux.
First, I set up one SD card with an easy-to-use tool after I downloaded the image from Fedora’s website:
[alex@lenny Downloads]$ sudo arm-image-installer --addkey=/home/alex/.ssh/id_rsa.pub --image=/home/alex/Downloads/Fedora-Minimal-29-1.2.aarch64.raw.xz --relabel --resizefs --norootpass --target=rpi3 --media=/dev/sda
[sudo] password for alex:
 ***********************************************************
 ** WARNING: You have requested the image be written to sda.
 ** /dev/sda is usually the root filesystem of the host.
 ***********************************************************
 ** Do you wish to continue? (type 'yes' to continue)
 ***********************************************************
 = Continue? yes

=====================================================
= Selected Image:
= /home/alex/Downloads/Fedora-Minimal-29-1.2.aarch64.raw.xz
= Selected Media : /dev/sda
= U-Boot Target : rpi3
= SELinux relabel will be completed on first boot.
= Root Password will be removed.
= Root partition will be resized
= SSH Public Key /home/alex/.ssh/id_rsa.pub will be added.
=====================================================
...
= Raspberry Pi 3 Uboot is already in place, no changes needed.
= Removing the root password.
= Adding SSH key to authorized keys.
= Touch /.autorelabel on rootfs.

= Installation Complete! Insert into the rpi3 and boot.
While our brand new Raspberry Pi 3 operating system will boots, we can export the Docker image from the running Minishift virtual machine.
We’ll connect directly to the VM and run a docker save command. We can use this trick because we’re in a demo environment; in a real use-case scenario, we may export the internal OpenShift registry to let external devices connect.
[alex@lenny ~]$ cdk-minishift ssh
Last login: Thu Jan 24 19:15:36 2019 from 192.168.42.1

[docker@minishift ~]$ docker save -o test-arm-container.tar 172.30.1.1:5000/test-arm-project/test-arm-container:latest

[alex@lenny Downloads]$ scp -i ~/.minishift/machines/minishift/id_rsa docker@`cdk-minishift ip`/home/docker/test-arm-container.tar
We can then push the image to the Raspberry Pi and install Podman for running it!
Don’t know what Podman is? Read more about Podman, which is in Red Hat Enterprise Linux.
[alex@lenny Downloads]$ scp test-arm-container.tar root@192.168.1.52:/root/test-arm-container.tar                              100% 214MB 450.1KB/s 08:07

[alex@lenny Downloads]$ ssh root@192.168.1.52

[root@localhost ~]# cat /etc/fedora-release
Fedora release 29 (Twenty Nine)

[root@localhost ~]# uname -a
Linux localhost.localdomain 4.19.15-300.fc29.aarch64 #1 SMP Mon Jan 14 16:22:13 UTC 2019 aarch64 aarch64 aarch64 GNU/Linux

[root@localhost ~]# dnf install -y podman
Then we load the container image and finally run it:
[root@localhost ~]# podman load -i test-arm-container.tar
Getting image source signatures
Copying blob 36a049148cc6: 104.31 MiB / 104.31 MiB [=====================] 1m34s
Copying blob d56ce20a3f9c: 15.20 MiB / 15.20 MiB [=======================] 1m34s
Copying blob cf01d69beeaf: 94.53 MiB / 94.53 MiB [=======================] 1m34s
Copying blob 115c696bd46d: 3.00 KiB / 3.00 KiB [=========================] 1m34s
Copying config 478a2361357e: 5.46 KiB / 5.46 KiB [==========================] 0s
Writing manifest to image destination
Storing signatures
Loaded image(s): 172.30.1.1:5000/arm-project/test-arm-container:latest

[root@localhost ~]# podman images
REPOSITORY                                       TAG IMAGE ID CREATED SIZE
172.30.1.1:5000/arm-project/test-arm-container   latest 478a2361357e 4 hours ago 224 MB

[root@localhost ~]# podman run -d 172.30.1.1:5000/arm-project/test-arm-container:latest
cdbf0ac43a2dd01afd73220d5756060665df0b72a43bd66bf865d1c6149f325f

[root@localhost ~]# podman ps
CONTAINER ID  IMAGE                                         COMMAND CREATED STATUS PORTS  NAMES
cdbf0ac43a2d  172.30.1.1:5000/arm-project/test-arm-container:latest  /usr/sbin/apache2... 6 seconds ago Up 5 seconds ago       pedantic_agnesi
We can then test the web server:
[root@localhost ~]# podman inspect cdbf0ac43a2d | grep -i address
            "LinkLocalIPv6Address": "",
            "SecondaryIPAddresses": null,
            "SecondaryIPv6Addresses": null,
            "GlobalIPv6Address": "",
            "IPAddress": "10.88.0.7",
            "MacAddress": "1a:c8:30:a4:be:2f"

[root@localhost ~]# curl 10.88.0.7:8080 2>/dev/null | head
<!DOCTYPE html PUBLIC "-//W3C//DTD XHTML 1.0 Transitional//EN" "http://www.w3.org/TR/xhtml1/DTD/xhtml1-transitional.dtd">
<html xmlns="http://www.w3.org/1999/xhtml">
  <head>
    <meta http-equiv="Content-Type" content="text/html; charset=UTF-8" />
    <title>Apache2 Debian Default Page: It works</title>
    <style type="text/css" media="screen">
  * {
    margin: 0px 0px 0px 0px;
    padding: 0px 0px 0px 0px;
Finally, let’s also check the content and compare the binaries in the container with ones in the Raspberry Pi:
[root@localhost ~]# podman run -ti 172.30.1.1:5000/arm-project/test-arm-container:latest /bin/bash

root@8e39d1c28259:/#
root@8e39d1c28259:/# id
uid=0(root) gid=0(root) groups=0(root)

root@8e39d1c28259:/# uname -a
Linux 8e39d1c28259 4.19.15-300.fc29.aarch64 #1 SMP Mon Jan 14 16:22:13 UTC 2019 aarch64 GNU/Linux

root@8e39d1c28259:/# cat /etc/debian_version
9.6

root@8e39d1c28259:/# file /bin/bash

/bin/bash: ELF 64-bit LSB executable, ARM aarch64, version 1 (SYSV), dynamically linked, interpreter /lib/ld-linux-aarch64.so.1, for GNU/Linux 3.7.0, BuildID[sha1]=29b2624b1e147904a979d91daebc60c27ac08dc6, stripped

root@8e39d1c28259:/# exit

[root@localhost ~]# file /bin/bash

/bin/bash: ELF 64-bit LSB shared object, ARM aarch64, version 1 (SYSV), dynamically linked, interpreter /lib/ld-linux-aarch64.so.1, for GNU/Linux 3.7.0, BuildID[sha1]=25dee020ab8f6525bd244fb3f9082a47e940b1e6, stripped, too many notes (256)
We just saw that we can run this container with Podman. So why not apply some techniques we saw in past articles about Podman and its integration with systemd? :)
Read more about Podman and managing containerized system services.
Additional resources
- IoT edge development and deployment with containers through OpenShift: Part 1
- Podman: Managing pods and containers in a local container runtime
- Managing containerized system services with Podman
- Containers without daemons: Podman and Buildah available in RHEL 7.6 and RHEL 8 Beta
- Podman – The next generation of Linux container tools
- Intro to Podman (New in Red Hat Enterprise Linux 7.6)
- Customizing an OpenShift Ansible Playbook Bundle
That's all. I hope you enjoyed this IoT solution!
About Alessandro