Testing I/O performance at scale presents challenges such as keeping track of test start and stop time, running tests against all hosts in parallel, and analyzing test results and comparing different runs for better performance. In this article, we will demonstrate how to run I/O workload at scale when testing hosts running on Red Hat OpenShift Virtualization as virtual machines, using a generic FIO workload.
The test process
We will demonstrate how to test a particular number of virtual machines for I/O performance. This process will work with Red Hat Enterprise Linux based hosts, and we will use Fedora upstream images to build test hosts for easier package management.
Prerequisites:
- Functional OpenShift Virtualization environment for testing.
- Working storage backend which can be used by OpenShift Virtualization virtual machines. Any storage class available in the OpenShift Virtualization environment will be fine. We will use a storage class built on top of OpenShift Data Foundation (ODF) storage.
- The tests are orchestrated from the command/bastion node. This can be any machine where we can reach our OpenShift Virtualization cluster via ssh/oc.
- Passwordless ssh access from command node to all test virtual machines. We will give an example of a virtual machine template and corresponding secret.
- Preinstalled FIO packages in the virtual machine image or set up proper repositories to install necessary packages.
In this simple example, we will take five virtual machines created inside an OpenShift Virtualization environment with storage from ODF. The following is an example of a virtual machine template used in this case.
We need ssh access to virtual machines to inject ssh key during virtual machine setup. The easiest way is to create a secret and use it during machine setup. You can create the secret with this command executed on the bastion/command host, assuming it has created the ssh key. If not, then create it with ssh-keygen.
$ kubectl create secret generic vmkeyroot --from-file=/root/.ssh/id_rsa.pub Next, create five virtual machines for testing by using the script we created for this purpose found here.
Executing the following command will create five virtual machines. The default image for the virtual machine is Fedora, and the default storage class used is ocs-storagecluster-ceph-rbd. The virtual machine create script allows us to specify a different test image and storage class.
$./multivm.sh -p vm --cores 8 --sockets 2 --threads 1 --memory 16Gi -s 1 -e 5 Wait until the virtual machines are up and running.
$ oc get vm
vm-1    1h   Running   True
vm-2    1h   Running   True
vm-3    1h   Running   True
vm-4    1h   Running   True
vm-5    1h   Running   True
Clone the ioscale repository to get the testing scripts as follows:
$ git clone https://github.com/ekuric/ioscale.git
$ cd ioscale/io-generic
In the ioscale repository, we have the fio-config.yaml where we specify the fio specific parameters. The following is an example of this fio-config.yaml:
vm:
  hosts: "vm1 vm2 vm3 vm-4 vm-5"
  namespace: "default"
storage:
  device: "vdc"
  mount_point: "/root/tests/data"
  filesystem: "xfs"
fio:
  test_size: "10GB"
  runtime: 300
  block_sizes: "4k 8k 128k 1024k 4096k"
  io_patterns: "randread randwrite read write"
  numjobs: 4
  iodepth: 16
  direct_io: 1
output:
  directory: "/root/fio-results"
  format: "json+"
In this configuration example, we will use hosts "vm1 vm2 vm3 vm-4 vm-5" for the test. The vdc device will be formatted with xfs and mounted to /root/tests/data. The fio test configuration section is self explanatory.
Now we can start the test.
$ ./fio-tests.sh -c fio-config.yml After starting the test, it will prompt us to confirm if we want to format the test device vdc on test machines.
$ ./fio-tests.sh -c fio-config.yaml


[2025-09-26 15:01:09] INFO Starting FIO remote testing script
[2025-09-26 15:01:09] INFO Using auto-detection: virtctl for VMs, SSH for regular hosts
[2025-09-26 15:01:09] INFO Using host pattern: vm-{1..5}
[2025-09-26 15:01:09] INFO Expanded pattern to: 5 hosts
[2025-09-26 15:01:09] INFO Configuration loaded from: fio-config.yaml
[2025-09-26 15:01:09] INFO VMs: vm-1 vm-2 vm-3 vm-4 vm-5
[2025-09-26 15:01:09] INFO Namespace: default
[2025-09-26 15:01:09] INFO Host connection methods (auto-detection):
[2025-09-26 15:01:09] INFO   vm-1: virtctl (VM detected)
[2025-09-26 15:01:09] INFO   vm-2: virtctl (VM detected)
[2025-09-26 15:01:09] INFO   vm-3: virtctl (VM detected)
[2025-09-26 15:01:10] INFO   vm-4: virtctl (VM detected)
[2025-09-26 15:01:10] INFO   vm-5: virtctl (VM detected)
[2025-09-26 15:01:10] INFO Storage device configuration:
[2025-09-26 15:01:10] INFO   vm-1: /dev/vdc
[2025-09-26 15:01:10] INFO   vm-2: /dev/vdc
[2025-09-26 15:01:10] INFO   vm-3: /dev/vdc
[2025-09-26 15:01:10] INFO   vm-4: /dev/vdc
[2025-09-26 15:01:10] INFO   vm-5: /dev/vdc
[2025-09-26 15:01:10] INFO Mount point: /root/tests/data
[2025-09-26 15:01:10] INFO Filesystem: xfs
[2025-09-26 15:01:10] INFO Test size: 10G
[2025-09-26 15:01:10] INFO Runtime: 300s
[2025-09-26 15:01:10] INFO Block sizes: 4k 8k 128k 1024k 4096k
[2025-09-26 15:01:10] INFO I/O patterns: read write randread randwrite
[2025-09-26 15:01:10] INFO Number of jobs: 4
[2025-09-26 15:01:10] INFO I/O depth: 16
[2025-09-26 15:01:10] INFO Direct I/O: 1
[2025-09-26 15:01:10] INFO Output directory: /root/fio-results


[2025-09-26 15:01:11] WARN WARNING: This script will format storage devices on all hosts!
[2025-09-26 15:01:11] WARN Hosts: vm-1 vm-2 vm-3 vm-4 vm-5
[2025-09-26 15:01:11] WARN Devices to be formatted:
[2025-09-26 15:01:11] WARN   vm-1: /dev/vdc
[2025-09-26 15:01:11] WARN   vm-2: /dev/vdc
[2025-09-26 15:01:11] WARN   vm-3: /dev/vdc
[2025-09-26 15:01:11] WARN   vm-4: /dev/vdc
[2025-09-26 15:01:11] WARN   vm-5: /dev/vdc


Are you sure you want to continue? (yes/no):
Once we confirm, it will proceed with test preparation and preload the dataset, followed by actual testing.
[2025-09-03 07:50:04] INFO Starting background task on vm-1: Writing test dataset
[2025-09-03 07:50:04] INFO Starting background task on vm-2: Writing test dataset
[2025-09-03 07:50:04] INFO Starting background task on vm-3: Writing test dataset
[2025-09-03 07:50:04] INFO Starting background task on vm-4: Writing test dataset
[2025-09-03 07:50:04] INFO Starting background task on vm-5: Writing test dataset
[2025-09-03 07:50:04] INFO Waiting for 500 background jobs to complete: test dataset writing
Test duration depends on io patterns and runtime used in the fio-config.yaml.
Once the test is finished, results are copied over to the command host where we executed the fio-tests.sh.
We recorded deploy steps in the aciinema video describing this test process.
The test results are saved in directory format. Every virtual machine will get its own directory, and FIO JSON test results will be located there.
$ ls -l fio-results-20250908-132707
total 0
drwxr-xr-x. 2 root root 68 Sep  8 13:27 vm-1
drwxr-xr-x. 2 root root 68 Sep  8 13:27 vm-2
drwxr-xr-x. 2 root root 68 Sep  8 13:27 vm-3
drwxr-xr-x. 2 root root 68 Sep  8 13:27 vm-4
drwxr-xr-x. 2 root root 68 Sep  8 13:27 vm-5
To analyze these files, we can use the following scripts:
- FIO iops and bandwidth analyzer: This script accepts a directory with fio results generated by
fio-tests.shscript and it will produce graph files for every FIO operation executed as well as summary graphs. We will show summary graphs soon. - FIO comparison tool: With the FIO comparison tool, we can compare two or more FIO test results. It accepts FIO directories containing FIO JSON result files and produces graphs for every FIO operation and summary graphs for runs.
Check the README.md files for these scripts for more information. If the required Python packages are not installed on the command host, run the following:
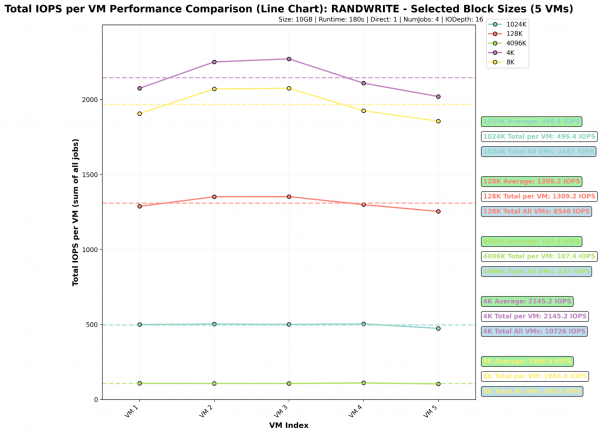
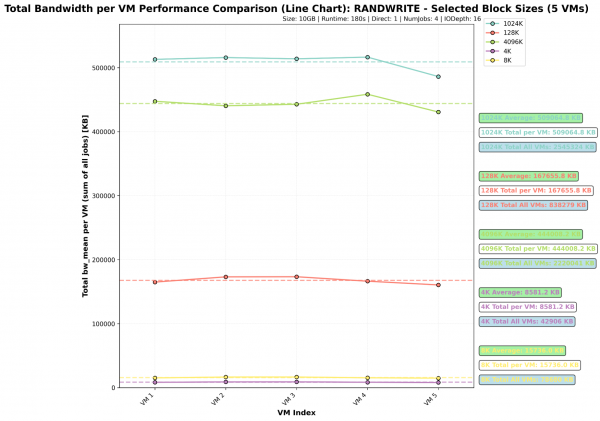
$ pip install pandas matplotlib numpy seabornFor example, executing analyze_bw_mean_with_graphs.py will generate a summary for tested operations and block sizes. In the graphs shown in Figures 1-4, we can see examples for randread and randwrite.
$ python3 analyze_bw_mean_with_graphs.py --input-dir fio-results-20250908-132707 --output-dir single-bw --graph-type line --operation-summary --summary-only --iops –bw This command will create a summary for test results gathered during testing in input-dir. It will create IOPS and bw graph summaries, which you can see in Figure 1.

As an example, we will show only graphs for randwrite, but similar graphs will be created in outpt-dir for every tested FIO operation.

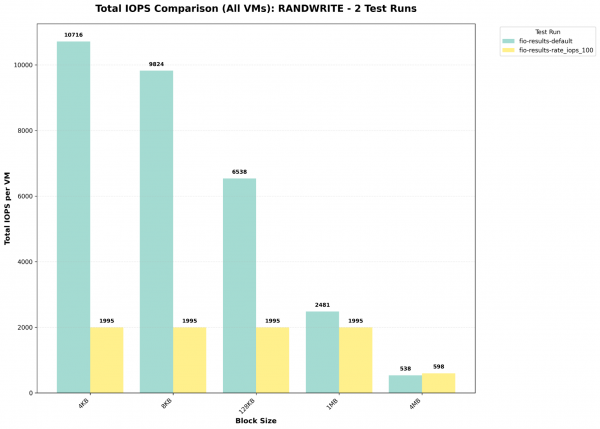
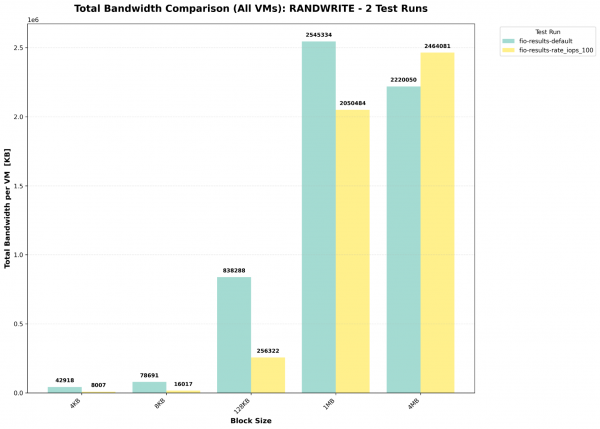
Another interesting case is when we have multiple runs, and it is necessary to compare these runs. The test_comparison_analyzer.py script does this work and produces graphs.
$ python3 test_comparison_analyzer.py fio-results-default/ fio-results-rate_iops_100/ --graphs bar --output-dir test1vstest2 --iopsAlternatively, we can generate graphs comparing bandwidth (bw_mean) between two or more fio runs as follows (Figures 3-4):
$ python test_comparison_analyzer.py fio-results-default/ fio-results-rate_iops_100/ --graphs bar --output-dir test1vstest2 --bw 
The FIO comparison tool works also if we want to compare more than two runs.

Managing test hosts
In the previous example, we had a small number of test hosts, and it used the hosts: directive to specify test machines. However, this can be problematic to list all hosts if the number of test hosts is large. For that reason, we created other options to specify test hosts in a smarter way.
These examples are currently supported by the fio-tests.sh script:
Host list: This is what we used in the previous examples. In this case, we add a space separated hostnames list, which is easiest to use for a small number of hosts.
hosts: “vm1 vm2 vm3 vm4 vm5”Host pattern ranges: If you name virtual machines following a specific name pattern, then you can use this to specify which hosts you will use for testing.
host_pattern: "vm{1..200}"External host file: When we want to keep the fio-config.yaml short and easily readable, we can also specify test hosts in a test file. In this case, we add one hostname per line and provide the path to this file in fio-config.yaml.
host_file: /path/to/hosts.txt
This is an example of hosts.txt:
$ cat hosts.txt
vm1
vm2
vm3
vm4
vm5
Wrap up
We hope after reading this article, you have a better understanding of how to run FIO I/O tests at scale on OpenShift Virtualization virtual machines. We also demonstrated how to quickly analyze collected results to determine which storage backend offers the best performance for OpenShift Virtualization virtual machines.
Stay tuned for our next article, presenting test results of I/O workload testing on OpenShift Virtualization virtual machines. Special thanks to the Red Hat Performance and Scale Team, especially Jenifer Abrams, Shekhar Berry, and Abhishek Bose.
