In this article, we will explore how to configure secure service-to-service authentication within Red Hat Developer Hub. Whether it’s sharing data between internal plug-ins or communicating with external systems, understanding the pros and cons of the available authentication methods is the key to securing your deployment.
After reading this, you will be able to:
- Answer the question, "What is service-to-service authentication?"
- Securely authenticate internal requests on behalf of a requester and as a service.
- Implement external authentication using Static Tokens and JWKS-based Tokens.
- Apply fine-grained access controls for external systems.
What is service-to-service authentication?
Service-to-service authentication is a security mechanism that verifies the identity of one service when it's making a request to another service, without requiring direct user interaction. Within Red Hat Developer Hub, this is used for internal plug-in-to-plug-in and external service-to-plug-in communication.
Internal plug-in-to-plug-in authentication
Internal plug-in-to-plug-in authentication is used when one backend plug-in needs to securely communicate with another backend plug-in within the same Developer Hub instance. This internal interaction is automatically secured using asymmetrical encryption. When one plug-in makes a request to another, it generates a self-signed token, which is then verified by the receiving plug-in using the initiator’s public key. This built-in mechanism ensures mutual trust and secure communication between internal plug-ins out of the box. An example use case would be the TechDocs plug-in retrieving metadata from the catalog plug-in to render documentation.
Depending on your use case, you will need to choose one of the options detailed in the following sections.
Authenticate as the plug-in
A plug-in may need to make a request as itself, rather than on behalf of a user or another service, which is useful for internal operations where no external requester is involved.
This is the recommended pattern for authenticating as the plug-in itself:
const { token } = await auth.getPluginRequestToken({
 onBehalfOf: await auth.getOwnServiceCredentials(),
  targetPluginId: 'catalog',
});
Generating a token this way ensures that the plug-in is authenticated as its own service identity, allowing for secure internal communication.
Authenticate on behalf of the caller
When requester credentials are available, you can make the request on behalf of the original caller, typically a user or another plug-in.
const credentials = await httpAuth.credentials(req);
const { token } = await auth.getPluginRequestToken({
  onBehalfOf: credentials,
  targetPluginId: 'catalog',
});
The caller’s credentials are first extracted from the incoming request, then used to generate a token on their behalf. The token can then be included in the outbound request to the target plug-in. Creating a token this way ensures that the identity and permissions of the requester are preserved and passed to the target plug-in.
External service authentication
External service-to-service authentication in Developer Hub is a key security mechanism that enables external systems to securely communicate with internal backend plug-ins. It is designed for scenarios where systems outside your deployment—such as CI/CD pipelines, end-to-end tests, webhooks, maintenance scripts, or monitoring tools—need to interact with Developer Hub services.
Red Hat Developer Hub supports two implementations for external service-to-service authentication:
- Static Token Authentication
- JSON Web Key Set (JWKS) Authentication
Control access
By default, when external services authenticate using Static Tokens or JWKS Tokens, they have unrestricted access to all backend plug-ins. However, some plug-ins, such as role-based access control (RBAC) (backstage-community-plugin-rbac), prohibit anonymous token usage and enforce their own checks.
To enable fine-grained security, Developer Hub supports the accessRestrictions option for external tokens. With accessRestrictions, you can:
- Control access to specific plug-ins.
- Specify which actions are allowed using explicit permission IDs or by defining allowed actions such as create, read, update, and delete.
Both static and JWKS tokens must be configured with accessRestrictions to minimize security risks. We will show basic examples as we walk through each authentication method, then provide a more detailed deep dive on this option later in the guide.
External access with static token authentication
Static token authentication is the easiest and most straightforward approach to service-to-service authentication in Developer Hub. At its core, this method uses pre-configured, long-lived tokens that are stored in your configuration. These tokens serve as digital keys that grant access to your backend services.
The authentication process is simple:
- A token is generated and stored in your Developer Hub configuration.
- External services include this token in the Authorization header of their HTTP requests.
- Developer Hub validates the token against its configuration.
- If the token is valid, the request is processed; otherwise, it is rejected.
This simplicity makes static token authentication particularly appealing for development and testing scenarios, where quick setup and straightforward implementation are often priorities.
Static tokens are only as secure as they are managed, and they require extra steps and attention to ensure they are a valuable tool in your toolset. There is no protection mechanism enforced for you, such as automatic token expiration or invalidation, leakage protection, or unusual behavior detection: it's all up to the administrators to implement these mechanisms and follow all the security best practices. Additionally, static tokens require the application to restart each time they are changed. This might not be the best case for production environments and might discourage system administrators from rotating them often.
Using static tokens can get you up and running quickly for internal automation, but for production systems that require frequent key rotation or more dynamic security, JWKS tokens offer a more secure long-term approach.
Set up static token authentication
The process of setting up static token authentication consist of the following keys steps.
Step 1: Generate a secure token
The first step is generating a secure token. A good approach might be to use cryptographically secure random values for these tokens. You can generate such a token using Node:
node -p 'require("crypto").randomBytes(24).toString("base64")'This command generates a 24-byte random value and encodes it in base64, resulting in a token that is:
- Sufficiently long to resist brute-force attacks.
- Random enough to prevent prediction.
- Properly encoded for use in HTTP headers.
Step 2: Configuration
Once you have generated your token, you need to configure it in your Developer Hub instance. This is done in the app-config.yaml file:
backend:
  auth:
    externalAccess:
      - type: static
        options:
          token: ${YOUR_TOKEN}
          subject: your-service-name
        accessRestrictions:
          - plugin: target-plugin
This configuration:
type: Defines the token type as "static."token: Specifies the token value.
Optional parameters include:
subject: This assigns a subject name for identification, which will help when debugging or tracking down any action performed by this specific token. Audit Logs will use the subject as the actorId to identify any action requested by this token.accessRestrictions: This restricts access to specific plug-ins (more on this in a later section).
Pro tip:
When using static tokens, always set them through environment variables instead of writing them directly into configuration files.
Step 3: Use the token in requests
To use the token, external services must include it in the Authorization header of their HTTP requests: Authorization: Bearer {token}.
You can then use the token to perform authenticated HTTP requests. Below is an example that uses the `curl` command-line utility to list all available locations in the catalog:
$ curl --location --request GET 'https://<your-developer-hub-url>/api/catalog/locations' \
--header 'Content-Type: application/json' \
--header 'Authorization: Bearer {token}'
An Audit Log entry will be created, using the subject field as the actor, making sure to log any action.
Security best practices, considerations, and limitations
Static token authentication provides a simple yet effective way to secure communication between external services and your Developer Hub instance. While it may not be suitable for all scenarios, particularly for compliance needs, it offers a practical solution for many development and testing use cases.
The key to successful implementation lies in:
- Proper token generation and management.
- Careful access control and restriction.
- Regular monitoring and auditing.
- Following security best practices.
Some security best practices when using static tokens include:
- Regular rotation: Tokens should be rotated on a regular schedule to limit the impact of potential leaks. Document the rotation process to ensure consistency.
- Secure storage: Never store tokens in plain text in the
app-config.yamlconfiguration file. Instead, use the environment variable mechanism available in Developer Hub. - Access control: Implement the principle of least privilege, restricting tokens to specific plug-ins and operations; regularly review and update access permissions.
- Analyze logs: Monitor and track token usage to identify unusual patterns and set up alerts for failed authentication attempts if you have a monitoring system integration available.
- Documentation: Document all authentication methods in use and maintain an inventory of all tokens and their purposes, and keep security policies up to date.
Static token authentication might be a good solution for simple, non-critical scenarios, such as:
- Development and testing environments: These require quick setup and configuration, simple debugging and troubleshooting, and easy integration with development tools. Static token authentication can be an easy option, especially when using ephemeral testing environments.
- Simple automation tasks: Basic CI/CD pipelines, simple maintenance scripts, and basic monitoring systems.
- Internal tools and utilities such as development tools, testing frameworks, and internal automation scripts.
However, it's important to note that static token authentication may not be suitable for:
- Production environments with high security requirements.
- Systems handling sensitive data.
- Large-scale deployments with many external services.
- Environments requiring frequent token rotation.
External access with JWKS tokens
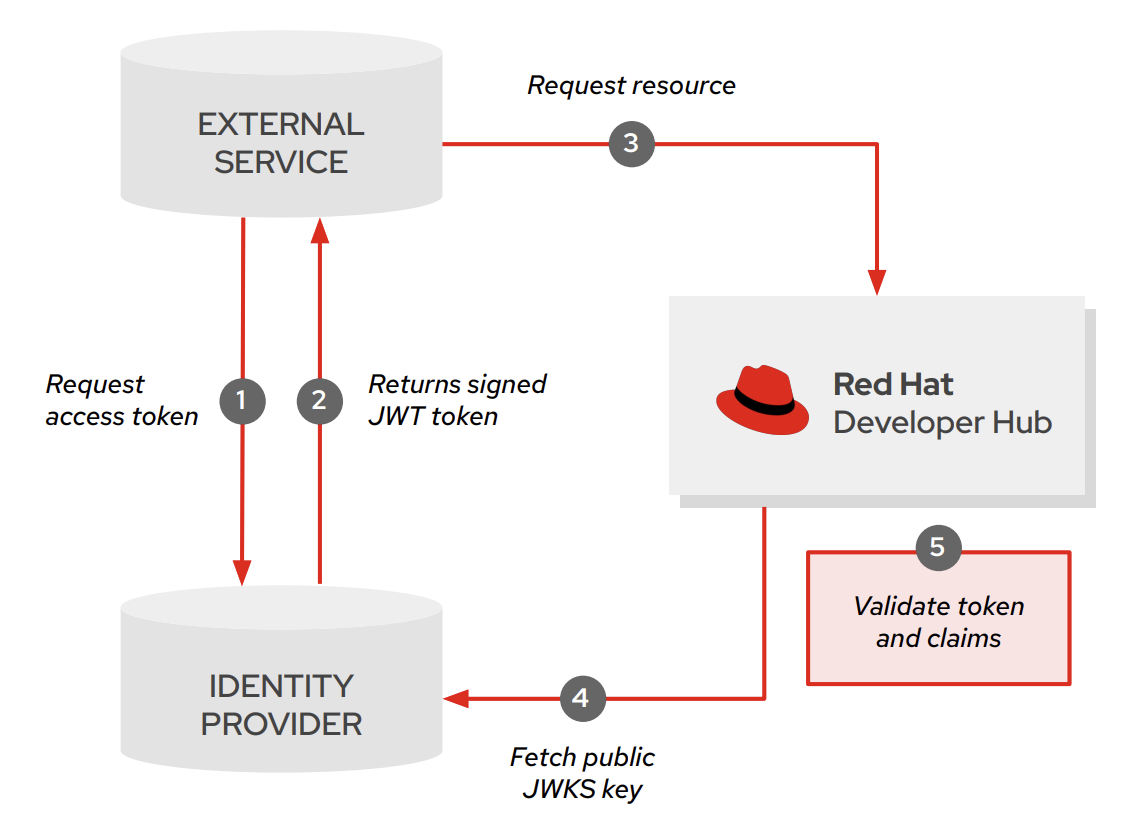
JWKS tokens are significantly more secure as they are signed and issued by a trusted Identity Provider, making them a much better choice for production deployments.
This approach offers strong security benefits via three key characteristics:
- Asymmetric encryption: JWKS uses a pair of shared keys—one public, one private—instead of a single shared static token. The Identity Provider signs the JWT with its private key, then Developer Hub verifies it using the public key fetched from the JWKS endpoint. This means Developer Hub never has access to the private signing key, reducing the risk of compromise.
- Easy key rotation: Key rotation is crucial for minimizing the impact of compromised tokens. Since Developer Hub fetches public keys dynamically at each verification using the JWKS endpoint, the identity provider can easily rotate the keys on its own cadence without the need to re-configure anything in Developer Hub.
- Ability to validate claims: JWTs include claims like issuer and audience, which can be verified by Developer Hub to ensure the token is from a trusted source and prevents it from being used in unintended contexts.
Figure 1 illustrates how a JWKS token is requested, verified, and validated during the authentication flow between an external service and Developer Hub.
Setting up JWKS for external access
Here is a basic configuration example:
backend:
  auth:
    externalAccess:
      - type: jwks
        options:
          url: http://your-idp.example.com/.well-known/jwks.json
          algorithm: RS256
          issuer: http://your-idp.example.com
          audience: management
          subjectPrefix: your-prefix
Required parameters:
url: URL of JWKS endpoint to fetch public key for token verification.
Optional parameters include:
algorithm: List of accepted JWT signature algorithms, must match the one used in the identity provider.issuer: List of valid issuer(s), the incoming JWT must match theissfield.audience: List of valid audience(s), the incoming JWT must match theaudfield.subjectPrefix: Prefix useful for debugging and tracking purposes, will appear in the Audit Log.
Set access restrictions to external service tokens
By default, when you configure external access in Developer Hub (using JWKS or static tokens), any external service with a valid token has unrestricted access to all backend plug-ins and actions. To have fine-grained control over what an external service is allowed to do, you can define accessRestrictions.
Restrict access to specific plug-ins
If you want to configure a token so that it can only interact with specific plug-ins, for example, just the catalog plug-in, you can define the configuration like this:
backend:
  auth:
    externalAccess:
      - type: jwks | static
          accessRestrictions:
          - plugin: catalog
With this configuration, the token is only allowed to make requests to the catalog plug-in. However, it’s important to note that the user will have unrestricted access to all actions within that plug-in by default. If you want finer-grained control, such as allowing users to only create and read catalog entities, there are two ways to accomplish this.
Use explicit permission IDs
The first way is to list the exact ID of the permission you want to allow. Use this when you want precise control over which registered permission rules the user is allowed to invoke:
...
        accessRestrictions:
          - plugin: catalog
            permission:
              - catalog.entity.create
              - catalog.entity.read
Use action attributes
The second way is to list the specific actions defined by the permission. Rather than naming specific permission IDs, you allow access to any permissions that are associated with certain actions:
...
        accessRestrictions:
          - plugin: catalog
            permissionAttribute:
              action:
                - create
                - read
Use this when you want broader filtering based on what kind of action is being performed, regardless of the exact permission ID.
Choosing between explicit permission IDs and action-based attributes allows you to strike the right balance between precision and flexibility depending on your external service’s needs.
Key takeaways
By properly setting up secure service-to-service authentication and applying access restrictions, you can strengthen the security posture of your Developer Hub deployment while enabling safe integration with internal and external systems.
