A client company’s Red Hat OpenShift team was facing a common issue: engineering teams had to allocate time to handle repetitive and manual tasks, such as addressing a high volume of service desk tickets. Many of these tickets stemmed from misconfigurations and unclear documentation, which not only consume valuable time and effort from the engineering team but also hinder the productivity and satisfaction of end-users.
The client wanted to improve the developer experience by introducing more self-service and automation. To achieve this, the client tested out Red Hat Developer Hub as a unified access point to tools and resources.
Background
Toil, as defined by Google’s site reliability engineering (SRE) framework, is work that doesn’t drive long-term value. In this case, answering recurring manual support tickets instead of working on adding features to the OpenShift platform is considered toil. This directly affects the pace at which the organization can innovate and respond to emerging needs.
Moreover, the reliance on manual processes for addressing these tickets introduces the risk of errors and inconsistencies, further compromising the reliability and stability of the IT infrastructure. By automating these processes and enabling self-service capabilities, the team can significantly reduce the incidence of such issues, leading to a more stable and reliable platform.
This shift not only improves the developer experience but also frees up the engineering team to focus on strategic initiatives that add long-term value to the OpenShift platform.
Project goals
The main objective of this proof of concept project was to pick one low hanging fruit use case to demonstrate how the developer experience can be improved while simultaneously reducing toil—turning a lose-lose into a win-win.
To identify this low hanging fruit, a data-driven approach was chosen to group and map common service desk requests. The chosen use case was troubleshooting issues around deploying GitLab runners to OpenShift clusters. This use case was the most common request by number of Jira tickets over time that could be automated.
Before this pilot the process involved the developers copy-pasting an ill-formatted YAML manifest from Confluence, then editing, and deploying it. This manual process was highly prone to human error, given YAML's sensitivity to formatting.
The project aimed to remove as many unnecessary roadblocks as possible from this process and avoid inconsistencies across deployments. Additionally, the integration of other tools the client was already using—such as Jira, GitLab, Argo CD, OpenShift—was meant to showcase the value of having a central hub for everything developers need for an end-to-end Secure Software Development Lifecycle.
Implementation
Step 1: Turn the resources into skeleton
After installing Developer Hub and getting it up and running, the resource templates developers were previously copy-pasting were turned into a skeleton which the scaffolding template will later populate. Conceptually, this is similar to a helm template in the sense that values get substituted and a manifest is rendered out.
apiVersion: v1
kind: Secret
metadata:
  name:  gitlab-runner-secret-${{ values.runnerName }}
  namespace: ${{ values.namespace }}
type: Opaque
stringData:
  runner-registration-token: ${{ values.runnerToken }}
---
apiVersion: apps.gitlab.com/v1beta2
kind: Runner
metadata:
  name: ${{ values.runnerName }}
  namespace: ${{ values.namespace }}
spec:
  imagePullPolicy: Always
  gitlabUrl: ${{ values.gitlabUrl }}
  token: ${{ values.runnerToken }}
  tags: ${{ values.runnerTags }}
Step 2: Write scaffolding template
The values are filled in by the user through a form. This is made possible by a template that allows us to define what inputs we want to collect from users, the input validation, and the actions to process the scaffolded resource.
apiVersion: scaffolder.backstage.io/v1beta3
kind: Template
metadata:
  name: gitlab-runner-deployment
  title: GitLab runner deployment on Kubernetes
  description: Deploys an instance of a GitLab runner custom resource to a target cluster in a user-specified namespace.
  tags:
    - gitlab
    - kubernetes
spec:
  owner: pfeifferj
  system: gitlab
  type: service
  parameters:
    - title: GitLab Runner Configuration
      required:
        - authToken
        - cluster
        - gitlabUrl
        - namespace
        - runnerName
        - runnerToken
      properties:
        authToken:
          type: string
          title: Kubernetes auth token
          description: Personal or ServiceAccount Token used to apply resources.
          ui:backstage:
            review:
              mask: '[MASKED]'
        cluster:
          type: string
          title: Kubernetes Cluster
          enum:
            - https://api.ocp4-dev.josie.cloud:6443 # CHANGE ME
            - https://api.ocp4-tst.josie.cloud:6443 # CHANGE ME
            - https://api.ocp4-prd.josie.cloud:6443 # CHANGE ME
          enumNames:
            - dev cluster
            - test cluster
            - prod cluster
        gitlabUrl:
          type: string
          title: GitLab instance
          description: URL for your GitLab instance.
          default: https://gitlab.com
        namespace:
          type: string
          title: Target Kubernetes Namespace
          description: The Kubernetes Namespace the runner will be deployed to.
        runnerName:
          type: string
          title: Runner Name
          description: Name used by the runner.
        runnerTags:
          type: string
          title: Runner tags
          description: Runner tags to control which jobs a runner can pick up.
        runnerToken:
          type: string
          title: Runner Registration Token
          description: Token used to register the runner with GitLab.
          ui:backstage:
            review:
              mask: '[MASKED]'
  steps:
    - id: generate-manifests
      name: Create Resource from Template
      action: fetch:template
      input:
        url: ./skeleton
        values:
          gitlabUrl: ${{ parameters.gitlabUrl }}
          namespace: ${{ parameters.namespace }}
          runnerName: ${{ parameters.runnerName }}
          runnerTags: ${{ parameters.runnerTags }}
          runnerToken: ${{ parameters.runnerToken }}
    - id: read-manifest
      name: Read manifest
      action: read:file
      input:
        filename: gitlab-runner.yaml
    - id: deploy-runner
      name: Deploy GitLab Runner
      action: deploy:kubernetes
      input:
        authToken: ${{ parameters.authToken }}
        clusterUrl: ${{ parameters.cluster }}
        manifest: ${{ steps['read-manifest'].output.content }}
  output:
    links:
      - url: '${{ parameters.gitlabUrl }}/admin/runners'
        title: GitLab Runner Settings
The template uses masking for sensitive information like the Kubernetes auth tokens and the runner registration token. This ensures that these values are obscured in any review interfaces, enhancing security.
Enum values for the Kubernetes cluster URLs are defined with friendly names (dev, test, prod), making it easier for users to select the correct environment without needing to remember complex URLs.
Users are prompted to provide specific configuration details such as the GitLab URL, runner name, and tags. This flexibility allows for tailored deployments based on the user's specific needs.
Upon completion, the template provides a direct link to the GitLab Runner settings page for the newly deployed runner. This facilitates immediate access to configure or review the runner settings in the GitLab instance.
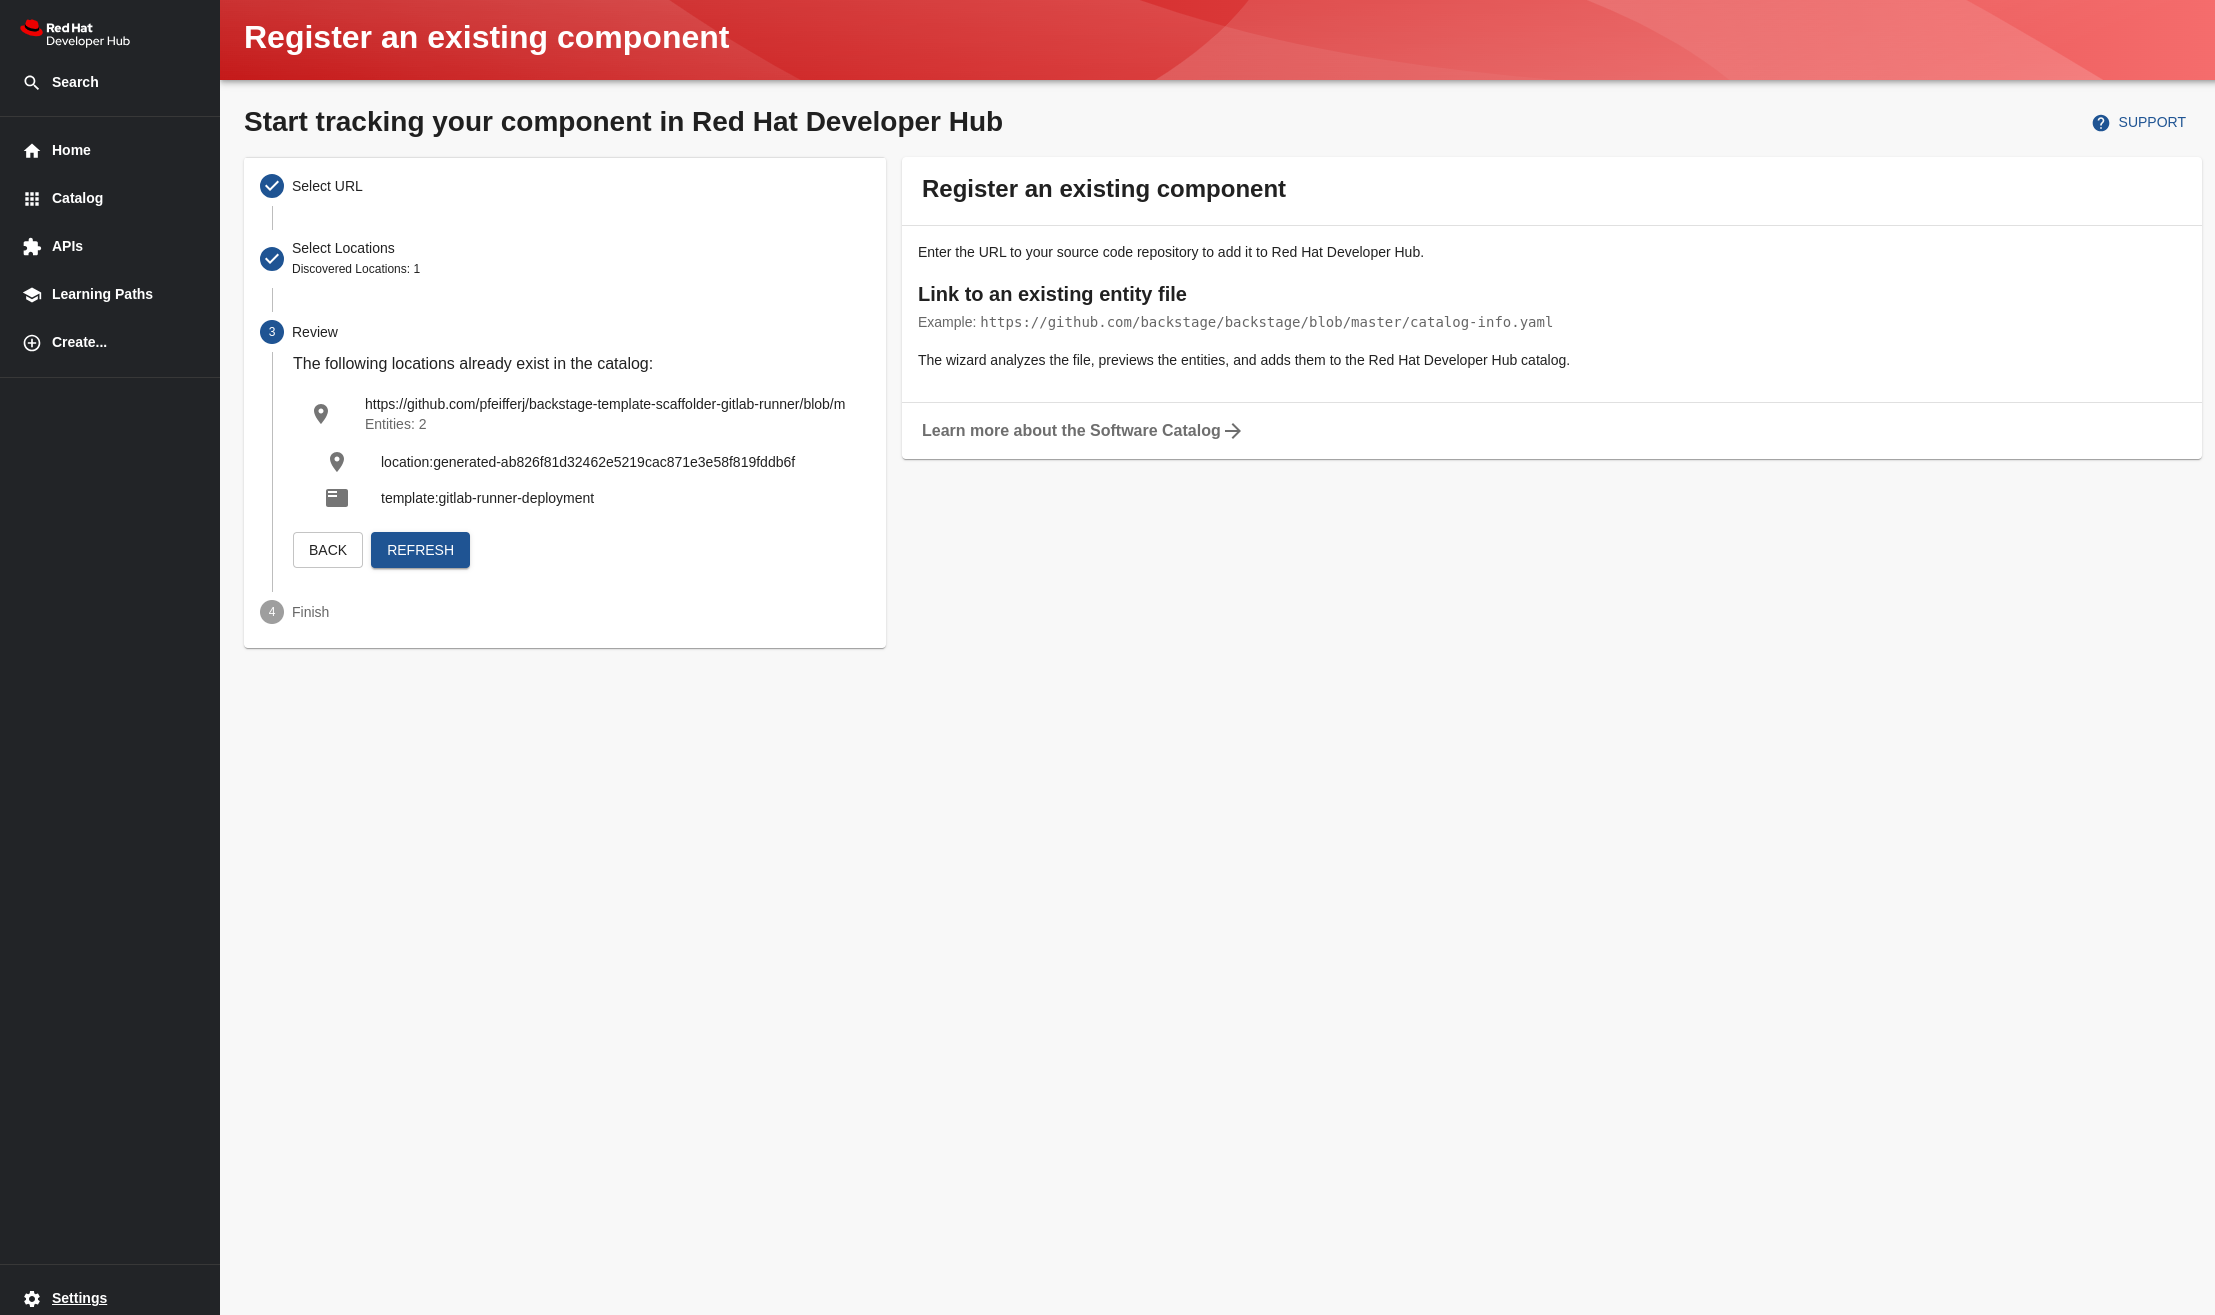
Next, we want to import the template into Developer Hub. To do this, we click Create… -> Register an existing component -> paste the GitHub link to the template.yaml and click analyze (see Figure 1).
Templates imported this way are stored in the database and thus survive pod restarts. It is also possible to include templates as code by creating an app config referencing the relevant catalog source.
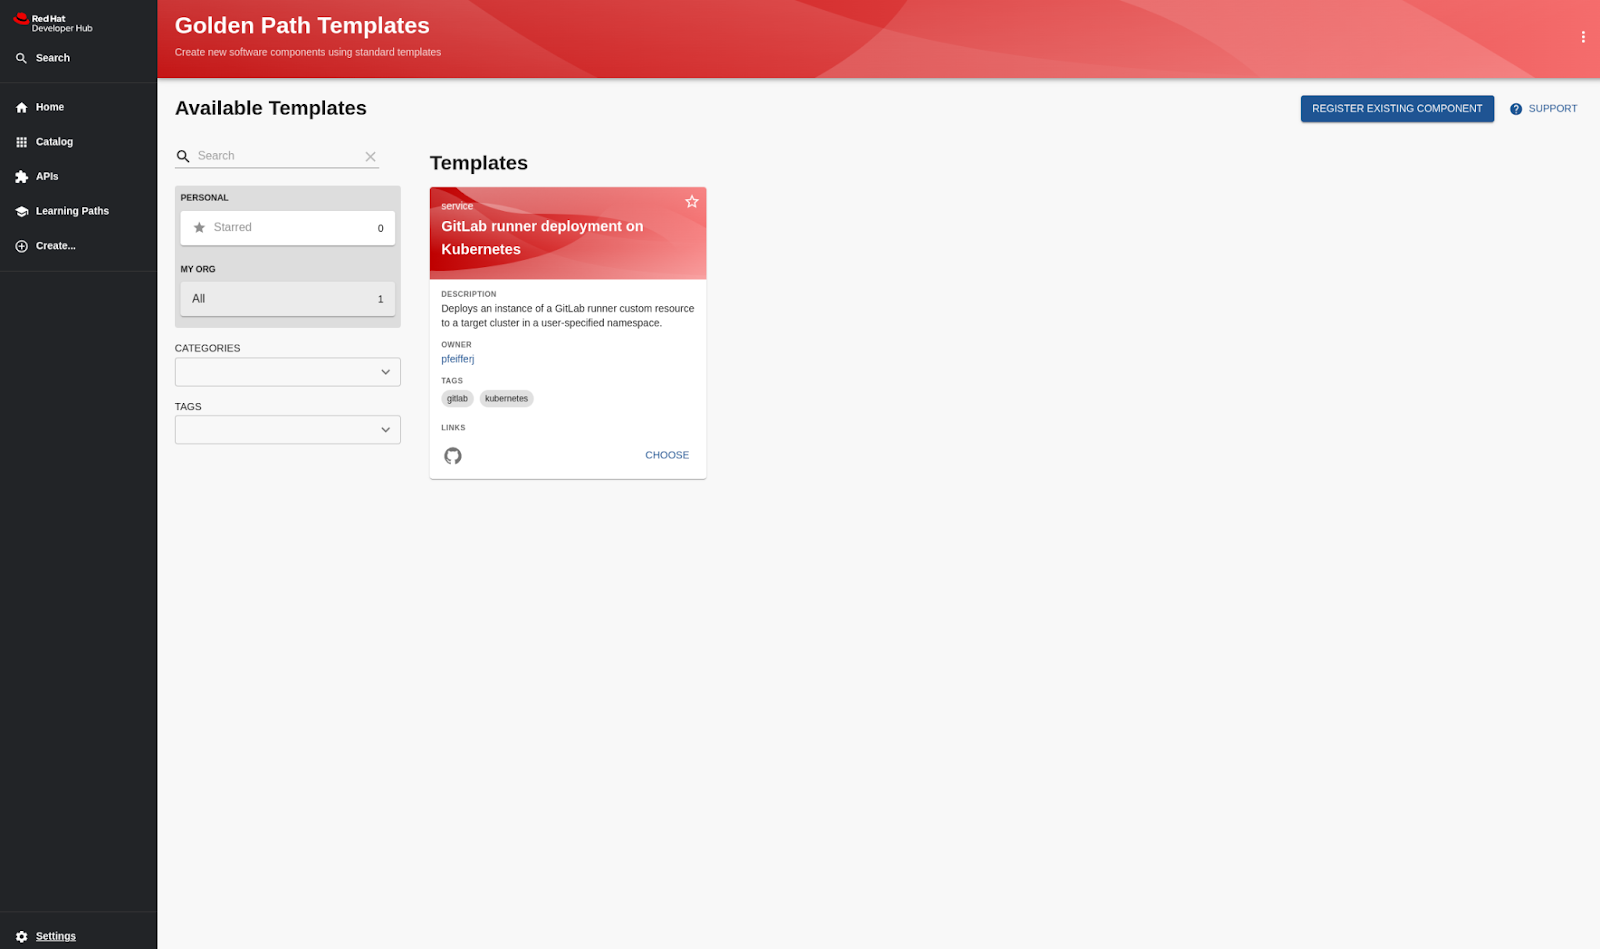
The template has been imported and now shows up in the catalog if the user clicks Create… again, as shown in Figure 2.
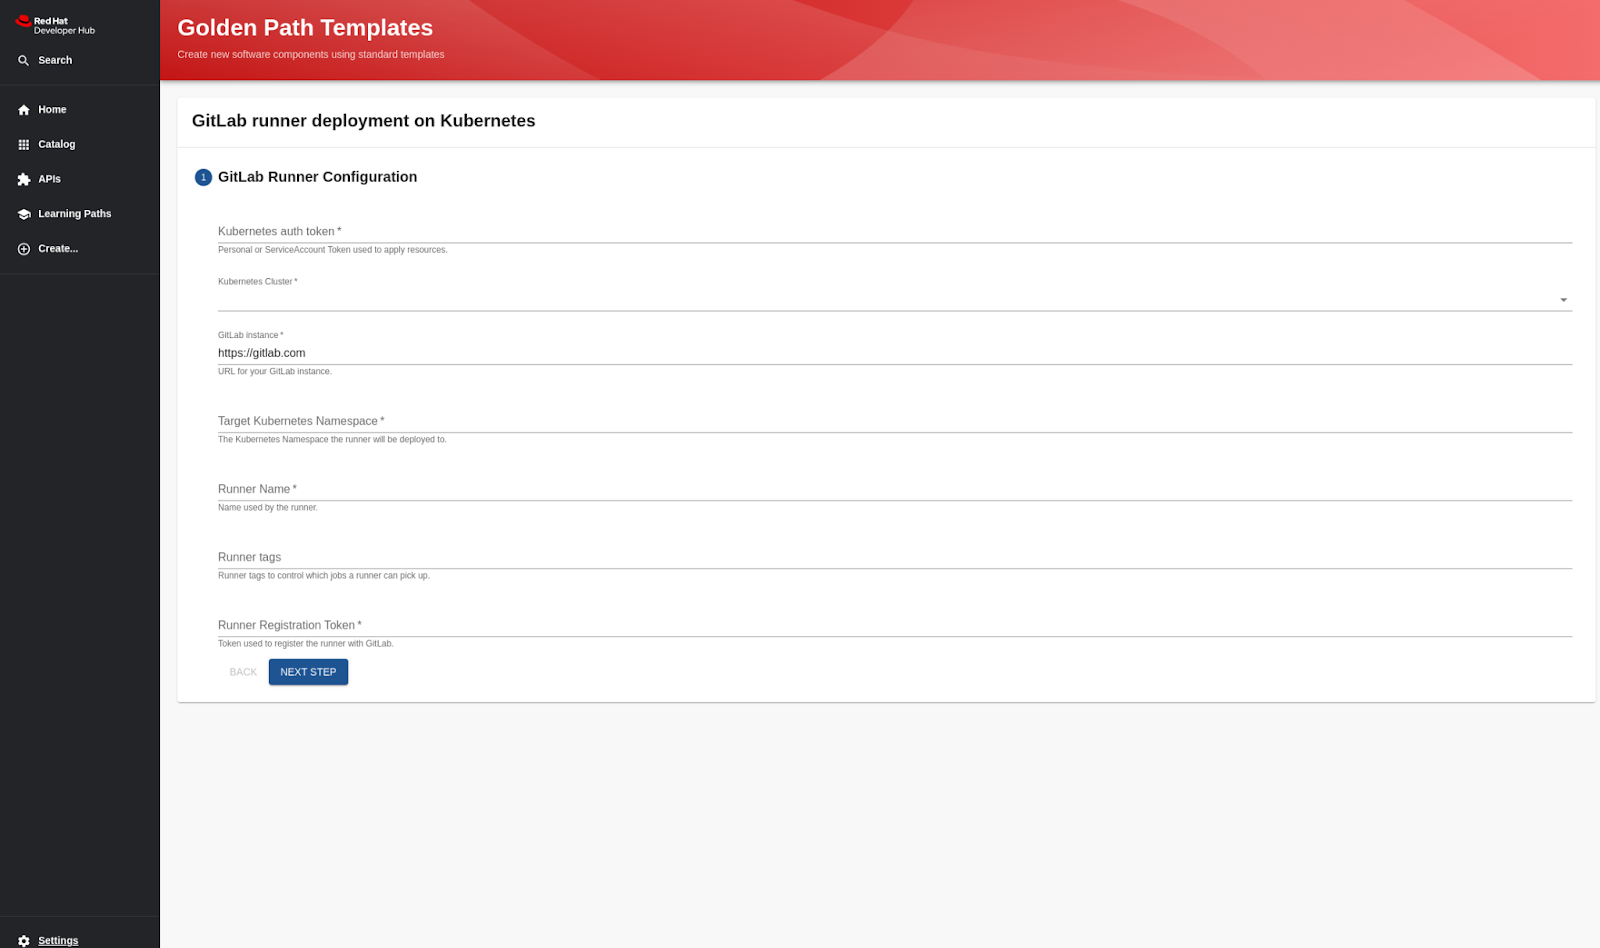
We can test the template by clicking Choose, which takes us to the form. This is shown in Figure 3.
Step 3: Write actions
The preferred way to deploy Kubernetes resources is with Helm charts, using GitOps principles. However, in this case this wasn’t a feasible solution because most of the client’s end users had not yet adopted GitOps. Therefore, another action was required to mimic the behavior of oc apply -f manifest.yaml to apply the generated manifest.
The Backstage CLI helps developers get started with plug-in creation.
npx @backstage/cli@latest new --scope @pfeifferj will bootstrap the required project structure.
The action used the Kubernetes client node library under the hood:
import { createTemplateAction } from '@backstage/plugin-scaffolder-backend';
import { KubeConfig, KubernetesObjectApi } from '@kubernetes/client-node';
import * as yaml from 'js-yaml';
The authentication to the cluster is delegated, i.e. the users use their personal token and the action thus inherits their permissions.
In the future, this could be streamlined using Red Hat's single-sign on technology and having the scaffolding template read from the user context similarly how it can already read logged in users’ username or email, for example, ${{ user.entity.spec.profile.email }}.
The user inputs clusterUrl and authToken are used to generate a kubeConfig.
clusterUrl: {
    title: 'Cluster URL',
    description: 'URL of the Kubernetes API',
    type: 'string',
},
authToken: {
    title: 'Token',
    description: 'Bearer token to authenticate with the Kubernetes API',
    type: 'string',
}
Which is then used to create an API client, which then applies the manifest:
const api = kubeConfig.makeApiClient(KubernetesObjectApi);
const resources = yaml.loadAll(manifest) as KubernetesResource[];

...
for (const resource of resources) {
try {
        const result = await api.create(resource);
...
See the complete code on GitHub.
To load the plug-ins dynamically, we need to edit the developer-hub-dynamic-plugins ConfigMap:
oc edit cm developer-hub-dynamic-plugins -n backstage

...
plugins:
  - package: '@pfeifferj/backstage-scaffolder-backend-module-kubernetes-deploy-dynamic'
    integrity: 'sha512-AwysOmmabZ4mtqk8Z4lb7OHO0j8xtsjOYL+DGnIscIw2RdM6zIjsanbM2EWrLw+Q4N3cEht0gRJAjxW7SWEoFQ==' # get using npm info <package>
    disabled: false
Next, we can verify the plugins are loaded correctly by checking the logs of the install-dynamic-plugins container in the backstage-developer-hub pod.
oc logs -l app.kubernetes.io/component-backstage -c install-dynamic-plugins

...
======= Installing dynamic plugin @pfeifferj/plugin-scaffolder-backend-module-read-file
==> Grabbing package archive through `npm pack`
==> Verifying package integrity
==> Removing previous plugin directory /dynamic-plugins-root/pfeifferj-plugin-scaffolder-backend-module-read-file-0.0.8
==> Extracting package archive /dynamic-plugins-root/pfeifferj-plugin-scaffolder-backend-module-read-file-0.0.8.tgz
Skipping directory entry package
Skipping directory entry package/dist
Skipping directory entry package/src
==> Removing package archive /dynamic-plugins-root/pfeifferj-plugin-scaffolder-backend-module-read-file-0.0.8.tgz
==> Successfully installed dynamic plugin @pfeifferj/plugin-scaffolder-backend-module-read-file
======= Installing dynamic plugin @pfeifferj/plugin-scaffolder-backend-module-kubernetes-deploy
==> Grabbing package archive through `npm pack`
==> Verifying package integrity
==> Removing previous plugin directory /dynamic-plugins-root/pfeifferj-plugin-scaffolder-backend-module-kubernetes-deploy-0.0.25
==> Extracting package archive /dynamic-plugins-root/pfeifferj-plugin-scaffolder-backend-module-kubernetes-deploy-0.0.25.tgz
Skipping directory entry package
Skipping directory entry package/dist
Skipping directory entry package/src
==> Removing package archive /dynamic-plugins-root/pfeifferj-plugin-scaffolder-backend-module-kubernetes-deploy-0.0.25.tgz
==> Successfully installed dynamic plugin @pfeifferj/plugin-scaffolder-backend-module-kubernetes-deploy
Step 4: Putting it all together
With the template imported and the plug-ins installed, the users can now complete the process end-to-end: They fill out the form, the fetch:template action renders the manifest based on the inputs, the manifest is passed to the deploy:kubernetes action to be applied.
Figure 4 shows a high-level abstraction of the scaffolding process as a diagram.

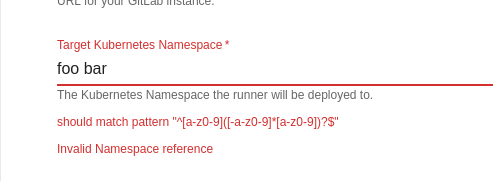
This new process leaves little room for human errors, thanks to the guardrails of the form and input validation which provides the users with instant feedback. An example of this is shown in Figure 5.
The instant validation can be improved even further in the future using custom field extensions.
Additionally, developers benefit from having all the tools and information they need to be productive at their fingertips in a single platform.
Watch a demo video
Check out the following video to see how you can use scaffolding templates and actions in Red Hat Developer Hub to create and deploy custom resources to OpenShift.
Conclusion
Embracing automation and self-service through the adoption of a golden path approach for standardized development workflows represents an important shift towards optimizing operational efficiency and developer productivity.
By systematically increasing capacity and minimizing unnecessary manual work, teams are empowered to allocate more time and resources to projects that drive significant business value. This strategy not only clears roadblocks for developers by smoothing out the development process but also sets the stage for a broader transformation within the organization.
With Red Hat Developer Hub at its core, the client is poised to harness the full potential of this platform, leveraging its capabilities to streamline workflows, enhance self-service options, and ultimately foster an environment where innovation has more space to flourish.
Next steps
The customer was impressed with the pilot and has plans to leverage more self-service and automation capabilities for different manual processes.
If you too are interested to get started on your self-service and automation journey, our Red Hat Developer Hub product page offers further guides, documentation, and support resources to help you navigate and test out the platform:
For practical implementation, explore the GitHub repositories containing the templates and plug-ins referenced in this post. The templates and plug-ins provided are examples and meant to serve as a starting point.
- Scaffolding template: https://github.com/pfeifferj/backstage-template-scaffolder-gitlab-runner
- Dynamic scaffolding action: https://github.com/pfeifferj/backstage-scaffolder-backend-module-kubernetes-deploy-dynamic
- Underlying scaffolding actions:
- Creating dynamic plug-ins: https://github.com/janus-idp/backstage-showcase/blob/main/showcase-docs/dynamic-plugins.md#backend-plugins