Redhat Developers  Logo
  • AI

    Get started with AI

    • Red Hat AI
      Accelerate the development and deployment of enterprise AI solutions.
    • AI learning hub
      Explore learning materials and tools, organized by task.
    • AI interactive demos
      Click through scenarios with Red Hat AI, including training LLMs and more.
    • AI/ML learning paths
      Expand your OpenShift AI knowledge using these learning resources.
    • AI quickstarts
      Focused AI use cases designed for fast deployment on Red Hat AI platforms.
    • No-cost AI training
      Foundational Red Hat AI training.

    Featured resources

    • OpenShift AI learning
    • Open source AI for developers
    • AI product application development
    • Open source-powered AI/ML for hybrid cloud
    • AI and Node.js cheat sheet

    Red Hat AI Factory with NVIDIA

    • Red Hat AI Factory with NVIDIA is a co-engineered, enterprise-grade AI solution for building, deploying, and managing AI at scale across hybrid cloud environments.
    • Explore the solution
  • Learn

    Self-guided

    • Documentation
      Find answers, get step-by-step guidance, and learn how to use Red Hat products.
    • Learning paths
      Explore curated walkthroughs for common development tasks.
    • Guided learning
      Receive custom learning paths powered by our AI assistant.
    • See all learning

    Hands-on

    • Developer Sandbox
      Spin up Red Hat's products and technologies without setup or configuration.
    • Interactive labs
      Learn by doing in these hands-on, browser-based experiences.
    • Interactive demos
      Click through product features in these guided tours.

    Browse by topic

    • AI/ML
    • Automation
    • Java
    • Kubernetes
    • Linux
    • See all topics

    Training & certifications

    • Courses and exams
    • Certifications
    • Skills assessments
    • Red Hat Academy
    • Learning subscription
    • Explore training
  • Build

    Get started

    • Red Hat build of Podman Desktop
      A downloadable, local development hub to experiment with our products and builds.
    • Developer Sandbox
      Spin up Red Hat's products and technologies without setup or configuration.

    Download products

    • Access product downloads to start building and testing right away.
    • Red Hat Enterprise Linux
    • Red Hat AI
    • Red Hat OpenShift
    • Red Hat Ansible Automation Platform
    • See all products

    Featured

    • Red Hat build of OpenJDK
    • Red Hat JBoss Enterprise Application Platform
    • Red Hat OpenShift Dev Spaces
    • Red Hat Developer Toolset

    References

    • E-books
    • Documentation
    • Cheat sheets
    • Architecture center
  • Community

    Get involved

    • Events
    • Live AI events
    • Red Hat Summit
    • Red Hat Accelerators
    • Community discussions

    Follow along

    • Articles & blogs
    • Developer newsletter
    • Videos
    • Github

    Get help

    • Customer service
    • Customer support
    • Regional contacts
    • Find a partner

    Join the Red Hat Developer program

    • Download Red Hat products and project builds, access support documentation, learning content, and more.
    • Explore the benefits

How to create an automation mesh with Ansible controller

April 12, 2024
Nagesh Rathod
Related topics:
Automation and management
Related products:
Red Hat Ansible Automation Platform

    Automation has become a key factor in streamlining operations, reducing human errors, and improving overall efficiency. One popular tool that has revolutionized automation is Red Hat Ansible Automation Platform, an enterprise automation platform. Ansible's versatility and ease of use make it a great choice for managing complex IT infrastructure. In this article, we'll explore different types of nodes, peering relationships, and how Ansible controllers orchestrate the nodes as part of an automation mesh.

    Automation mesh

    Automation mesh is a key component of Ansible Automation Platform that enables customers to automate at scale in a cloud-native way. It gives customers maximum flexibility in planning distributed, remote, or otherwise complex automation deployments, along with visibility, control, and reporting.

    Ansible controller

    The controller acts as a central hub that orchestrates and manages automation tasks across the network. It provides a single point of control and enables administrators to define and execute automation workflows effortlessly.

    Types of nodes

    A node represents a specific computing device or system that is managed by the configuration management tool. Each node is usually assigned a unique identifier, and the tool can interact with and configure the nodes based on their individual specifications.

    • Control plane nodes: These are  accessed either via the web UI and API. Execution capabilities are disabled on these nodes. 

                 node_type=control

    • Execution nodes: This is where Ansible playbooks are actually executed.  This node will run an automation execution environment which in turn runs the Ansible playbook.

                 node_type=execution

    • Hop nodes: These optional nodes can be used to interconnect control nodes and Execution nodes. 

                 node_type=hop

    • Hybrid nodes: This performs automation controller runtime functions as well as executing automation (not covered in this blog).

                 node_type=hybrid

    Receptors

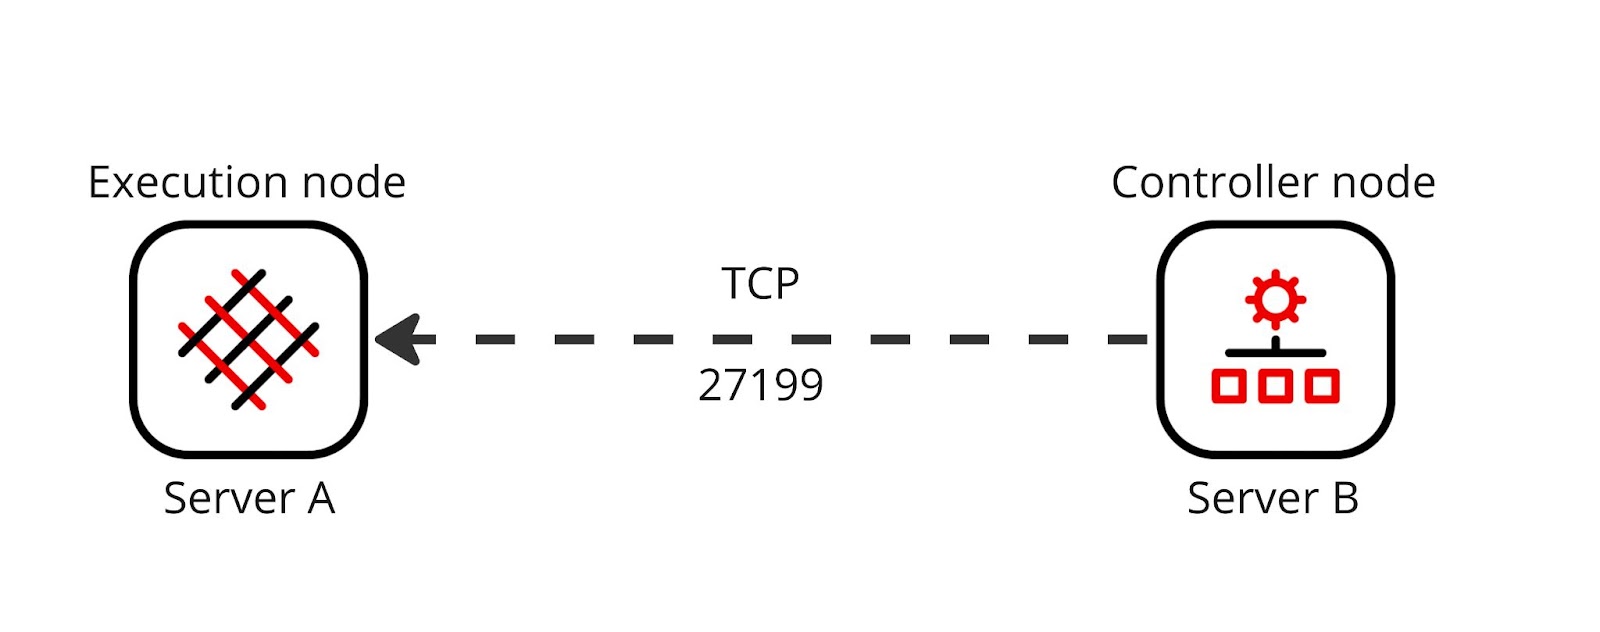
    Receptor is another upstream project used by Ansible Automation Platform. Using this technology, you can connect controller, hop, and execution nodes through an overlay network. It is part of the Ansible Automation Platform installer. On each node in your automation overlay, there will be a receptor application that runs as a daemon. The following diagram (Figure 1) defines secure connection between controller node and execution nodes.

    receptor
    Figure 1: Receptor connectivity between  Execution & Controller nodes.

    Prerequisites

    • Installed Ansible controller.
    • Execution and hop nodes with Red Hat Enterprise Linux (RHEL) 8.4+ installed.
    • Activate subscription manager in execution/hop node.
    • ssh connectivity between controller node, execution node, hop node.
    • The following ports need to open on nodes.

    Port

    Protocol

    Service

    Ansible var

    Required for

    22

    TCP

    SSH

    ansible_port

    Installation

    27199

    TCP

    Receptor

    receptor_listener_port

    Listening port for receptor connection.

    443*

    TCP

    Podman

    N/A

    Access to a container registry for execution environments (e.g. registry.redhat.io or private automation hub).  Configurable server side on your registry.

    Installation of automation controller with execution nodes

    To install automation controllers, you can refer to this blog. Visit our product page to download Ansible Automation Platform. In this tutorial we are covering extensions of Ansible such as connecting execution nodes and hop nodes with Automation controllers.

    To create automation mesh, we have to define all the configurations inside the Inventory file. The connectivity is totally based on how we define the values inside the file. The following example covers a single automation controller and two execution nodes.

    After downloading the Ansible Automation platform bundle, extract it. After that, make the changes in the inventory file as per the following parameters.

    [automationcontroller]
    fqdn ansible_connection=local
    
    
    [all:vars]
    admin_password='redhat’' 
    
    pg_host=''
    pg_port=''
    pg_database='awx'
    pg_username='awx'
    pg_password='redhat'
    
    
    [execution_nodes]
    aap_e_1.example.com  ansible_ssh_user=rhel  ansible_become=true node_type=execution peers=aap_e_2.example.com  ansible_ssh_user=rhel  ansible_become=true
    
    aap_e_2.example.com  ansible_ssh_user=rhel  ansible_become=true node_type=execution
    
    
    [autometioncontroller:vars]
    peers=execution_nodes
    node_type=control

    After updating Inventory file, you can start the installation process. The following command will trigger the installation process.

    sudo ./setup.sh

    The installation process takes time. After successful installation, log in to automation controller UI using defined credentials in the inventory file. From the[all:vars] section you can get your password for the controller and your username will be admin.

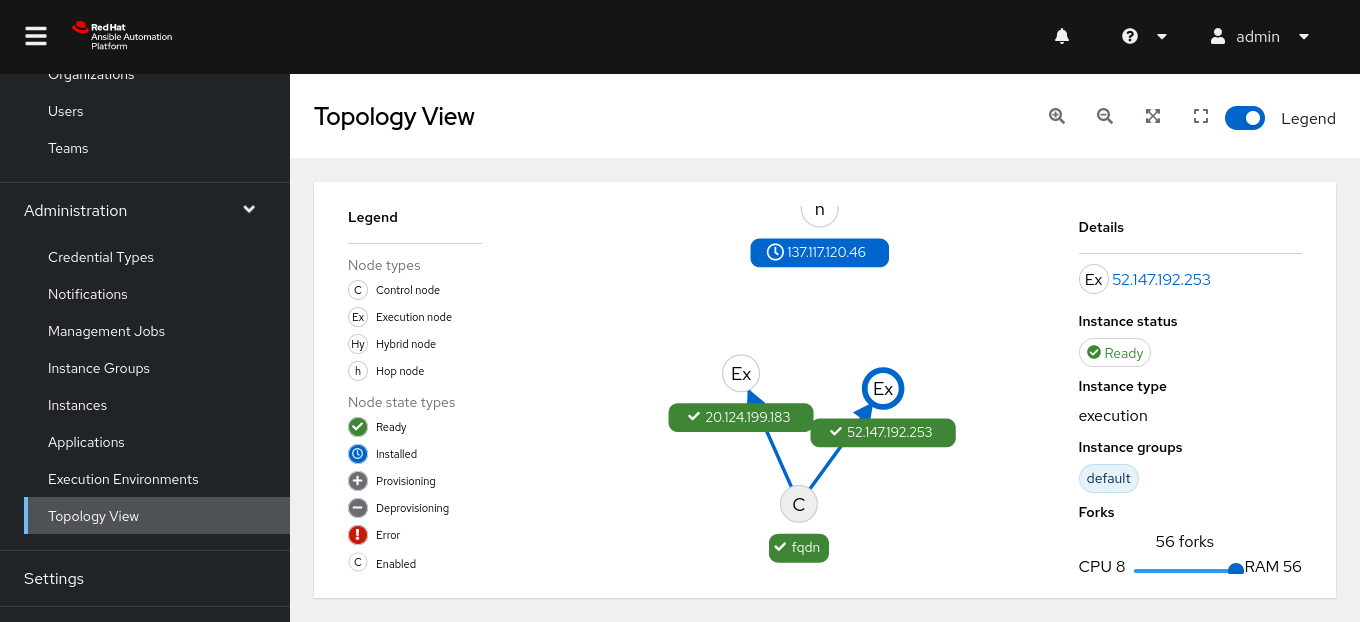
    Go to https://localhost and log in to the automation controller. To see execution and hop nodes are connected with automation controller, go to Topology View from left menu under Administration. You will get the view as shown below (Figure 2).

    topology
    Figure 2: Topology view of mesh.

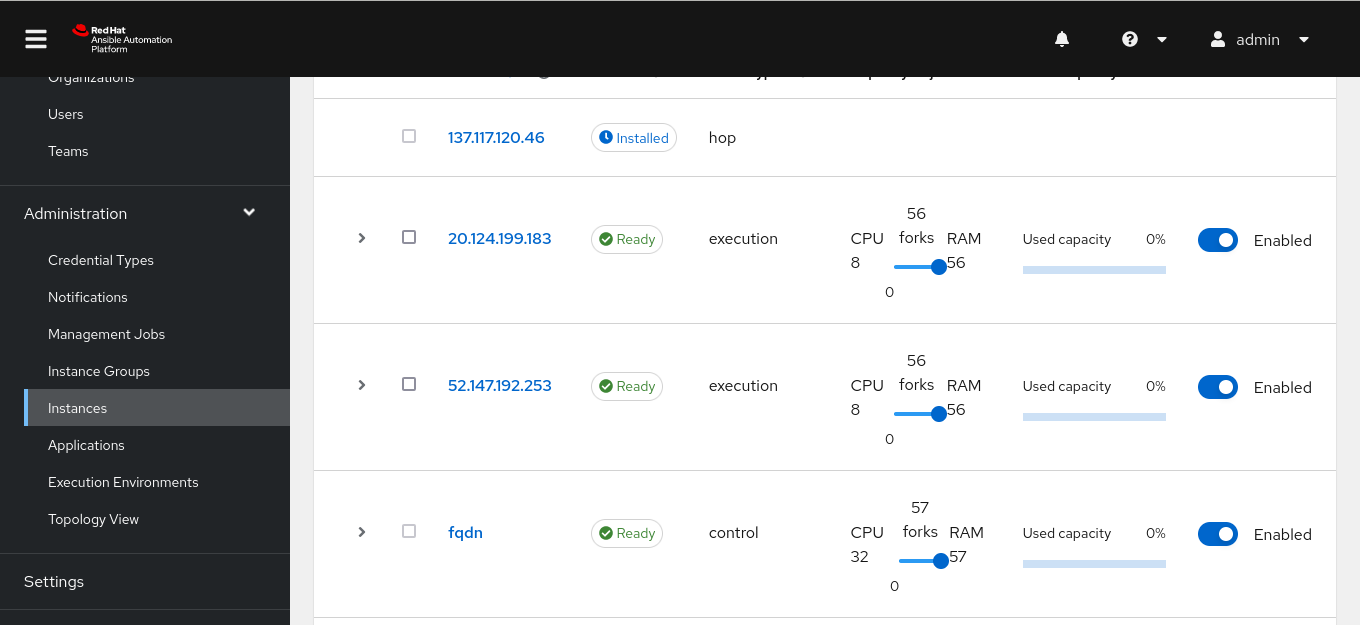
    To see the utilization of connected execution nodes, you can visit the left menu under Administration and click on Instances. From this you can control the instances/servers from the following panel (Figure 3).

    instances
    Figure 3: Connected instances with Controller.

    It is possible to create a more complex mesh network according to your requirements. The following are some of the more complicated mesh designs covered with inventory files.

    First automation mesh design example

    Figure 4 shows an automation mesh design example.

    [automationcontroller]
    fqdn ansible_connection=local
    
    
    [execution_nodes]
    aap_e_1.example.com
    aap_e_2.example.com
    aap_h_1.example.com
    aap_e_3.example.com
    
    
    [instance_group_local]
    aap_e_1.example.com
    aap_e_2.example.com
    
    
    [hop]
    aap_h_1.example.com
    
    
    [hop:vars]
    peers=instance_group_local
    
    
    [instance_group_remote]
    aap_e_3.example.com
    
    
    [instance_group_remote:vars]
    peers=hop
    
    
    [automationcontroller:vars]
    node_type=control
    peers=hop
    peers=instance_group_remote
    mesh1
    Figure 4: Automation mesh design 1.

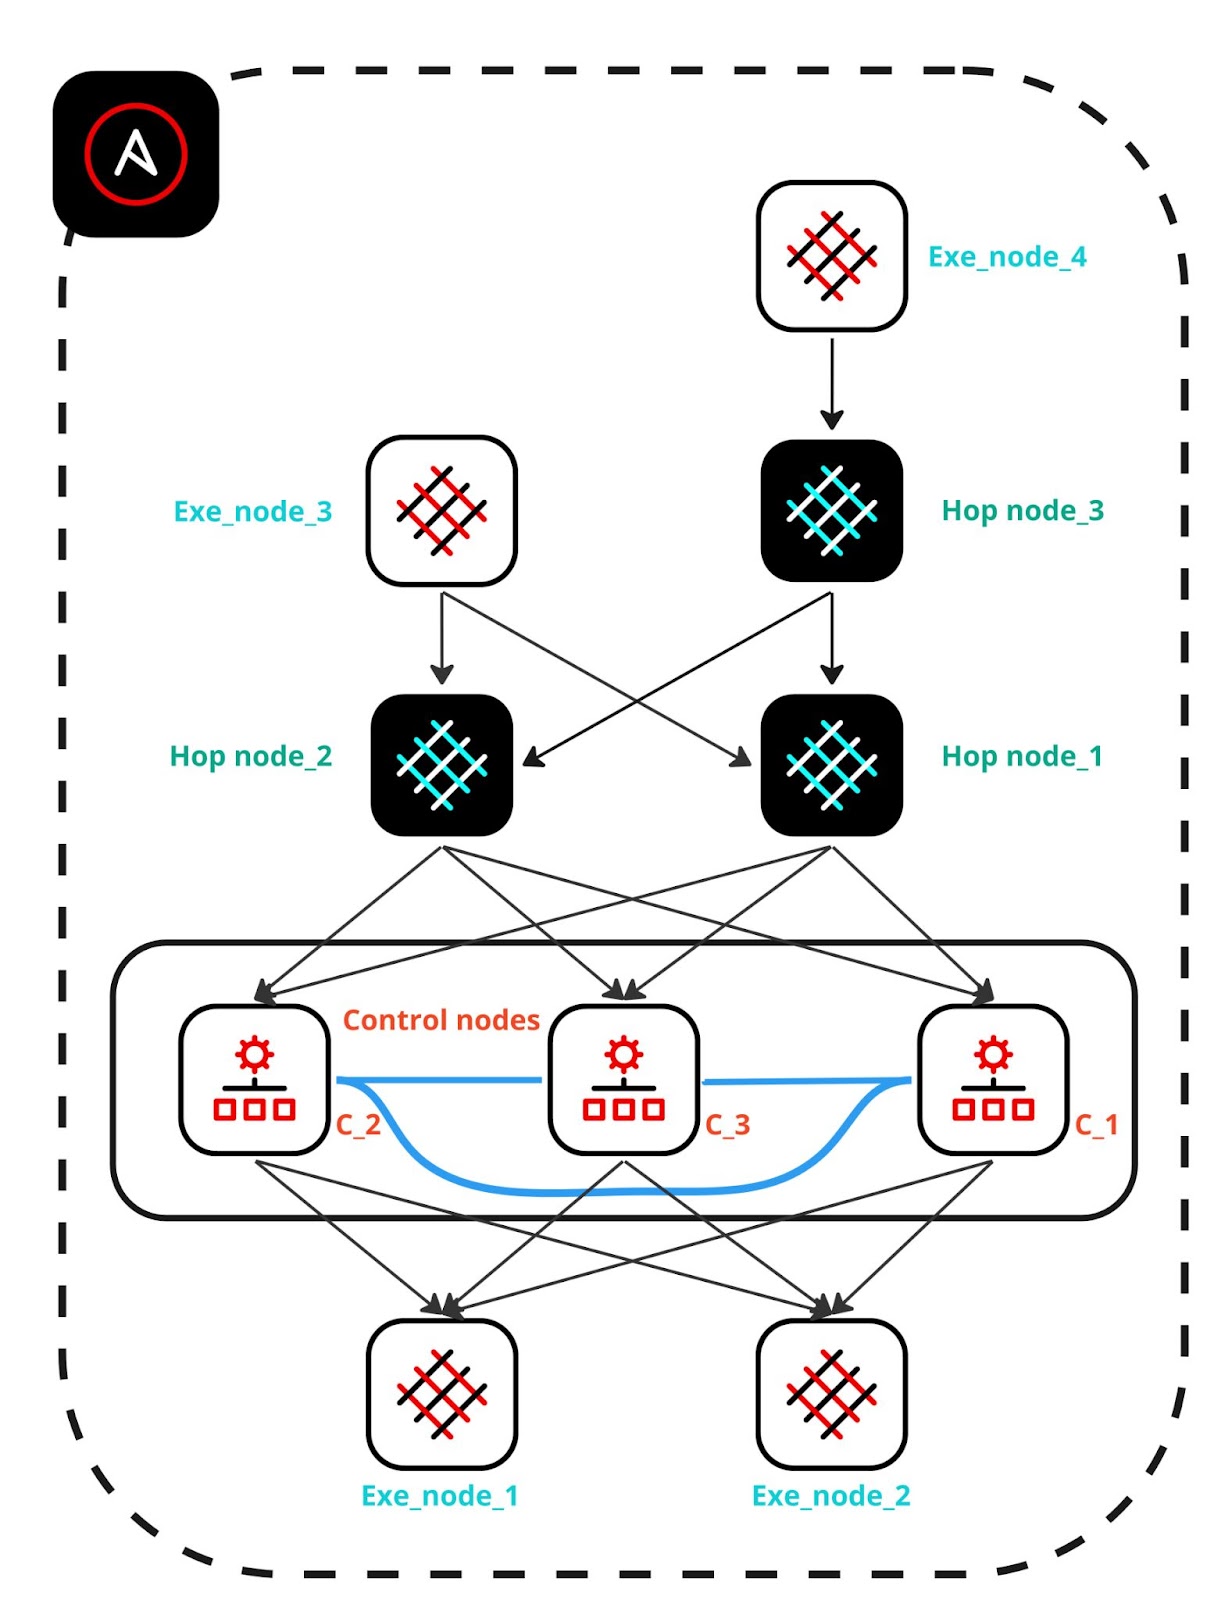
    Second automation mesh design example

    Figure 5 illustrates another example automation mesh design.

    [automationcontroller]
    aap_c_1.example.com
    aap_c_2.example.com
    aap_c_3.example.com
    
    
    [automationcontroller:vars]
    node_type=control
    peers=instance_group_local
    
    
    [execution_nodes]
    aap_e_1.example.com
    aap_e_2.example.com
    aap_e_3.example.com
    aap_e_4.example.com
    aap_h_1.example.com node_type=hop
    aap_h_2.example.com node_type=hop
    aap_h_3.example.com node_type=hop
    
    
    [instance_group_local]
    aap_e_1.example.com
    aap_e_2.example.com
    
    
    [instance_group_remote]
    aap_e_3.example.com
    
    
    [instance_group_remote:vars]
    peers=local_hop
    
    
    [instance_group_multi_hop_remote]
    aap_e_4.example.com
    
    
    [instance_group_multi_hop_remote:vars]
    peers=remote_multi_hop
    
    
    [local_hop]
    aap_h_1.example.com
    aap_h_2.example.com
    
    [local_hop:vars]
    peers=automationcontroller
    
    
    [remote_multi_hop]
    aap_h_3 peers=local_hop
    mesh2
    Figure 5: Automation mesh design 2

    Continue your automation journey with Ansible Automation Platform

    Utilizing your infrastructure to its full potential can be achieved with automation mesh, which is the next level of automated processes.

    Get started with Ansible Automation Platform by exploring interactive hands-on labs. Download Ansible Automation Platform at no cost and begin your automation journey.

    Related Posts

    • OpenShift application monitoring with Event-Driven Ansible & Alertmanager

    • How to install Red Hat Ansible Automation Platform on RHEL 9

    • How to create execution environments using ansible-builder

    • 6 steps to install Ansible Automation Platform 2.3 on RHEL

    • Introducing Ansible Molecule with Ansible Automation Platform

    • How to employ continuous deployment with Ansible on OpenShift

    Recent Posts

    • Red Hat Enterprise Linux 10.2 and 9.8: Top features for developers

    • What GPU kernels mean for your distributed inference

    • Debugging image mode with Red Hat OpenShift 4.20: A practical guide

    • EvalHub: Because "looks good to me" isn't a benchmark

    • SQL Server HA on RHEL: Meet Pacemaker HA Agent v2 (tech preview)

    What’s up next?

    SSH into remote machines

    Ansible uses SSH protocol to connect to servers and run tasks, providing flexible and secure options for remote connectivity. This cheat sheet outlines two different methods to manage and configure remote hosts.

    Get the cheat sheet
    Red Hat Developers logo LinkedIn YouTube Twitter Facebook

    Platforms

    • Red Hat AI
    • Red Hat Enterprise Linux
    • Red Hat OpenShift
    • Red Hat Ansible Automation Platform
    • See all products

    Build

    • Developer Sandbox
    • Developer tools
    • Interactive tutorials
    • API catalog

    Quicklinks

    • Learning resources
    • E-books
    • Cheat sheets
    • Blog
    • Events
    • Newsletter

    Communicate

    • About us
    • Contact sales
    • Find a partner
    • Report a website issue
    • Site status dashboard
    • Report a security problem

    RED HAT DEVELOPER

    Build here. Go anywhere.

    We serve the builders. The problem solvers who create careers with code.

    Join us if you’re a developer, software engineer, web designer, front-end designer, UX designer, computer scientist, architect, tester, product manager, project manager or team lead.

    Sign me up

    Red Hat legal and privacy links

    • About Red Hat
    • Jobs
    • Events
    • Locations
    • Contact Red Hat
    • Red Hat Blog
    • Inclusion at Red Hat
    • Cool Stuff Store
    • Red Hat Summit
    © 2026 Red Hat

    Red Hat legal and privacy links

    • Privacy statement
    • Terms of use
    • All policies and guidelines
    • Digital accessibility

    Chat Support

    Please log in with your Red Hat account to access chat support.