The execution environment builder (aka Ansible Builder) is a part of Red Hat Ansible Automation Platform. It is a command-line interface (CLI) tool for building and creating custom execution environments. The Ansible Builder project enables users to automate and accelerate the process of creating execution environments. This article will show you how to install and use the execution environment builder CLI tool.
Installing the execution environment builder
The execution environment builder makes it easier for Ansible Automation Platform content creators and administrators to build custom execution environments. They can use dependency information from various Ansible Content Collections and directly from the user.
Step 1: Install the execution environment builder tool
Install the execution environment builder tool from the Python Package Index (PyPI) by using the following command:
pip install ansible-builderStep 2: Access the ansible-builder subcommands
To access the subcommands of ansible-builder, run build and create commands to get help output.
The build subcommand will build the execution environment using the definition file.
ansible-builder build –helpIt populates the build context and then uses Podman or Docker to create the execution environment image. The help output appears as follows:
usage: ansible-builder build [-h] [-t TAG] [--container-runtime {podman,docker}] [--build-arg BUILD_ARGS] [-f FILENAME] [-c BUILD_CONTEXT]
                             [--output-filename {Containerfile,Dockerfile}] [-v {0,1,2,3}]

Creates a build context (including a Containerfile) from an execution environment spec. The build context will be populated from the execution environment spec. After that, the specified container runtime podman/docker will be invoked to build an image from that definition. After building the image, it can be used locally or published using the
supplied tag.

optional arguments:
  -h, --help            show this help message and exit
  -t TAG, --tag TAG     The name for the container image being built (default: ansible-execution-env:latest)
  --container-runtime {podman,docker}
                        Specifies which container runtime to use (default: podman)
  --build-arg BUILD_ARGS
                        Build-time variables to pass to any podman or docker calls. Internally ansible-builder makes use of ANSIBLE_GALAXY_CLI_COLLECTION_OPTS, EE_BASE_IMAGE,
                        EE_BUILDER_IMAGE.
  -f FILENAME, --file FILENAME
                        The definition of the execution environment (default: execution-environment.yml)
  -c BUILD_CONTEXT, --context BUILD_CONTEXT
                        The directory to use for the build context (default: context)
  --output-filename {Containerfile,Dockerfile}
                        Name of file to write image definition to (default depends on --container-runtime, Containerfile for podman and Dockerfile for docker)
  -v {0,1,2,3}, --verbosity {0,1,2,3}
                        Increase the output verbosity, for up to three levels of verbosity (invoked via "--verbosity" or "-v" followed by an integer ranging in value from 0 to
                        3) (default: 2)
The create subcommand works similar to the build command.
ansible-builder create –helpHowever, it will not build the execution environment image as you will see in the following output:
usage: ansible-builder build [-h] [-t TAG] [--container-runtime {podman,docker}] [--build-arg BUILD_ARGS] [-f FILENAME] [-c BUILD_CONTEXT]
                             [--output-filename {Containerfile,Dockerfile}] [-v {0,1,2,3}]

Creates a build context (including a Containerfile) from an execution environment spec. The build context will be populated from the execution environment spec. After that,
the specified container runtime podman/docker will be invoked to build an image from that definition. After building the image, it can be used locally or published using the
supplied tag.

optional arguments:
  -h, --help            show this help message and exit
  -t TAG, --tag TAG     The name for the container image being built (default: ansible-execution-env:latest)
  --container-runtime {podman,docker}
                        Specifies which container runtime to use (default: podman)
  --build-arg BUILD_ARGS
                        Build-time variables to pass to any podman or docker calls. Internally ansible-builder makes use of ANSIBLE_GALAXY_CLI_COLLECTION_OPTS, EE_BASE_IMAGE,
                        EE_BUILDER_IMAGE.
  -f FILENAME, --file FILENAME
                        The definition of the execution environment (default: execution-environment.yml)
  -c BUILD_CONTEXT, --context BUILD_CONTEXT
                        The directory to use for the build context (default: context)
  --output-filename {Containerfile,Dockerfile}
                        Name of file to write image definition to (default depends on --container-runtime, Containerfile for podman and Dockerfile for docker)
  -v {0,1,2,3}, --verbosity {0,1,2,3}
                        Increase the output verbosity, for up to three levels of verbosity (invoked via "--verbosity" or "-v" followed by an integer ranging in value from 0 to
                        3) (default: 2)
Step 3: Populate the ansible-builder spec
Populate the ansible-builder spec to build the custom execution environment by running the following command:
mkdir project_directory && cd project_directoryPopulate the execution-environment.yml file:
cat <<EOT >> execution-environment.yml
---
version: 1
dependencies:
  galaxy: requirements.yml
EOT
Create a requirements.yml file and populate the contents with the following:
cat <<EOT >> requirements.yml
---
collections:
  - name: servicenow.itsm
EOT
Through the spec and requirements file, we ensure that execution environment builder will download the servicenow.itsm collection while building the execution environment. The default download location is galaxy.ansible.com. You can also point to an automation hub or your own hub instance in the spec file.
Step 4: Build the execution environment
Build the execution environment using the previously created files. Run the following command to create a new custom execution environment called custom-ee:
ansible-builder build -v3 -t custom-eeThe -v3 flag adds verbosity to the CLI run, and -t custom-ee will tag your image with the name you provided.
The output appears as follows:
Ansible Builder is building your execution environment image, "custom-ee".
File context/_build/requirements.yml will be created.
Rewriting Containerfile to capture collection requirements
Running command:
  podman build -f context/Containerfile -t custom-ee context
[1/3] STEP 1/7: FROM registry.redhat.io/ansible-automation-platform-21/ee-minimal-rhel8:latest AS galaxy
[1/3] STEP 2/7: ARG ANSIBLE_GALAXY_CLI_COLLECTION_OPTS=
--> 88d9ea223d0
[1/3] STEP 3/7: USER root
--> 549f29055c2
[1/3] STEP 4/7: ADD _build /build
--> 0d3e9515b12
[1/3] STEP 5/7: WORKDIR /build
--> 3b290acf78c
[1/3] STEP 6/7: RUN ansible-galaxy role install -r requirements.yml --roles-path /usr/share/ansible/roles
Skipping install, no requirements found
--> 8af36370e78
[1/3] STEP 7/7: RUN ansible-galaxy collection install $ANSIBLE_GALAXY_CLI_COLLECTION_OPTS -r requirements.yml --collections-path /usr/share/ansible/collections
Starting galaxy collection install process
Process install dependency map
…
Run the following commands to check the image list:
podman imagesThe output appears as follows:
REPOSITORY                                                   TAG         IMAGE ID           CREATED                SIZE
localhost/custom-ee                                        latest      bfe6c40bad52    21 seconds ago      626 MB
Step 5: Build a complex execution environment
To build a complex execution environment, go back into the project directory with the following command:
cd project_directoryEdit the execution-environment.yml file and add the following content:
cat <<EOT >> execution-environment.yml
---
version: 1
dependencies:
  galaxy: requirements.yml
  python: requirements.txt
  system: bindep.txt
additional_build_steps:
  prepend: |
    RUN whoami
    RUN cat /etc/os-release
  append:
    - RUN echo This is a post-install command!
    - RUN ls -la /etc
EOT
We can see the following:
- Python requirements were added through the requirements.txt file, which will hold the pip dependencies.
- We added a bindep.txt, which will hold the rpm installs.
- Additional build steps that will run before (prepend) and after (append) the build steps.
Now create a new file called requirements.yml and append the following content:
cat <<EOT >> requirements.yml
---

collections:

  - name: servicenow.itsm
  - name: ansible.utils
EOT
We added a new collection called ansible.utils alongside the servicenow.itsm file.
Create a new file called requirements.txt and then append the following:
cat <<EOT >> requirements.txt
gcp-cli
ncclient
netaddr
paramiko
EOT
This contains the Python requirements that need to be installed via pip.
Create a new file called bindep.txt and then append the following:
cat <<EOT >> bindep.txt
findutils [compile platform:centos-8 platform:rhel-8]
gcc [compile platform:centos-8 platform:rhel-8]
make [compile platform:centos-8 platform:rhel-8]
python38-devel [compile platform:centos-8 platform:rhel-8]
python38-cffi [platform:centos-8 platform:rhel-8]
python38-cryptography [platform:centos-8 platform:rhel-8]
python38-pycparser [platform:centos-8 platform:rhel-8]
EOT
This file contains the rpm requirements needed to be installed using dnf.
Run the following build:
ansible-builder build -v3 -t custom-eeThe output is as follows:
Ansible Builder is building your execution environment image, "custom-ee".
File context/_build/requirements.yml will be created.
File context/_build/requirements.txt will be created.
File context/_build/bindep.txt will be created.
Rewriting Containerfile to capture collection requirements
Running command:
  podman build -f context/Containerfile -t custom-ee context
[1/3] STEP 1/7: FROM registry.redhat.io/ansible-automation-platform-21/ee-minimal-rhel8:latest AS galaxy
[1/3] STEP 2/7: ARG ANSIBLE_GALAXY_CLI_COLLECTION_OPTS=
--> Using cache 88d9ea223d01bec0d53eb7efcf0e76b5f7da0285a411f2ce0116fe9641cbc3a0
--> 88d9ea223d0
[1/3] STEP 3/7: USER root
--> Using cache 549f29055c2f1ba0ef3f7c5dfdc67a40302ff0330af927adb94fbcd7b0b1e7b4
--> 549f29055c2
[1/3] STEP 4/7: ADD _build /build
--> 6b9ee91e773
[1/3] STEP 5/7: WORKDIR /build
--> 5518e019f2d
[1/3] STEP 6/7: RUN ansible-galaxy role install -r requirements.yml --roles-path /usr/share/ansible/roles
Skipping install, no requirements found
--> 60c1605d66c
[1/3] STEP 7/7: RUN ansible-galaxy collection install $ANSIBLE_GALAXY_CLI_COLLECTION_OPTS -r requirements.yml --collections-path /usr/share/ansible/collections
Starting galaxy collection install process
Process install dependency map
You can check the context or Containerfile to see all the steps you took to build the execution environment. You can transfer the context directory to a different server and replicate the image creation via docker or podman commands.
Pushing the execution environment to a private automation hub
Log in to the private automation hub by using the podman command:
podman login <automation hub url>Then tag the image before pushing it to the hub as follows:
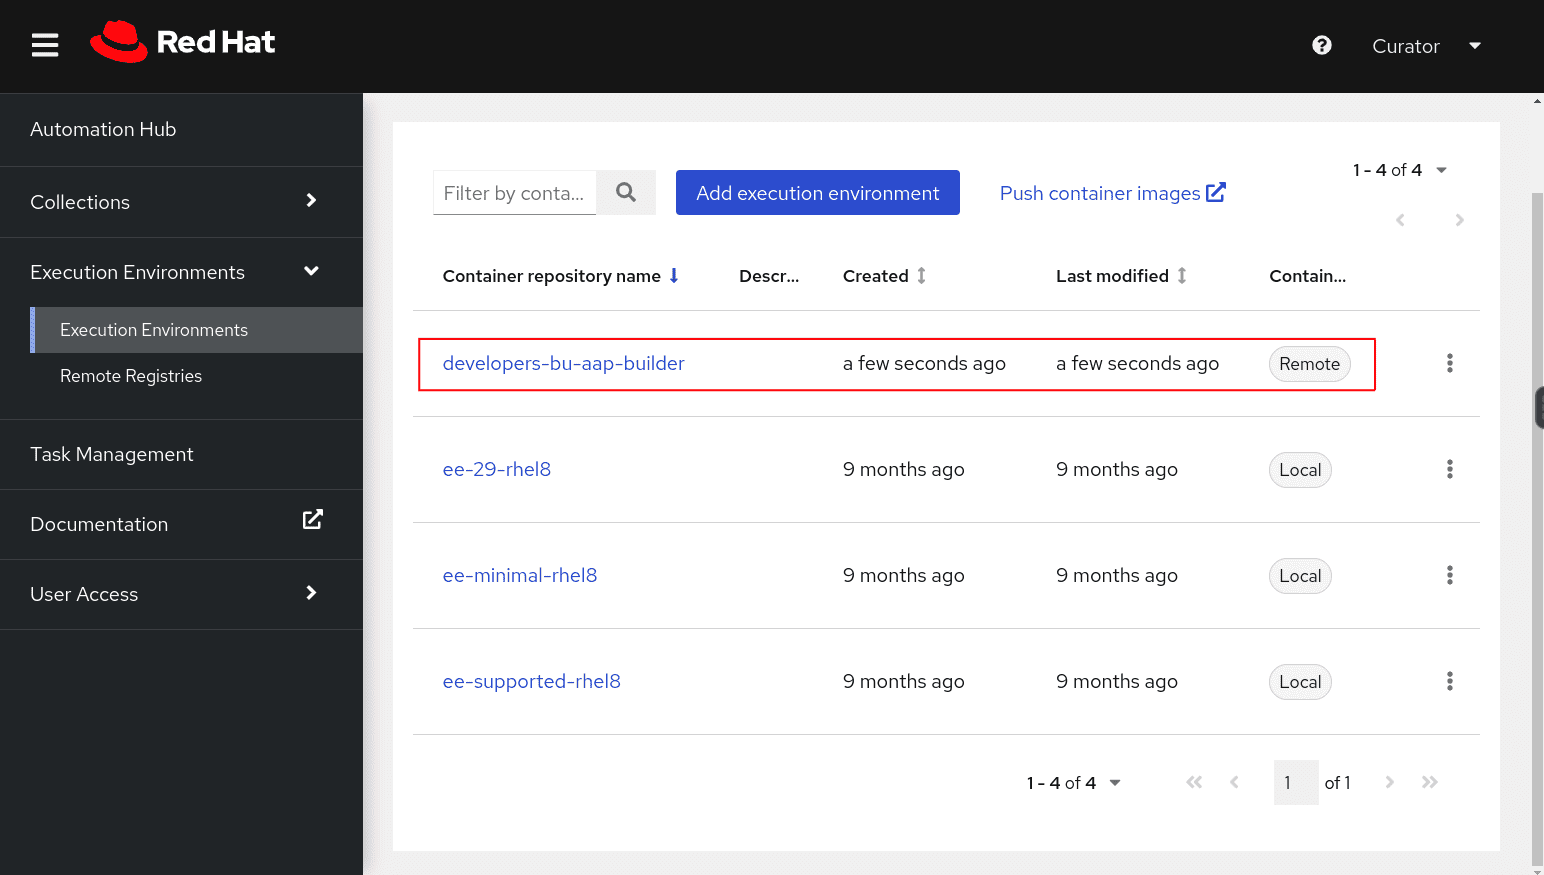
podman tag localhost/custom-ee <automation hub url>/developers-bu-aap-builderFinally, push it to the private automation hub as follows:
podman push <automation hub url>/developers-bu-aap-builderWe can see the image pushed to the private automation hub in Figure 1:
Continue your automation journey with Ansible Automation Platform
Get started with Ansible Automation Platform by exploring interactive labs. Check out Red Hat’s hands-on labs for all skill levels to learn more. The wide range of labs include useful Linux commands, Install software using package managers, and Deploying containers using container tools [podman]. Try these labs to see your favorite products in action. Ansible Automation Platform is also available as a managed offering on Microsoft Azure and as a self-managed offering on AWS.
Last updated: May 30, 2025