In our previous article, we learned how to create a continuous integration pipeline on Red Hat OpenShift using Jenkins. In this article, we will learn how to perform continuous deployment on OpenShift using the Red Hat Ansible Automation Platform.
Follow the series:
- Part 1: Continuous integration with Jenkins on OpenShift
- Part 2: Continuous deployment using Ansible Automation Platform on OpenShift
- Part 3: How a manual intervention pipeline restricts deployment
This article assumes that you have basic knowledge of Jenkins, OpenShift, and Ansible Automation Platform. You will need administrator privileges for your Openshift cluster to execute this blog.
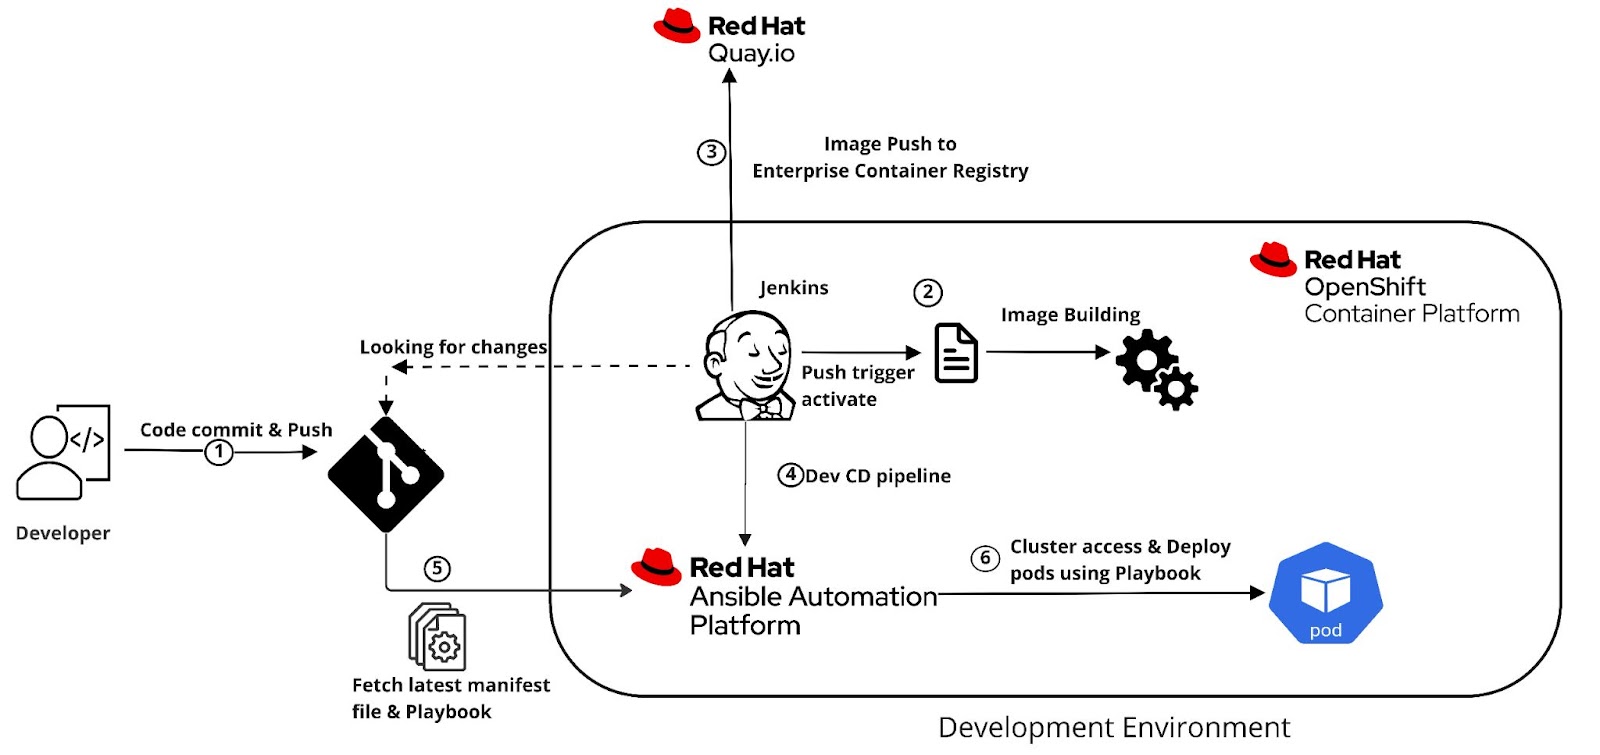
The CD pipeline architecture
The architecture diagram in Figure 1 illustrates all actions that occur after developers push and when Jenkins detects the changes to help with polling or webhooks. When Jenkins triggers the Ansible Automation Platform, continuous integration will occur. The Ansible Automation Platform fetches the playbook and configuration files over Git, which are required for the deployment of game applications. With the help of a template, Ansible Automation Platform deploys the application to the OpenShift cluster.
Prerequisites
Here is the list of resources required to implement this solution in your environment:
- An OpenShift cluster with admin privileges
- Ansible Automation Platform Deployment and Configuration on OpenShift
- Ansible tower OpenShift setup script
The requirements mentioned in OpenShift Deployment and Configuration for Ansible Automation Platform on OpenShift are as follows:
- Red Hat OpenShift 4.10+
- Per-pod default resource requirements:
- 6GB RAM
- 3 CPU cores
- OpenShift command-line tool (oc) on the machine running the installer
- Fork the project GitHub repository link.
How to install Ansible Automation Platform in OpenShift
From the operator's hub, we will install an Ansible Automation Platform on OpenShift. Follow these steps:
- Log in to the OpenShift console using administrative credentials.
- Make sure you are in the administrator perspective from the left side menu of the OpenShift console.
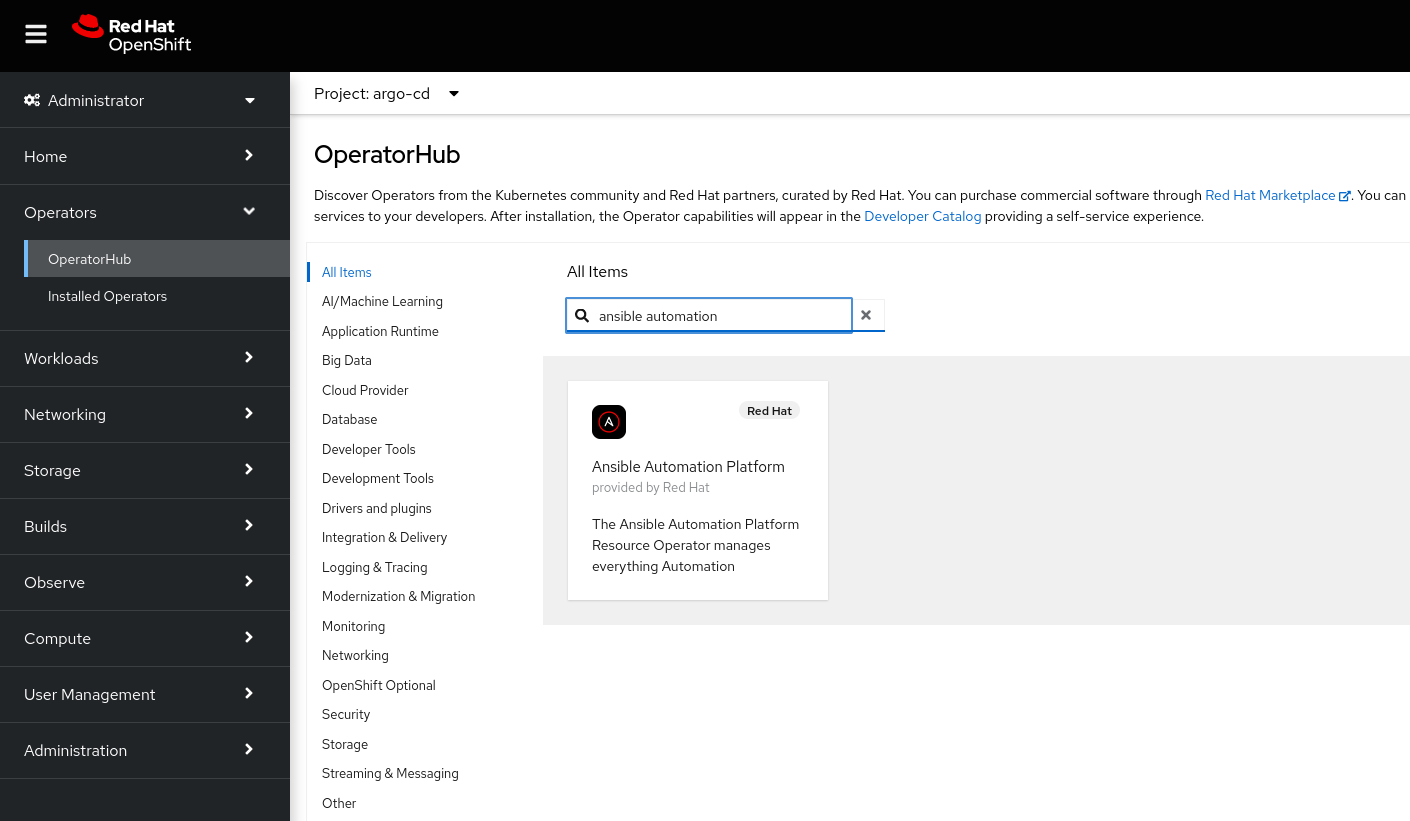
- Click on Operators > OperatorHub.
- Search for Ansible Automation Platform (Figure 2).
5. For this demo, we will keep default settings, but if you want to change them, you can as per your environment requirement.
6. Click on Install.
For a better understanding, you can also follow the Ansible Automation Platform installation video. The operator installation may take time for the Ansible cluster to be ready.
Access the Ansible Automation Platform console
After the Ansible Automation platform installation, access the Ansible Automation Platform web console by following these steps:
- From the installed operators, please select the Ansible Automation Platform.
- Select the Automation controller and create a new automation controller.
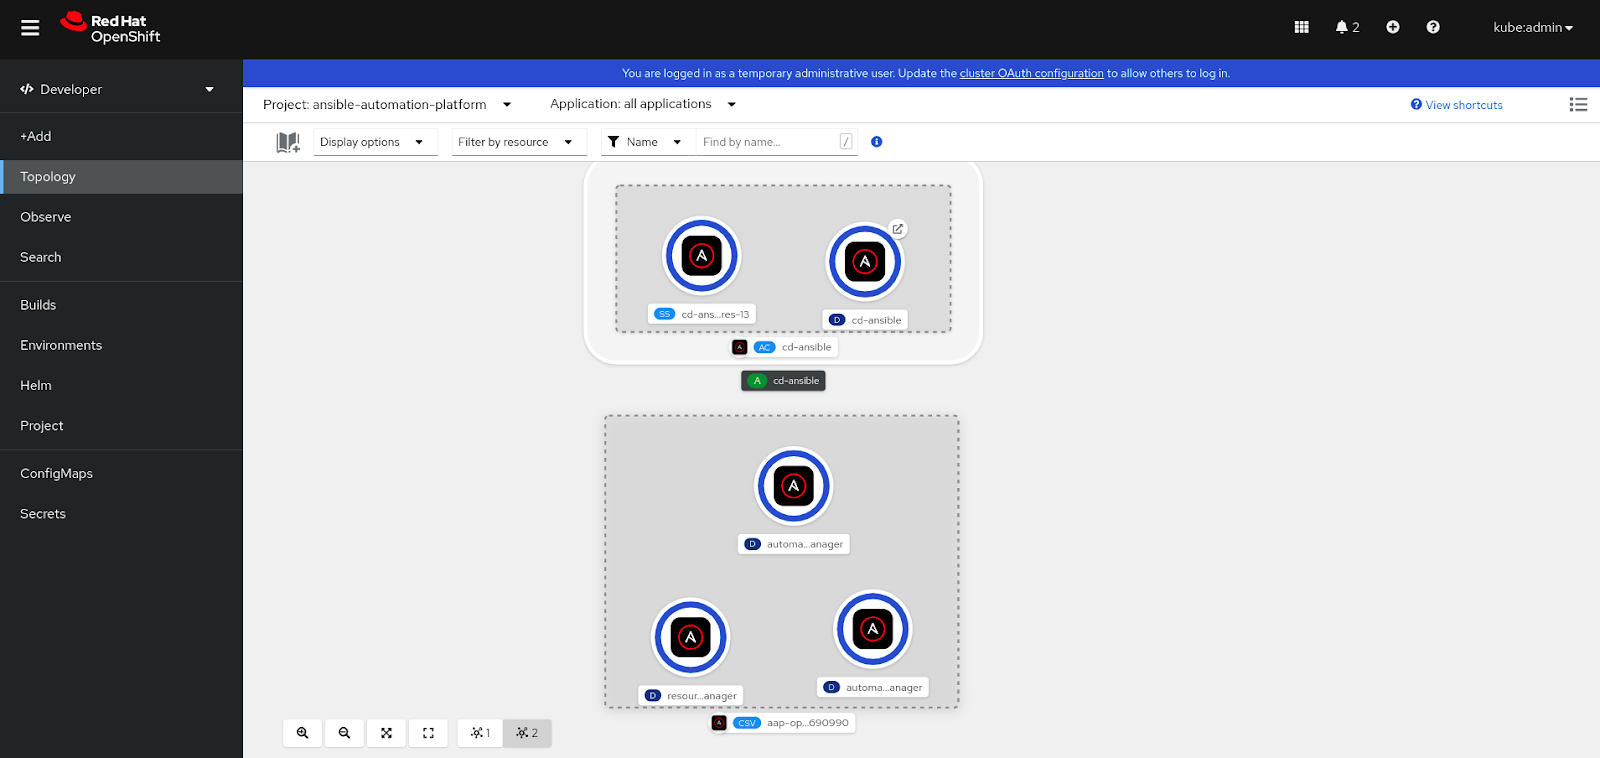
- Give a name to the automation controller like 'cd-ansible' & create it.
- After the creation of the Automation controller, two pods will appear.
- To access the Ansible Automation Platform console, click on route ↗.
- Set up the subscription, as shown in Figure 3.
7. Use the following for credentials:
User: admin
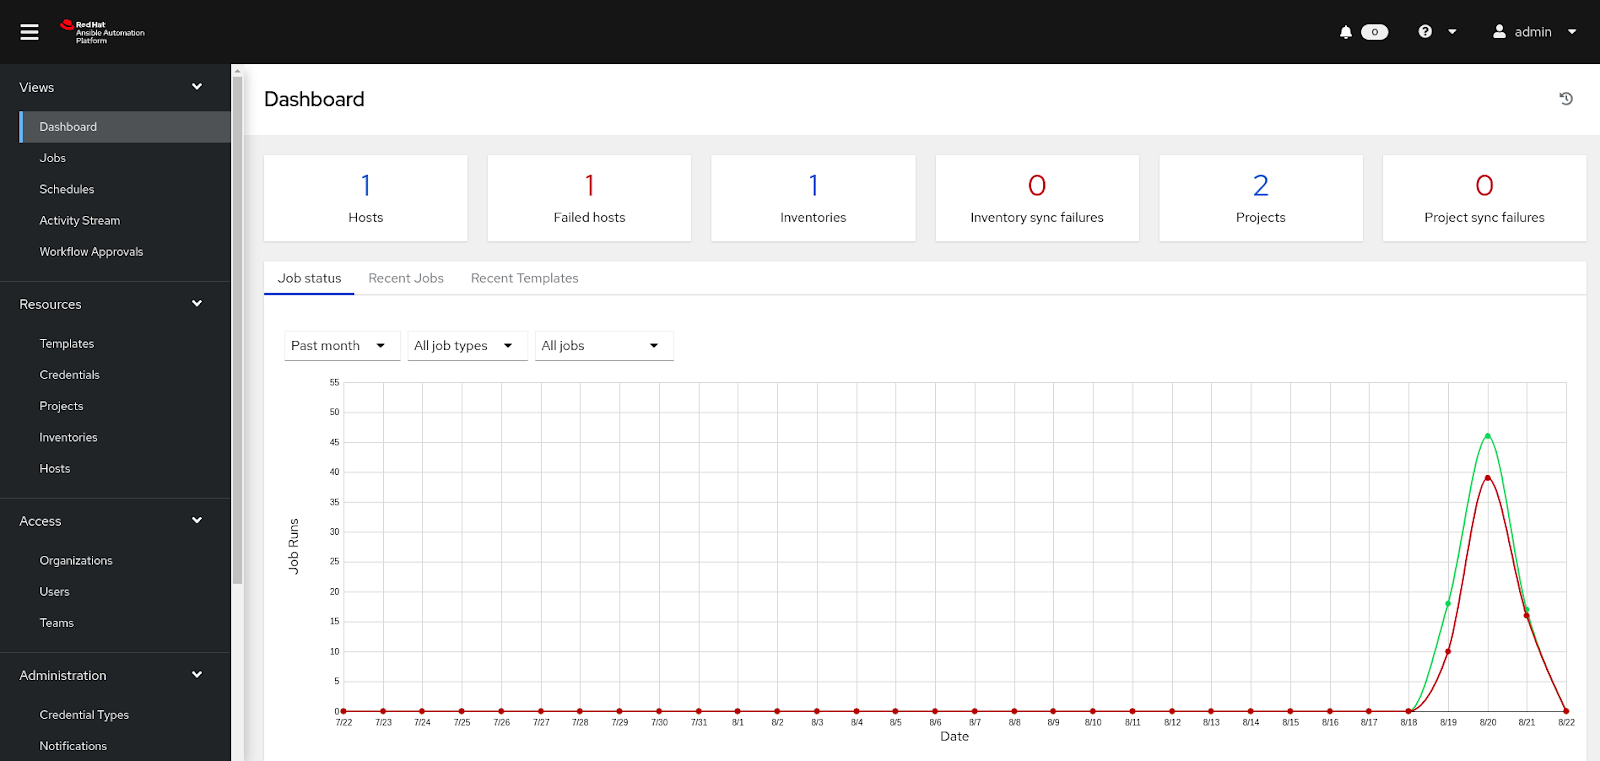
To access the password of the Ansible Automation Platform console from secrets, search for <controller-name>-admin-password and copy that password. You will get the AAP dashboard as sown below (Figure 4).
Or you can use the following command to extract the password.
export SA_SECRET=cd-ansible
oc get secret $SA_SECRET-admin-password -o jsonpath='{.data.password}' -n aap | base64 --decode
Configuring credentials
Credentials are utilized for authentication when launching jobs against machines, synchronizing with inventory sources, and importing project content from a version control system.
- From the OpenShift console left menu select Credentials.
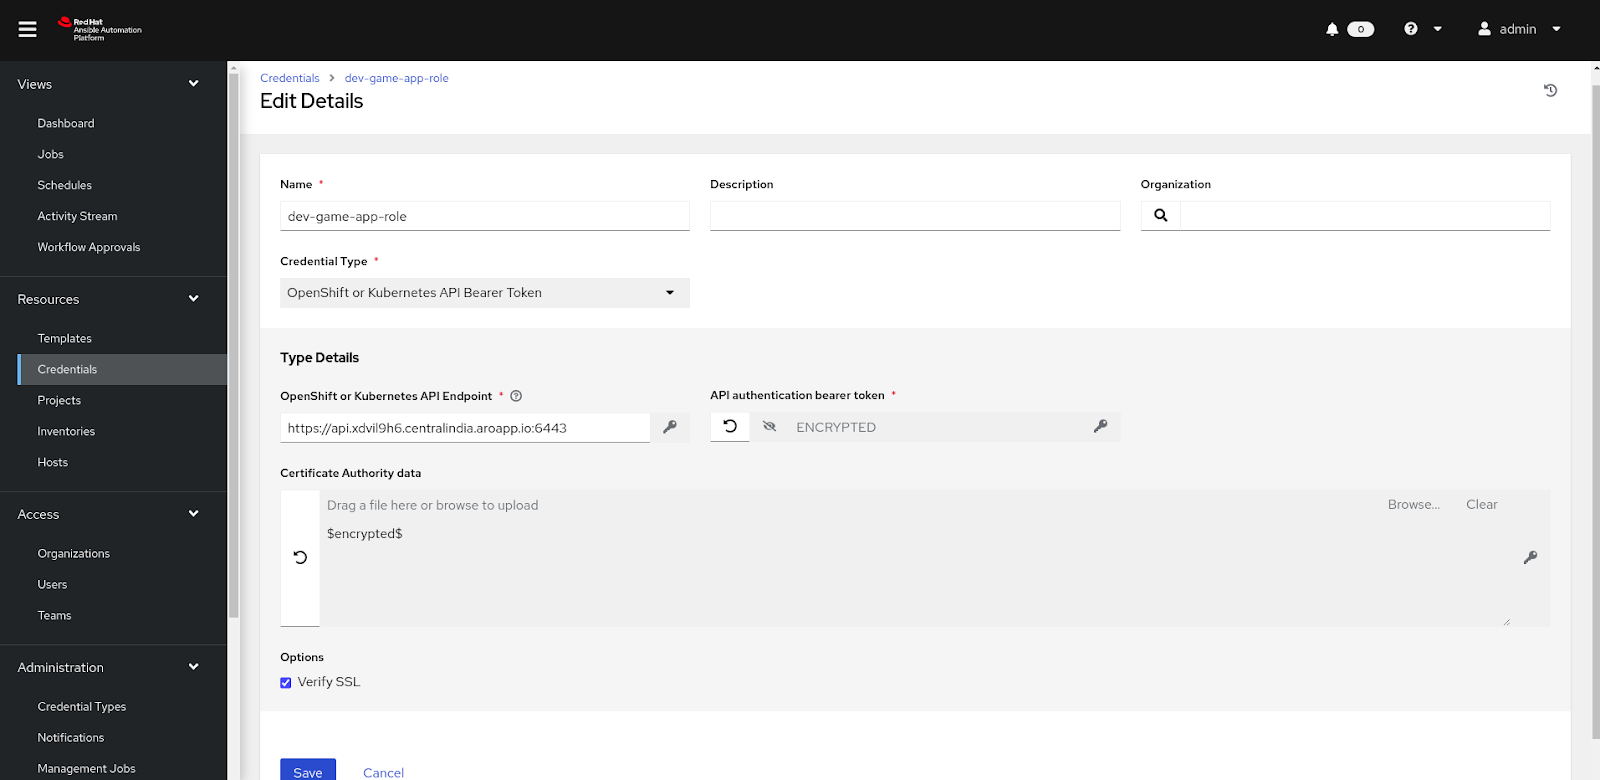
- Click on ADD and fill in the name of the credentials. The type of credentials will be OpenShift or Kubernetes API Bearer Token. And select your organization.
- The Type Details: OpenShift or Kubernetes API Endpoint. Provide the endpoint of the OpenShift cluster to which you want to deploy the application.
- API authentication bearer token. To get the token of a service account, create a service account, and give the required permission to the service account. Create a new file named containergroup-sa.yml with the following contents.
- From OpenShift CLI, apply containergroup-sa.yml file to the OpenShift cluster.
oc apply -f containergroup-sa.yml -n dev-game-app
cat <<EOF | oc apply -f -

---
apiVersion: v1
kind: Namespace
metadata:
  name: dev-game-app

---
  apiVersion: v1
  kind: ServiceAccount
  metadata:
      annotations:
      name: containergroup-service-account
      namespace: dev-game-app

---
  kind: Role
  apiVersion: rbac.authorization.k8s.io/v1
  metadata:
    name: role-containergroup-service-account
    namespace: dev-game-app
  rules:
  - apiGroups: ["*"]
    resources: ["*"]
    verbs: ["*"]
---
  kind: RoleBinding
  apiVersion: rbac.authorization.k8s.io/v1
  metadata:
    name: role-containergroup-service-account-binding
    namespace: dev-game-app
  subjects:
  - kind: ServiceAccount
    name: containergroup-service-account
  roleRef:
    kind: Role
    name: role-containergroup-service-account
    apiGroup: rbac.authorization.k8s.io

---
apiVersion: v1
kind: Secret
type: kubernetes.io/service-account-token
metadata:
  name: cicd
  annotations:
    kubernetes.io/service-account.name: "containergroup-service-account"
EOF
6. Next, extract the token and certificate of the service account.
$ oc get secret cicd -o json | jq '.data.token' | xargs | base64 --decode > containergroup-sa.token
$ oc get secret cicd -o json | jq '.data["ca.crt"]' | xargs | base64 --decode > containergroup-ca.crt
7. The containergroup-sa.token file contains the Authentication Bearer Token and the containergroup-ca.crt file contains CA data. Add these details to the credentials form and save it (Figure 5).
Configuring container and instance groups
The controller allows you to execute jobs via ansible-playbook running directly on a member of the cluster or in a namespace of an OpenShift cluster with the necessary service account provisioned called a Container Group. You can execute jobs in a container group only as needed in the playbook. Follow these steps:
- To configure the instance group, navigate to the instance group and create an instance group.
- Provide a name to the instance group and select recently created credentials, in our case, dev-game-app-role.
- Select customize pod specification.
- Under Custom pod spec, replace the namespace and service account name with the one that you have used when creating credentials (Figure 6).
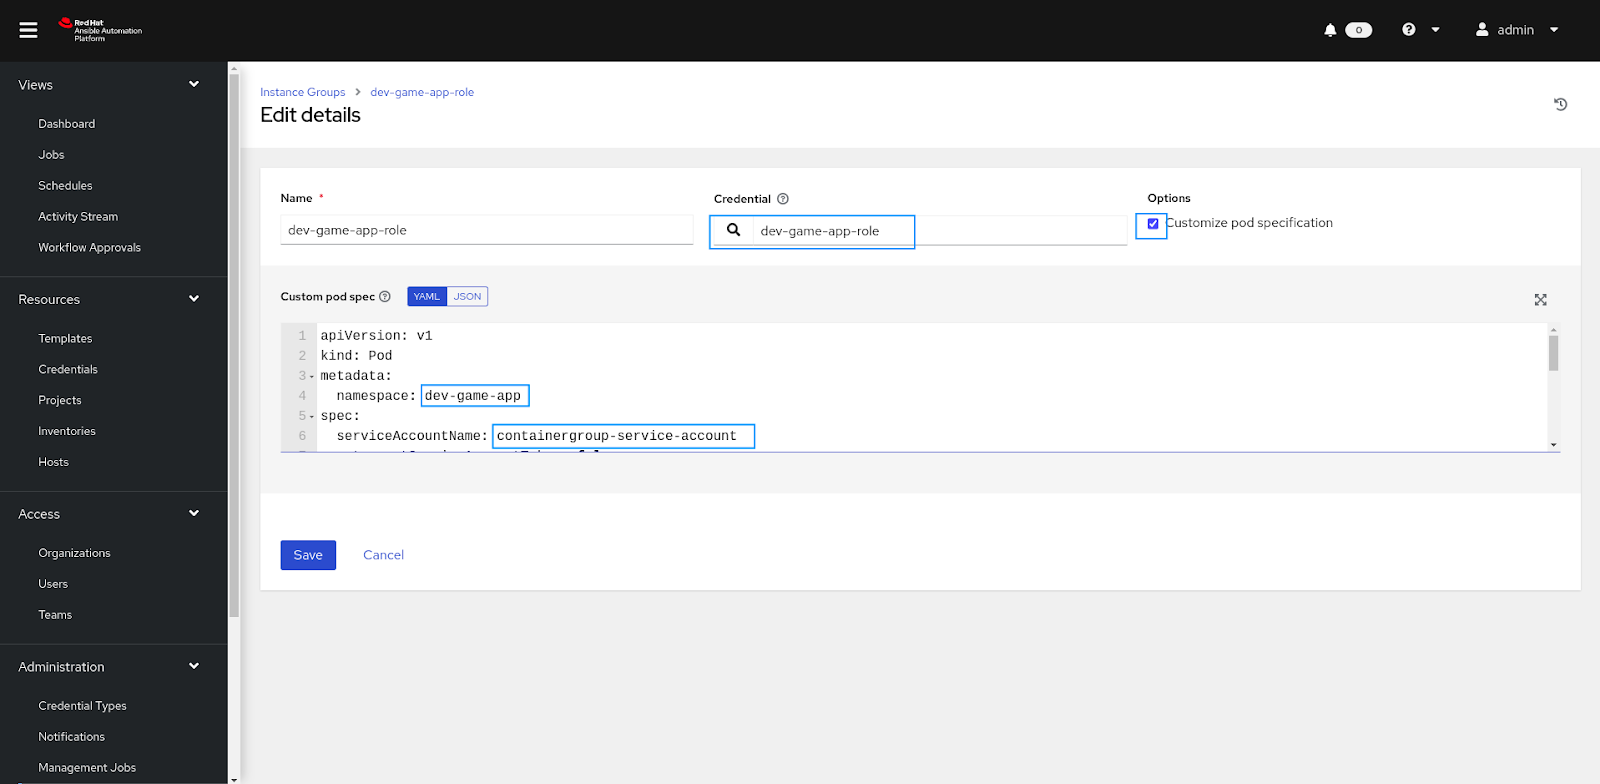
5. Modify manifest files with namespace and serviceAccountName.
apiVersion: v1
kind: Pod
metadata:
  namespace: dev-game-app #--------------------------(Add Namespace)
spec:
  serviceAccountName: containergroup-service-account #-(Add SA name)
  automountServiceAccountToken: false
  containers:
    - image: >-
        registry.redhat.io/ansible-automation-platform-22/ee-supported-rhel8@sha256:f1bd44cb3aff459f05af7855f0bcea8a0d7a44c85acd6d0f2c64148d137502e8
      name: worker
      args:
        - ansible-runner
        - worker
        - '--private-data-dir=/runner'
      resources:
        requests:
          cpu: 250m
          memory: 100Mi
Configuring inventories
An inventory is a collection of hosts against which jobs may be launched, the same as an Ansible inventory file. Inventories are divided into groups, and these groups contain the actual hosts. Groups may be sourced manually by entering host names into the automation controller or from one of its supported cloud providers.
- Navigate to inventories, and create a new inventory.
- Provide a name to inventory & select the organization.
- Add the instance group which we had created in the last step (Figure 7).

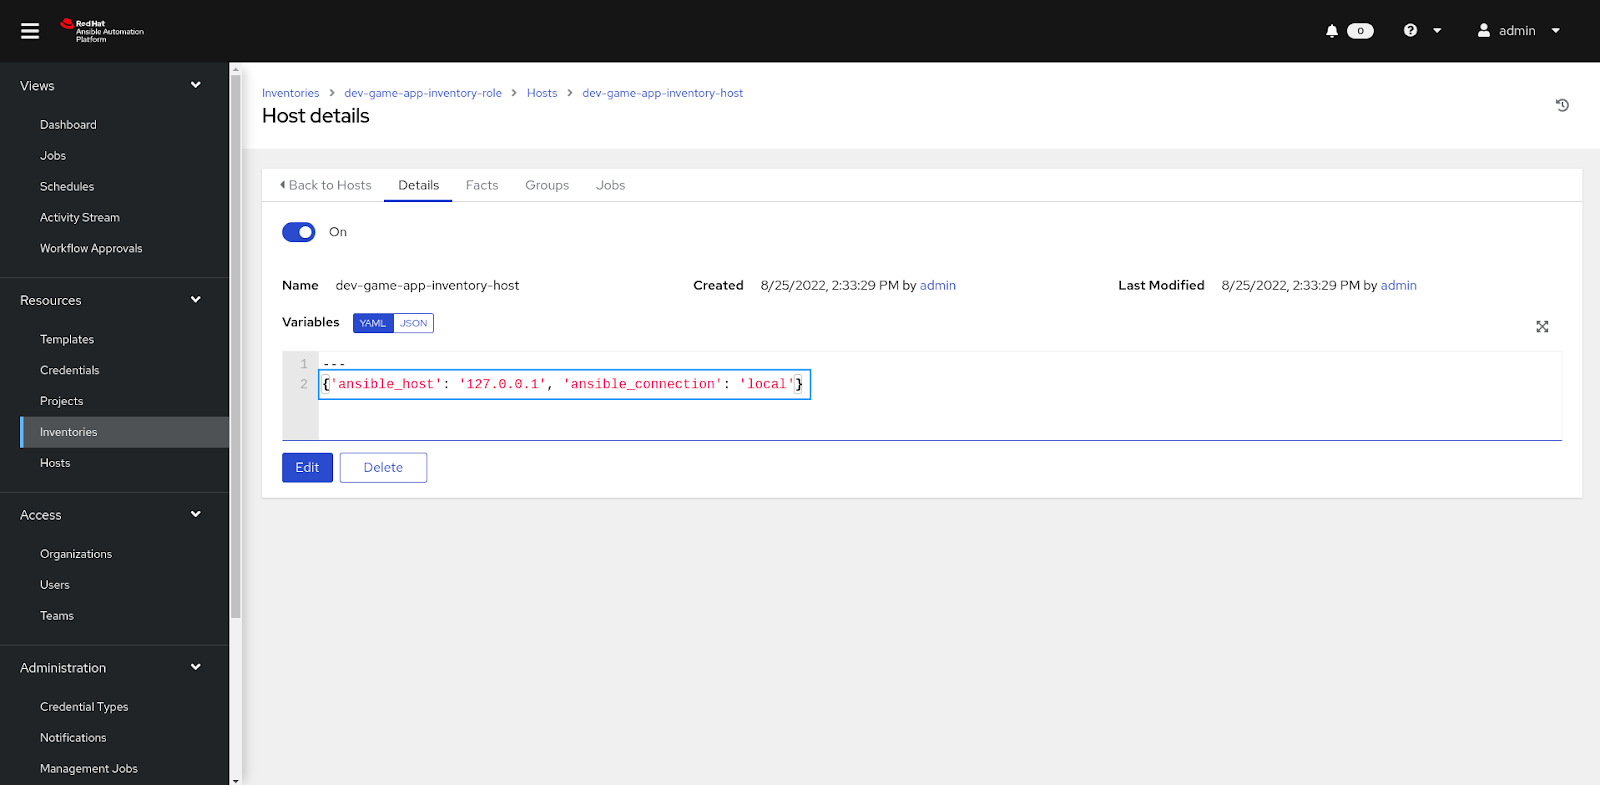
4. Next, add the host to the inventory. We are using localhost, as shown in Figure 8.
---
{'ansible_host': '127.0.0.1', 'ansible_connection': 'local'}
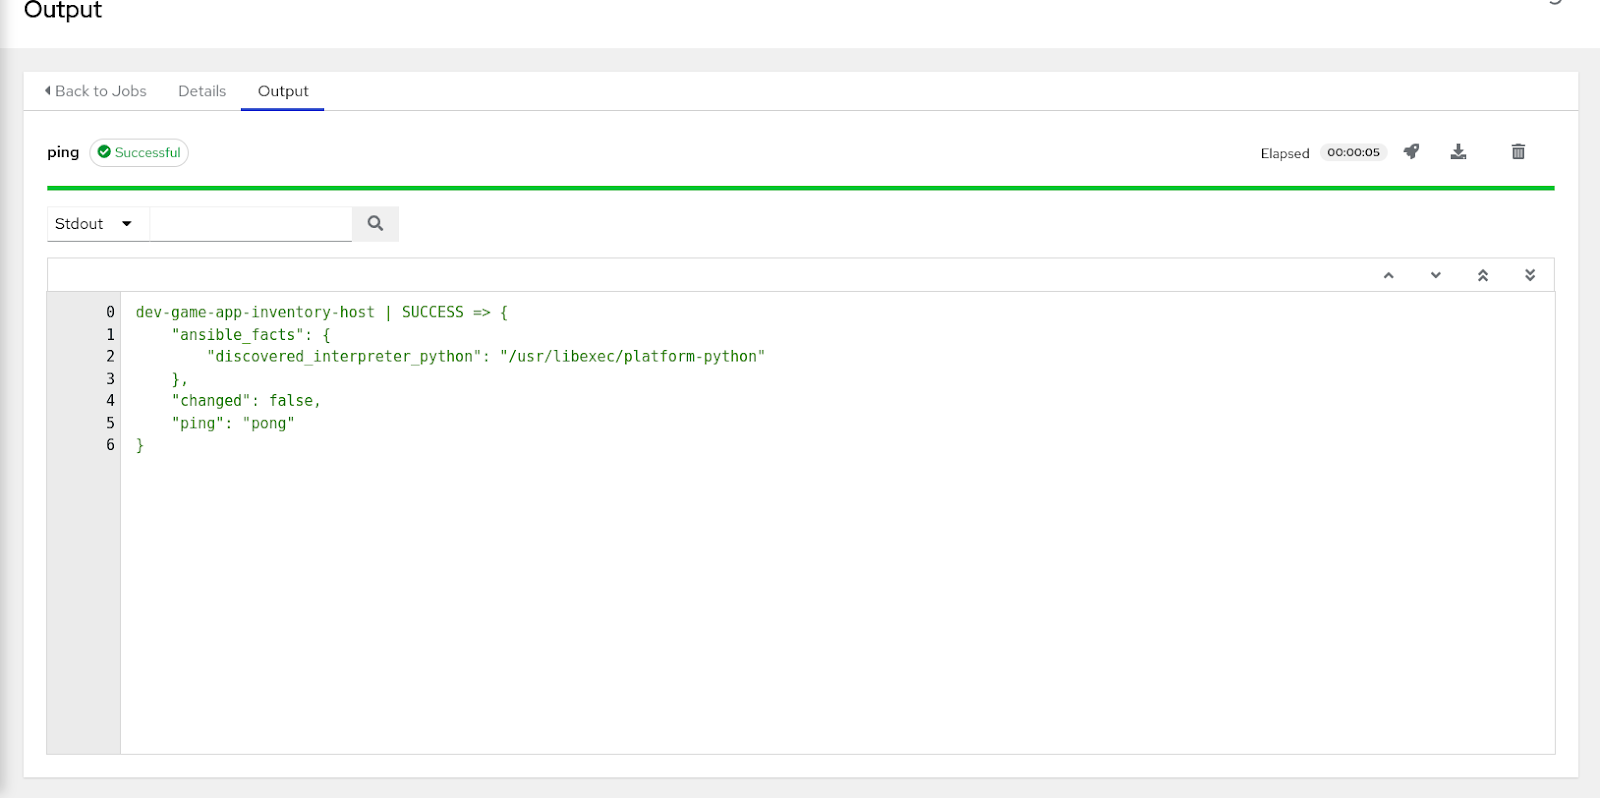
5. Finally, test the connectivity with the OpenShift cluster using the ping module by clicking on the Run Command button (Figure 9).
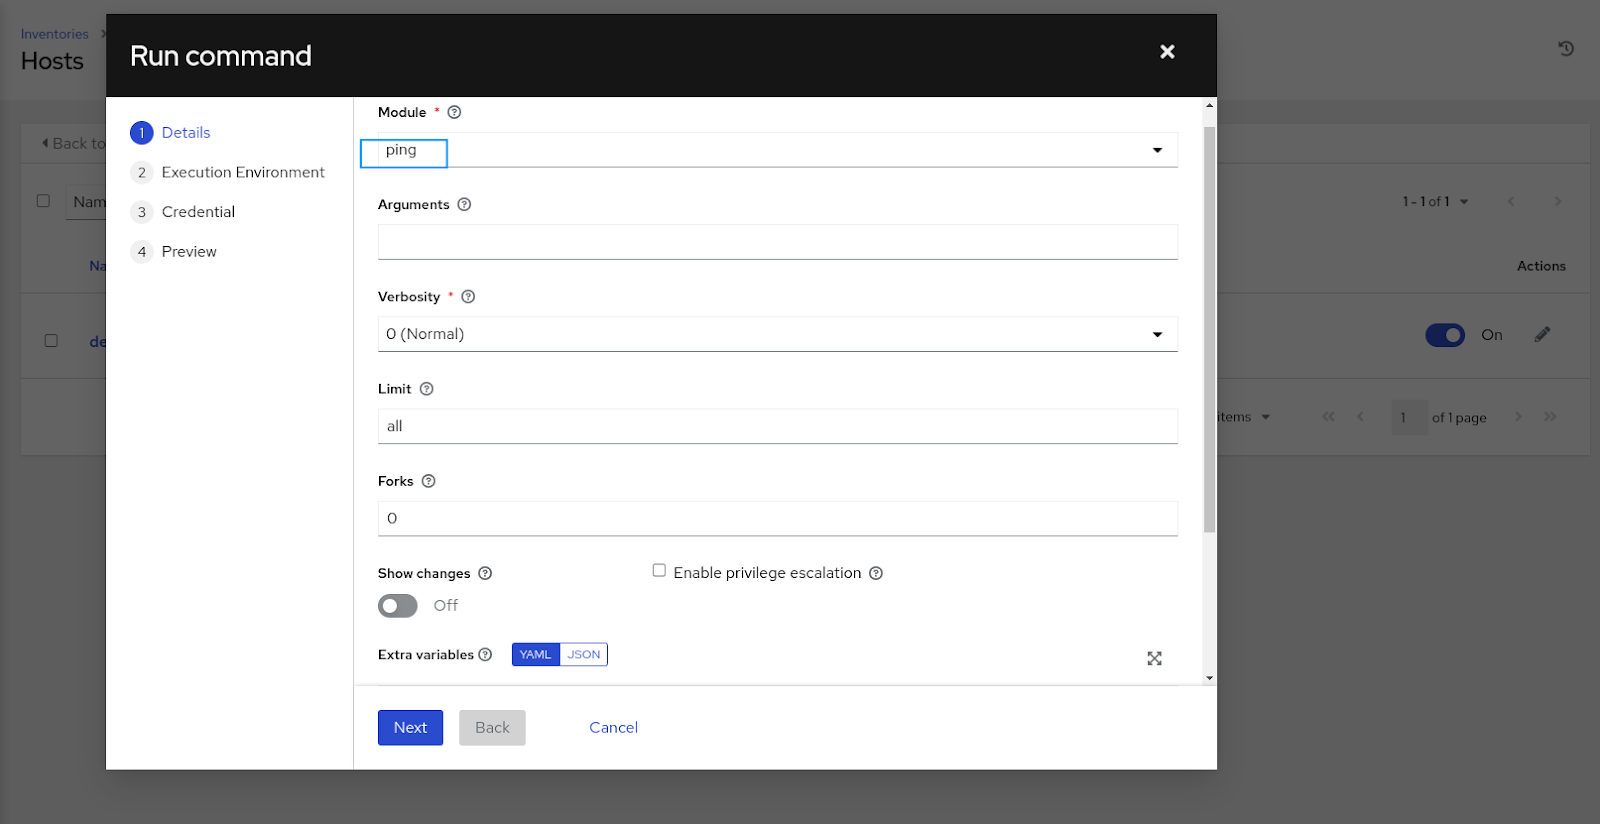
6. In the Run Command form, select Demo Credentials and keep the rest of the details as default. You can change the settings as per your environment requirement.
7. Click Launch.
8. Automatically, one job will be triggered and give you results, as shown in Figure 10. This validates that the cluster details, such as endpoints and credentials, are correct.
Configuring a project
A Project is a logical collection of Ansible playbooks represented in the controller.
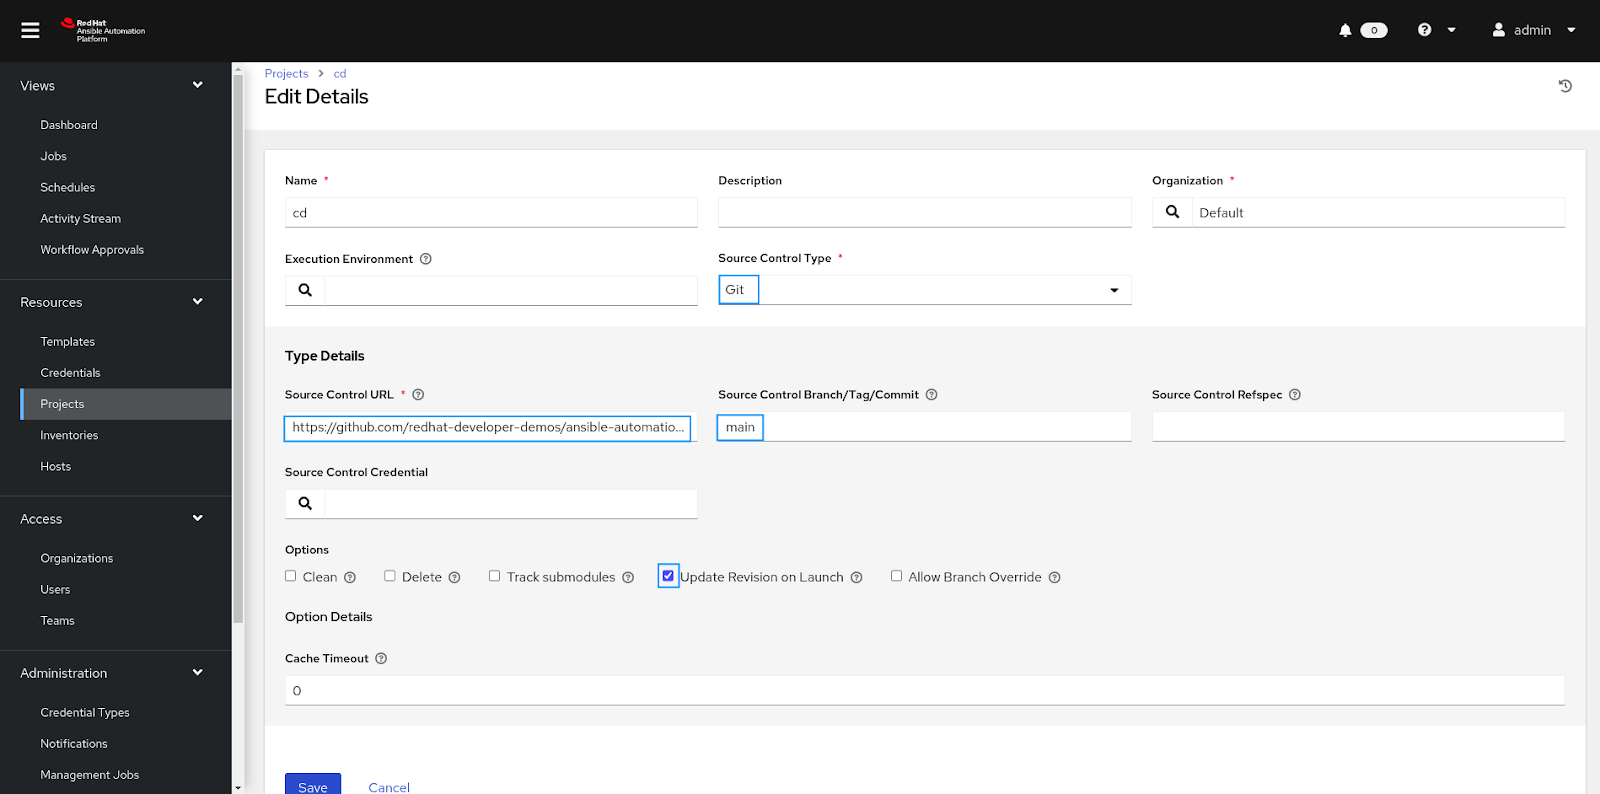
You can manage playbooks and playbook directories by either placing them manually under the Project Base Path on your controller server or by placing your playbooks into a source code management (SCM) system supported by the controller, including Git, Subversion, and Mercurial (Figure 11).
- Create a new project for our git repository from the left menu.
- Click on the + icon from the right corner.
- Give the project a name.
- Select your organization.
- Select the SCM TYPE (GIT in our case).
- Add these RESOURCE DETAILS:
- SCM URL
- SCM BRANCH
- SCM CREDENTIAL
- Click on + it to create new credentials.
- Give credentials a name.
- Select organization
- Select the credentials type
and file accordingly.
7. Finally, save it.
Configuring job templates
A job template is a definition and set of parameters for running an Ansible job. Job templates are useful to execute the same job many times. Job templates also encourage the reuse of Ansible Playbook content and collaboration between teams.
The Templates menu opens a list of the job templates that are currently available. The default view is collapsed (compact), showing the template name, template type, and the timestamp of the last job that ran using that template. You can click Expanded (arrow next to each entry) to expand to view more information. This list is sorted alphabetically by name, but you can sort by other criteria or search by various fields and attributes of a template.
Create a template, and that template will execute the job for us.
- From the left menu, select templates and create a new template
- Click on the + icon from the right corner and select the Job template.
- Give the template a name.
- Select the project and playbook you want to run in the template of the forked repository link.
---
- hosts: all
- hosts: localhost

  collections:
  - kubernetes.core

  tasks:
  - name: Get a list of all pods from any namespace
    kubernetes.core.k8s_info:
      kind: Pod
      namespace: ansible-automation-platform
    register: pod_list

- name: create k8s pod
    kubernetes.core.k8s:
      src: deployment.yaml
      namespace: dev-game-app
      state: present

- name: service create
    kubernetes.core.k8s:
      src: service.yaml
      namespace: dev-game-app
      state: present

- name: route create
    kubernetes.core.k8s:
      src: route.yaml
      namespace: dev-game-app
      state: present

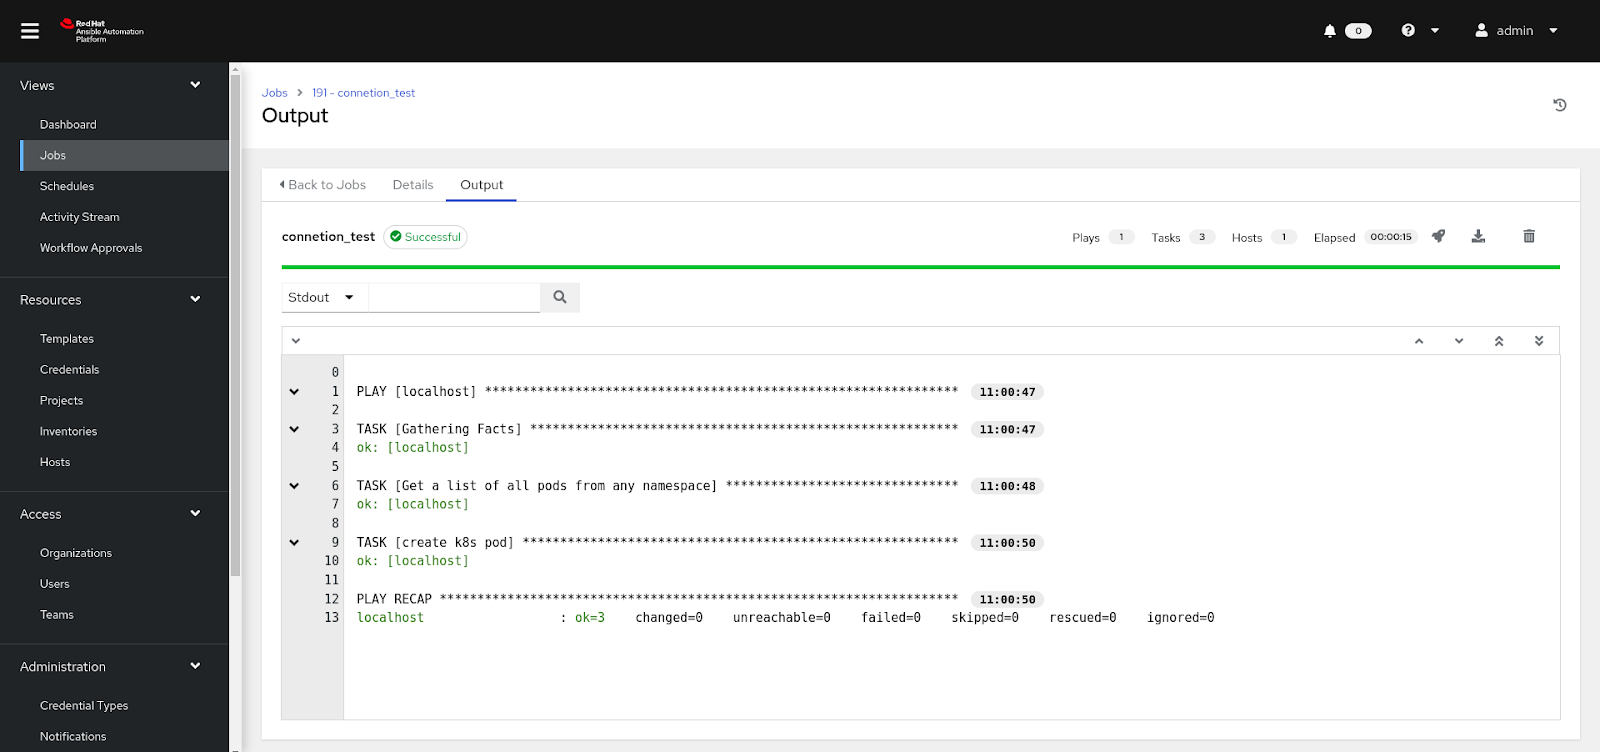
- Finally, run the template and verify the result in the cluster (Figure 13).
Integrate Ansible Automation Platform with Jenkins
In this stage, we will integrate the Ansible Automation Platform with Jenkins with the help of plugins. We will also configure the Ansible Automation Platform in managing Jenkins.
Prerequisite:
- Install Ansible and Ansible-Tower plugins in Jenkins.
- After plugin installation, go into Manage Jenkins > System Configuration > Configure System > Ansible Tower section.
- Add the URL/endpoint of Ansible Automation Platform and create credentials in that add user id admin and password.
- By using the following command, you can easily extract the password and endpoint of the Ansible Automation Platform.
export SA_SECRET=cd-ansible
oc get route -n aap | grep $(echo ${SA_SECRET}) | awk '{print$2}'

oc get secret $SA_SECRET-admin-password -o jsonpath='{.data.password}' -n aap | base64 --decode
Follow the steps to implement the CD pipeline (Figure 14):
- Login to Jenkins.
- Install Ansible and Ansible Tower plugins.
- Create one freestyle project.
- In that project, choose the build option with Ansible Tower.
- Create the credentials of Ansible and select here for connectivity.
- Add the template name.

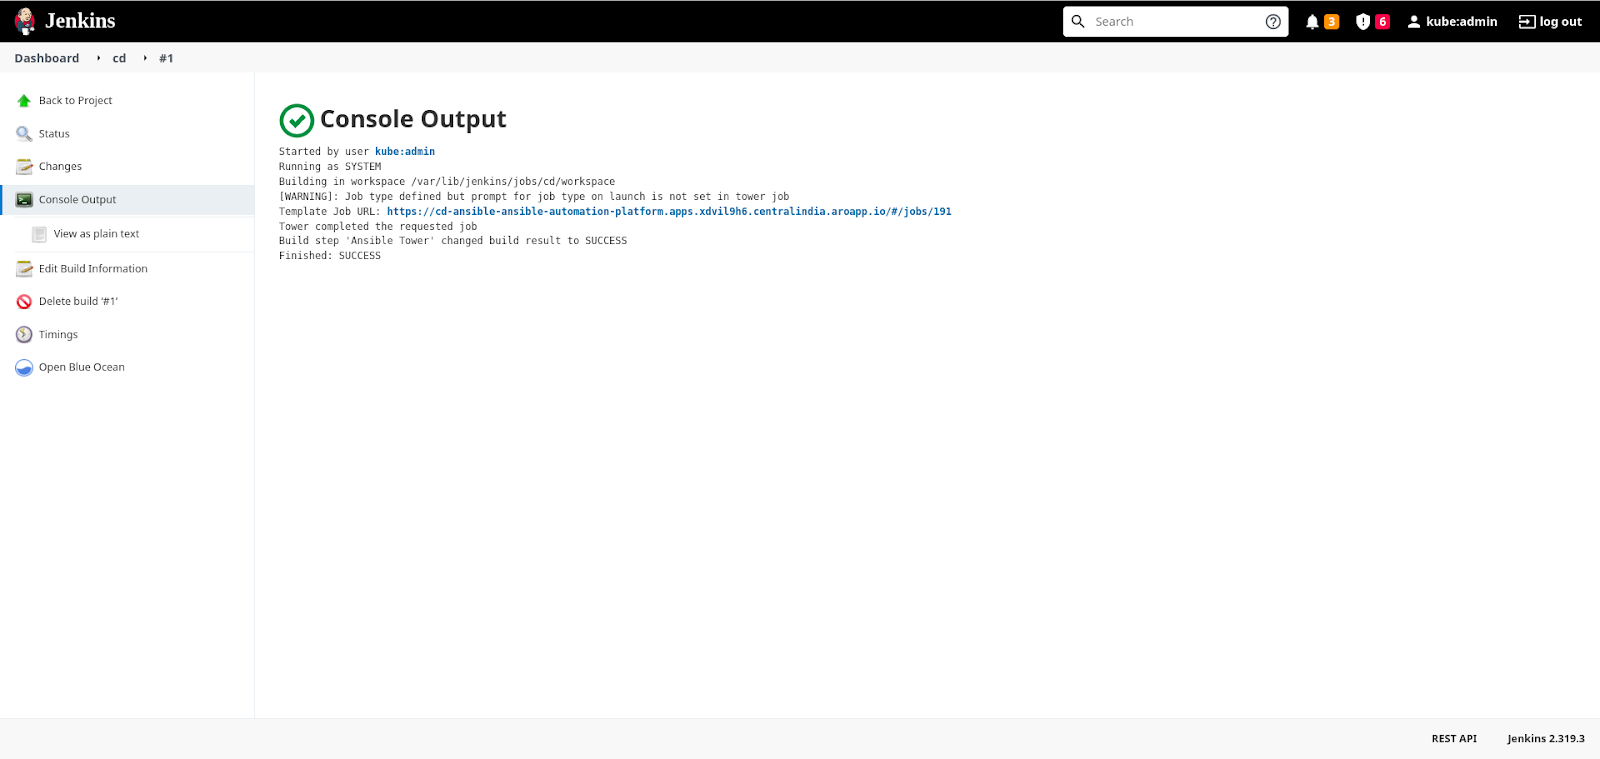
7. The CD pipeline is ready now. Click on Build Now. You will get console output which validates the results (Figure 15).
What's Next?
The next article covers the production deployment using the Ansible Automation Platform on the OpenShift cluster. In that article, we will learn how to deploy an application in different OpenShift/Kubernetes clusters with manual intervention, a very restricted form of deployment that happens in production. Check out a demo of this project in DevNation2022.
Last updated: September 19, 2023