Tools provided with Kubernetes continually make it easier for Java developers to build applications, store them in registries, and deploy images. This article looks at Helm charts, the fundamental tool for building applications on Kubernetes and the Red Hat OpenShift cloud service, together with Eclipse JKube, which is available as a Kubernetes Maven or Gradle plugin.
The article demonstrates how combining Helm with JKube simplifies Kubernetes manifest management for Java projects. You'll learn how JKube makes it possible for Java developers to automatically generate and publish Helm charts (Figure 1).
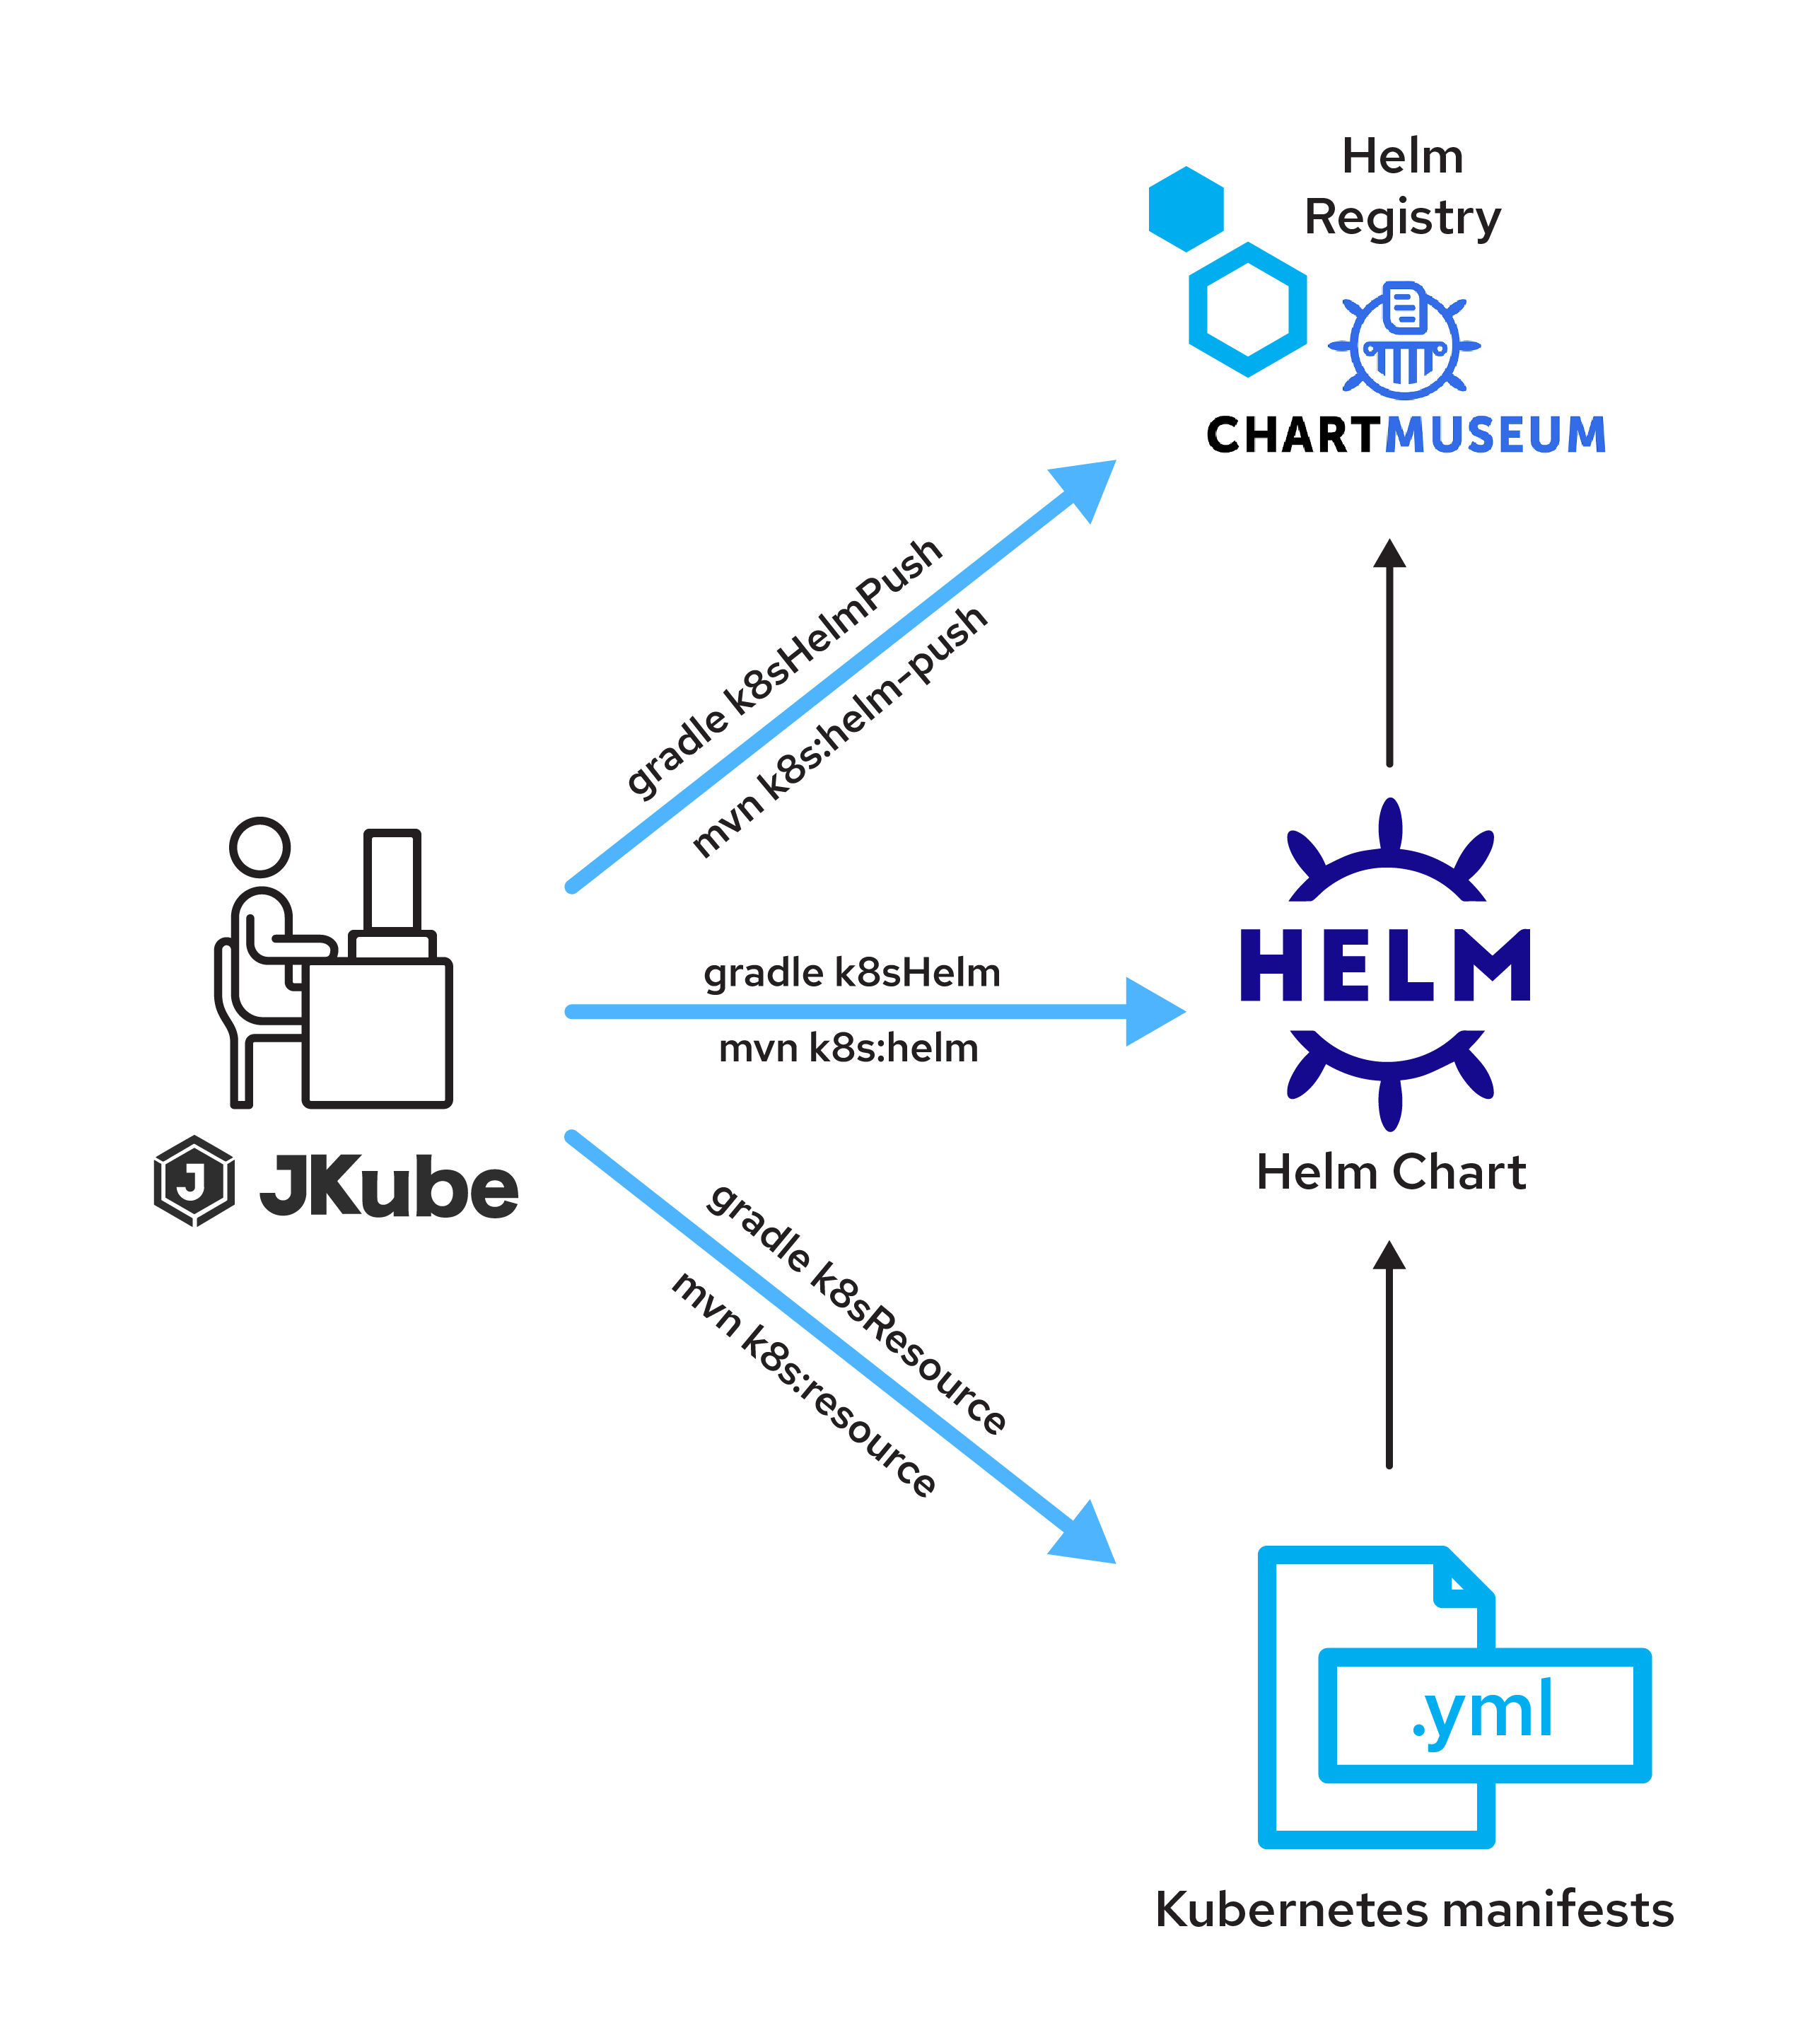
Benefits of Helm and JKube
Kubernetes has been here for a while now, and more and more organizations are showing interest in the platform. Java developers are becoming increasingly familiar with packaging their applications into Docker or Podman container images and publishing them to container registries such as Docker Hub and Quay.io.
When working with Kubernetes developers normally need to write Kubernetes configuration files in YAML format. The files can be written manually, of course. But as the complexity of applications increases, it becomes more and more difficult to manage and maintain these Kubernetes manifests.
The Helm project was introduced in 2015-16 to reduce this complexity. It allows Kubernetes users to package Kubernetes manifests in form of Helm charts. A Helm chart is basically a collection of Kubernetes configuration files. It combines pre-configured Kubernetes application resources with corresponding versions into one easily manageable package.
Helm quickly gained popularity and became a graduated project of the Cloud Native Computing Foundation. Helm is now considered the de facto package manager for Kubernetes. Think of it as equivalent to the rpm -i command for Linux systems or pip install for Python. Helm processes an application packaged as a chart, and deploys the application to Kubernetes. Through a command-line interface (CLI), Helm makes installation, upgrades, fetching dependencies, and configuring deployments on Kubernetes smoother.
Benefits of Helm charts include:
- Easy management of Kubernetes resource manifests
- Better distribution of Kubernetes manifests across public and private Helm registries
- Better management of version history for deployments with features such as Helm Rollback
While Helm is useful, it has a learning curve. You can use Helm directly with Java projects, but it requires some effort. It isn't designed with Java developers' workflow in mind.
That's where Eclipse JKube comes in. JKube is a collection of tools and libraries that make your development experience smoother on top of Kubernetes and OpenShift. JKube is available as a Maven or Gradle plugin, and aids Java developers working with cloud-native technologies such as Docker and Kubernetes. JKube provides an end-to-end workflow for Java developers while building container images of applications, generating opinionated manifests, and deploying the images to a Kubernetes cluster. Along with opinionated defaults, JKube also provides a rich set of configuration options via plugin configuration.
Benefits of Eclipse JKube include:
- Creation of container images and Kubernetes manifests with little to no configuration
- Creation of Helm charts with little to no configuration
- Robust operation in both inner and outer loop scenarios
- Exposure as plugins via Maven and Gradle (with which Java developers are already familiar)
- No external dependency on any CLI (
docker,podman,kubectl,helm,oc, etc.)
This article will specifically focus on generating Helm Charts using JKube. If you're not already familiar with general aspects of JKube usage, please check out Introduction to Eclipse JKube: Java tooling for Kubernetes and Red Hat OpenShift to get up to speed.
Generate Helm charts using Eclipse JKube
Over the rest of this article, you will package a simple Java project into a Helm chart and publish it to a Helm registry using Eclipse JKube. After that, the Java project will be available to any Kubernetes cluster to be installed using the Helm CLI. Then you will install the chart on an OpenShift cluster on the Developer Sandbox for Red Hat OpenShift.
If you already have an existing Java project, you can try adding the plugins in this section to it. Otherwise, you can go to common starter websites such as code.quarkus.io or spring initializer to generate an application through Maven or Gradle. The sample code and configuration used in this article is available in a Github repository.
If you're an Apache Maven user, add the OpenShift Maven plugin to your pom.xml file through the following configuration:
<dependency>
  <groupId>org.eclipse.jkube</groupId>
  <artifactId>openshift-maven-plugin</artifactId>
  <version>${jkube.version}</version>
</dependency>
Once you've set up your Java project, you'll need to package it into a container image. You can use OpenShift Maven Plugin's build goal to package the application. This goal uses an OpenShift Source-to-Image (S2I) build, which builds the image in a pod and pushes it to OpenShift's internal container registry:
$ ./mvnw oc:build
Once you've built a container image, you can generate Kubernetes manifests using the resource goal:
$ ./mvnw oc:resource
After running this command, you should be able to see OpenShift manifests generated in the build output directories:
$ tree target/classes/META-INF/
target/classes/META-INF/
├── jkube
│   ├── openshift
│   │   ├── jkube-helm-maven-deploymentconfig.yml
│   │   ├── jkube-helm-maven-route.yml
│   │   └── jkube-helm-maven-service.yml
│   └── openshift.yml
└── resources
    └── index.html

3 directories, 5 files
Instead of preparing a Helm chart manually, package these generated OpenShift manifests into a Helm chart by running the following JKube Helm goal:
$ ./mvnw oc:helm
JKube generates a Helm chart without using the Helm CLI. You should be able to see both compressed and decompressed forms of the generated chart in the build output directory:
$ ls target/jkube-helm-mavejkube-helm-maven-1.0.0-SNAPSHOT-helmshift.tar.gz
target/jkube-helm-maven-1.0.0-SNAPSHOT-helmshift.tar.gz
$ tree target/jkube/helm/
target/jkube/helm/
└── jkube-helm-maven
    └── openshift
        ├── Chart.yaml
        ├── README.md
        ├── templates
        │   ├── jkube-helm-maven-deploymentconfig.yaml
        │   ├── jkube-helm-maven-route.yaml
        │   └── jkube-helm-maven-service.yaml
        └── values.yaml

3 directories, 6 files
For more advanced configuration options for Helm chart generation, please check out the oc:helm documentation.
Publish Helm charts to Helm repositories
After you have packaged your application into a Helm chart, you might also want to upload it to a Helm registry. You can upload the chart using the JKube Helm push goal (oc:helm-push for Maven and ocHelmPush for Gradle).
First, you must provide registry details in the plugin configuration. Because this article offers a demo application, we're providing registry details in snapshotRepository. For a real application, you should use stableRepository. The sample configuration is:
     <plugin>
        <groupId>org.eclipse.jkube</groupId>
        <artifactId>openshift-maven-plugin</artifactId>
        <version>${jkube.version}</version>
        <configuration>
          <helm>
            <snapshotRepository>
              <name>ChartMuseum</name>
              <url>http://localhost:8080/api/charts</url>
              <type>CHARTMUSEUM</type>
              <username>user1</username>
            </snapshotRepository>
          </helm>
        </configuration>
      </plugin>
After you have configured the registry details, you can run the JKube Helm push goal. The following command uses Maven and provides the registry password on the command line as a property:
$ ./mvnw oc:helm-push -Djkube.helm.snapshotRepository.password=secret
You can check the complete list of configuration options for pushing Helm charts in the oc:helm-push documentation.
Deploy a Helm chart to OpenShift with Helm CLI
After you've pushed your Helm chart to a Helm registry, you can deploy your application by pulling it and installing the chart via the Helm CLI. This section shows several common commands.
List all available Helm registries:
$ helm repo list
Get the latest chart updates from the registries:
$ helm repo update
Search the Helm repositories for the chart you pushed in the previous section. Because you used the snapshot option, the following command has to include the --devel option:
$ helm search repo chartmusuem --devel
NAME                        	CHART VERSION 	APP VERSION	DESCRIPTION
chartmusuem/jkube-helm-maven	1.0.0-SNAPSHOT
Install the chart:
$ helm install --generate-name chartmusuem/jkube-helm-maven --devel
I0301 22:23:38.971633   37999 request.go:665] Waited for 1.198529433s due to client-side throttling, not priority and fairness, request: GET:https://api.sandbox.openshiftapps.com:6443/apis/security.openshift.io/v1?timeout=32s
NAME: jkube-helm-maven-1646153615
LAST DEPLOYED: Tue Mar  1 22:23:40 2022
NAMESPACE: rokumar-dev
STATUS: deployed
REVISION: 1
TEST SUITE: None
This command deploys all OpenShift resources contained in this Helm chart to the OpenShift cluster. If you visit the console in the Developer Sandbox, you should see the application deployed in the Topology section (Figure 2).

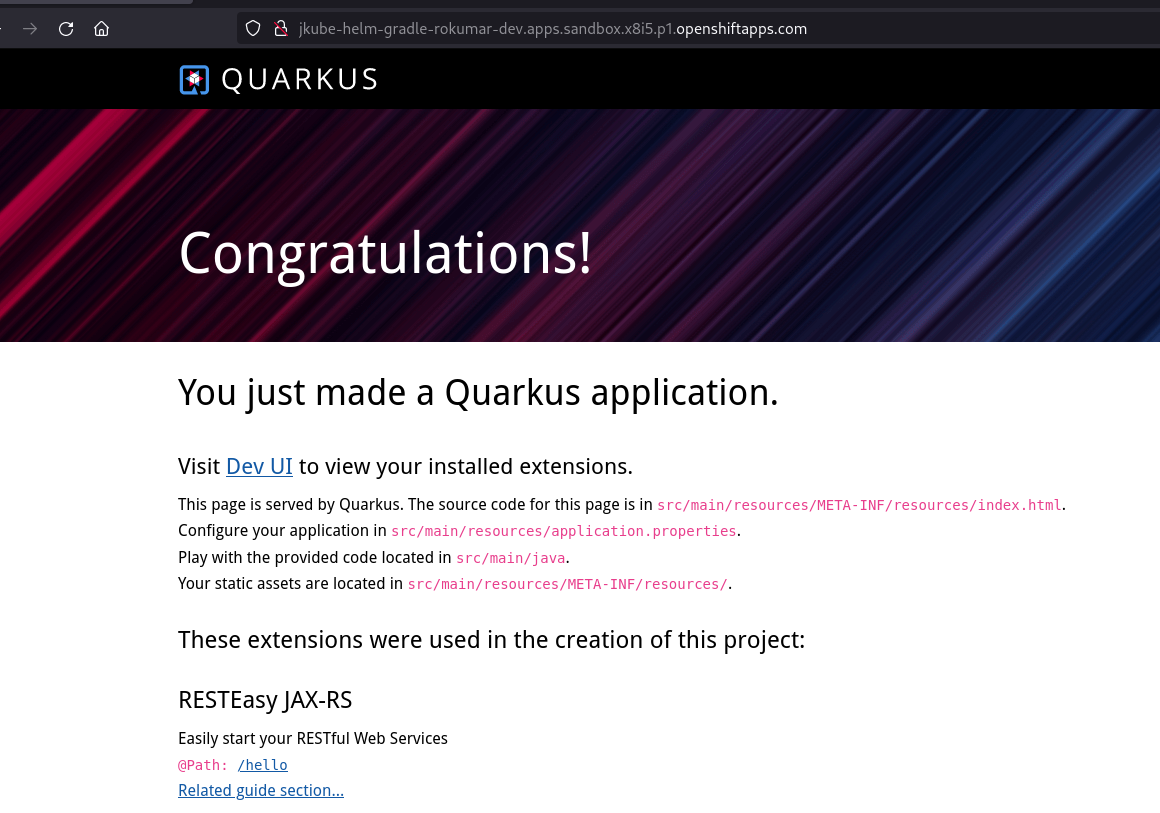
Click Open URL and you should be redirected to your application's page (Figure 3).
Discover more
In this article, you learned about the Helm capabilities provided by the Kubernetes Maven and Gradle JKube plugins. Generating and distributing a complete Helm chart for a Java application consists of just adding the desired Maven or Gradle plugin and invoking a few commands. Check out the follow-up article, How to configure Helm charts using JKube, part 2, to learn about the advanced configuration options provided by Eclipse JKube for generating Helm charts and pushing them to Helm registries.
For more information about Eclipse JKube, please check out these articles:
- Java development on top of Kubernetes using Eclipse JKube
- Get started with Gradle plugins for Eclipse JKube
You can also check out the Eclipse JKube website. If you like this project, feel free to follow it via these channels:
Last updated: October 31, 2023