Eclipse JKube is a collection of plugins and libraries to help Java developers containerize and deploy their applications. At the end of the Summer of 2020, Eclipse JKube published its first stable release (see the article, Cloud-native Java applications made easy: Eclipse JKube 1.0.0 now available ). The Eclipse JKube team has just released Eclipse JKube v1.5.1, which includes Gradle plugins for Kubernetes and Red Hat OpenShift.
This article introduces the new Gradle plugins in Eclipse JKube. You will learn how to build a Java application into a container image and deploy it onto either vanilla Kubernetes or an OpenShift cluster using Gradle.
Gradle plugins for Kubernetes
The Eclipse JKube team has been working on developing the new Gradle plugins for the past year. The effort required a major refactor in Eclipse JKube to make it independent of Maven. The Gradle plugins are now available in the v1.5.1 release (see Table 1) and can be added to any Gradle project.
|
|
 |
|
Note: The Kubernetes and OpenShift plugins are currently in feature preview. Only a limited set of features mentioned in the documentation are provided.
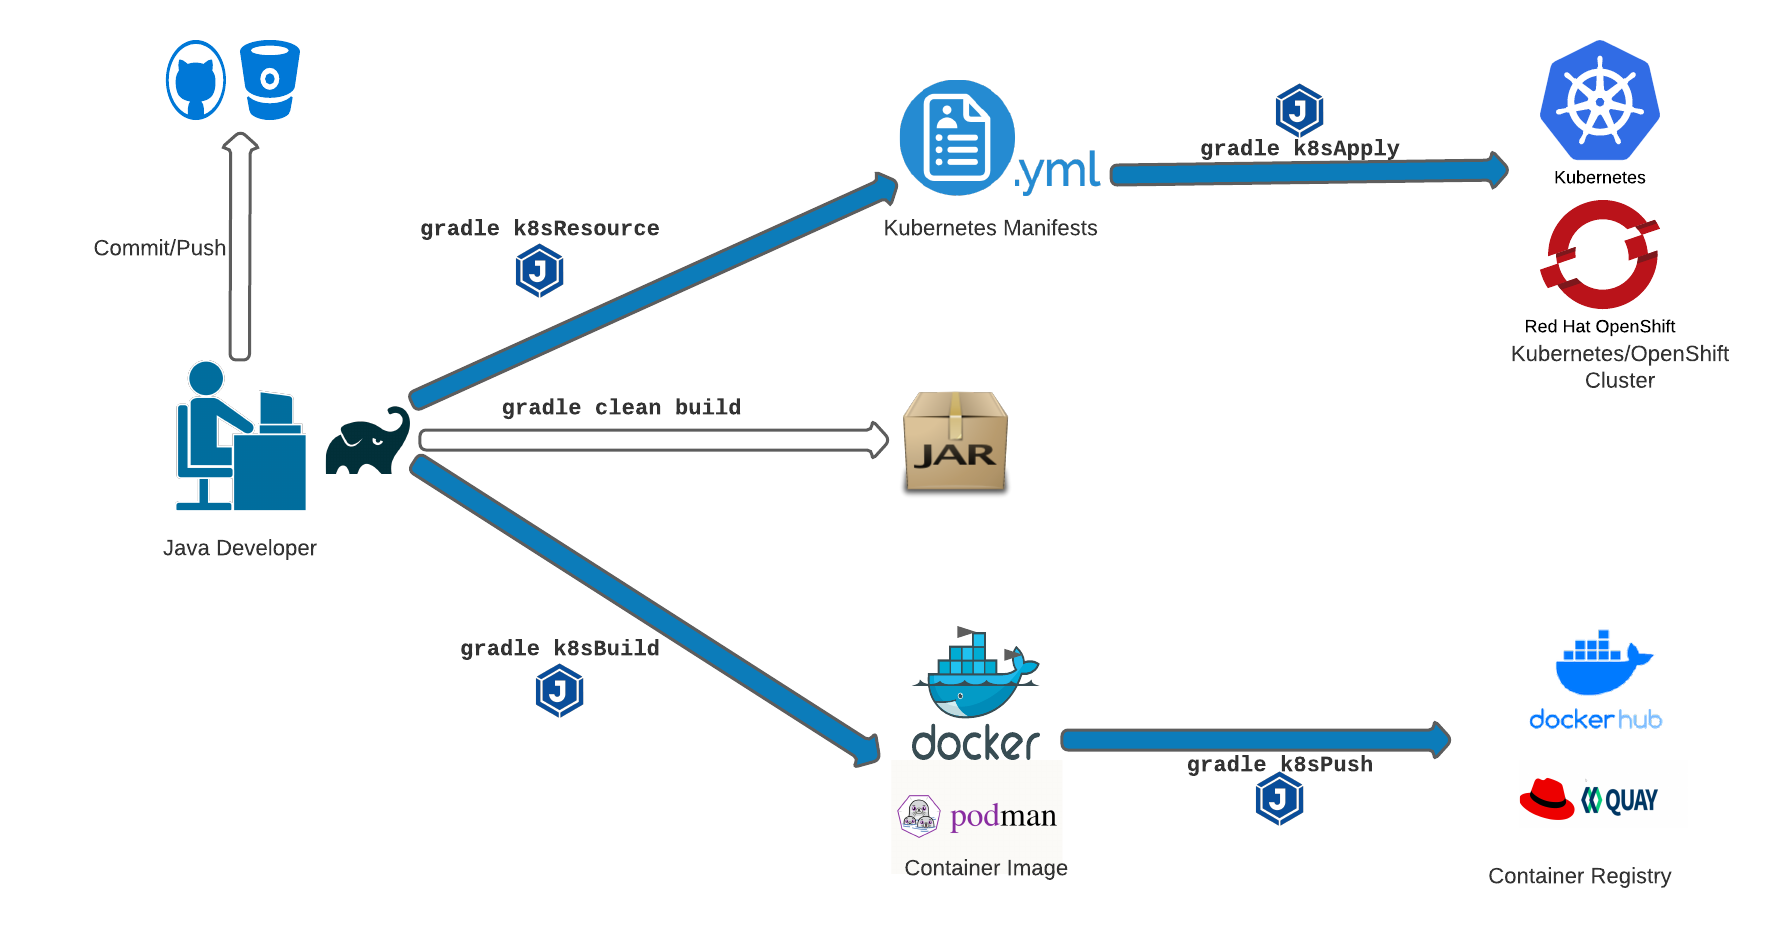
Just like Maven plugins, both the Kubernetes and OpenShift Gradle plugins cover the end-to-end flow of a Java developer working on top of Kubernetes or OpenShift. Figure 1 showcases various tasks performed by the Kubernetes Gradle plugin, simplifying a Java developer's workflow while working on top of Kubernetes.
Just like the existing Maven plugins, the Gradle plugins operate in various modes:
- Zero configuration: Plugins automatically create opinionated container images and manifests by inspecting the project's configuration. At the time of writing, this mode is available only for Spring Boot projects.
- Groovy DSL configuration: Plugins read the project's configuration from the Groovy DSL configuration in the
build.gradlefile. - Resource fragments: Plugins read partial or complete YAML fragments from the
src/main/jkubedirectory and merge them into the final generated manifests. This mode is applicable only to Kubernetes and OpenShift.
Get started with the Gradle plugins
Next, let’s look at a quick demo.
To run the examples, you will need the following:
- Java 11
- Gradle
- Docker
- A Quay.io account
- Minikube (If using Kubernetes)
- Access to the Developer Sandbox for Red Hat OpenShift (if you want to try out Red Hat OpenShift and don't yet have an account)
Step 1: Create a Spring Boot application
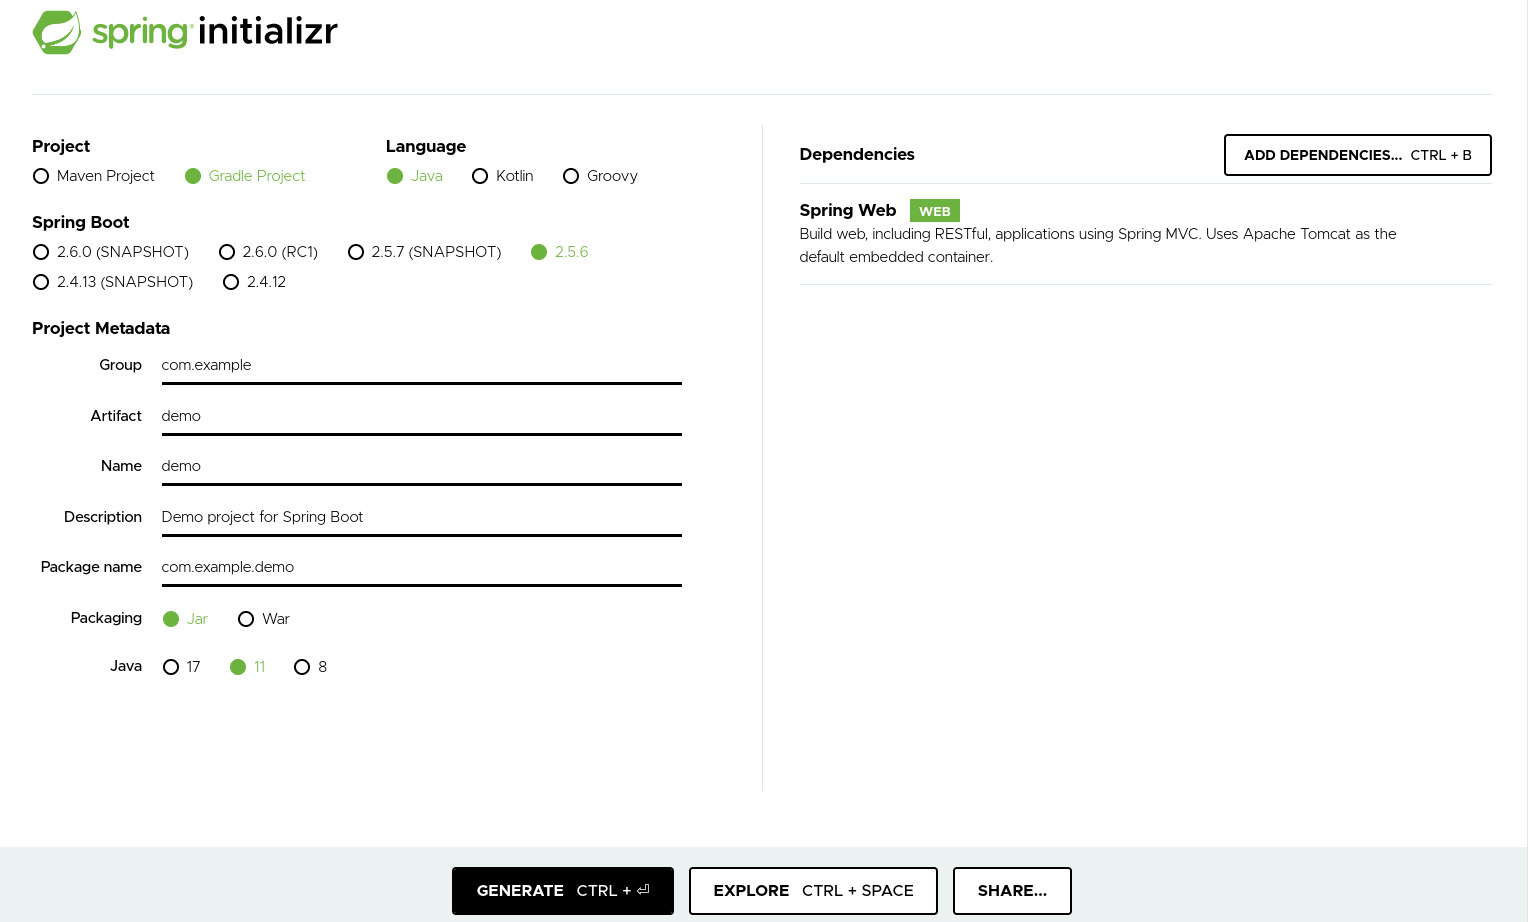
Go to the Spring initializr and create a Gradle application. We’ll be creating a project based on Java 11 and the latest version of Spring Boot. Make sure to include Spring Boot's Spring Web dependency, as shown in Figure 2.
Generate the project and unzip it to your work directory. Add a simple GET mapping:
package org.demo.eclipse.eclipsejkubedemoprojectgradle;

import org.springframework.http.ResponseEntity;
import org.springframework.web.bind.annotation.GetMapping;
import org.springframework.web.bind.annotation.RestController;

@RestController
public class JKubeDemoApplication {
  @GetMapping("/")
  public ResponseEntity<String> greet() {
    return ResponseEntity.ok("Hello JKube!");
  }
}
Next, add the Eclipse JKube Gradle plugins for Kubernetes and OpenShift to build.gradle:
plugins {
    id 'org.springframework.boot' version '2.5.6'
    id 'io.spring.dependency-management' version '1.0.11.RELEASE'
    id 'org.eclipse.jkube.kubernetes' version '1.5.1'
    id 'org.eclipse.jkube.openshift' version '1.5.1'
    id 'java'
}

group = 'org.demo.eclipse'
version = '0.0.1-SNAPSHOT'
sourceCompatibility = '11'

repositories {
    mavenCentral()
}

dependencies {
    implementation 'org.springframework.boot:spring-boot-starter-web'
}
Step 2: Build the container image
Eclipse JKube offers various ways to build a container image of a Java application. By default, if you have access to a Docker daemon, you can build a container image with a Docker build strategy. Before building the container image, make sure you have no old files in the way:
gradle clean build
The clean build is enabled by default and you just need access to the Docker daemon while building the container image.
To build a container image with a Docker build strategy, you can run a k8sBuild task:
$ gradle k8sBuild
> Task :k8sBuild
k8s: Running in Kubernetes mode
k8s: Running generator spring-boot
k8s: spring-boot: Using Docker image quay.io/jkube/jkube-java-binary-s2i:0.0.10 as base / builder
k8s: Building container image in Kubernetes mode
k8s: [eclipse/eclipse-jkube-demo-project-gradle:latest] "spring-boot": Created docker-build.tar in 51 milliseconds
k8s: [eclipse/eclipse-jkube-demo-project-gradle:latest] "spring-boot": Built image sha256:c2124
k8s: [eclipse/eclipse-jkube-demo-project-gradle:latest] "spring-boot": Tag with latest

BUILD SUCCESSFUL in 2s
1 actionable task: 1 executed

$ docker images
REPOSITORY                                  TAG       IMAGE ID       CREATED          SIZE
eclipse/eclipse-jkube-demo-project-gradle   latest    c21249a12862   10 seconds ago   465MB
This build uses the zero configuration mode described earlier: You don’t need to provide any configuration, so you can get started very quickly. Eclipse JKube reads your project dependencies and builds an opinionated container image. You can change the mode by providing a custom plugin Groovy DSL configuration or your own Dockerfiles.
Eclipse JKube creates a container image by inspecting the project group and name. To prepare an image that you can push to a Quay.io registry, use the user/repository:tag format. You can do this simply by providing a property:
$ gradle k8sBuild -Pjkube.generator.name=quay.io/rohankanojia/eclipse-jkube-demo-project-gradle:1.0.0

> Task :k8sBuild
k8s: Running in Kubernetes mode
k8s: Running generator spring-boot
k8s: spring-boot: Using Docker image quay.io/jkube/jkube-java-binary-s2i:0.0.10 as base / builder
k8s: Building container image in Kubernetes mode
k8s: [quay.io/rohankanojia/eclipse-jkube-demo-project-gradle:1.0.0] "spring-boot": Created docker-build.tar in 40 milliseconds
k8s: [quay.io/rohankanojia/eclipse-jkube-demo-project-gradle:1.0.0] "spring-boot": Built image sha256:c3a0b
k8s: [quay.io/rohankanojia/eclipse-jkube-demo-project-gradle:1.0.0] "spring-boot": Tag with latest

BUILD SUCCESSFUL in 1s
1 actionable task: 1 executed
Step 3: Push the container image to Quay.io
Once you’ve built the container image as described in the previous section, push it to a container registry. I’ll be pushing it to Quay.io, so I log in to the registry from the command line:
$ docker login quay.io
Username: rohankanojia
Password:
WARNING! Your password will be stored unencrypted in /home/rokumar/.docker/config.json.
Configure a credential helper to remove this warning. See
https://docs.docker.com/engine/reference/commandline/login/#credentials-store

Login Succeeded
Once you log in successfully, you can push the image to the registry using a k8sPush task:
$ gradle k8sPush -Pjkube.generat-Pjkube.generator.name=quay.io/rohankanojia/eclipse-jkube-demo-project-gradle:1.0.0

> Task :k8sPush
k8s: Running in Kubernetes mode
k8s: Running generator spring-boot
k8s: spring-boot: Using Docker image quay.io/jkube/jkube-java-binary-s2i:0.0.10 as base / builder
k8s: The push refers to repository [quay.io/rohankanojia/eclipse-jkube-demo-project-gradle]
k8s: 1.0.0: digest: sha256:a5f68765e32aaaa94494dbea98322a141b5e05458b1547a5a4c9ac9054919c1f size: 1162
k8s: Pushed quay.io/rohankanojia/eclipse-jkube-demo-project-gradle:1.0.0 in 23 seconds
k8s: The push refers to repository [quay.io/rohankanojia/eclipse-jkube-demo-project-gradle]
k8s: latest: digest: sha256:a5f68765e32aaaa94494dbea98322a141b5e05458b1547a5a4c9ac9054919c1f size: 1162

BUILD SUCCESSFUL in 30s
1 actionable task: 1 executed
Step 4: Deploy the image to Kubernetes
You have containerized your application and published it to a registry. Next, you'll use Eclipse JKube’s k8sResource task to generate Kubernetes manifests, then use k8sApply to apply those manifests so they are deployed to the Kubernetes cluster.
For deploying to Kubernetes, I’m using minikube. Once downloaded, you can create a single-node Kubernetes cluster like this:
$ minikube start
Once your Kubernetes cluster is running, you can use Kubernetes Gradle plugin tasks to deploy your application to Kubernetes:
$ gradle k8sResource k8sApply -Pjkube.enricher.jkube-service.type=NodePort

> Task :k8sResource
k8s: Running in Kubernetes mode
k8s: Running generator spring-boot
k8s: spring-boot: Using Docker image quay.io/jkube/jkube-java-binary-s2i:0.0.10 as base / builder
k8s: Using resource templates from /home/rokumar/Downloads/eclipse-jkube-demo-project-gradle/src/main/jkube
k8s: jkube-controller: Adding a default Deployment
k8s: jkube-service: Adding a default service 'eclipse-jkube-demo-project-gradle' with ports [8080]
k8s: jkube-service-discovery: Using first mentioned service port '8080'
k8s: jkube-revision-history: Adding revision history limit to 2
k8s: validating /home/rokumar/Downloads/eclipse-jkube-demo-project-gradle/build/classes/java/main/META-INF/jkube/kubernetes/eclipse-jkube-demo-project-gradle-service.yml resource
k8s: validating /home/rokumar/Downloads/eclipse-jkube-demo-project-gradle/build/classes/java/main/META-INF/jkube/kubernetes/eclipse-jkube-demo-project-gradle-deployment.yml resource

> Task :k8sApply
k8s: Running in Kubernetes mode
k8s: Running generator spring-boot
k8s: spring-boot: Using Docker image quay.io/jkube/jkube-java-binary-s2i:0.0.10 as base / builder
k8s: Using Kubernetes at https://192.168.39.69:8443/ in namespace default with manifest /home/rokumar/Downloads/eclipse-jkube-demo-project-gradle/build/classes/java/main/META-INF/jkube/kubernetes.yml
k8s: Creating a Service from kubernetes.yml namespace default name eclipse-jkube-demo-project-gradle
k8s: Created Service: build/jkube/applyJson/default/service-eclipse-jkube-demo-project-gradle-2.json
k8s: Creating a Deployment from kubernetes.yml namespace default name eclipse-jkube-demo-project-gradle
k8s: Created Deployment: build/jkube/applyJson/default/deployment-eclipse-jkube-demo-project-gradle-2.json
k8s: HINT: Use the command `kubectl get pods -w` to watch your pods start up

BUILD SUCCESSFUL in 5s
2 actionable tasks: 2 executed
Note that I’ve provided an additional property to customize the type of service (in this case, NodePort). By default, a ClusterIP service is generated. Once the build is finished, you should be able to see your application deployed and its pods available:
$ kubectl get pods
NAME                                                 READY   STATUS    RESTARTS        AGE
eclipse-jkube-demo-project-gradle-854d58d46b-nlnml   1/1     Running   0               47s
You can list services created through a minikube service command:
$ minikube service eclipse-jkube-demo-project-gradle --url
$ curl http://192.168.39.69:30834
Hello JKube!
That’s it—your Gradle application is successfully running inside Kubernetes.
Step 5: Deploy the image to OpenShift
Next, let’s see the OpenShift Gradle plugin in action. If you don’t have access to an OpenShift cluster, the Developer Sandbox for Red Hat OpenShift is a great way to get started. You just need to create a Red Hat Developer account. Once you’ve created an account and provisioned an OpenShift cluster, you can go to the top-right corner of the console (shown in Figure 3) and copy the login command to access the cluster via the oc command-line.

Log in to the cluster from your terminal:
$ oc login --token=sha256~xxxxxxxxxxx --server=https://api.sandbox.x8i5.p1.openshiftapps.com:6443
Logged into "https://api.sandbox.x8i5.p1.openshiftapps.com:6443" as "rokumar" using the token provided.

You have access to the following projects and can switch between them with 'oc project <projectname>':

  * rokumar-dev
    rokumar-stage

Using project "rokumar-dev".
Welcome! See 'oc help' to get started.
Once you've logged in, you can get going by just building the project and issuing OpenShift Gradle plugin goals as follows:
$ gradle ocBuild ocResource ocApply
$ gradle clean build

BUILD SUCCESSFUL in 842ms
$ gradle ocBuild ocResource ocApply

> Task :ocBuild
oc: Running in OpenShift mode
oc: Running generator spring-boot
oc: spring-boot: Using Docker image quay.io/jkube/jkube-java-binary-s2i:0.0.10 as base / builder
oc: Using OpenShift build with strategy S2I
oc: [eclipse-jkube-demo-project-gradle:latest] "spring-boot": Created docker source tar /home/rokumar/Downloads/eclipse-jkube-demo-project-gradle/build/docker/eclipse-jkube-demo-project-gradle/latest/tmp/docker-build.tar
oc: Creating BuildServiceConfig eclipse-jkube-demo-project-gradle-s2i for Source build
oc: Creating ImageStream eclipse-jkube-demo-project-gradle
oc: Starting Build eclipse-jkube-demo-project-gradle-s2i
oc: Waiting for build eclipse-jkube-demo-project-gradle-s2i-1 to complete...
oc: time="2021-10-28T15:34:07Z" level=info msg="Not using native diff for overlay, this may cause degraded performance for building images: kernel has CONFIG_OVERLAY_FS_REDIRECT_DIR enabled"
oc: I1028 15:34:07.839900       1 defaults.go:102] Defaulting to storage driver "overlay" with options [mountopt=metacopy=on].
oc: Caching blobs under "/var/cache/blobs".
oc: Getting image source signatures
oc: Copying blob sha256:27e66e775ba36a6ac17cc1cbd8744331133be6d2ae31b0787e9ab79f04cfe6bd
oc: Copying blob sha256:c2c17d84f25a8380da8196e4173249e5324e4f653231b00d2e95a6efaac5687a
oc: Copying blob sha256:46cdcde062b27f6c24775848f60eeb6a7216a98d4d6d7617927f5024fc8edfc3
oc: Copying config sha256:189b57c8e407b92f67dae0f0d3d7bf7a8d5b7e681d36d803b342d2e4183edd3d
oc: Writing manifest to image destination
oc: Storing signatures
oc: Generating dockerfile with builder image quay.io/jkube/jkube-java-binary-s2i:0.0.10
oc: Adding transient rw bind mount for /run/secrets/rhsm
oc: STEP 1: FROM quay.io/jkube/jkube-java-binary-s2i:0.0.10
oc: STEP 2: LABEL "io.openshift.build.image"="quay.io/jkube/jkube-java-binary-s2i:0.0.10"       "io.openshift.build.source-location"="/tmp/build/inputs"       "io.openshift.s2i.destination"="/tmp"
oc: STEP 3: ENV JAVA_APP_DIR="/deployments"     OPENSHIFT_BUILD_NAME="eclipse-jkube-demo-project-gradle-s2i-1"     OPENSHIFT_BUILD_NAMESPACE="rokumar-dev"
oc: STEP 4: USER root
oc: STEP 5: COPY upload/src /tmp/src
oc: STEP 6: RUN chown -R 1000:0 /tmp/src
oc: STEP 7: USER 1000
oc: STEP 8: RUN /usr/local/s2i/assemble
oc: INFO S2I source build with plain binaries detected
oc: INFO S2I binary build from fabric8-maven-plugin detected
oc: INFO Copying binaries from /tmp/src/deployments to /deployments ...
oc: eclipse-jkube-demo-project-gradle-0.0.1-SNAPSHOT.jar
oc: INFO Copying deployments from deployments to /deployments...
oc: '/tmp/src/deployments/eclipse-jkube-demo-project-gradle-0.0.1-SNAPSHOT.jar' -> '/deployments/eclipse-jkube-demo-project-gradle-0.0.1-SNAPSHOT.jar'
oc: INFO Cleaning up source directory (/tmp/src)
oc: STEP 9: CMD /usr/local/s2i/run
oc: STEP 10: COMMIT temp.builder.openshift.io/rokumar-dev/eclipse-jkube-demo-project-gradle-s2i-1:dbd0c971
oc: Getting image source signatures]
oc: Copying blob sha256:785573c4b94554cc3ba023f2648ba476bc5c33a05344c341f78bb384fb4b9d58
oc: Copying blob sha256:e7ed17121dee57e210a027da1f0097bb67e8074b1cb49b8c9361c4b6e0198cf9
oc: Copying blob sha256:21c5418392b76438784599fa9849957c34df22ae27fa94f52dfca7f5026bf7fa
oc: Copying blob sha256:8f243c1461333b5b0bebae10f201acdd612c81855b7166e38296116f6ce1c018
oc: Copying config sha256:117344321138b98dddaa74834d7ace8b5b73804b9489978614069fd984fca633
oc: Writing manifest to image destination
oc: Storing signatures
oc: --> 11734432113
oc: 117344321138b98dddaa74834d7ace8b5b73804b9489978614069fd984fca633
oc:
oc: Pushing image image-registry.openshift-image-registry.svc:5000/rokumar-dev/eclipse-jkube-demo-project-gradle:latest ...
oc: Getting image source signatures
oc: Copying blob sha256:8f243c1461333b5b0bebae10f201acdd612c81855b7166e38296116f6ce1c018
oc: Copying blob sha256:c2c17d84f25a8380da8196e4173249e5324e4f653231b00d2e95a6efaac5687a
oc: Copying blob sha256:46cdcde062b27f6c24775848f60eeb6a7216a98d4d6d7617927f5024fc8edfc3
oc: Copying blob sha256:27e66e775ba36a6ac17cc1cbd8744331133be6d2ae31b0787e9ab79f04cfe6bd
oc: Copying config sha256:117344321138b98dddaa74834d7ace8b5b73804b9489978614069fd984fca633
oc: Writing manifest to image destination
oc: Storing signatures
oc: Successfully pushed image-registry.openshift-image-registry.svc:5000/rokumar-dev/eclipse-jkube-demo-project-gradle@sha256:1374ae9691ac4d2b047b7f2e70d7ae3812e11df3923a8463d34820fbf6097c56
oc: Push successful
oc: Build eclipse-jkube-demo-project-gradle-s2i-1 in status Complete
oc: Found tag on ImageStream eclipse-jkube-demo-project-gradle tag: sha256:1374ae9691ac4d2b047b7f2e70d7ae3812e11df3923a8463d34820fbf6097c56
oc: ImageStream eclipse-jkube-demo-project-gradle written to /home/rokumar/Downloads/eclipse-jkube-demo-project-gradle/build/eclipse-jkube-demo-project-gradle-is.yml

> Task :ocResource
oc: Using container image name of namespace: rokumar-dev
oc: Running in OpenShift mode
oc: Running generator spring-boot
oc: spring-boot: Using Docker image quay.io/jkube/jkube-java-binary-s2i:0.0.10 as base / builder
oc: Using resource templates from /home/rokumar/Downloads/eclipse-jkube-demo-project-gradle/src/main/jkube
oc: jkube-controller: Adding a default Deployment
oc: jkube-service: Adding a default service 'eclipse-jkube-demo-project-gradle' with ports [8080]
oc: jkube-openshift-deploymentconfig: Converting Deployment to DeploymentConfig
oc: jkube-service-discovery: Using first mentioned service port '8080'
oc: jkube-revision-history: Adding revision history limit to 2
oc: validating /home/rokumar/Downloads/eclipse-jkube-demo-project-gradle/build/classes/java/main/META-INF/jkube/openshift/eclipse-jkube-demo-project-gradle-service.yml resource
oc: validating /home/rokumar/Downloads/eclipse-jkube-demo-project-gradle/build/classes/java/main/META-INF/jkube/openshift/eclipse-jkube-demo-project-gradle-deploymentconfig.yml resource
oc: validating /home/rokumar/Downloads/eclipse-jkube-demo-project-gradle/build/classes/java/main/META-INF/jkube/openshift/eclipse-jkube-demo-project-gradle-route.yml resource

> Task :ocApply
oc: Running in OpenShift mode
oc: Running generator spring-boot
oc: spring-boot: Using Docker image quay.io/jkube/jkube-java-binary-s2i:0.0.10 as base / builder
oc: Using OpenShift at https://api.sandbox.x8i5.p1.openshiftapps.com:6443/ in namespace rokumar-dev with manifest /home/rokumar/Downloads/eclipse-jkube-demo-project-gradle/build/classes/java/main/META-INF/jkube/openshift.yml
oc: Creating a Service from openshift.yml namespace rokumar-dev name eclipse-jkube-demo-project-gradle
oc: Created Service: build/jkube/applyJson/rokumar-dev/service-eclipse-jkube-demo-project-gradle.json
oc: Creating a DeploymentConfig from openshift.yml namespace rokumar-dev name eclipse-jkube-demo-project-gradle
oc: Created DeploymentConfig: build/jkube/applyJson/rokumar-dev/deploymentconfig-eclipse-jkube-demo-project-gradle.json
oc: Creating Route rokumar-dev:eclipse-jkube-demo-project-gradle host: null
oc: HINT: Use the command `oc get pods -w` to watch your pods start up

BUILD SUCCESSFUL in 1m 31s
3 actionable tasks: 3 executed
The OpenShift Gradle plugin starts a Source-to-Image (S2I) build, generates OpenShift manifests, and applies them to the OpenShift cluster. You can check the deployed application either in the OpenShift console or via the command line. After the pod enters a running state, you can access the application via the OpenShift route:
$ oc get pods
NAME                                            READY     STATUS      RESTARTS   AGE
eclipse-jkube-demo-project-gradle-1-9n99q       1/1       Running     0          2m6s
eclipse-jkube-demo-project-gradle-1-deploy      0/1       Completed   0          2m8s
eclipse-jkube-demo-project-gradle-s2i-1-build   0/1       Completed   0          3m23s
$ oc get routes
NAME                                HOST/PORT                                                                              PATH      SERVICES                            PORT      TERMINATION   WILDCARD
eclipse-jkube-demo-project-gradle   eclipse-jkube-demo-project-gradle-rokumar-dev.apps.sandbox.x8i5.p1.openshiftapps.com             eclipse-jkube-demo-project-gradle   8080                    None
$ curl eclipse-jkube-declipse-jkube-demo-project-gradle-rokumar-dev.apps.sandbox.x8i5.p1.openshiftapps.com
Hello JKube!
Do more with Eclipse JKube and Gradle
Apart from the standard build and deployment tasks in the demo, the Gradle plugins can help with other tasks, listed in Table 2. These tasks are available in both the OpenShift and Kubernetes Gradle plugins.
| Task name | Description |
|
Generate Helm charts. |
|
Debug application in a Kubernetes cluster. |
|
Get logs of the application running in Kubernetes. |
|
Cleanup: Delete all resources deployed in Kubernetes. |
Conclusion
In this article, you have learned how to deploy Java applications built with Gradle onto Kubernetes using Eclipse JKube’s Kubernetes Gradle plugin. You also learned how to build applications into container images and push them to container registries.
Finally, we deployed the same application to OpenShift using the OpenShift Gradle plugin.
You can find the code used in this article on my Eclipse JKube Gradle plugin repository.
If you have questions regarding this article, feel free to reach the Eclipse JKube team through any of these channels:
Last updated: September 20, 2023