This article shows how to use the Microsoft Azure Marketplace offering of Red Hat JBoss Enterprise Application Platform (JBoss EAP) to deploy a JBoss EAP server running on Red Hat Enterprise Linux (RHEL) to Azure virtual machines (VMs). JBoss EAP is an open source application platform for building and deploying enterprise Java applications. Azure is a very popular cloud service, and the JBoss EAP offering makes it easy to start using a powerful and familiar Jakarta EE runtime on Azure.
JBoss Enterprise Application Platform on Azure Marketplace
The Azure Marketplace offering of JBoss EAP offers three combinations of JBoss EAP and Red Hat Enterprise Linux:
A standalone server running on an Azure Virtual Machine. This is the simplest case, with one JBoss EAP server running on Red Hat Enterprise Linux on a private virtual network with one subnet (Figure 1).
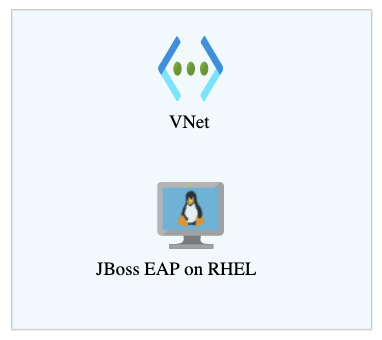
Figure 1. The simplest Azure deployment is a standalone single JBoss EAP instance. A cluster of JBoss EAP servers running on Azure VMs on a private virtual network with one subnet. You can choose the number of cluster members you want to deploy. This configuration uses an internal load balancer to distribute the incoming network traffic to your private network (Figure 2).

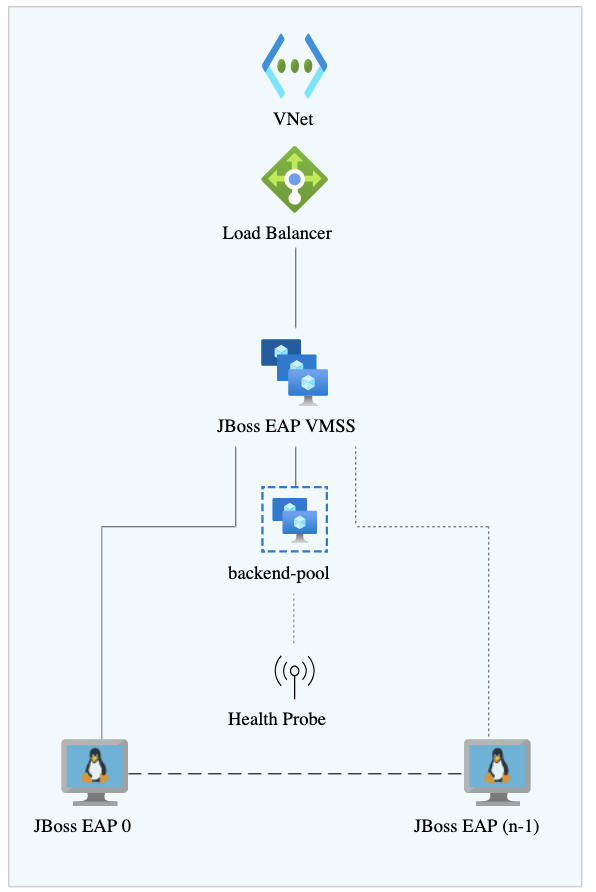
Figure 2. Multiple JBoss EAP instances can run in a cluster with a load balancer to direct traffic. An autoscale cluster server running on Azure Virtual Machine Scale Set (VMSS). This configuration is similar to the previous one, but can automatically increase or decrease the number of cluster members in response to demand (Figure 3).

Figure 3. Azure can also autoscale JBoss EAP instances.


The example in this article uses the Red Hat offering on Azure to create a cluster of two JBoss EAP instances. We expose the instances to the internet behind an Azure firewall and get access to the JBoss management command-line interface (CLI) of each instance from your local machine.
Prerequisites
- An Azure account with an active subscription: If you don't have an Azure subscription, you can create an account for free.
- JBoss EAP: You need a Red Hat account with a Red Hat Subscription Management entitlement for JBoss EAP. The entitlement lets you download a version of JBoss EAP tested and certified by Red Hat. If you don't have EAP entitlement, sign up for a free developer subscription through the Red Hat Developer Subscription for Individuals. Once registered, you can find the necessary credentials (Pool IDs) at the Red Hat Customer Portal.
- The Azure CLI utility, which you can install from the Microsoft site.
Deploy a JBoss EAP cluster on an Azure VM
The following steps describe how to deploy a JBoss EAP cluster on an Azure VM:
Get the Azure Marketplace offering of JBoss EAP on Red Hat Enterprise Linux. Open the Azure portal and select the Create a resource button, and then search for Red Hat JBoss Enterprise Application Platform (JBoss EAP). You will arrive at the overview page in Figure 4.
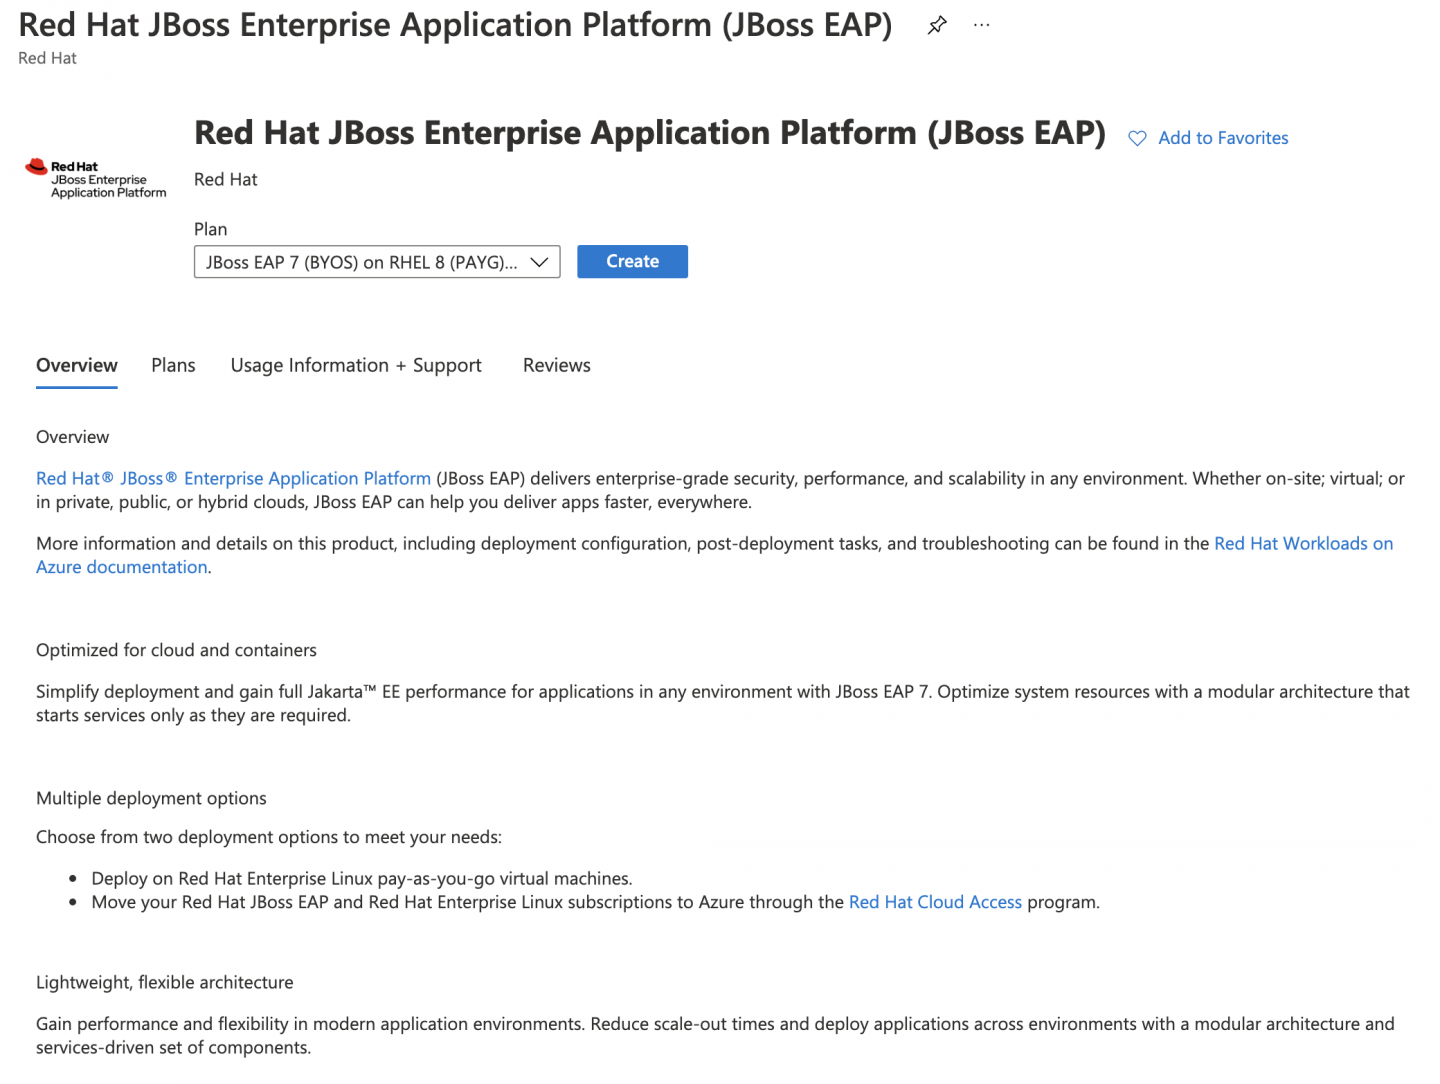
Figure 4. Azure has a JBoss EAP offering. Select your desired software plan, which defines the license model combination of JBoss EAP and Red Hat Enterprise Linux. At the moment of writing, the following license models are available:
- Bring Your Own Subscription (BYOS): Use your existing Red Hat subscriptions to run Red Hat Products on Azure.
- Pay As You Go (PYOS): Get billed periodically for usage by Microsoft.
For this tutorial, we selected "JBoss EAP 7 (BYOS) on Red Hat Enterprise Linux 8 (PAYG) Clustered VM." Once you have selected your software plan, click the Create button. You will be redirected to the Basics configuration.
- You are going to connect to your cluster's VMs using an SSH public key, which you supply on the Basics configuration tab. If you don't know how to create the SSH keys, you can follow the Create and use an SSH public-private key pair for Linux VMs in Azure guide. As the terms indicate, you must keep your private key secret and use your public key on systems to which you want to connect.
On the Basics tab of the Create Red Hat JBoss Enterprise Application Platform (JBoss EAP) page, enter or select the information listed in Table 1.
Table 1. Parameters for JBoss EAP instance. Setting Value Subscription Select your Azure subscription. Resource group Select Create new and enter eap-clusterin the text box.Region Choose the Azure region that's right for you. Virtual Machine name Enter eap-cluster-vmin the text box.Availability set name Enter eap-cluster-asin the text box.Username This is the Red Hat Enterprise Linux user account name. Enter rheluser.Authentication type This setting configures how your Red Hat Enterprise Linux user account can be authenticated in your system. Select SSH Public Key. SSH public key This is the SSH public key for the Virtual Machines. Paste here the content of the public key you generated earlier. - Select the Next: Virtual Machine Settings button to navigate to the next tab.
On the Virtual Machine Settings tab, configure the number of machines that will be part of your cluster, the size of your VMs, and the virtual network and subnet where your cluster will be deployed. We use all the defaults in this article except for the virtual network and subnet.
Click the Create new button in the Virtual Network field to open the Create virtual network dialog. Edit the virtual network name and the subnet names as shown in Figure 5.
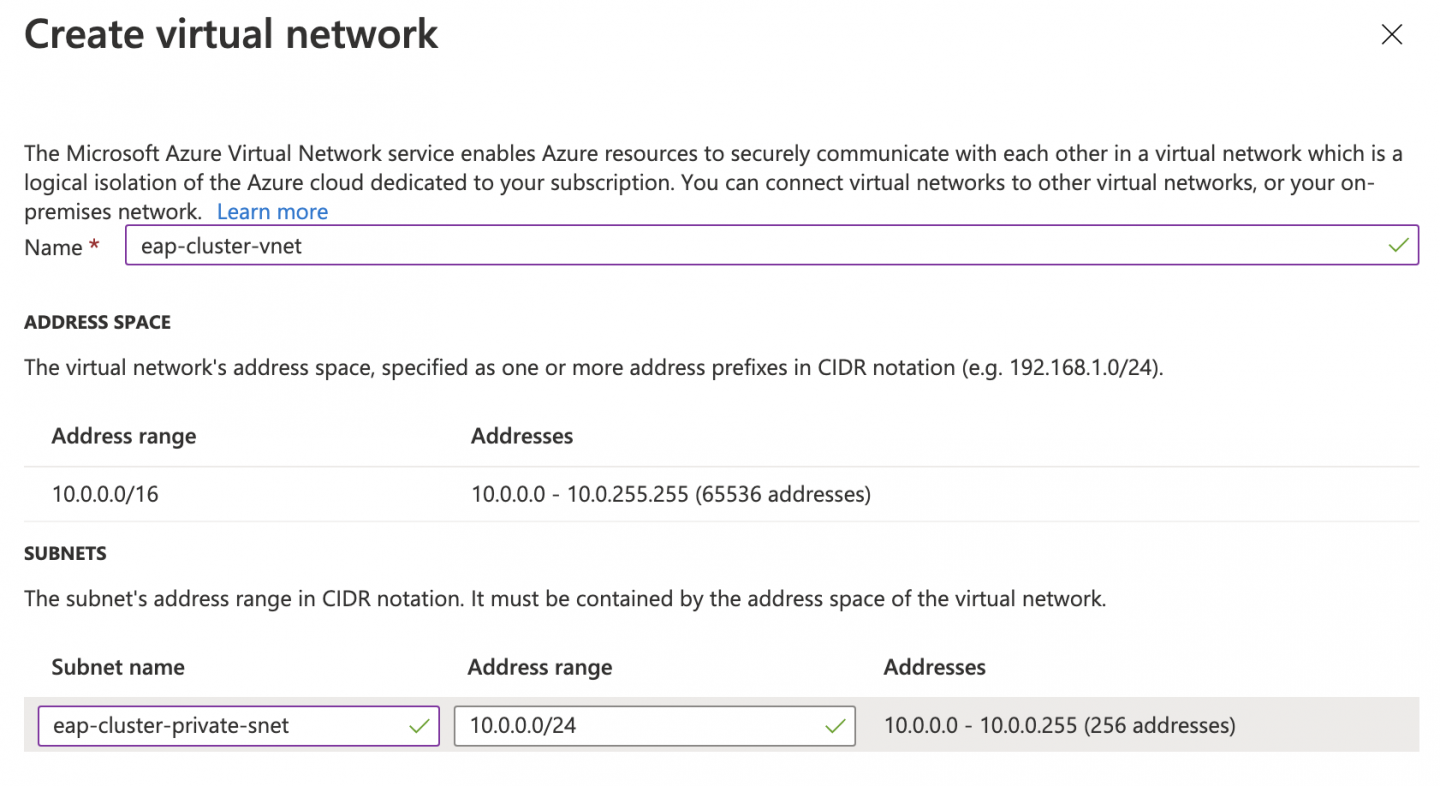
Figure 5. Specify a name, subnet name, and address range. For the purposes of this example, the virtual network needs to have enough space to accommodate two subnets. One subnet will be private and the other will be public. At this step, you are defining only the private subnet. Later, when you add the Azure Firewall, you will need to create an additional subnet. So take both subnets into account at this stage. Use an address range for your virtual network and a private subnet large enough to allow you to create an additional subnet later.
- Select the OK button to accept the changes. The Create virtual network dialog will close.
- Click the Next: JBoss EAP Settings button to navigate to the next tab.
In the JBoss EAP Settings tab, configure the JBoss EAP administrator username and password. Here you also supply information about the Red Hat subscription account that will be used to bring your license for your JBoss EAP product on Azure, in accordance with the BYOS model. Enter the information shown in Table 2.
Table 2. Parameters for JBoss EAP administrator. Setting Value JBoss EAP Admin username Enter the name of the JBoss EAP administrator user: For example, eapuser. You will log in to the JBoss EAP CLI later as this user.JBoss EAP password Enter the EAP admin password and confirm it. It must have a minimum of twelve characters. RHSM username Enter your Subscription Manager user account. RHSM password Enter your Subscription Manager password and confirm it. RHSM Pool ID with EAP entitlement Enter the Subscription Manager Pool ID where the JBoss EAP product is available. - Select the Next: Review + create button. All the supplied information will be immediately validated and a summary report will be shown.
- If you are fine with the summary, select the Create button to deploy all the resources in Azure. The deployment might take a few minutes. Behind the scenes, the desired number of VMs will be created and the JBoss EAP server will be installed on those machines via RPM packages. Your Subscription Manager BYOS subscription will be used to download and install the JBoss EAP server on your Red Hat Enterprise Linux VMs. The default JBoss EAP server configuration will be modified accordingly, to make the server run properly on Azure.
- When your deployment finishes, you will see a summary of all the resources created automatically.


Verify the cluster data replication
On each JBoss EAP server, the default multi-VM configuration of the Red Hat offering deploys a demo application that you can use to verify that your cluster is working properly. However, at this moment, we have two Red Hat Enterprise Linux virtual machines running on a private virtual network on Azure, and neither of those resources is accessible externally. In addition, the configured load balancer is an internal load balancer. It is not suitable for directly exposing your applications to external access by adding a public IP address. That restriction is intentional because it makes the default configuration secure without exposing any element to the outside world. It is up to you to decide what you want to expose and how. The best configuration choice depends considerably on your needs and what you are trying to achieve.
Assuming you want to access your cluster externally, in the following sections, we will explore one way to gain access to your JBoss instances by adding an Azure firewall.
If you don't want to expose your private network to the public, you have also multiple options: For example, you can deploy a Windows VM on your private network and connect to it via Azure Bastion. Once you have logged into your Windows machine, you will get access to your JBoss EAP cluster machines from there.
Expose the cluster demo application to the internet
Our goal is to get access from the public internet to the demo application deployed in your cluster. To do so, you will deploy an Azure firewall and place it in front of your internal load balancer so you can access your web applications externally in a secure way.
In the following sections, you will use the Azure CLI on a Linux machine to add and configure the required resources. In addition, you have to ensure that all your Azure CLI commands are created for the same location you used when you created the JBoss EAP cluster. You can handle the location by initializing an environment variable. That allows you to copy and paste the commands shown in this article without worrying about altering them to reflect your location.
Note: At the moment of writing, some commands related to the firewall configuration are in preview mode, so they might change slightly by the time you are reading this article.
This article assumes you have created an environment variable named LOCATION to hold the location you used when creating your JBoss EAP resources. If you don't remember the location, grab it from your resource group by executing the following command:
$ LOCATION=$(az group show --name eap-cluster --query 'location' --output tsv)Set up the public IP address and firewall
Azure Firewall is a managed, cloud-based network security service that protects your Azure Virtual Network resources. You have to create three sets of resources to make it work:
- A public IP address, to make your service accessible from the internet.
- Security policies, which are collections of rules that allow inbound traffic to your Azure virtual network. These rules need to be added by creating three nested elements:
- Rule collection groups: Sets of rule collections of any type. These are useful to group your rules in a logical way, based on a similar priority.
- Rule collections: Sets of rules of the same type, which can apply to a DNAT, network, or application. We will add DNAT rules to translate the external requests arriving at the HTTP port.
- Rules: Actual rules defining what to do when a request arrives at your public IP address. In this article, the security policy accepts TCP traffic that arrives at your public IP address at port 80, and translates the destination to the internal IP address of your load balancer, which is also listening at port 80. The load balancer redirects the incoming traffic from port 80 to port 8080 on each VM, choosing healthy VMs.
- The firewall resource itself, which is deployed on a different subnet. The firewall uses the defined security policies to check whether inbound or outbound traffic is allowed.
Create a public IP address
Let's start by creating a public IP address:
Use az network public-ip create to create the address:
$ az network public-ip create \ --resource-group eap-cluster \ --location $LOCATION \ --name eap-cluster-public-ip \ --dns-name eapclusterdemo \ --sku StandardNote: The DNS name assigned to the public IP address is
eapclusterdemo.$LOCATION.cloudapp.azure.com.Create the firewall policy resource with az network firewall policy create:
$ az network firewall policy create \
    --name eap-cluster-fw-policy \
    --resource-group eap-cluster \
    --location $LOCATION
Create a rule collection group to hold your rule collections with az network firewall policy rule-collection-group create:
$ az network firewall policy rule-collection-group create \
    --name eap-cluster-rule-collection-group \
    --policy-name eap-cluster-fw-policy \
    --priority 30000 \
    --resource-group eap-cluster
Create a DNAT rule collection to hold all the rules related to web traffic. In the same command, you can also create the rule itself. Our rule is pretty simple: It allows HTTP traffic from any IP address to our public IP address and translates the specified port from 80 to the internal load balancer IP address. To accomplish this transformation, you need to know the public IP address and the internal load balancer IP address. Grab them by using the following commands:
LOAD_BALANCER_IP=$(az network lb show \
    --name jbosseap-lb \
    --resource-group eap-cluster \
    --query 'frontendIpConfigurations[].privateIpAddress' --output tsv)

AZURE_PUBLIC_IP=$(az network public-ip show \
    --name eap-cluster-public-ip \
    --resource-group eap-cluster \
    --query 'ipAddress' --output tsv)
Create the DNAT rule collection and rule with az network firewall policy rule-collection-group collection add-nat-collection:
$ az network firewall policy rule-collection-group collection add-nat-collection \
    --name http-web-collection \
    --collection-priority 30000 \
    --policy-name eap-cluster-fw-policy \
    --resource-group eap-cluster \
    --rule-collection-group-name eap-cluster-rule-collection-group \
    --action DNAT \
    --rule-name inbound_web_trafic \
    --description "Allow inbound Web traffic to the internal Load Balancer" \
    --source-addresses "*" \
    --destination-addresses $AZURE_PUBLIC_IP \
    --destination-ports 80 \
    --translated-address $LOAD_BALANCER_IP \
    --translated-port 80 \
    --ip-protocols TCP
That's all you need to do regarding the firewall security policy. Now create the firewall resource itself with az network firewall create:
$ az network firewall create \
   --name eap-cluster-fw \
   --resource-group eap-cluster \
   --firewall-policy eap-cluster-fw-policy \
   --location $LOCATION
To configure the firewall to protect your virtual network, you must create a subnet named AzureFirewallSubnet. You can create it with az network vnet subnet create. At this step, pay attention to the address prefix you have to use. You probably will need to review what addresses you used when you were creating the JBoss EAP cluster. The subnet you need to create at this step is the public subnet:
$ az network vnet subnet create \
    --name AzureFirewallSubnet \
    --resource-group eap-cluster \
    --vnet-name eap-cluster-vnet \
    --address-prefixes 10.0.1.0/24
The firewall will be working on the 10.0.1.0/24 subnet, whereas your private subnet is on 10.0.0.0/24. The virtual network is 10.0.0.0/16.
Finally, configure the firewall to use the public IP address and your virtual network through az network firewall ip-config create:
$ az network firewall ip-config create \
    --firewall-name eap-cluster-fw \
    --name eap-cluster-fw-ip \
    --public-ip-address eap-cluster-public-ip \
    --resource-group eap-cluster \
    --vnet-name eap-cluster-vnet
This operation takes a few minutes to complete. Once done, you will have access to the demo application deployed on the EAP servers.
Interact with the demo application
At this point, your VMs are exposed on the internet, protected by a firewall. You should have access to them via the fully qualified domain name (FQDN) of your Azure Virtual Network public IP address. You can get the FQDN by issuing the following command:
$ az network public-ip show \
   --resource-group eap-cluster \
   --name eap-cluster-public-ip \
   --query 'dnsSettings.fqdn'
Open your favorite browser and navigate to http://<DNS FQDN>/eap-session-replication. The demo application's landing page will be displayed.
You can use this application to verify that the cluster is working as expected through the following steps:
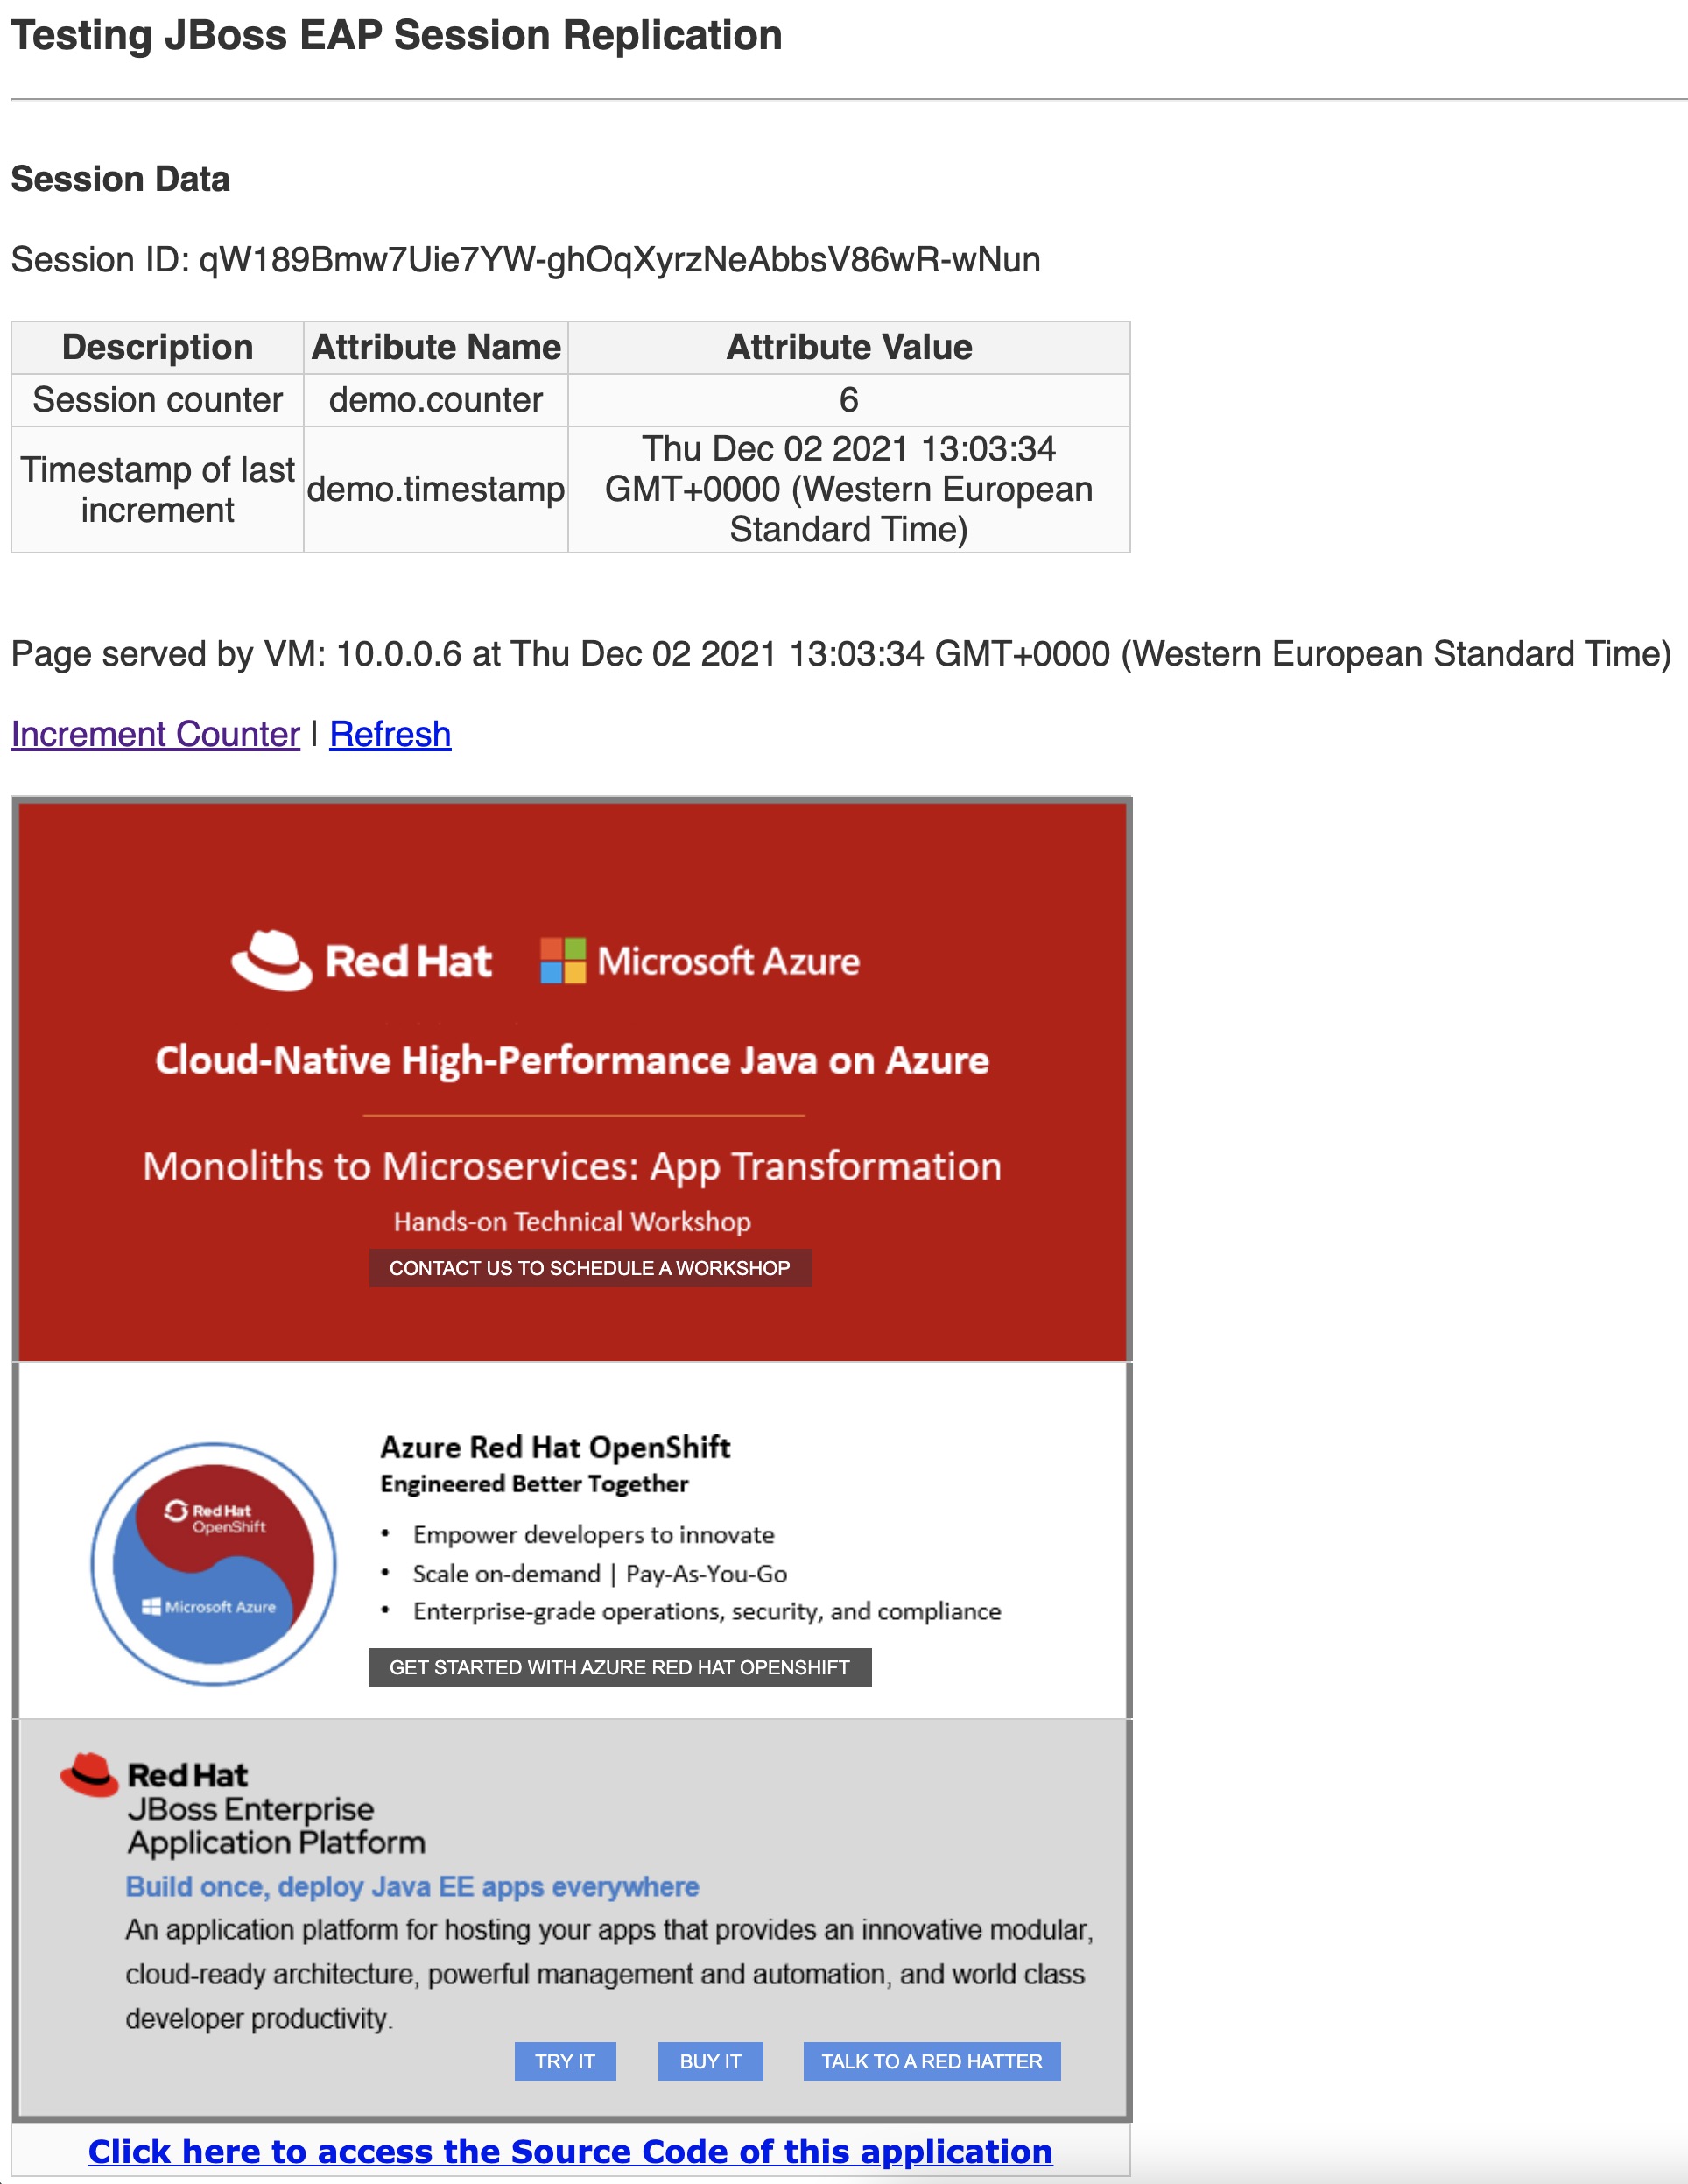
- Increment the counter several times. The demo application shows the VM's private IP address that served your last request (Figure 7).
From the Azure portal, locate the VM with that IP address and stop it. You can find the VM's private IP address by inspecting the Networking settings on your VM resource (Figure 6).
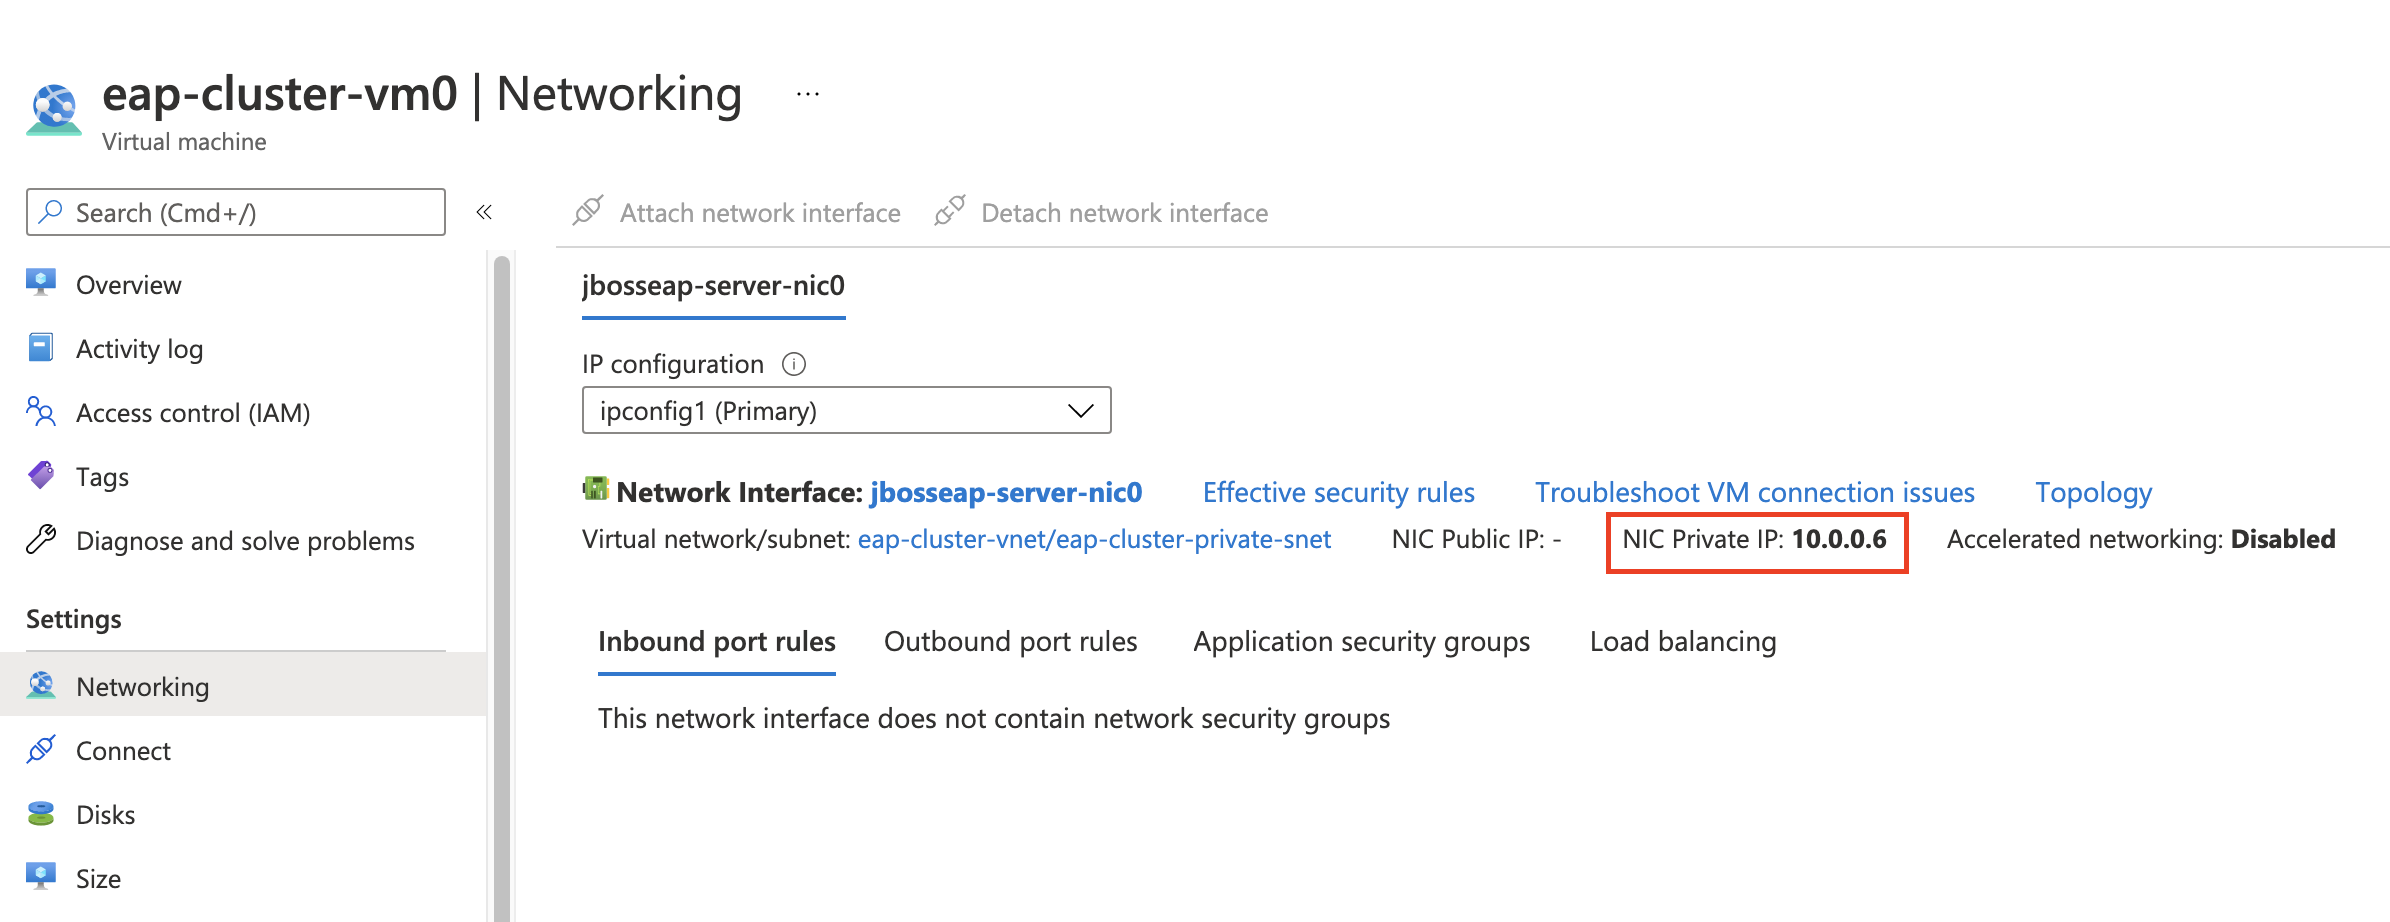
Figure 6. The VM's resources page shows the public IP address in the Networking settings. - Go back to the demo application and select Refresh.
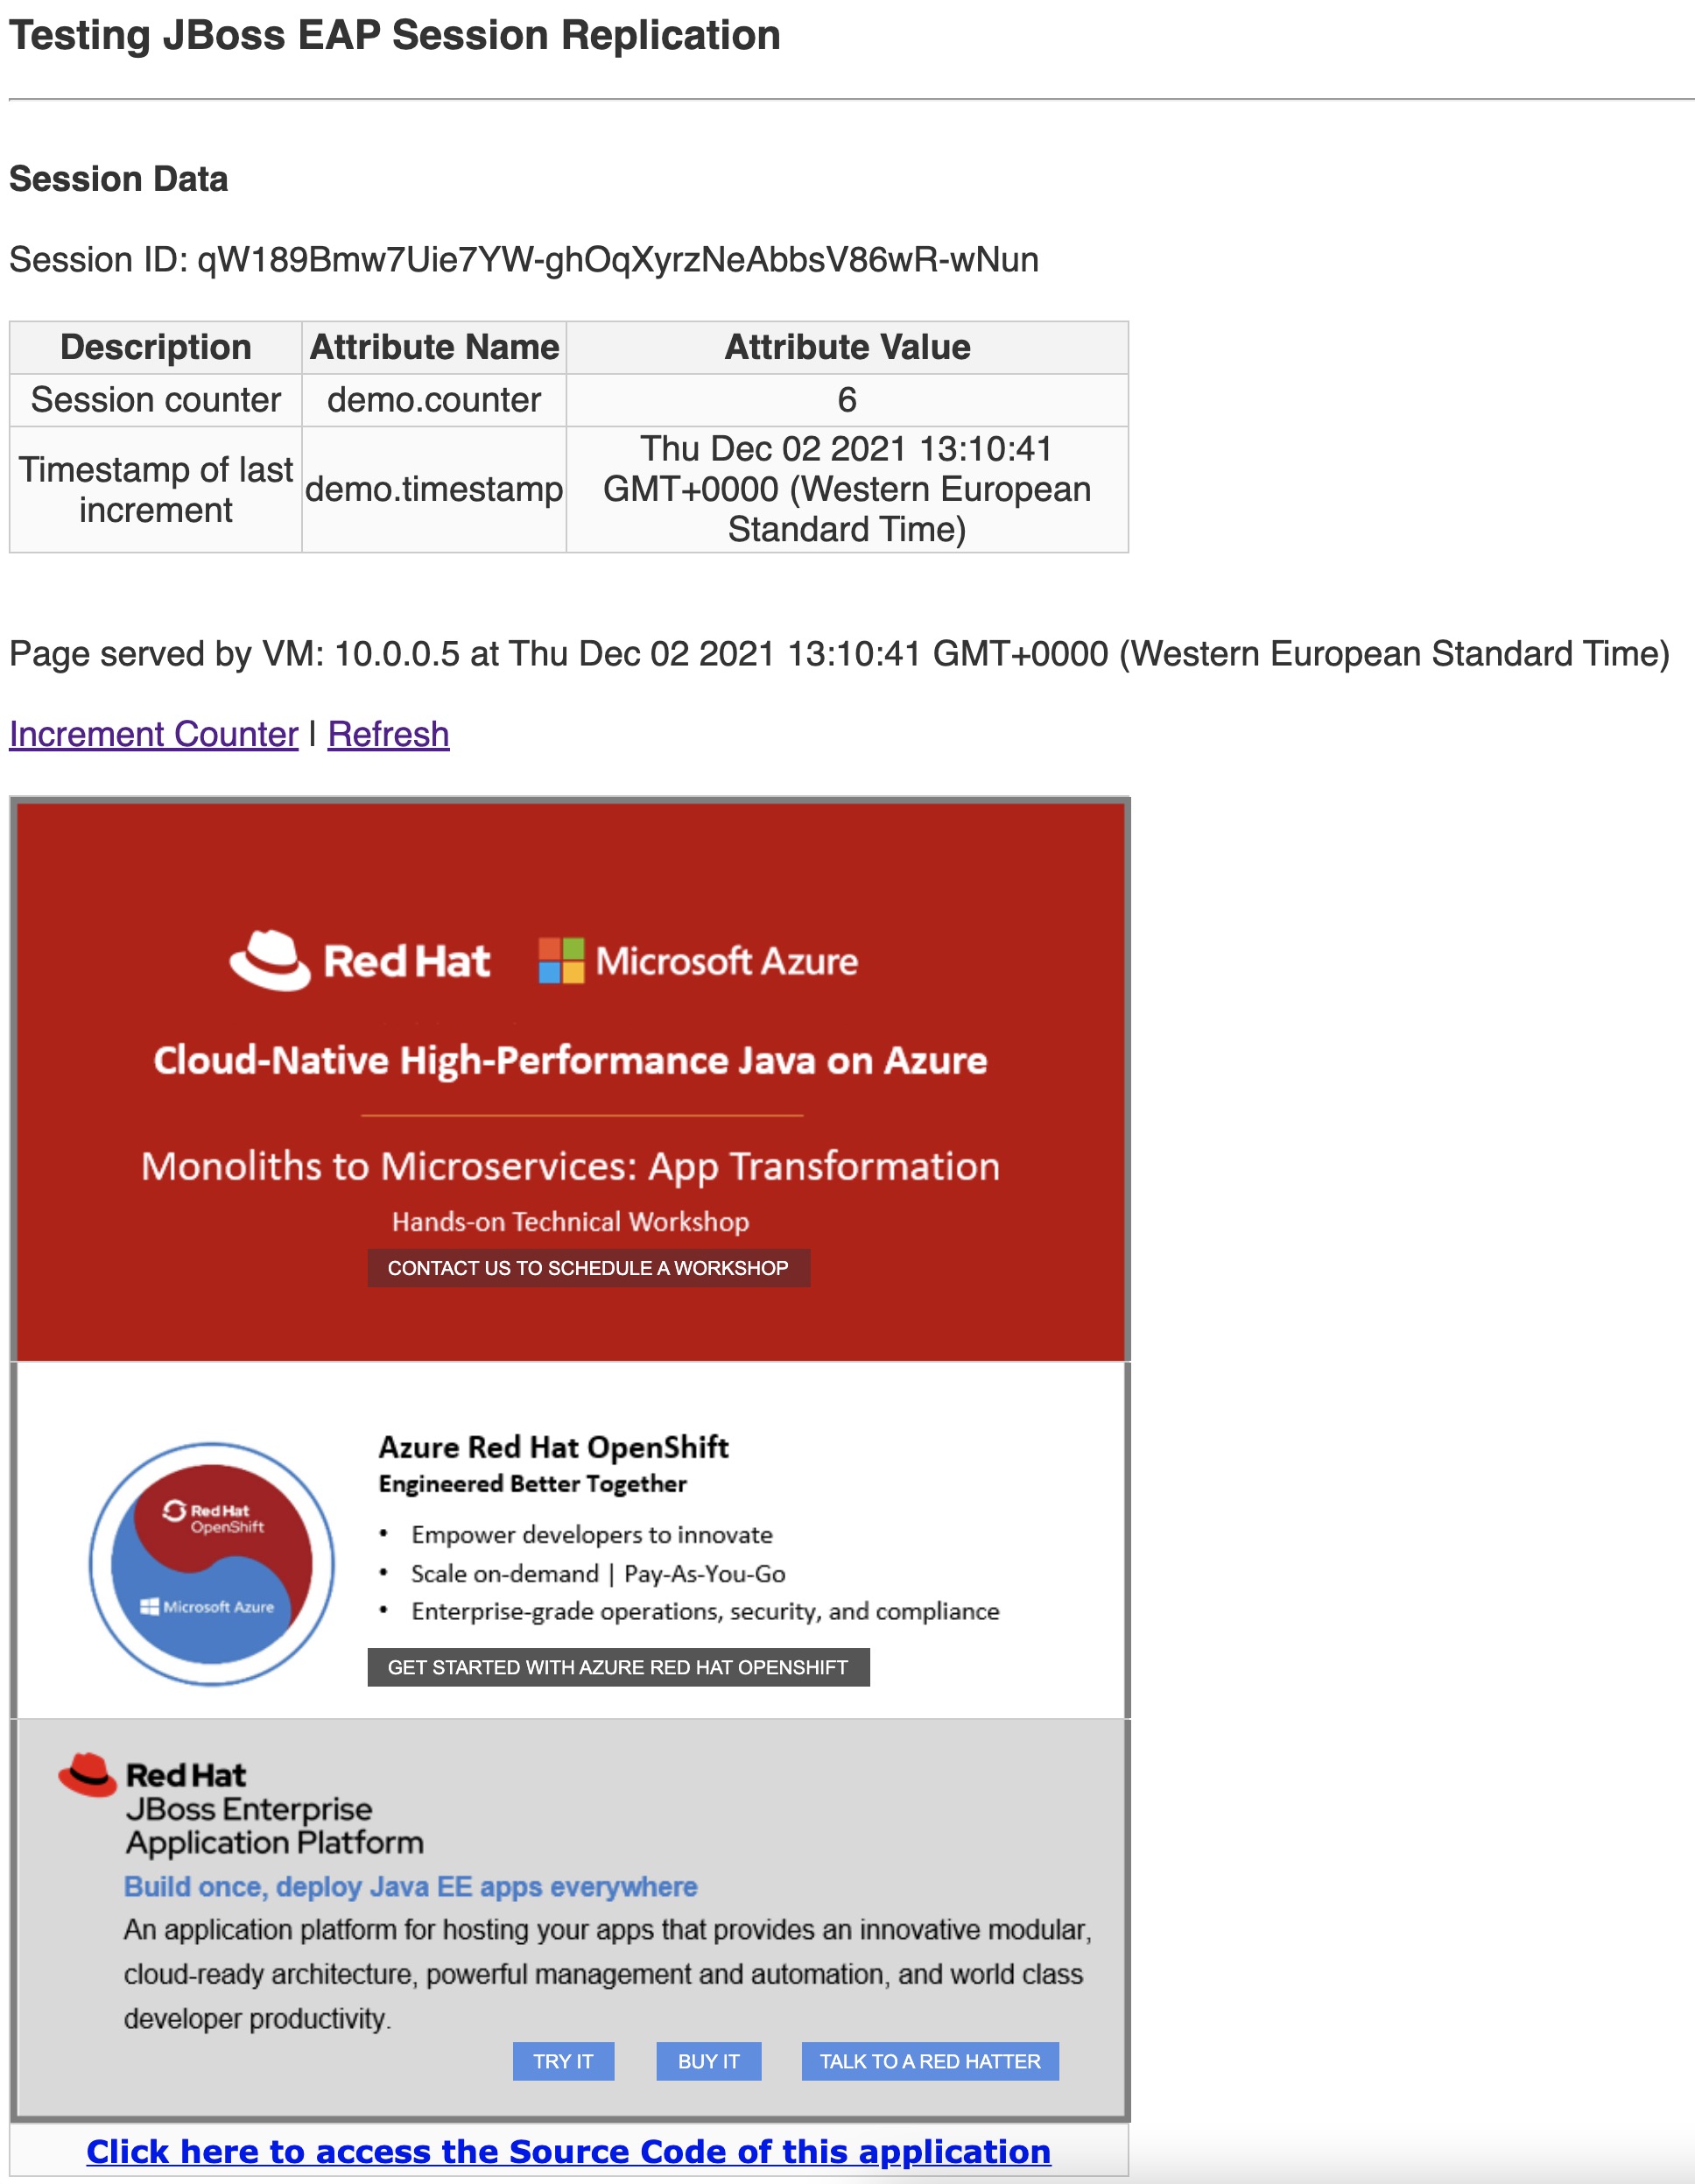
- You will get a response served by the other VM (Figure 8), which returns the same session ID and counter value.

Going through the steps in the previous list demonstrates that your session information is replicated in the cluster (Figures 7 and 8). If the process succeeds, restart the stopped VM so you can continue with the next section.
Deploy your applications via the JBoss Management CLI
In addition to the HTTP ports, you can add DNAT rules to access the JBoss EAP CLI on each server instance. Access to the CLI allows you to configure the servers further and deploy applications. Similar to what you did to expose the HTTP port, the following steps expose the SSH port of each VM through the firewall. You will use the private key of the SSH key pair you used when you created the cluster. To increase the level of security, you are allowing only connections coming from your local machine.
First of all, grab your public IP address (multiple sites on the internet such as whatismyip.com can give you this information), the public IP address of your cluster in Azure, and the private IP addresses of each VM. Save these addresses in variables, for instance:
LOCAL_PUBLIC_IP="71.145.22.216"

AZURE_PUBLIC_IP=$(az network public-ip show \
  --name eap-cluster-public-ip \
  --resource-group eap-cluster \
  --query 'ipAddress' --output tsv)

IP_VM0=$(az network nic show \
    --name jbosseap-server-nic0 \
    --resource-group eap-cluster \
    --query 'ipConfigurations[].privateIpAddress' \
    --output tsv)

IP_VM1=$(az network nic show \
    --name jbosseap-server-nic1 \
    --resource-group eap-cluster \
    --query 'ipConfigurations[].privateIpAddress' \
--output tsv)Note: By default, the network interfaces are created by appending the index of the VM that belongs to the cluster to jbosseap-server-nic . Therefore, if you have created a cluster with two machines, the network interface names of those machines are jbosseap-server-nic0 and jbosseap-server-nic1.
Add a new firewall rule collection to group the rules related to the SSH ports and two rules that translate the traffic coming from port 10022 to port 22 for the first Virtual Machine (VM0) and from port 20022 to port 22 for the other Virtual Machine (VM1). Notice that you are also specifying that the only valid source is your public IP address:
Create the rule for the VM0:
$ az network firewall policy rule-collection-group collection add-nat-collection \
    --name ssh-collection \
    --collection-priority 30010 \
    --policy-name eap-cluster-fw-policy \
    --resource-group eap-cluster \
    --rule-collection-group-name eap-cluster-rule-collection-group \
    --action DNAT \
    --rule-name inbound_ssh_trafic_vm0 \
    --description "Allow inbound SSH traffic to VM 0" \
    --source-addresses $LOCAL_PUBLIC_IP \
    --destination-addresses $AZURE_PUBLIC_IP \
    --destination-ports 10022 \
    --translated-address $IP_VM0 \
    --translated-port 22 \
    --ip-protocols TCP
Create the rule for the VM1:
$ az network firewall policy rule-collection-group collection rule add \
    --collection-name ssh-collection \
    --name inbound_ssh_trafic_vm1 \
    --policy-name eap-cluster-fw-policy \
    --rule-collection-group-name eap-cluster-rule-collection-group \
    --resource-group eap-cluster \
    --rule-type NatRule \
    --description "Allow inbound SSH traffic to VM 1" \
    --source-addresses $LOCAL_PUBLIC_IP \
    --destination-addresses $AZURE_PUBLIC_IP \
    --destination-ports 20022 \
    --translated-address $IP_VM1 \
    --translated-port 22 \
    --ip-protocols TCP
Once you have created the rules, you can gain access to the VMs using SSH with the user name of your Red Hat Enterprise Linux VMs (rheluser in this article) and your public key:
$ ssh -i eap-cluster-rsa rheluser@${AZURE_PUBLIC_IP} -p 10022
$ ssh -i eap-cluster-rsa rheluser@${AZURE_PUBLIC_IP} -p 20022
And on each SSH session, you can get onto the JBoss CLI server by issuing the following command:
[rheluser@eap-cluster-vm0 ~]$ $EAP_HOME/wildfly/bin/jboss-cli.sh -c -u=eapuser
Authenticating against security realm: ManagementRealm
Password:
[standalone@localhost:9990 /]
This eapuser user and its password are the credentials configured when you created the cluster.
Since you can connect to your VMs using SSH, you can also copy files securely using Secure Copy (scp). To deploy an application in your cluster, you can copy the application to a known directory on the remote VMs, and then deploy the application by using the JBoss EAP CLI. For example, suppose you have a local application named helloworld.war. You can deploy it by issuing the following commands:
$ scp -i eap-cluster-rsa -P 10022 helloworld.war rheluser@${AZURE_PUBLIC_IP}:/tmp
helloworld.war           100% 6495   109.1KB/s   00:00

$ ssh -i eap-cluster-rsa rheluser@${AZURE_PUBLIC_IP} -p 10022
[rheluser@eap-cluster-vm0 ~]$ $EAP_HOME/wildfly/bin/jboss-cli.sh -c -u=eapuser
Authenticating against security realm: ManagementRealm
Password:
[standalone@localhost:9990 /] deploy /tmp/helloworld.war
[standalone@localhost:9990 /] exit
[rheluser@eap-cluster-vm0 ~]$ exit
logout
Connection to 20.90.187.110 closed.
Repeat the same commands for VM1 by using port 20022 in place of 10022. Your application will be deployed and available at http://<DNS FQDN>/your-application-web-context.
For debugging, you can find the server.log at /opt/rh/eap7/root/usr/share/wildfly/standalone/log/server.log.
Clean up resources
To delete all the resources created on Azure, open the eap-cluster resource group and select Delete resource group.
Conclusion
Red Hat accounts make it easy to use JBoss EAP on Azure with modern, production-level features such as load balancing. Try out different configurations and scale your applications.
Last updated: September 27, 2024