Page
Deploy an Express.js application to Red Hat OpenShift

Many modern Node.js applications are now run on a Kubernetes-based platform such as Red Hat OpenShift. These applications are run as containers. This lesson shows you how to create a new Developer Sandbox instance and prepare your application to be containerized and then deployed to Red Hat OpenShift.
In order to get full benefit from taking this lesson, you need:
- The application from the previous lessons.
- An environment where you can install and run a Node.js application.
- A Developer Sandbox account.
In this lesson, you will:
- Create a Developer Sandbox instance.
- Add a Dockerfile.
- Deploy the application to Red Hat OpenShift.
Set up the environment
Note: This section assumes that you have already registered for a no-cost Developer Sandbox account and have installed the OpenShift CLI tool (oc).
Before you start deploying your application, you first need to log in to the Developer Sandbox from your local machine.
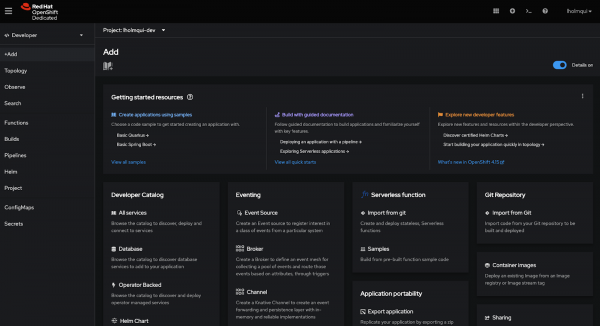
Navigate to the web console of your Developer Sandbox, shown in Figure 1.

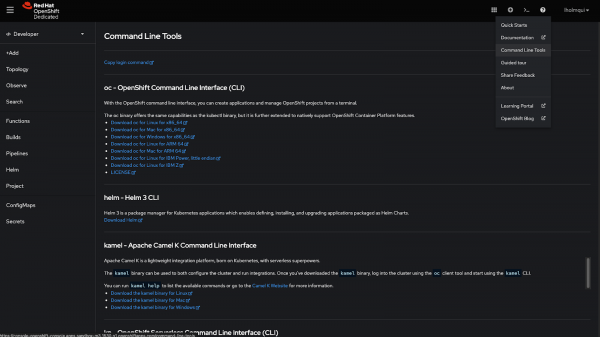
If you still need to download and install the OpenShift CLI tools, you can download them from the Command Line Tools page, shown in Figure 2.

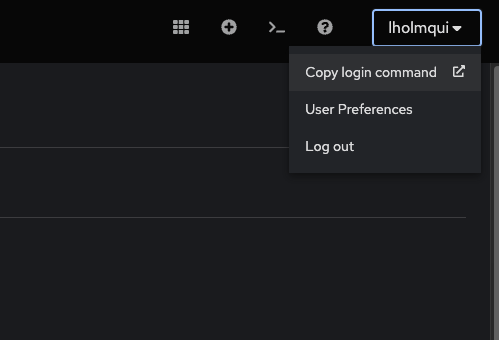
Once that is done, the next step is to copy the login command. For this, navigate to the top right corner where your username is and click the Copy login command link (Figure 3).

You will eventually navigate to a screen that has your API token and a nicely formatted login command, something similar to this:
oc login --token=SECRET_API_TOKEN
   --server=https://api.sandbox-m3.1530.p1.openshiftapps.com:6443
Copy this command and run it in your terminal. Once successful, you should see a similar output:
Logged into "https://api.sandbox-m3.1530.p1.openshiftapps.com:6443" as "lholmqui" using the token provided.
You have access to the following projects and can switch between them with 'oc project <projectname>':
  * lholmqui-dev
    openshift-virtualization-os-images
Using project "lholmqui-dev".
Deploy a Dockerfile
Before we deploy our application to Red Hat OpenShift, we need to prepare it to become a container. Usually, you would create a container locally and push that to a container registry for Red Hat OpenShift to consume, but we are going to leverage the built-in container tools that Red Hat OpenShift has, so we don’t need to install Podman/Docker locally.
First, you need to create a Dockerfile for your application. Create a new file called Dockerfile and add the following contents:
# Install the app dependencies in a full UBI Node docker image
FROM registry.access.redhat.com/ubi8/nodejs-20:latest
# Copy package.json and package-lock.json
COPY package*.json ./
USER 0
# Install app dependencies
RUN npm install
# Copy the dependencies into a Slim Node docker image
FROM registry.access.redhat.com/ubi8/nodejs-20-minimal:latest
# Install app dependencies from the other container
COPY --from=0 /opt/app-root/src/node_modules /opt/app-root/src/node_modules
COPY . /opt/app-root/src
ENV NODE_ENV production
ENV PORT 3000
EXPOSE 3000
CMD ["node", "server"]
You might notice that there are two FROM sections. This is because we are using a multi-stage build. The first part is responsible for installing all our dependencies using a “regular” Node.js image.
The second part uses a minimal Node.js image, which only includes the things that need to be able to run a Node.js application. This makes the image considerably smaller.
Then we copy our node_modules folder as well as our source code.
While this example doesn’t show it, imagine you had a TypeScript project that had many development dependencies that were not needed for your production deployment. This type of build would allow you to install those dependencies and build your application in a separate stage, then copy over what is needed for runtime, making the image smaller and more secure.
The last thing you need to do is to create a .dockerignore file. This is for the items you don’t want to add to our container when it is built.
Create a new file called .dockerignore and add the following contents:
**/node_modules/
**/node_modules_linux/
**/.dockerignore
**/.gitignore
**/.git
**/README.md
**/LICENSE
**/.vscode
Now we can deploy our application to OpenShift.
Deploy your application to the Developer Sandbox
To deploy the application to Red Hat OpenShift, we are going to use a Node.js-based command-line interface (CLI) tool called Nodeshift CLI. This tool lets you easily deploy your source code-based application to Red Hat OpenShift with one command.
To learn more about the Nodeshift CLI, check out its documentation.
Copy the following command and run it in your terminal:
npx nodeshift --build.strategy Docker --useDeployment --expose --deploy.port 3000As you can see, there are multiple options being specified. Let’s break them down piece by piece.
npx nodeshift: npx is a command built into npm that allows you to run a module without having to install it. This is especially useful for running one-off CLI commands, like we are doing with the Nodeshift CLI.--build.strategy Docker: Here you are telling the Nodeshift CLI to use the Docker build strategy. This will create a BuildConfig object on Red Hat OpenShift using the Docker strategy and our Dockerfile instead of doing an S2I build.--useDeployment:This tells the Nodeshift CLI to create a deployment object on Red Hat OpenShift to deploy our application.--expose: This tells the Nodeshift CLI to create a route object on Red Hat OpenShift so you can make our application publicly available.--deploy.port 3000: This tells the Nodeshift CLI that the application runs on port 3000 and to make sure any of the Red Hat OpenShift objects it creates also use that port to access our application.
Once the application has finished deploying, you should see something similar on the Topology view of your Developer Sandbox (Figure 4).

You can then click either the link at the bottom right under the Routes section, or the arrow at the top right of the circle to navigate to your application. You should see something similar to Figure 5.

The other routes that you added should also be available as well. You would just need to append either /live or /metrics to the end of the route URL.
And that’s it! You’ve deployed our application to the Developer Sandbox.
Summary
This learning path showed how to:
- Use the popular Express.js framework for creating a Node.js application.
- Add components for observability.
- Create routes to expose metrics data.
- Containerize and deploy the application to Red Hat OpenShift.
We hope this learning path has helped you understand some of the concepts of cloud-native Node.js applications.
To learn more, check out:
