Introduction
OpenShift Virtualization enables running VMs alongside pods within the same cluster which paves a path for infrastructure modernization. Using hyperconverged ODF as the backend storage for OpenShift Virtualization allows your VMs to exist on the same node where storage is attached, and provides the potential to max out hardware resource utilization and cost savings. This document provides the detailed step by step guide to set up OCP-Virt (OpenShift Virtualization) VMs backed by a hyperconverged ODF (OpenShift Data Foundation) storage system. At the end of this guide, we show you how to create thousands of VMs using a one-line bash command and we also include some scale data comparing PVC and VolumeSnapshot cloning and VM boot time for both Windows and RHEL 9 VMs.
Environment
We have a 3 + 108 node bare metal cluster: 3 masters and 108 workers. There are in total 108 OSD pods with a total raw storage capacity of 313 TiB, and 3-way replication enabled to provide data resilience.
Hardware Per Node:
- 112 CPUs: 2 sockets x 28 cores x 2 Threads Intel(R) Xeon(R) Gold 6330 CPU @ 2.00GHz
- 512GiB RAM: DIMM DDR4 Synchronous Registered (Buffered) 3200 MHz (0.3 ns)
- 2.9 TiB Disk: NVMe P5600 MU (Mixed Use) U.2
- 100Gbps NIC: MT2892 Family [ConnectX-6 Dx] (OVN)
OCP and Operators verision:
- OCP 4.15.15
- CNV 4.15.2
- ODF 4.15.2-rhodf ceph quincy
- Local Storage Operator 4.15.0-202405161507
Operator Installation
Prerequisite: A running OCP bare metal cluster
This is a laboratory setup using command line examples, which might be useful if you would like to incorporate CLI procedures into your automation pipelines. There are 3 operators required for this particular setup:
- OpenShift Virtualization which is an add-on to OCP and allows you to run VMs side by side with container workloads.
- Local StorageOperator automates the process of local disk discovery and provisioning of local volumes.
- OpenShift Data Foundation Internal Mode, a provider of persistent shared storage using local volumes.
OpenShift Virtualization
When creating the Namespace, OperatorGroup and Subscription objects, make sure to replace the startingCSV with the compatible version as described in the documentation.
$ oc create -f - <<'END'
apiVersion: v1
kind: Namespace
metadata:
  name: openshift-cnv
---
apiVersion: operators.coreos.com/v1
kind: OperatorGroup
metadata:
  name: kubevirt-hyperconverged-group
  namespace: openshift-cnv
spec:
  targetNamespaces:
    - openshift-cnv
---
apiVersion: operators.coreos.com/v1alpha1
kind: Subscription
metadata:
  name: hco-operatorhub
  namespace: openshift-cnv
spec:
  source: redhat-operators
  sourceNamespace: openshift-marketplace
  name: kubevirt-hyperconverged
  startingCSV: kubevirt-hyperconverged-operator.v4.15.4
  channel: "stable"
END
Once the creation of those objects concludes, we should be able to see a list of operator pods up and running:
$ oc get pod -n openshift-cnv
aaq-operator-75b8d6c995-6q4g5                          1/1     Running   0          44s
cdi-operator-5c9c664ff8-k7rf2                          1/1     Running   0          46s
cluster-network-addons-operator-7c49c56976-s4nc8       2/2     Running   0          48s
hco-operator-6bcfd97954-9bhm6                          1/1     Running   0          49s
hco-webhook-74c65945b4-glshx                           1/1     Running   0          49s
hostpath-provisioner-operator-fbd4ddf86-6qbhv          1/1     Running   0          45s
hyperconverged-cluster-cli-download-667976d696-qf2nx   1/1     Running   0          48s
mtq-operator-799f785f9f-8bntj                          1/1     Running   0          45s
ssp-operator-545976874d-k756l                          1/1     Running   0          47s
virt-operator-7bfcb4c964-27gxx                         1/1     Running   0          47s
virt-operator-7bfcb4c964-hv87x                         1/1     Running   0          47s
The next step is to create the hyperconverged object:
$ oc create -f - <<'END'
apiVersion: hco.kubevirt.io/v1beta1
kind: hyperconverged
metadata:
  name: kubevirt-hyperconverged
  namespace: openshift-cnv
spec:
END
The hyperconverged object will trigger the run of some daemon pods for each node, such as linux bridge plugin and virt handler pods etc. We can verify the pods are up and running before moving to the next step.
$ oc get pod -n openshift-cnv -o wide
kube-cni-linux-bridge-plugin-5hbpx                     1/1     Running   0               4m27s   10.129.14.13   e40-h30-000-r650.example.com   <none>           <none>
kube-cni-linux-bridge-plugin-6hdpz                     1/1     Running   0               4m27s   10.130.8.17    d24-h03-000-r650.example.com   <none>           <none>
kube-cni-linux-bridge-plugin-86l9n                     1/1     Running   0               4m27s   10.129.12.20   e40-h33-000-r650.example.com   <none>           <none>
kube-cni-linux-bridge-plugin-947rq                     1/1     Running   0               4m27s   10.131.10.24   d24-h15-000-r650.example.com   <none>           <none>
kube-cni-linux-bridge-plugin-9bwcq                     1/1     Running   0               4m27s   10.130.15.66   e40-h36-000-r650.example.com   <none>           <none>
...
We can verify that the OpenShift Virtualization addon is deployed successfully by checking the Cluster Service Version (CSV) object:
$ oc get csv -n openshift-cnv
NAME                                       DISPLAY                    VERSION   REPLACES                                   PHASE
kubevirt-hyperconverged-operator.v4.15.4   OpenShift Virtualization   4.15.4    kubevirt-hyperconverged-operator.v4.15.3   Succeeded
Local Storage
Creation of Namespace, OperatorGroup and Subscription objects: (GUI installation steps are described in the documentation)
$ oc create -f - <<'END'
apiVersion: v1
kind: Namespace
metadata:
  name: openshift-local-storage
---
apiVersion: operators.coreos.com/v1
kind: OperatorGroup
metadata:
  name: local-operator-group
  namespace: openshift-local-storage
spec:
  targetNamespaces:
    - openshift-local-storage
---
apiVersion: operators.coreos.com/v1alpha1
kind: Subscription
metadata:
  name: local-storage-operator
  namespace: openshift-local-storage
spec:
  channel: stable
  installPlanApproval: Automatic
  name: local-storage-operator
  source: redhat-operators
  sourceNamespace: openshift-marketplace
END
Verify operator and disk manager pods are running:
$ oc get pod -n openshift-local-storage
NAME                                      READY   STATUS    RESTARTS   AGE
diskmaker-manager-w2vxk                   2/2     Running   0          2m36s
diskmaker-manager-zkgkr                   2/2     Running   0          2m36s
local-storage-operator-5d54c95c8b-nvn78   1/1     Running   0          2m40s
Verify local storage operator is successfully deployed:
$ oc get csv -n openshift-local-storage
NAME                                          DISPLAY         VERSION               REPLACES   PHASE
local-storage-operator.v4.15.0-202407120536   Local Storage   4.15.0-202407120536              Succeeded
OpenShift Data Foundation
Create the openshift-storage Namespace: (GUI installation steps are described in the documentation)
$ oc apply -f - <<'END'
apiVersion: v1
kind: Namespace
metadata:
 labels:
   openshift.io/cluster-monitoring: "true"
 name: openshift-storage
spec: {}
END
Create the operator group
$ oc apply -f - <<'END'
apiVersion: operators.coreos.com/v1
kind: OperatorGroup
metadata:
 name: openshift-storage-operatorgroup
 namespace: openshift-storage
spec:
 targetNamespaces:
 - openshift-storage
END
Create the Subscription object, make sure to replace the channel value with the correct value.
$ oc apply -f - <<'END'
apiVersion: operators.coreos.com/v1alpha1
kind: Subscription
metadata:
 name: odf-operator
 namespace: openshift-storage
spec:
 channel: "stable-4.15"
 installPlanApproval: Automatic
 name: odf-operator
 source: redhat-operators
 sourceNamespace: openshift-marketplace
END
Verify ODF operator is successfully installed:
$ oc get pod -n openshift-storage
NAME                                               READY   STATUS    RESTARTS   AGE
csi-addons-controller-manager-7db788474f-gkxw7     2/2     Running   0          2m43s
noobaa-operator-57c499978c-kbb6c                   1/1     Running   0          2m48s
ocs-operator-ddfb8dfd8-4r2tk                       1/1     Running   0          2m26s
odf-console-75cc6644d-tnr54                        1/1     Running   0          2m58s
odf-operator-controller-manager-764dc97458-9kqdk   2/2     Running   0          2m58s
rook-ceph-operator-ff85fd6cd-9lfk8                 1/1     Running   0          2m17s
ux-backend-server-b497fcf7c-f6d79                  2/2     Running   0          2m26s
$ oc get csv -n openshift-storage
NAME DISPLAY VERSION REPLACES PHASE
mcg-operator.v4.15.5-rhodf NooBaa Operator 4.15.5-rhodf mcg-operator.v4.15.4-rhodf Succeeded
ocs-operator.v4.15.5-rhodf OpenShift Container Storage 4.15.5-rhodf ocs-operator.v4.15.4-rhodf Succeeded
odf-csi-addons-operator.v4.15.5-rhodf CSI Addons 4.15.5-rhodf odf-csi-addons-operator.v4.15.4-rhodf Succeeded
odf-operator.v4.15.5-rhodf OpenShift Data Foundation 4.15.5-rhodf odf-operator.v4.15.4-rhodf SucceededPersistent Storage Configuration
ODF Storage Node Labeling
We have installed all required operators so far, we can then label the storage nodes so they will become scheduling targets for ODF.
$ oc label node <NodeName> cluster.ocs.openshift.io/openshift-storage=''Local Volume Discovery
Starting with Local Storage Operator v4.6, a new feature, LocalVolumeDiscovery, enables the discovery of storage devices. The creation of the following LVD object will automatically discover all the storage devices on nodes with the openshift-storage label.
$ oc apply -f - <<'END'
apiVersion: local.storage.openshift.io/v1alpha1
kind: LocalVolumeDiscovery
metadata:
 name: auto-discover-devices
 namespace: openshift-local-storage
spec:
 nodeSelector:
   nodeSelectorTerms:
     - matchExpressions:
       - key: cluster.ocs.openshift.io/openshift-storage
         operator: In
         values:
           - ""
END
After the creation of LVD object, we should see a diskmaker-discovery daemon pod running on every storage node:
$ oc get pod -n openshift-local-storage | head
NAME                                      READY   STATUS    RESTARTS   AGE
diskmaker-discovery-4d9gc                 2/2     Running   0          10m
diskmaker-discovery-54tk2                 2/2     Running   0          10m
diskmaker-discovery-5d765                 2/2     Running   0          10m
…
And the local volume discovery result of each node can be retrieved as follows:
$ oc get localvolumediscoveryresults -n openshift-local-storage | head
NAME                                                         AGE
discovery-result-d23-h29-000-r650.example.com   8m44s
discovery-result-d23-h31-000-r650.example.com   8m43s
discovery-result-d24-h01-000-r650.example.com   8m44s
discovery-result-d24-h02-000-r650.example.com   8m44s
…
Local Volume Set
The local volume discovery pods will find all the block devices on a node, and we can use the target device of a node based on certain criteria specified under deviceInclusionSpec. Example selection criteria can be found in the documentation. We will use the 2.9 TiB NVME disk on each storage node, which also happens to be the only disk that’s greater than 2TiB. Therefore, the device inclusion spec can be simply minSize: 2TiB
$ oc apply -f - <<'END'
apiVersion: local.storage.openshift.io/v1alpha1
kind: LocalVolumeSet
metadata:
 name: local-nvme-volume
 namespace: openshift-local-storage
spec:
 nodeSelector:
   nodeSelectorTerms:
     - matchExpressions:
         - key: cluster.ocs.openshift.io/openshift-storage
           operator: In
           values:
             - ""
 storageClassName: local-nvme-volume
 volumeMode: Block
 maxDeviceCount: 1
 deviceInclusionSpec:
   deviceTypes:
   - disk
   deviceMechanicalProperties:
   - NonRotational
   minSize: 2Ti
END
If everything goes well, we should see PVs get created with the storage class name local-nvme-volume
$ oc get pv | grep local-nvme-volume | head
local-pv-19d9dc8d   2980Gi     RWO            Delete           Available                                                        local-nvme-volume            42s
local-pv-225c120c   2980Gi     RWO            Delete           Available                                                        local-nvme-volume            43s
local-pv-29ba4d67   2980Gi     RWO            Delete           Available                                                        local-nvme-volume            42s
…
Storage Cluster
We can now create the StorageCluster where daemon pods such as OSDs and the rbd plugin will fire up. This will take some time if you have a fairly large cluster of storage devices. Note that the storageDeviceSets count is set to 36 since we have a total of 108 disks. For every 3 disks, this count is increased by 1. Make sure to set the correct storage request size according to your disk size. In our example, the NVMe is 2980 GiB.
$ oc apply -f - <<'END'
apiVersion: ocs.openshift.io/v1
kind: StorageCluster
metadata:
  name: ocs-storagecluster
  namespace: openshift-storage
spec:
  resources:
    mds:
      limits:
        cpu: "3"
        memory: "8Gi"
      requests:
        cpu: "3"
        memory: "8Gi"
  monDataDirHostPath: /var/lib/rook
  managedResources:
    cephBlockPools:
      reconcileStrategy: manage
    cephConfig: {}
    cephFilesystems: {}
    cephObjectStoreUsers: {}
    cephObjectStores: {}
  multiCloudGateway:
    reconcileStrategy: manage
  storageDeviceSets:
  - count: 36
    dataPVCTemplate:
      spec:
        accessModes:
        - ReadWriteOnce
        resources:
          requests:
            storage: "2980Gi"
        storageClassName: local-nvme-volume
        volumeMode: Block
    name: ocs-deviceset
    placement: {}
    portable: false
    replica: 3
    resources:
      limits:
        cpu: "2"
        memory: "5Gi"
      requests:
        cpu: "2"
        memory: "5Gi"
END
Verify if ODF storage classes are being created:
$ oc get sc -A
NAME                                         PROVISIONER                             RECLAIMPOLICY   VOLUMEBINDINGMODE      ALLOWVOLUMEEXPANSION   AGE
local-nvme-volume                            kubernetes.io/no-provisioner            Delete          WaitForFirstConsumer   false                  88m
ocs-storagecluster-ceph-rbd                  openshift-storage.rbd.csi.ceph.com      Delete          Immediate              true                   71m
ocs-storagecluster-ceph-rbd-virtualization   openshift-storage.rbd.csi.ceph.com      Delete          Immediate              true                   71m
ocs-storagecluster-ceph-rgw                  openshift-storage.ceph.rook.io/bucket   Delete          Immediate              false                  84m
ocs-storagecluster-cephfs                    openshift-storage.cephfs.csi.ceph.com   Delete          Immediate              true                   70m
openshift-storage.noobaa.io                  openshift-storage.noobaa.io/obc         Delete          Immediate              false                  69m
OCP-Virt VM creation
We now have all the operators ready and the persistent storage provided by ODF is ready to be consumed. The following sections will take you through how VM .qcow content is populated into a PVC, and how we can take a snapshot of that PVC and use it to clone hundreds of VMs.
Data Volume
A DataVolume automates the process of PVC creation and importing virtual machine qcow image content into PVC.
$ oc apply -f - <<'END'
apiVersion: cdi.kubevirt.io/v1beta1
kind: DataVolume
metadata:
  name: rhel9-placeholder
spec:
  source:
      http:
        url: http://127.0.0.1:8000/rhel9_uefi.qcow2
  pvc:
    accessModes:
      - ReadWriteMany
    resources:
      requests:
        storage: 22Gi
    volumeMode: Block
    storageClassName: ocs-storagecluster-ceph-rbd-virtualization
END
The above yaml shows an example of creating a data volume object which will trigger the creation of a PVC and download the VM qcow image hosted locally.
$ oc get dv
NAME                PHASE              PROGRESS   RESTARTS   AGE
rhel9-placeholder   ImportInProgress   9.98%      1          46s
Once qcow image download is complete, PVC status should change from pending to Bound.
$  oc get pvc
NAME                STATUS   VOLUME                                     CAPACITY   ACCESS MODES   STORAGECLASS                                 AGE
rhel9-placeholder   Bound    pvc-ff79c6af-4d35-47c5-bb17-cf09cdf9eca6   22Gi       RWX            ocs-storagecluster-ceph-rbd-virtualization   3m36s
Volume Snapshot
Volume snapshot feature makes it convenient to clone hundreds of VMs. Instead of duplicating the whole PVC content, cloning the snapshot of that PVC helps with scaling a large number of VMs faster. The YAML example below takes a volume snapshot of PVC: rhel9-placeholder and later we can create hundreds of clones using that snapshot.
$ oc apply -f - <<'END'
apiVersion: snapshot.storage.k8s.io/v1
kind: VolumeSnapshot
metadata:
  name: rhel9-snap
  namespace: default
spec:
  volumeSnapshotClassName: ocs-storagecluster-rbdplugin-snapclass
  source:
    persistentVolumeClaimName: rhel9-placeholder
END
Check if volume snapshot is ready to be used:
$ oc get vs -n default
NAME         READYTOUSE   SOURCEPVC           SOURCESNAPSHOTCONTENT   RESTORESIZE   SNAPSHOTCLASS                            SNAPSHOTCONTENT                                    CREATIONTIME   AGE
rhel9-snap   true         rhel9-placeholder                           22Gi          ocs-storagecluster-rbdplugin-snapclass   snapcontent-ea2341e1-e543-4489-9326-23ea5f44b0c5   6d             6d
Virtual Machine Template
Once the volume snapshot is ready, we can use the following VM yaml template to create VMs. If we look at spec.dataVolumeTemplates.spec.source: It tells us that this VM will clone from a snapshot named: rhel9-snap from default namespace. There are two DataVolumes in this yaml definition, meaning 2 disks will be attached to the VM, the one that clones from the snapshot will be the root disk and another one with blank:{} will be simply exposed as a blank block device within the VM. Save the following YAML template as vm-2-disk-template.yaml and the following section will show you how to create many VMs in a batch.
apiVersion: kubevirt.io/v1
kind: VirtualMachine
metadata:
  name: rhel9-placeholder
spec:
  dataVolumeTemplates:
  - apiVersion: cdi.kubevirt.io/v1beta1
    kind: DataVolume
    metadata:
      name: root-placeholder
    spec:
      pvc:
        accessModes:
        - ReadWriteMany
        resources:
          requests:
            storage: 22Gi
        volumeMode: Block
        storageClassName: ocs-storagecluster-ceph-rbd-virtualization
      source:
        snapshot:
          namespace: default
          name: rhel9-snap
  - apiVersion: cdi.kubevirt.io/v1beta1
    kind: DataVolume
    metadata:
      name: data-placeholder
    spec:
      pvc:
        accessModes:
        - ReadWriteMany
        resources:
          requests:
            storage: 50Gi
        volumeMode: Block
        storageClassName: ocs-storagecluster-ceph-rbd-virtualization
      source:
        blank: {}
  running: false
  template:
    metadata:
      labels:
        kubevirt.io/domain: rhel9
    spec:
      domain:
        ioThreadsPolicy: auto
        cpu:
          cores: 16
        devices:
          blockMultiQueue: true
          disks:
          - disk:
              bus: virtio
            name: vda
          - disk:
              bus: virtio
            name: vdb
            dedicatedIOThread: true
          interfaces:
          - masquerade: {}
            model: virtio
            name: default
          networkInterfaceMultiqueue: true
          rng: {}
        features:
          smm:
            enabled: true
        firmware:
          bootloader:
            efi:
              secureBoot: false
        resources:
          requests:
            memory: 128Gi
            cpu: 16
      evictionStrategy: LiveMigrate
      networks:
      - name: default
        pod: {}
      volumes:
        - name: vda
          dataVolume:
            name: root-placeholder
        - name: vdb
          dataVolume:
            name: data-placeholder
VM Batch Creation
In the VM YAML template, I purposely used the string placeholder to make it easier for VM batch creation. For example, to create 1000 VMs named rhel9-1 to rhel9-1000, we can use the following bash in conjunction with sed command.
$ for i in {1..1000}; do sed "s/placeholder/$i/g" vm-2-disk-template.yaml | oc create -f - ; doneTo start all 1,000 VMs:
$ for i in {1..1000}; do virtctl start rhel9-$i; doneScale Data
We present some data here comparing PVC with snapshot cloning time as well as RHEL 9 and Windows 11 boot time. We managed to get a total of 10,000 VMs (6,000 RHEL and 4,000 Windows) up and running on a hyperconverged ODF environment.
PVC Cloning vs Snapshot Cloning
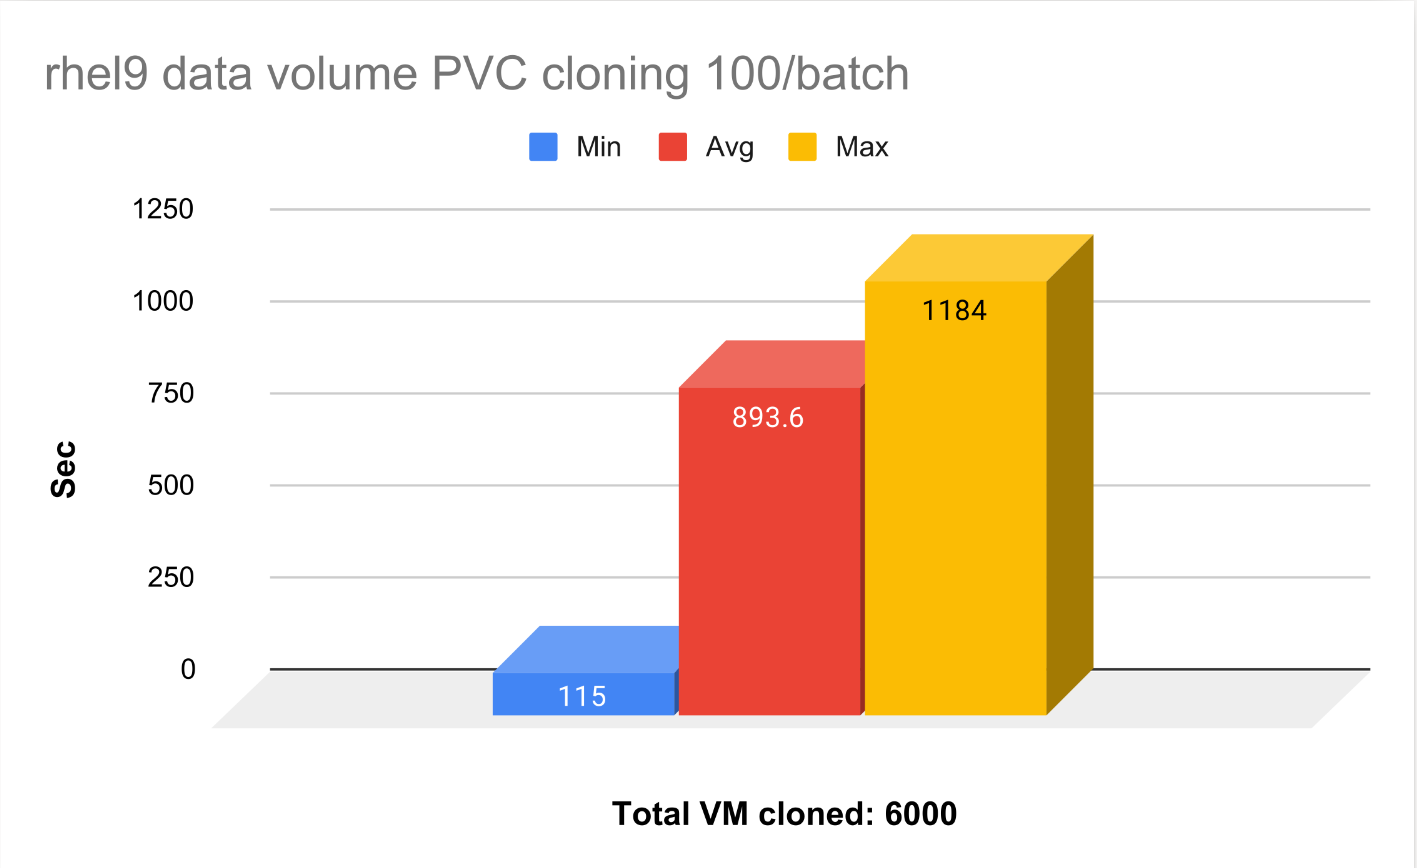
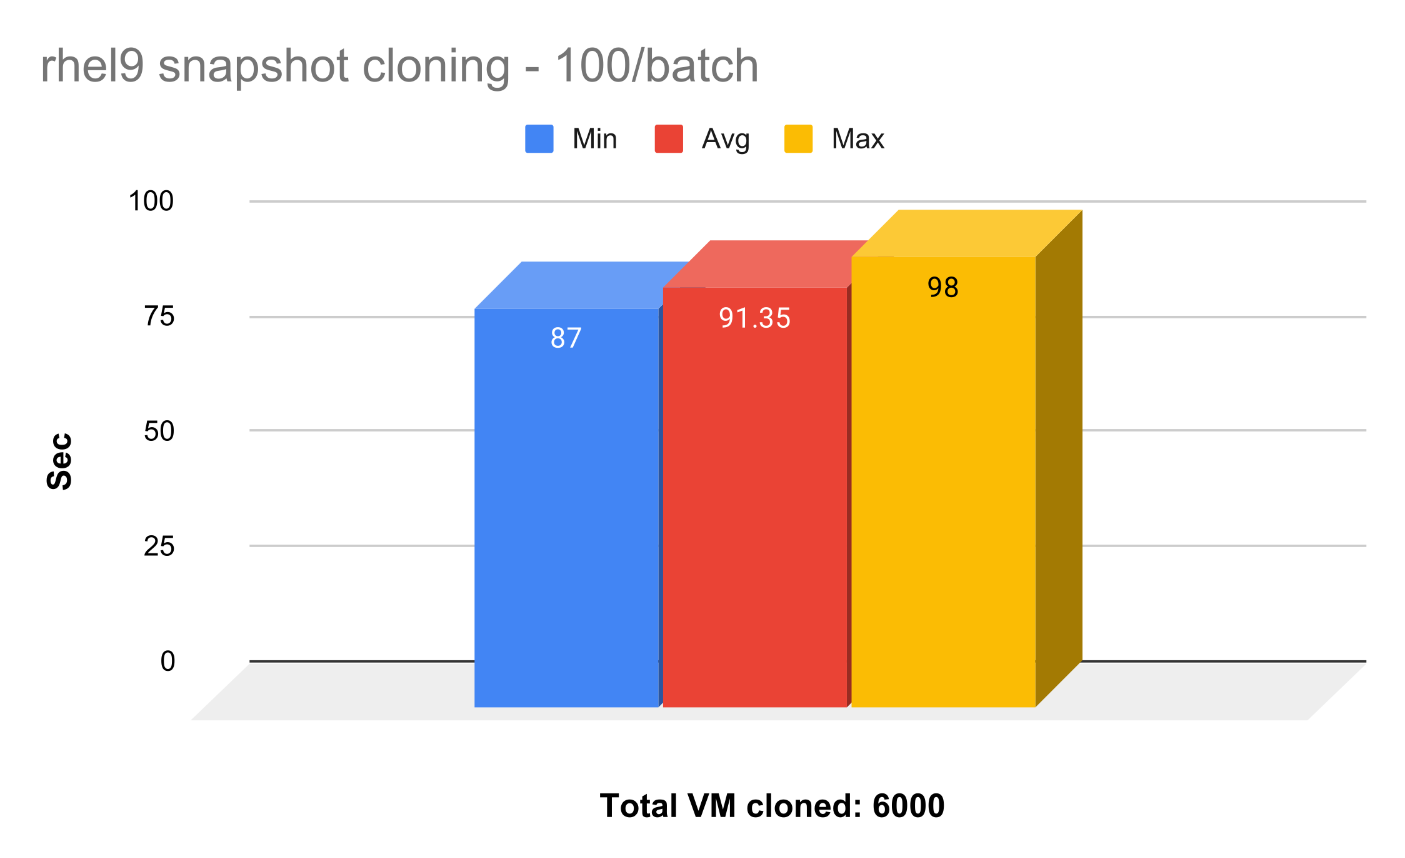
The average time it takes to clone the snapshot is 10x faster than cloning the entire PVC. Our tuning guide recommends using snapshot cloning; not only is it faster to get the VMs up and running, but also saves us a lot of storage space.
RHEL 9 vs Windows 10 Booting
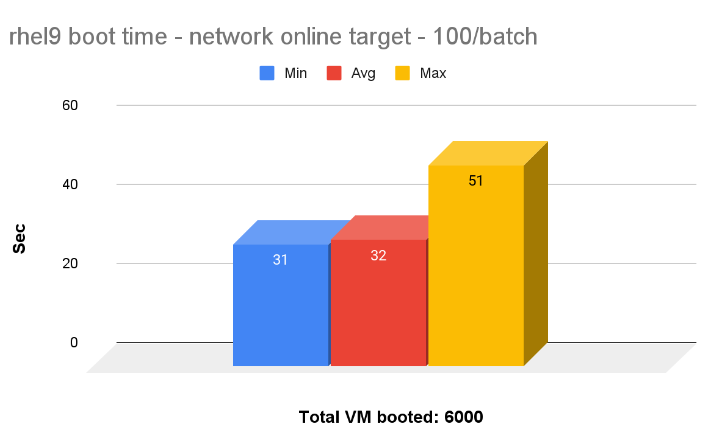
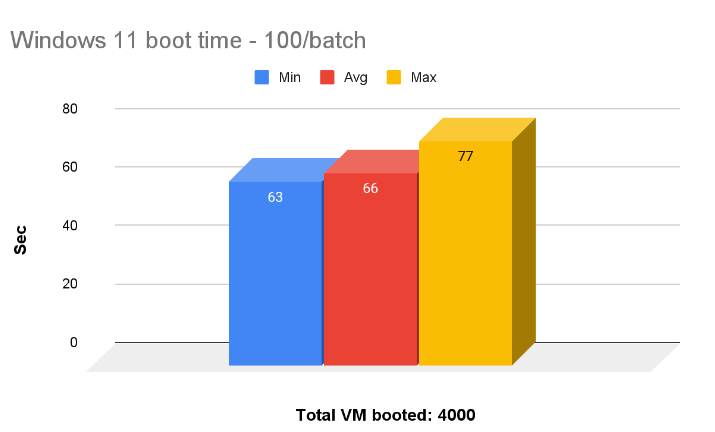
We booted all 6,000 RHEL 9 and Windows 11 VMs, 100 per batch in parallel. On average it takes around 32 seconds to boot all 100 RHEL VMs and 65 seconds to boot 100 Windows 11 VMs.
Summary
This blog covered the detailed step by step guide to setup OpenShift Virtualization on top of hyperconverged ODF. We demonstrated the ability to scale a mix of 10K RHEL and Windows VMs in a hyperconverged ODF environment.
Acknowledgement
This is a collaborative effort with the OpenShift Virtualization and Storage Performance and Scale teams, with special thanks to Robert Krawitz Jenifer Abrams Elvir Kuric Abhishek Bose Paul Cuzner Boaz Ben Shabat Eli Battat