Serverless functions are driving the fast adoption of DevApps development and deployment practices today. To successfully adopt serverless functions, developers must understand how serverless capabilities are specified using a combination of cloud computing, data infrastructure, and function-oriented programming. We also need to consider resource optimization (memory and CPU) and high-performance boot and first-response times in both development and production environments. What if we didn't have to worry about all of that?
In this article, I'll walk you through two steps to write a serverless function with superfast boot and response times and built-in resource optimization. First, we'll use a pre-defined Quarkus function project template to write a serverless function. Then, we'll deploy the function as a native executable using Red Hat OpenShift Serverless. With these two steps, we can avoid the extra work of developing a function from scratch, optimizing the application, and deploying it as a Knative service in Kubernetes.
Step 1: Create a Quarkus function project
The Knative command-line interface (kn) supports simple interactions with Knative components on Red Hat OpenShift Container Platform. In this step, we'll use kn to create a new function project based on the Quarkus runtime. See the OpenShift Serverless documentation for instructions to install kn for your operating system.
Assuming you have kn installed, move to a preferred directory in your local development environment. Then, execute the following command in your terminal:
$ kn func create quarkus-func -l quarkus
The command generates a quarkus-func directory that includes a new Quarkus project. Here's the output for our example:
Project path: /Users/danieloh/Downloads/func-demo/quarkus-func
Function name: quarkus-func
Runtime: quarkus
Trigger: http
Next, use a text editor or your favorite IDE to open a func.yaml file in the quarkus-func project. Update the builder’s value to native for building a Quarkus native executable. The native executable allows you to get Quarkus's superfast boot and first-response times and subatomic memory footprint. You should see something like this:
name: quarkus-func
namespace: ""
runtime: quarkus
image: ""
imageDigest: ""
trigger: http
builder: native
builderMap:
  default: quay.io/boson/faas-quarkus-jvm-builder
  jvm: quay.io/boson/faas-quarkus-jvm-builder
  native: quay.io/boson/faas-quarkus-native-builder
envVars: {}
That's it. We can move forward to the next step, which is also the last step.
Note: The kn CLI does not include a login mechanism. To log in to your OpenShift cluster, in the next step, you will need to have the oc CLI installed. Once it's installed, you can use the oc login command. Installation options for oc will vary depending on your operating system. For more information, see the OpenShift CLI documentation. Furthermore, we’ll use OpenShift Serverless features to deploy a serverless function, so you must install the OpenShift Serverless Operator to your OpenShift cluster. See the OpenShift Serverless documentation for more about installation.
Step 2: Deploy a Quarkus function to OpenShift Serverless
In this step, we'll build and deploy a container image based on the Quarkus function we've just created. To start, move your working directory to the Quarkus project. Then, run the following commands in your terminal:
$ oc new-project quarkus-func
$ cd quarkus-func
$ kn func deploy -r registry_string -n quarkus-func -v
Note: Be sure to replace the above registry_string (quay.io/myuser or docker.io/myuser) with your own registry and namespace.
It takes a few minutes to build a native executable and containerize the application, which we'll do using Boson Project Buildpacks. Buildpacks automate the process of converting a user's function from source code into a runnable OCI image.
You will see the following message once the Knative service deploys the function to your OpenShift cluster:
Deploying function to the cluster
Creating Knative Service: quarkus--func
Waiting for Knative Service to become ready
Function deployed at URL: http://quarkus--func-quarkus-func.apps.cluster-boston-c079.boston-c079.sandbox1545.opentlc.com
Note: The deployment URL in this output will be different for your environment.
Now, let's add a label to the Quarkus pod for fun. Run the following commands:
$ REV_NAME=$(oc get rev | awk '{print $1}')
$ oc label rev/$REV_NAME app.openshift.io/runtime=quarkus --overwrite
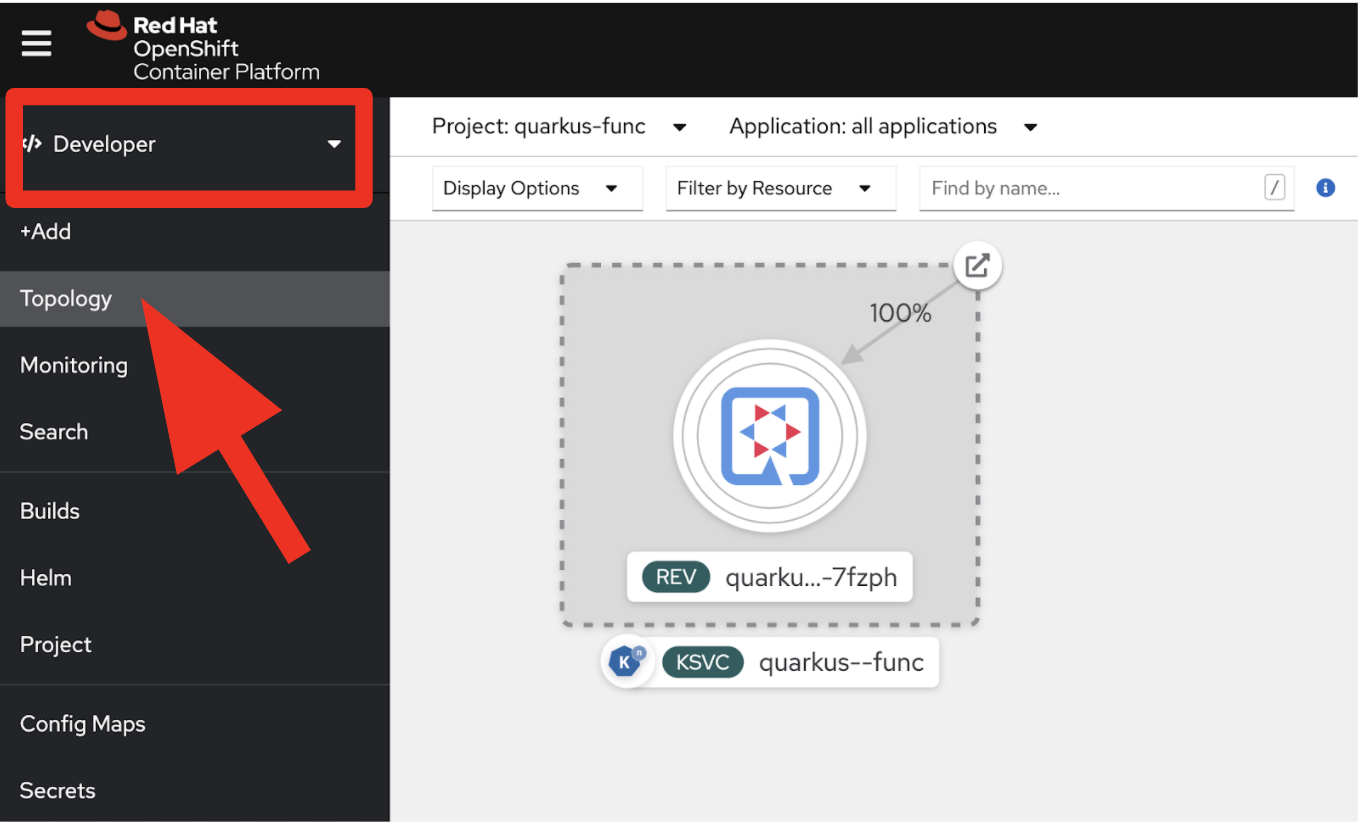
Next, go to the developer console in your OpenShift cluster and navigate to the Topology view, as shown in Figure 1.
The serverless function might be terminated because the scale-to-zero interval is 30 seconds by default. We can fire up the function by entering the following command:
$ curl -v FUNC_URL  \
  -H 'Content-Type:application/json' \
  -d '{"message": "Quarkus Native function on OpenShift Serverless"}'
You should see something like this:
...
* Connection #0 to host quarkus--func-quarkus-func.apps.cluster-boston-c079.boston-c079.sandbox1545.opentlc.com left intact
{"message":"Quarkus Native function on OpenShift Serverless"}* Closing connection 0
Note: Be sure to replace the above FUNC_URL with your own URL, which should be the same as the deployment URL in the previous step. (You can also find it by entering oc get rt.)
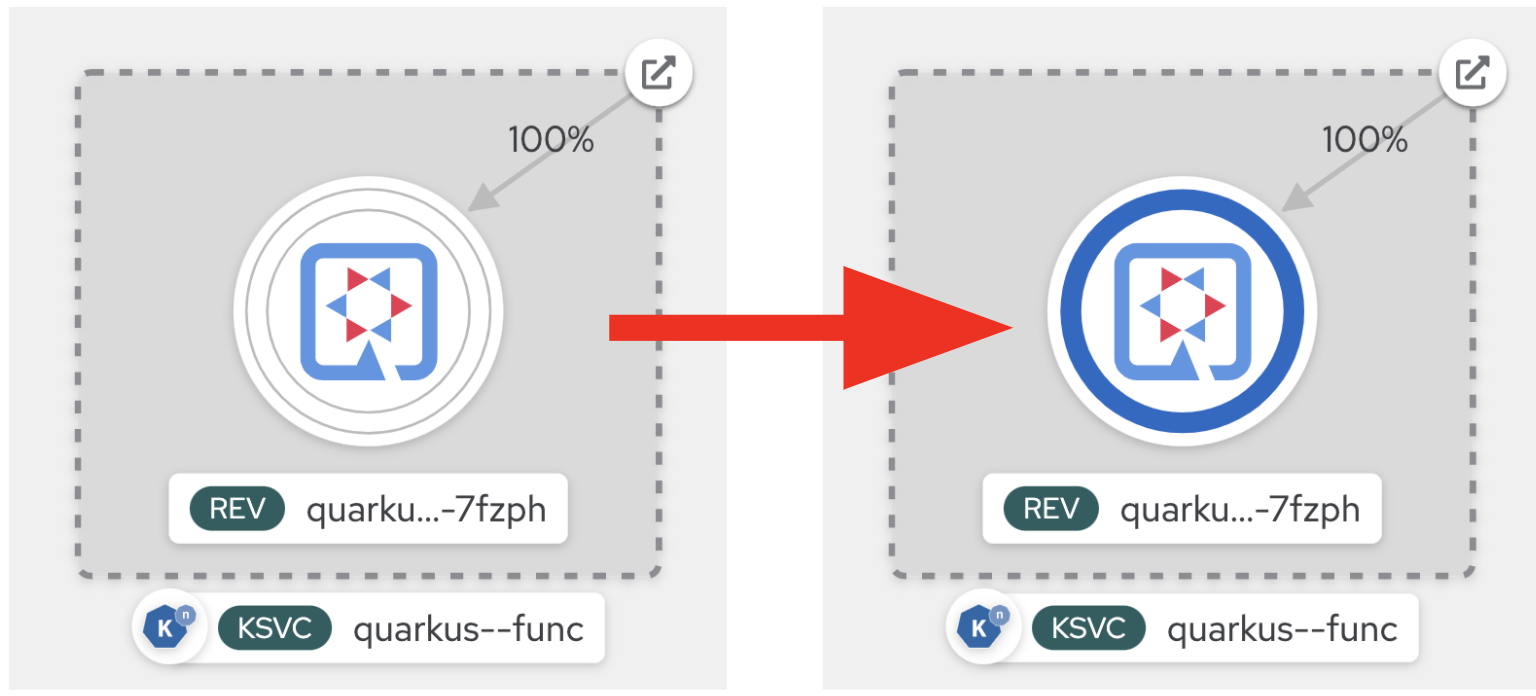
Now, let's go back to the developer console. Sending traffic to the endpoint triggers the autoscaler to scale the function, so you'll see that the Quarkus function pod has gone up automatically, as shown in Figure 2.
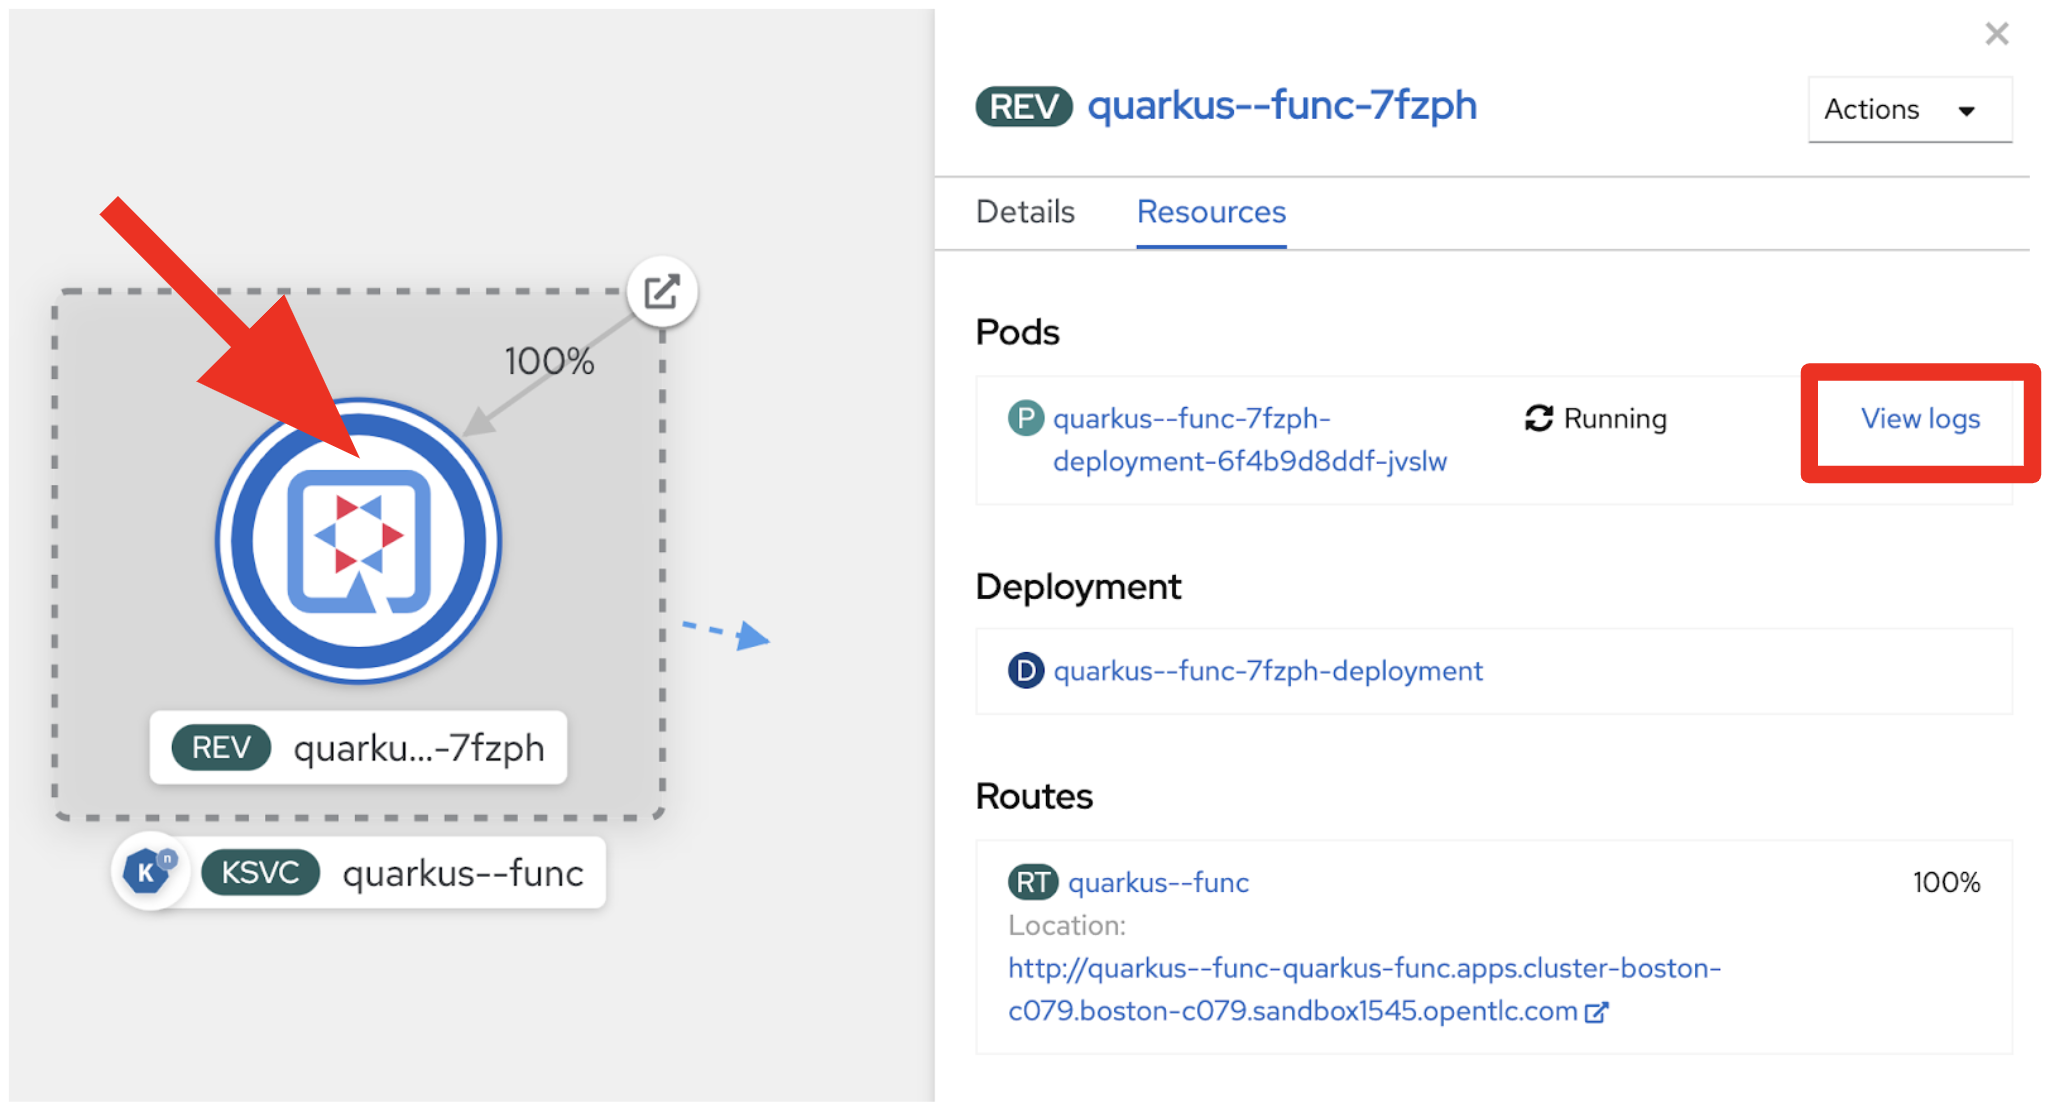
Click the View logs option in Figure 3 to discover the application's amazingly fast startup time.
You should see something like the startup time shown in Figure 4.
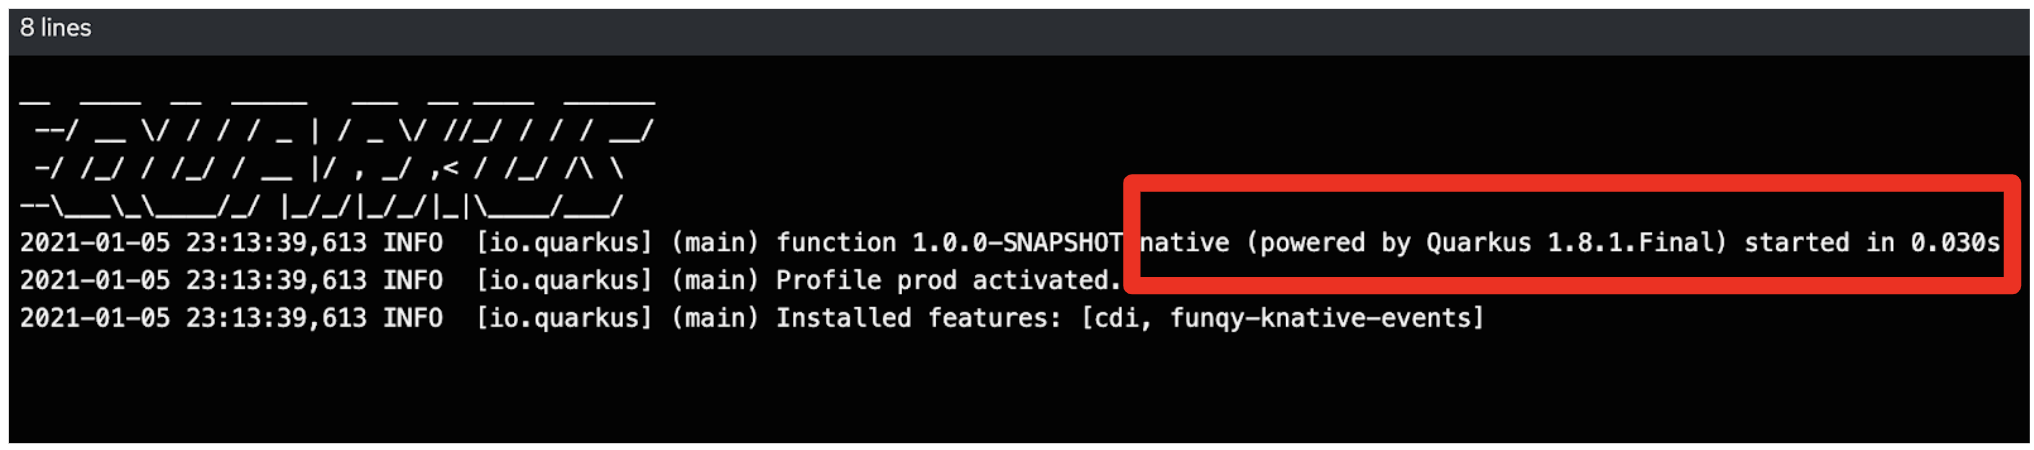
In my example, the application took 30 milliseconds to start up. The startup time might be different in your environment.
Finally, if you want to check the (extremely low) memory usage while the function is running, go to the Monitoring page and check the memory usage in metrics, as shown in Figure 5.
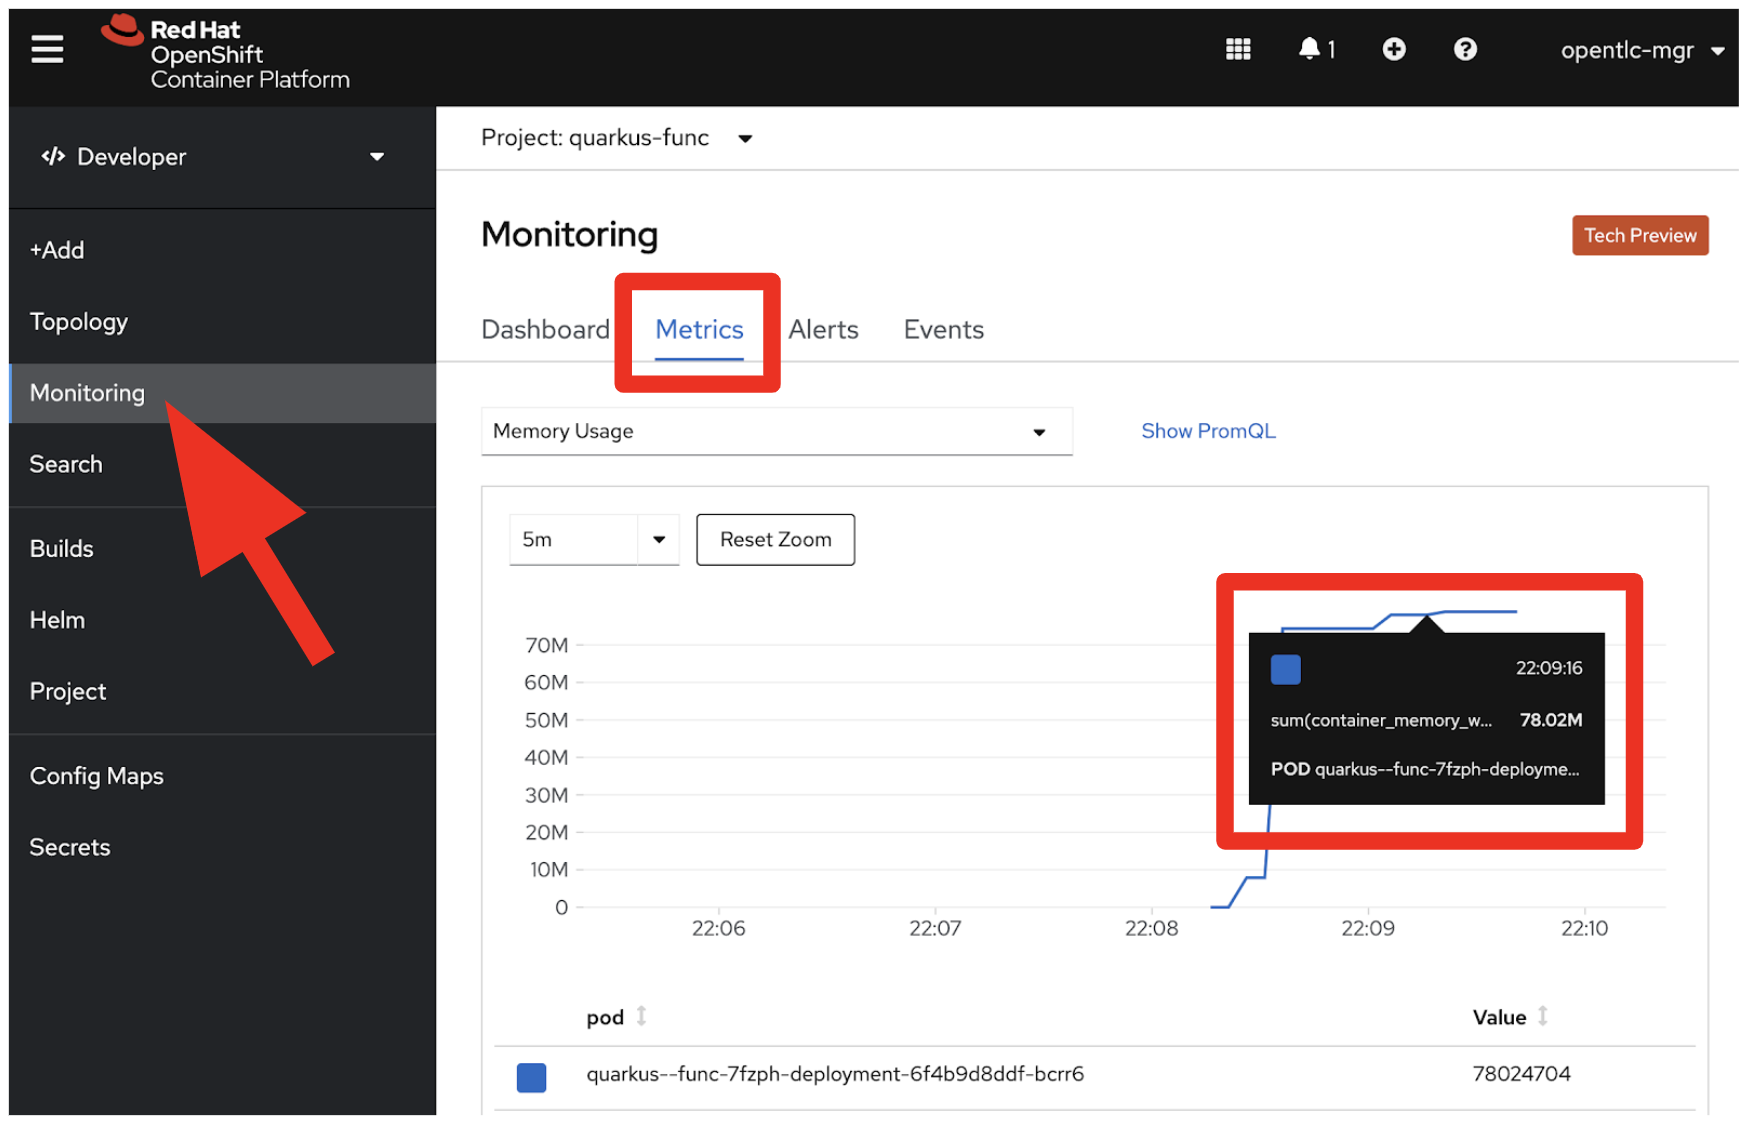
This shows that our process is taking around 78MB of memory footprint. That's pretty compact!
Conclusion
This article showed you how to use OpenShift Serverless to create a function based on the Quarkus runtime with native compilation, then deploy it to an OpenShift cluster with just two kn func commands. It's also possible to choose a different function runtime (such as Node.js or Go) and function trigger (such as HTTP or CloudEvents) than we used for this example. For a guide to creating a front-end application with a Node.js runtime and OpenShift Serverless, see Create your first serverless function with Red Hat OpenShift Serverless Functions. For more about Quarkus's serverless strategy, see Quarkus Funqy—a portable Java API that you can use to write functions deployable to Function-as-a-Service (FaaS) environments like AWS Lambda, Azure Functions, Knative, and Knative Events.

