Redhat Developers  Logo
  • Products

    Platforms

    • Red Hat Enterprise Linux
      Red Hat Enterprise Linux Icon
    • Red Hat AI
      Red Hat AI
    • Red Hat OpenShift
      Openshift icon
    • Red Hat Ansible Automation Platform
      Ansible icon
    • View All Red Hat Products

    Featured

    • Red Hat build of OpenJDK
    • Red Hat Developer Hub
    • Red Hat JBoss Enterprise Application Platform
    • Red Hat OpenShift Dev Spaces
    • Red Hat OpenShift Local
    • Red Hat Developer Sandbox

      Try Red Hat products and technologies without setup or configuration fees for 30 days with this shared Openshift and Kubernetes cluster.
    • Try at no cost
  • Technologies

    Featured

    • AI/ML
      AI/ML Icon
    • Linux
      Linux Icon
    • Kubernetes
      Cloud icon
    • Automation
      Automation Icon showing arrows moving in a circle around a gear
    • View All Technologies
    • Programming Languages & Frameworks

      • Java
      • Python
      • JavaScript
    • System Design & Architecture

      • Red Hat architecture and design patterns
      • Microservices
      • Event-Driven Architecture
      • Databases
    • Developer Productivity

      • Developer productivity
      • Developer Tools
      • GitOps
    • Automated Data Processing

      • AI/ML
      • Data Science
      • Apache Kafka on Kubernetes
    • Platform Engineering

      • DevOps
      • DevSecOps
      • Ansible automation for applications and services
    • Secure Development & Architectures

      • Security
      • Secure coding
  • Learn

    Featured

    • Kubernetes & Cloud Native
      Openshift icon
    • Linux
      Rhel icon
    • Automation
      Ansible cloud icon
    • AI/ML
      AI/ML Icon
    • View All Learning Resources

    E-Books

    • GitOps Cookbook
    • Podman in Action
    • Kubernetes Operators
    • The Path to GitOps
    • View All E-books

    Cheat Sheets

    • Linux Commands
    • Bash Commands
    • Git
    • systemd Commands
    • View All Cheat Sheets

    Documentation

    • Product Documentation
    • API Catalog
    • Legacy Documentation
  • Developer Sandbox

    Developer Sandbox

    • Access Red Hat’s products and technologies without setup or configuration, and start developing quicker than ever before with our new, no-cost sandbox environments.
    • Explore Developer Sandbox

    Featured Developer Sandbox activities

    • Get started with your Developer Sandbox
    • OpenShift virtualization and application modernization using the Developer Sandbox
    • Explore all Developer Sandbox activities

    Ready to start developing apps?

    • Try at no cost
  • Blog
  • Events
  • Videos

How to enable HTTPS and SSL termination in a Quarkus app

January 6, 2021
Carles Arnal
Related topics:
DevOpsJavaQuarkusSecurity
Related products:
Red Hat build of Quarkus

Share:

    When it comes to the container world, it is common to have an application deployed to a cluster that needs to be secured. In this article, I will show you how to enable HTTPS and SSL termination for a Quarkus application that is running in Red Hat OpenShift.

    Create the secret

    First, we will need a paired key and certificate. If you do not have any available, you can use the following command to create a development-only key and certificate:

    ~ openssl req -newkey rsa:2048 -new -nodes -x509 -days 3650 -keyout key.pem -out cert.pem

    This will create two files (key.pem and cert.pem) that we need to inject into our pods to make them available to the Quarkus application. This can easily be achieved using secrets and volumes by following these steps:

      1. Create a key/value secret in the Create Key/Value Secret dialog box.
      2. Add two keys, one for the file cert.pem and one for the key.pem, as shown in Figure 1.
    Create your key secret in OpenShift
    Figure 1: First, create your key/value secret in OpenShift.

    Once created, add the secret to the application's workload as shown in Figure 2.

    Add the secret to your workload
    Figure 2: Second, add the secret to your workload.

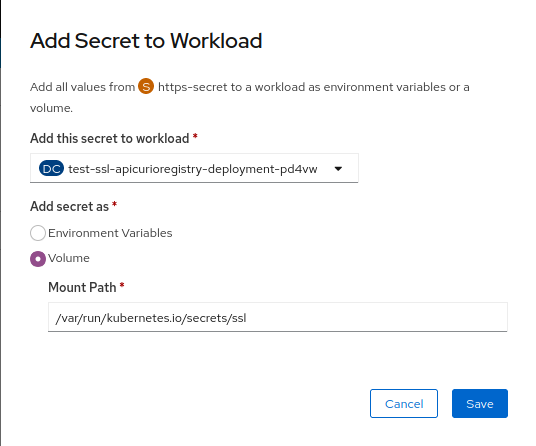
    We now add it as a volume with a mount path of our choice. This will mount and add both the cert and the key files to all application pods.

    Enable HTTPS

    Once the secret has been added to the workload, we'll need to set up some environment variables in order to enable HTTPS and for Quarkus to expose the proper port. The most important parts of the configuration are the environment variables referring to the SSL certificate. For more information about options available when configuring SSL in Quarkus see this section of the Quarkus HTTP Reference Guide.

    Figure 3 shows an example of the resulting configuration.

    SSL certificate-related environment variables, see the description for the variables and their values.
    Figure 3: Third, set up your environment variables, especially for your SSL certificate.

    With this configuration, we're redirecting all of the insecure requests, and we’re telling Quarkus to use the key and the certificate (that we have mounted in the previous step) into the pods.

    Now our Quarkus application should be exposing port 8443 for HTTPS. If we go to the application logs, we should see a message like the following:

    The application log with the example application's launch record highlighted, which shows what ports it's listening on.
    Figure 4: And finally, make sure that your Quarkus application is exposing port 8443 for HTTPS.

    Exposing the app to the real world

    Great, the Quarkus application is now exposing the proper port and accepting connections through HTTPS. At this point, we can consider the Quarkus work done. However, if we don't expose our app to the external world, this is useless.

    In order to make our app available externally, we are going to need a service and a route. A service serves as an internal load balancer. It identifies a set of replicated pods in order to proxy the connections it receives to them. Services are assigned an IP address and port that, when accessed, proxy to an appropriate backing pod.

    A service uses a label selector to find all of the running containers that provide a certain network service on a certain port. Here's a service example:

    apiVersion: v1
    kind: Service
    metadata:
      generateName: test-ssl-apicurioregistry-service-
      namespace: default
    spec:
     selector:
      app: test-ssl-apicurioregistry
     ports:
      - protocol: TCP
      port: 8443
      targetPort: 8443
    

    An OpenShift route is a way to expose a service by giving it an externally-reachable host name. For more information on how to create or manage secured routes, see the Secured Routes section of the OpenShift documentation.

    Here's a secured route example:

    apiVersion: v1
    kind: Route
    metadata:
      name: secured-registry
      namespace: default
    spec:
      to:
       kind: Service
       name: test-ssl-apicurioregistry-service-mjdzd
       weight: 100
      port:
       targetPort: 8443
      tls:
       termination: passthrough
       insecureEdgeTerminationPolicy: Redirect
       wildcardPolicy: None
    

    Check the configuration

    We can easily check our configuration using the OpenShift client:

    ➜  ~ oc get routes
    NAME                                            HOST/PORT                                                          PATH   SERVICES                                  PORT    TERMINATION            WILDCARD
    secured-registry                                secured-registry-default.apps.carnalca.ipt.integrations.rhmw.io           test-ssl-apicurioregistry-service-mjdzd   8443    passthrough/Redirect   None  
    
    ➜  ~ oc get svc test-ssl-apicurioregistry-service-mjdzd
    NAME                                      TYPE        CLUSTER-IP      EXTERNAL-IP   PORT(S)    AGE
    test-ssl-apicurioregistry-service-mjdzd   ClusterIP   172.30.122.25           8443/TCP   21h


    Conclusion

    In this article, I showed you how to secure the traffic of a Quarkus application. From the Quarkus properties to the OpenShift resources, you have seen the simplest way to achieve this goal. While I've used some defaults, there are many other features and configurations to explore. Here I am just covering the basics on how to secure a Quarkus application in OpenShift while keeping everything as simple as possible. I hope sharing this experience will be helpful to others.

    Last updated: January 12, 2024

    Recent Posts

    • Splitting OpenShift machine config pool without node reboots

    • Node.js 20+ memory management in containers

    • Integrate incident detection with OpenShift Lightspeed via MCP

    • One model is not enough, too many models is hard: Technical deep dive

    • What's new in Ansible Automation Platform 2.6

    Red Hat Developers logo LinkedIn YouTube Twitter Facebook

    Platforms

    • Red Hat AI
    • Red Hat Enterprise Linux
    • Red Hat OpenShift
    • Red Hat Ansible Automation Platform
    • See all products

    Build

    • Developer Sandbox
    • Developer Tools
    • Interactive Tutorials
    • API Catalog

    Quicklinks

    • Learning Resources
    • E-books
    • Cheat Sheets
    • Blog
    • Events
    • Newsletter

    Communicate

    • About us
    • Contact sales
    • Find a partner
    • Report a website issue
    • Site Status Dashboard
    • Report a security problem

    RED HAT DEVELOPER

    Build here. Go anywhere.

    We serve the builders. The problem solvers who create careers with code.

    Join us if you’re a developer, software engineer, web designer, front-end designer, UX designer, computer scientist, architect, tester, product manager, project manager or team lead.

    Sign me up

    Red Hat legal and privacy links

    • About Red Hat
    • Jobs
    • Events
    • Locations
    • Contact Red Hat
    • Red Hat Blog
    • Inclusion at Red Hat
    • Cool Stuff Store
    • Red Hat Summit
    © 2025 Red Hat

    Red Hat legal and privacy links

    • Privacy statement
    • Terms of use
    • All policies and guidelines
    • Digital accessibility

    Report a website issue