Redhat Developers  Logo
  • Products

    Featured

    • Red Hat Enterprise Linux
      Red Hat Enterprise Linux Icon
    • Red Hat OpenShift AI
      Red Hat OpenShift AI
    • Red Hat Enterprise Linux AI
      Linux icon inside of a brain
    • Image mode for Red Hat Enterprise Linux
      RHEL image mode
    • Red Hat OpenShift
      Openshift icon
    • Red Hat Ansible Automation Platform
      Ansible icon
    • Red Hat Developer Hub
      Developer Hub
    • View All Red Hat Products
    • Linux

      • Red Hat Enterprise Linux
      • Image mode for Red Hat Enterprise Linux
      • Red Hat Universal Base Images (UBI)
    • Java runtimes & frameworks

      • JBoss Enterprise Application Platform
      • Red Hat build of OpenJDK
    • Kubernetes

      • Red Hat OpenShift
      • Microsoft Azure Red Hat OpenShift
      • Red Hat OpenShift Virtualization
      • Red Hat OpenShift Lightspeed
    • Integration & App Connectivity

      • Red Hat Build of Apache Camel
      • Red Hat Service Interconnect
      • Red Hat Connectivity Link
    • AI/ML

      • Red Hat OpenShift AI
      • Red Hat Enterprise Linux AI
    • Automation

      • Red Hat Ansible Automation Platform
      • Red Hat Ansible Lightspeed
    • Developer tools

      • Red Hat Trusted Software Supply Chain
      • Podman Desktop
      • Red Hat OpenShift Dev Spaces
    • Developer Sandbox

      Developer Sandbox
      Try Red Hat products and technologies without setup or configuration fees for 30 days with this shared Openshift and Kubernetes cluster.
    • Try at no cost
  • Technologies

    Featured

    • AI/ML
      AI/ML Icon
    • Linux
      Linux Icon
    • Kubernetes
      Cloud icon
    • Automation
      Automation Icon showing arrows moving in a circle around a gear
    • View All Technologies
    • Programming Languages & Frameworks

      • Java
      • Python
      • JavaScript
    • System Design & Architecture

      • Red Hat architecture and design patterns
      • Microservices
      • Event-Driven Architecture
      • Databases
    • Developer Productivity

      • Developer productivity
      • Developer Tools
      • GitOps
    • Secure Development & Architectures

      • Security
      • Secure coding
    • Platform Engineering

      • DevOps
      • DevSecOps
      • Ansible automation for applications and services
    • Automated Data Processing

      • AI/ML
      • Data Science
      • Apache Kafka on Kubernetes
      • View All Technologies
    • Start exploring in the Developer Sandbox for free

      sandbox graphic
      Try Red Hat's products and technologies without setup or configuration.
    • Try at no cost
  • Learn

    Featured

    • Kubernetes & Cloud Native
      Openshift icon
    • Linux
      Rhel icon
    • Automation
      Ansible cloud icon
    • Java
      Java icon
    • AI/ML
      AI/ML Icon
    • View All Learning Resources

    E-Books

    • GitOps Cookbook
    • Podman in Action
    • Kubernetes Operators
    • The Path to GitOps
    • View All E-books

    Cheat Sheets

    • Linux Commands
    • Bash Commands
    • Git
    • systemd Commands
    • View All Cheat Sheets

    Documentation

    • API Catalog
    • Product Documentation
    • Legacy Documentation
    • Red Hat Learning

      Learning image
      Boost your technical skills to expert-level with the help of interactive lessons offered by various Red Hat Learning programs.
    • Explore Red Hat Learning
  • Developer Sandbox

    Developer Sandbox

    • Access Red Hat’s products and technologies without setup or configuration, and start developing quicker than ever before with our new, no-cost sandbox environments.
    • Explore Developer Sandbox

    Featured Developer Sandbox activities

    • Get started with your Developer Sandbox
    • OpenShift virtualization and application modernization using the Developer Sandbox
    • Explore all Developer Sandbox activities

    Ready to start developing apps?

    • Try at no cost
  • Blog
  • Events
  • Videos

Handling Angular environments in continuous delivery with Red Hat OpenShift

November 27, 2019
Mikel Sanchez
Related topics:
CI/CDContainersKubernetes
Related products:
Red Hat OpenShift

Share:

    In this article, I will cover how we can deploy the same Angular application image but use a different configuration for each environment. Before we start, however, let's review what we mean when we talk about "continuous delivery."

    What is continuous delivery?

    According to ContinuousDelivery.com:

    Continuous delivery is the ability to put changes of all types—including new features, configurations, bug fixes, and experiments—into production, or into the hands of users, safely and quickly in a sustainable way.

    Our goal is to make deployments—whether of a large-scale distributed system, a complex production environment, an embedded system, or an app—predictable, routine affairs that can be performed on demand.

    We achieve all of this by ensuring that our code is always in a deployable state, even in the face of teams of thousands of developers making changes on a daily basis. We thus completely eliminate the integration, testing, and hardening phases that traditionally followed "dev complete," as well as code freezes.

    How to handle Angular environments

    Angular applications typically have a config, containing settings like:

    • URLs to the APIs
    • App configuration based on the environment
    • Logs

    Angular's CLI offers application environments that set up the environment at build time.

    In Angular, if you look into the angular.json file, you can see how the app will be built and its environment-specific setup:

    "configurations": {
                "production": {
                  "fileReplacements": [
                    {
                      "replace": "src/environments/environment.ts",
                      "with": "src/environments/environment.prod.ts"
                    }
                  ],

    The fileReplacements section lets you replace the files needed for each environment at build time.

    We can deduce by looking into the code that when we run ng build --configuration=production the src/envrionments/envrironment.ts file is replaced with src/envrionments/envrionment.prod.ts. As a result, if you import environments/environment.ts into your application to access the environment variables property, you will get the desired value.

    Angular's CLI makes all the magic:

    import { Component } from '@angular/core';  
    import { environment } from './../environments/environment';
    
    @Component({
      selector: 'app-root',
      templateUrl: './app.component.html',
      styleUrls: ['./app.component.css']
    })
    export class AppComponent {  
      constructor() {
        console.log(environment.<property>);
      }
      title = 'app works!';
    }
    

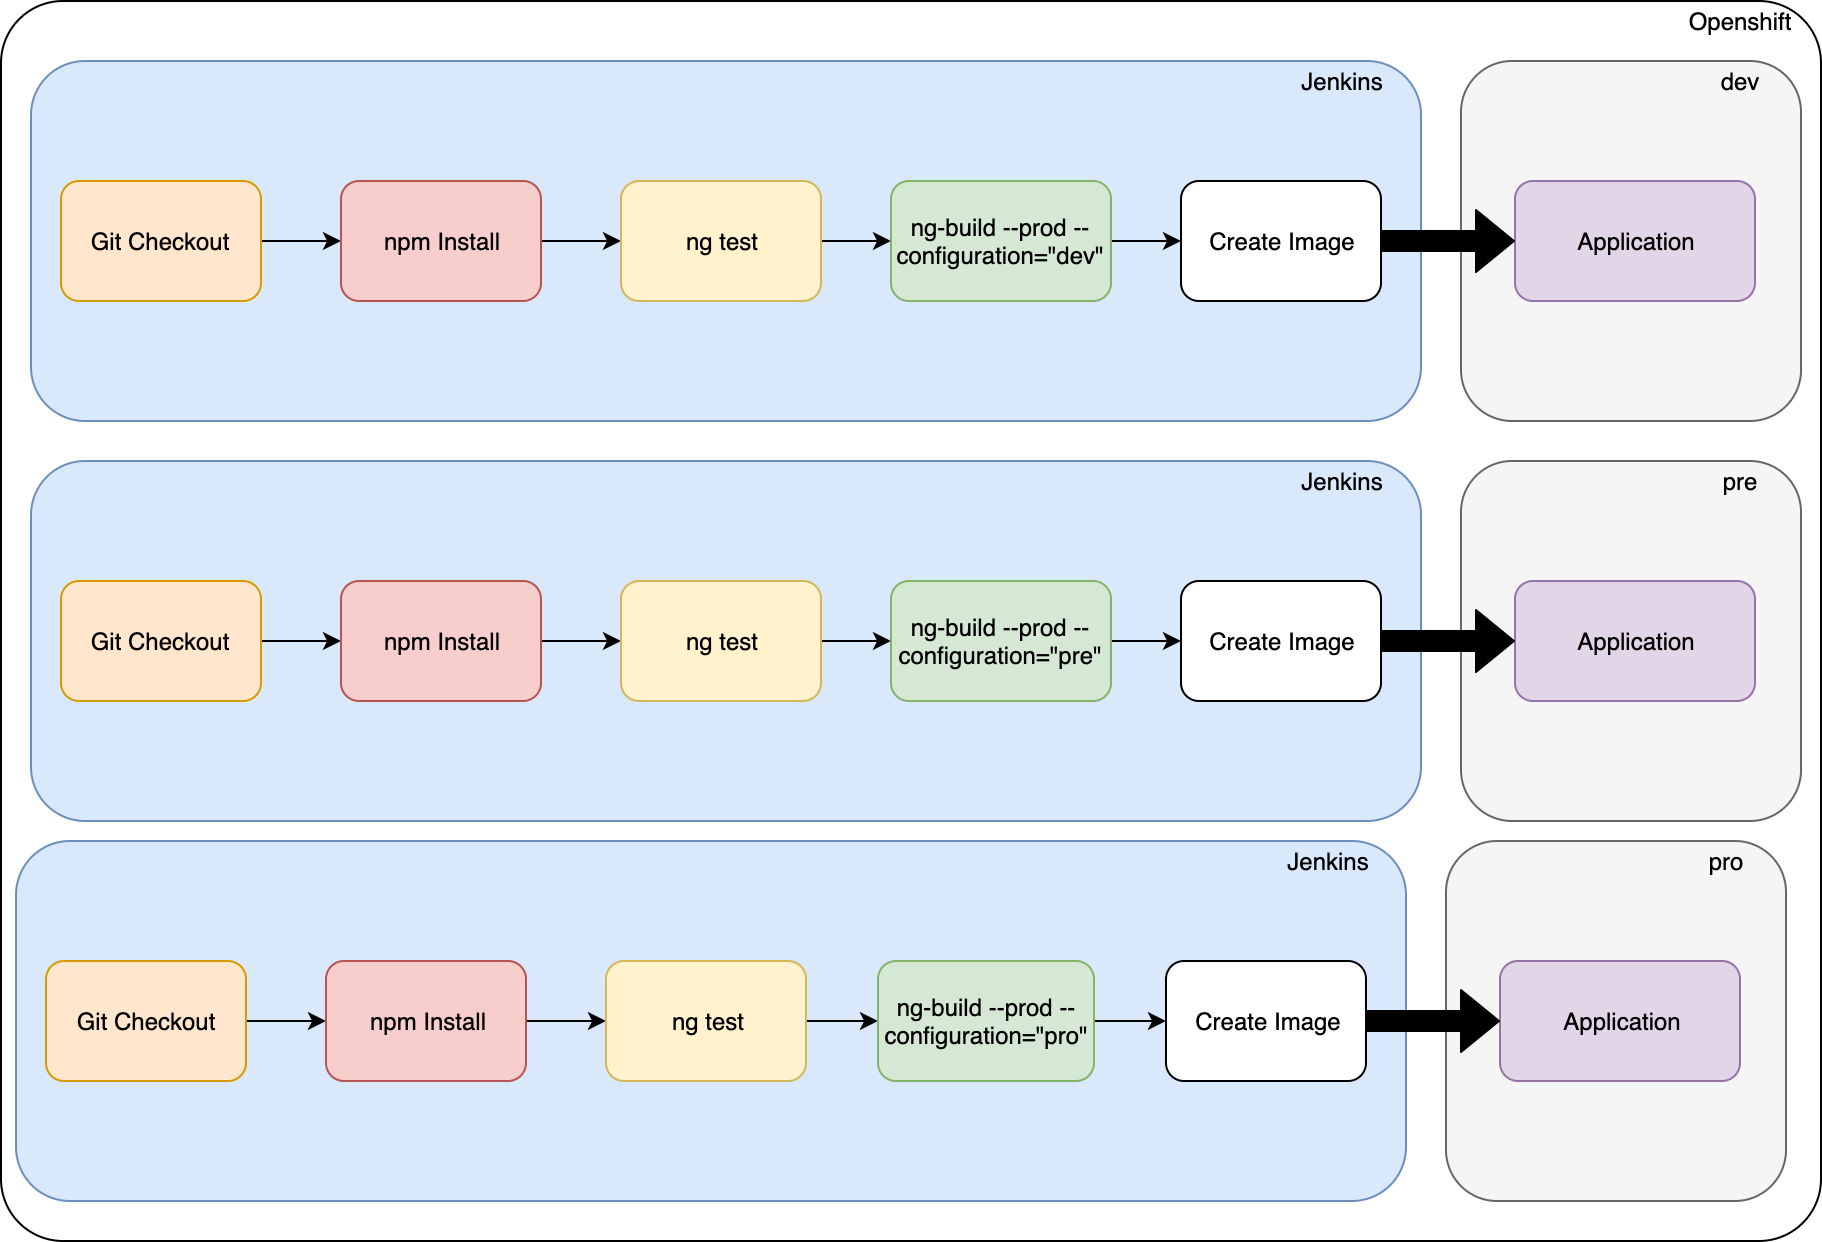
    But this setup is not good for continuous delivery, as we have one image for each environment, as shown in Figure 1:

    Angular environments architecture
    Figure 1: Not the best setup for continuous delivery.">

    There is another approach, however. We can solve this problem by only building the image once and then promoting it to other environments using this approach:

    Under assets/config, create a JSON file with the properties:

    {
        "server1": "url1",
        "server2": "url2",
        "server3": "url3"
    }

    Create a new provider:

    ng g s providers/appConfig

    Replace the contents with the following:

    import { Injectable } from '@angular/core';
    import { HttpClient } from '@angular/common/http';
    @Injectable({
      providedIn: 'root'
    })
    export class AppConfigService {
      private config: any;
      constructor(private http: HttpClient) { }
      public loadConfig() {
        return this.http.get('./assets/config/config.json')
          .toPromise()
          .then((config: any) => {
            this.config = config;
            console.log(this.config);
          })
          .catch((err: any) => {
            console.error(err);
          });
      }
      getConfig() {
        return this.config;
      }
    }

    Modify the app.module.ts with the following code:

    import { BrowserModule } from '@angular/platform-browser';
    import { NgModule, APP_INITIALIZER } from '@angular/core';
    import { AppComponent } from './app.component';
    import { AppConfigService } from './providers/app-config.service';
    import { HttpClientModule } from '@angular/common/http';
    export function initConfig(appConfig: AppConfigService) {
      return () => appConfig.loadConfig();
    }
    @NgModule({
      declarations: [
        AppComponent
      ],
      imports: [
        BrowserModule,
        HttpClientModule
      ],
      providers: [{
        provide: APP_INITIALIZER,
        useFactory: initConfig,
        deps: [AppConfigService],
        multi: true,
      }],
      bootstrap: [AppComponent]
    })
    
    export class AppModule { }

    Here, we added the APP_INITIALIZER provider to load before the app's bootstrap, which lets us have the configuration before the app initialization. We then use a factory that calls appService.loadConfig(). Then, if we want to use it from the component, we inject the service and get the config:

    import { Component } from '@angular/core';
    import { HttpClient } from '@angular/common/http';
    import { AppConfigService } from './providers/app-config.service';
    @Component({
      selector: 'app-root',
      templateUrl: './app.component.html',
      styleUrls: ['./app.component.css']
    })
    export class AppComponent {
      title = 'app';
    constructor(private http: HttpClient, private config: AppConfigService) {
    console.log(this.config.getConfig());
    }

    How to apply the configuration in Red Hat OpenShift

    To use our environment-specific configuration, we just need to create a ConfigMap and then create a new volume from the ConfigMap(We are going to suppose that the app is already deployed and using nginx as base image)

    oc create configmap config --from-file=<configMapLocation>/config.json

    Now, set the volume in the deployment config:

    oc set volume dc/angular --add --type=configmap --configmap-name=config --mount-path=/opt/app-root/src/assets/config --overwrite

    Figure 2 shows what our architecture will ultimately look like:

    Angular environments continuous delivery architecture
    Figure 2: Our final architecture layout.">

    I hope you found this article useful.

    Last updated: July 1, 2020

    Recent Posts

    • How Trilio secures OpenShift virtual machines and containers

    • How to implement observability with Node.js and Llama Stack

    • How to encrypt RHEL images for Azure confidential VMs

    • How to manage RHEL virtual machines with Podman Desktop

    • Speech-to-text with Whisper and Red Hat AI Inference Server

    Red Hat Developers logo LinkedIn YouTube Twitter Facebook

    Products

    • Red Hat Enterprise Linux
    • Red Hat OpenShift
    • Red Hat Ansible Automation Platform

    Build

    • Developer Sandbox
    • Developer Tools
    • Interactive Tutorials
    • API Catalog

    Quicklinks

    • Learning Resources
    • E-books
    • Cheat Sheets
    • Blog
    • Events
    • Newsletter

    Communicate

    • About us
    • Contact sales
    • Find a partner
    • Report a website issue
    • Site Status Dashboard
    • Report a security problem

    RED HAT DEVELOPER

    Build here. Go anywhere.

    We serve the builders. The problem solvers who create careers with code.

    Join us if you’re a developer, software engineer, web designer, front-end designer, UX designer, computer scientist, architect, tester, product manager, project manager or team lead.

    Sign me up

    Red Hat legal and privacy links

    • About Red Hat
    • Jobs
    • Events
    • Locations
    • Contact Red Hat
    • Red Hat Blog
    • Inclusion at Red Hat
    • Cool Stuff Store
    • Red Hat Summit

    Red Hat legal and privacy links

    • Privacy statement
    • Terms of use
    • All policies and guidelines
    • Digital accessibility

    Report a website issue