In this article, we will discuss how to set up Red Hat AMQ 6.3 on OpenShift. We will also set up an external Camel-based SSL client to connect to AMQ Broker, a pure-Java multiprotocol message broker.
By using the procedures in this article, you can easily set up the broker in your OpenShift environment and also set up a Camel-based client to quickly produce and consume messages. Also, you can change the log level to get verbose logs, thus getting a better understanding of the complete setup.
I recommend using a source-to-image (s2i) approach for deploying Red Hat AMQ 6.x on OpenShift, but if you do not use an s2i approach, this article will help you to configure logging to get verbose logs. Note that the Red Hat AMQ image used here is ephemeral; it doesn't support persistence.
A. Generate the keystore and truststore
1. First, we have to generate the keystore and truststore.
[cpandey@cpandey certificate_amq_15Feb]$ keytool -genkey -alias mydomain -keyalg RSA -keystore keystore.jks -keysize 2048
[cpandey@cpandey certificate_amq_15Feb]$ keytool -export -alias mydomain -file mydomain.crt -keystore keystore.jks
[cpandey@cpandey certificate_amq_15Feb]$ keytool -import -trustcacerts -alias mydomain -file mydomain.crt -keystore clientkeystore.jks
2. Add keystore.jks as a secret.
[cpandey@cpandey certificate_amq_15Feb]$ oc login https://openshift.cpandey.lab.pnq2.cee.redhat.com:443 -u username -p password
[cpandey@cpandey certificate_amq_15Feb]$ echo '{"kind": "ServiceAccount", "apiVersion": "v1", "metadata": {"name": "amq-service-account"}}' | oc create -f -
[cpandey@cpandey certificate_amq_15Feb]$ oc policy add-role-to-user view system:serviceaccount:amq-demo:amq-service-account
[cpandey@cpandey certificate_amq_15Feb]$ oc secrets new amq-app-secret keystore.jks
[cpandey@cpandey certificate_amq_15Feb]$ oc secrets add sa/amq-service-account secret/amq-app-secret
B. Set up the broker
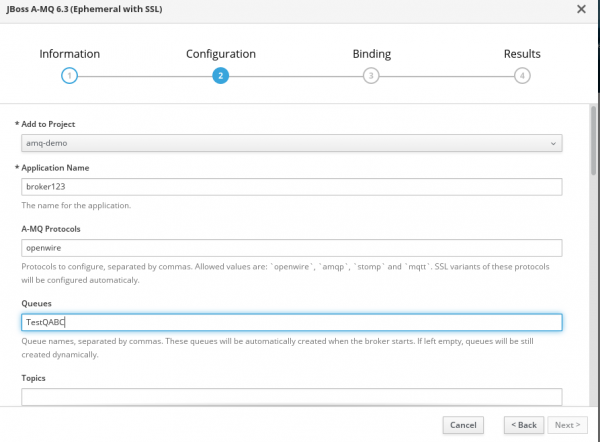
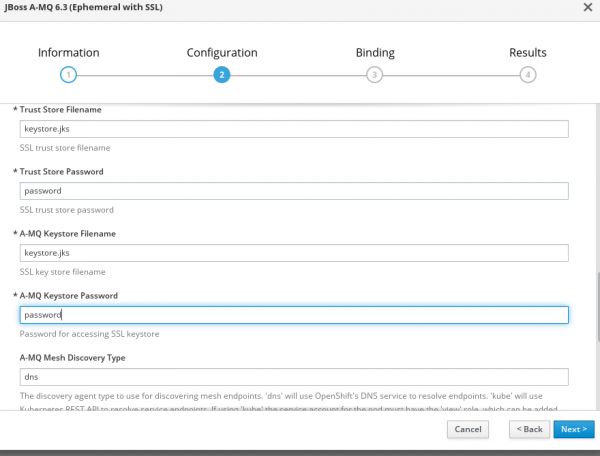
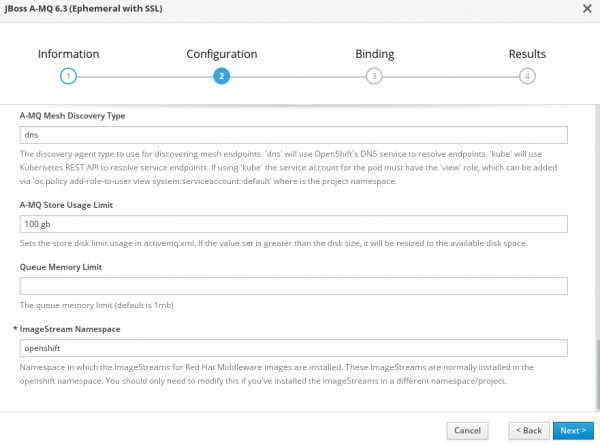
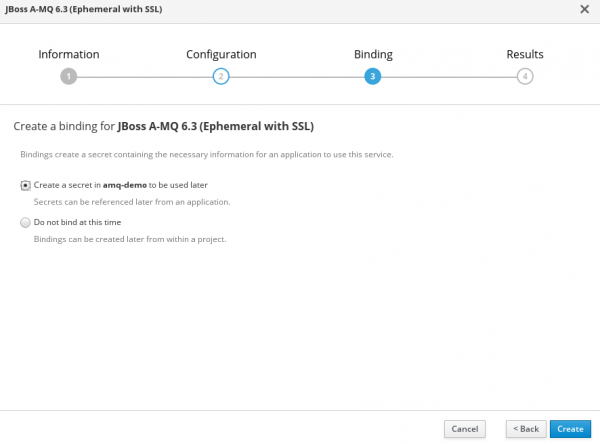
1. The OpenShift GUI can be used for the broker setup. I used template JBoss A-MQ 6.3 (Ephemeral with SSL) from the catalog. The following four images show the information I had to fill in for the broker setup.


2. If everything goes well, we will have a pod that was created and is in the running state and services will also be visible and accessible.
[cpandey@cpandey certificate_amq_15Feb]$ oc get pod|grep broker123
broker123-amq-1-pl8lb 1/1 Running 0 2m

[cpandey@cpandey certificate_amq_15Feb]$ oc get service |grep broker123
broker123-amq-amqp ClusterIP 172.30.187.55 none 5672/TCP 2m
broker123-amq-amqp-ssl ClusterIP 172.30.84.222 none 5671/TCP 2m
broker123-amq-mesh ClusterIP None none 61616/TCP 2m
broker123-amq-mqtt ClusterIP 172.30.172.5 none 1883/TCP 2m
broker123-amq-mqtt-ssl ClusterIP 172.30.245.237 none 8883/TCP 2m
broker123-amq-stomp ClusterIP 172.30.172.21 none 61613/TCP 2m
broker123-amq-stomp-ssl ClusterIP 172.30.177.0 none 61612/TCP 2m
broker123-amq-tcp ClusterIP 172.30.222.183 none 61616/TCP 2m
broker123-amq-tcp-ssl ClusterIP 172.30.215.39 none 61617/TCP 2m
C. Set up an SSL Camel-based client
1. To access the broker externally, an OpenShift route is required. You can create a route using the following command:
[cpandey@cpandey certificate_amq_15Feb]$ oc create route passthrough --service broker123-amq-tcp-ssl

[cpandey@cpandey certificate_amq_15Feb]$ oc get route|grep broker123
broker123-amq-tcp-ssl broker123-amq-tcp-ssl-amq-demo.apps.cpandey.lab.pnq2.cee.redhat.com broker123-amq-tcp-ssl all passthrough None
2. Once you have route, you can use my GitHub code as a client to test broker.
The first message would fail, because there is an exception thrown explicitly and that route will try to redeliver the message 6 times. This message will be in dead letter queue (DLQ), which will be automatically created.
3. The next step is to get more-verbose logs for better analysis of runtime issues. It is always recommended to use an s2i approach for configuration, so I created a log4j.properties file with following content. The content here is copied from the log4j.properties file from the /opt/amq/conf/ directory of the broker pod, and I changed only the first few lines of the configuration so that it won't impact other default logging. For more information, check the default log4j.properties of the pod at /opt/amq/conf.
log4j.rootLogger=DEBUG, logfile, console

# Or for more fine grained debug logging uncomment one of these
log4j.logger.org.apache.activemq=DEBUG
log4j.logger.org.apache.camel=DEBUG

# Console appender
log4j.appender.console=org.apache.log4j.ConsoleAppender
log4j.appender.console.layout=org.apache.log4j.PatternLayout
log4j.appender.console.layout.ConversionPattern=%d | %5p | %m%n
log4j.appender.console.threshold=INFO

# File appender
log4j.appender.logfile=org.apache.log4j.RollingFileAppender
log4j.appender.logfile.file=${activemq.base}/data/activemq.log
log4j.appender.logfile.maxFileSize=1024KB
log4j.appender.logfile.maxBackupIndex=5
log4j.appender.logfile.append=true
log4j.appender.logfile.layout=org.apache.log4j.PatternLayout
log4j.appender.logfile.layout.ConversionPattern=%d | %-5p | %m | %c | %t%n
log4j.throwableRenderer=org.apache.log4j.EnhancedThrowableRenderer

###########
# Audit log
###########

log4j.additivity.org.apache.activemq.audit=false
log4j.logger.org.apache.activemq.audit=INFO, audit

log4j.appender.audit=org.apache.log4j.RollingFileAppender
log4j.appender.audit.file=${activemq.base}/data/audit.log
log4j.appender.audit.maxFileSize=1024KB
log4j.appender.audit.maxBackupIndex=5
log4j.appender.audit.append=true
log4j.appender.audit.layout=org.apache.log4j.PatternLayout
log4j.appender.audit.layout.ConversionPattern=%-5p | %m | %t%n
D. Change the log level to the debug mode of the broker
1. Create ConfigMap to load the log4j.properties file.
[cpandey@cpandey certificate_amq_15Feb]$ oc create configmap logconfig --from-file=./log4j.properties
2. Modify the deployment configuration with a subpath so that we only mount log4j.properties at location /opt/amq/conf and leave the other configuration file intact. Edit the deployment configuration using the command shown below and append volumeMounts and volume entries in the deployment configuration. We can edit the deployment config from the OpenShift GUI console too.

That's it; happy integration! I hope this article helps you to have a basic understanding of a standalone AMQ 6.x setup on OpenShift, how to set up SSL clients to connect the broker, and how to configure a debug-level log configuration to have more verbose logging so you can analyze runtime issues. This configuration can also be used to modify other broker configuration files.
Here are other Red Hat AMQ articles that you might find helpful:
Last updated: November 17, 2023