This post is a continuation of the series on Red Hat AMQ 7 security topics for developers and ops people started by Mary Cochran. We will see how to configure LDAP authentication on a Red Hat AMQ 7 broker instance. In order to do so, we will go perform the followings actions:
- Set up a simple LDAP server with a set of users and groups using Apache Directory Studio.
- Connect Red Hat AMQ 7 to LDAP using authentication providers.
- Enable custom LDAP authorization policies in Red Hat AMQ 7.
Set up the LDAP server
In this tutorial, we will rely on Apache Directory Studio to quickly set up a simple LDAP server with the following structure:
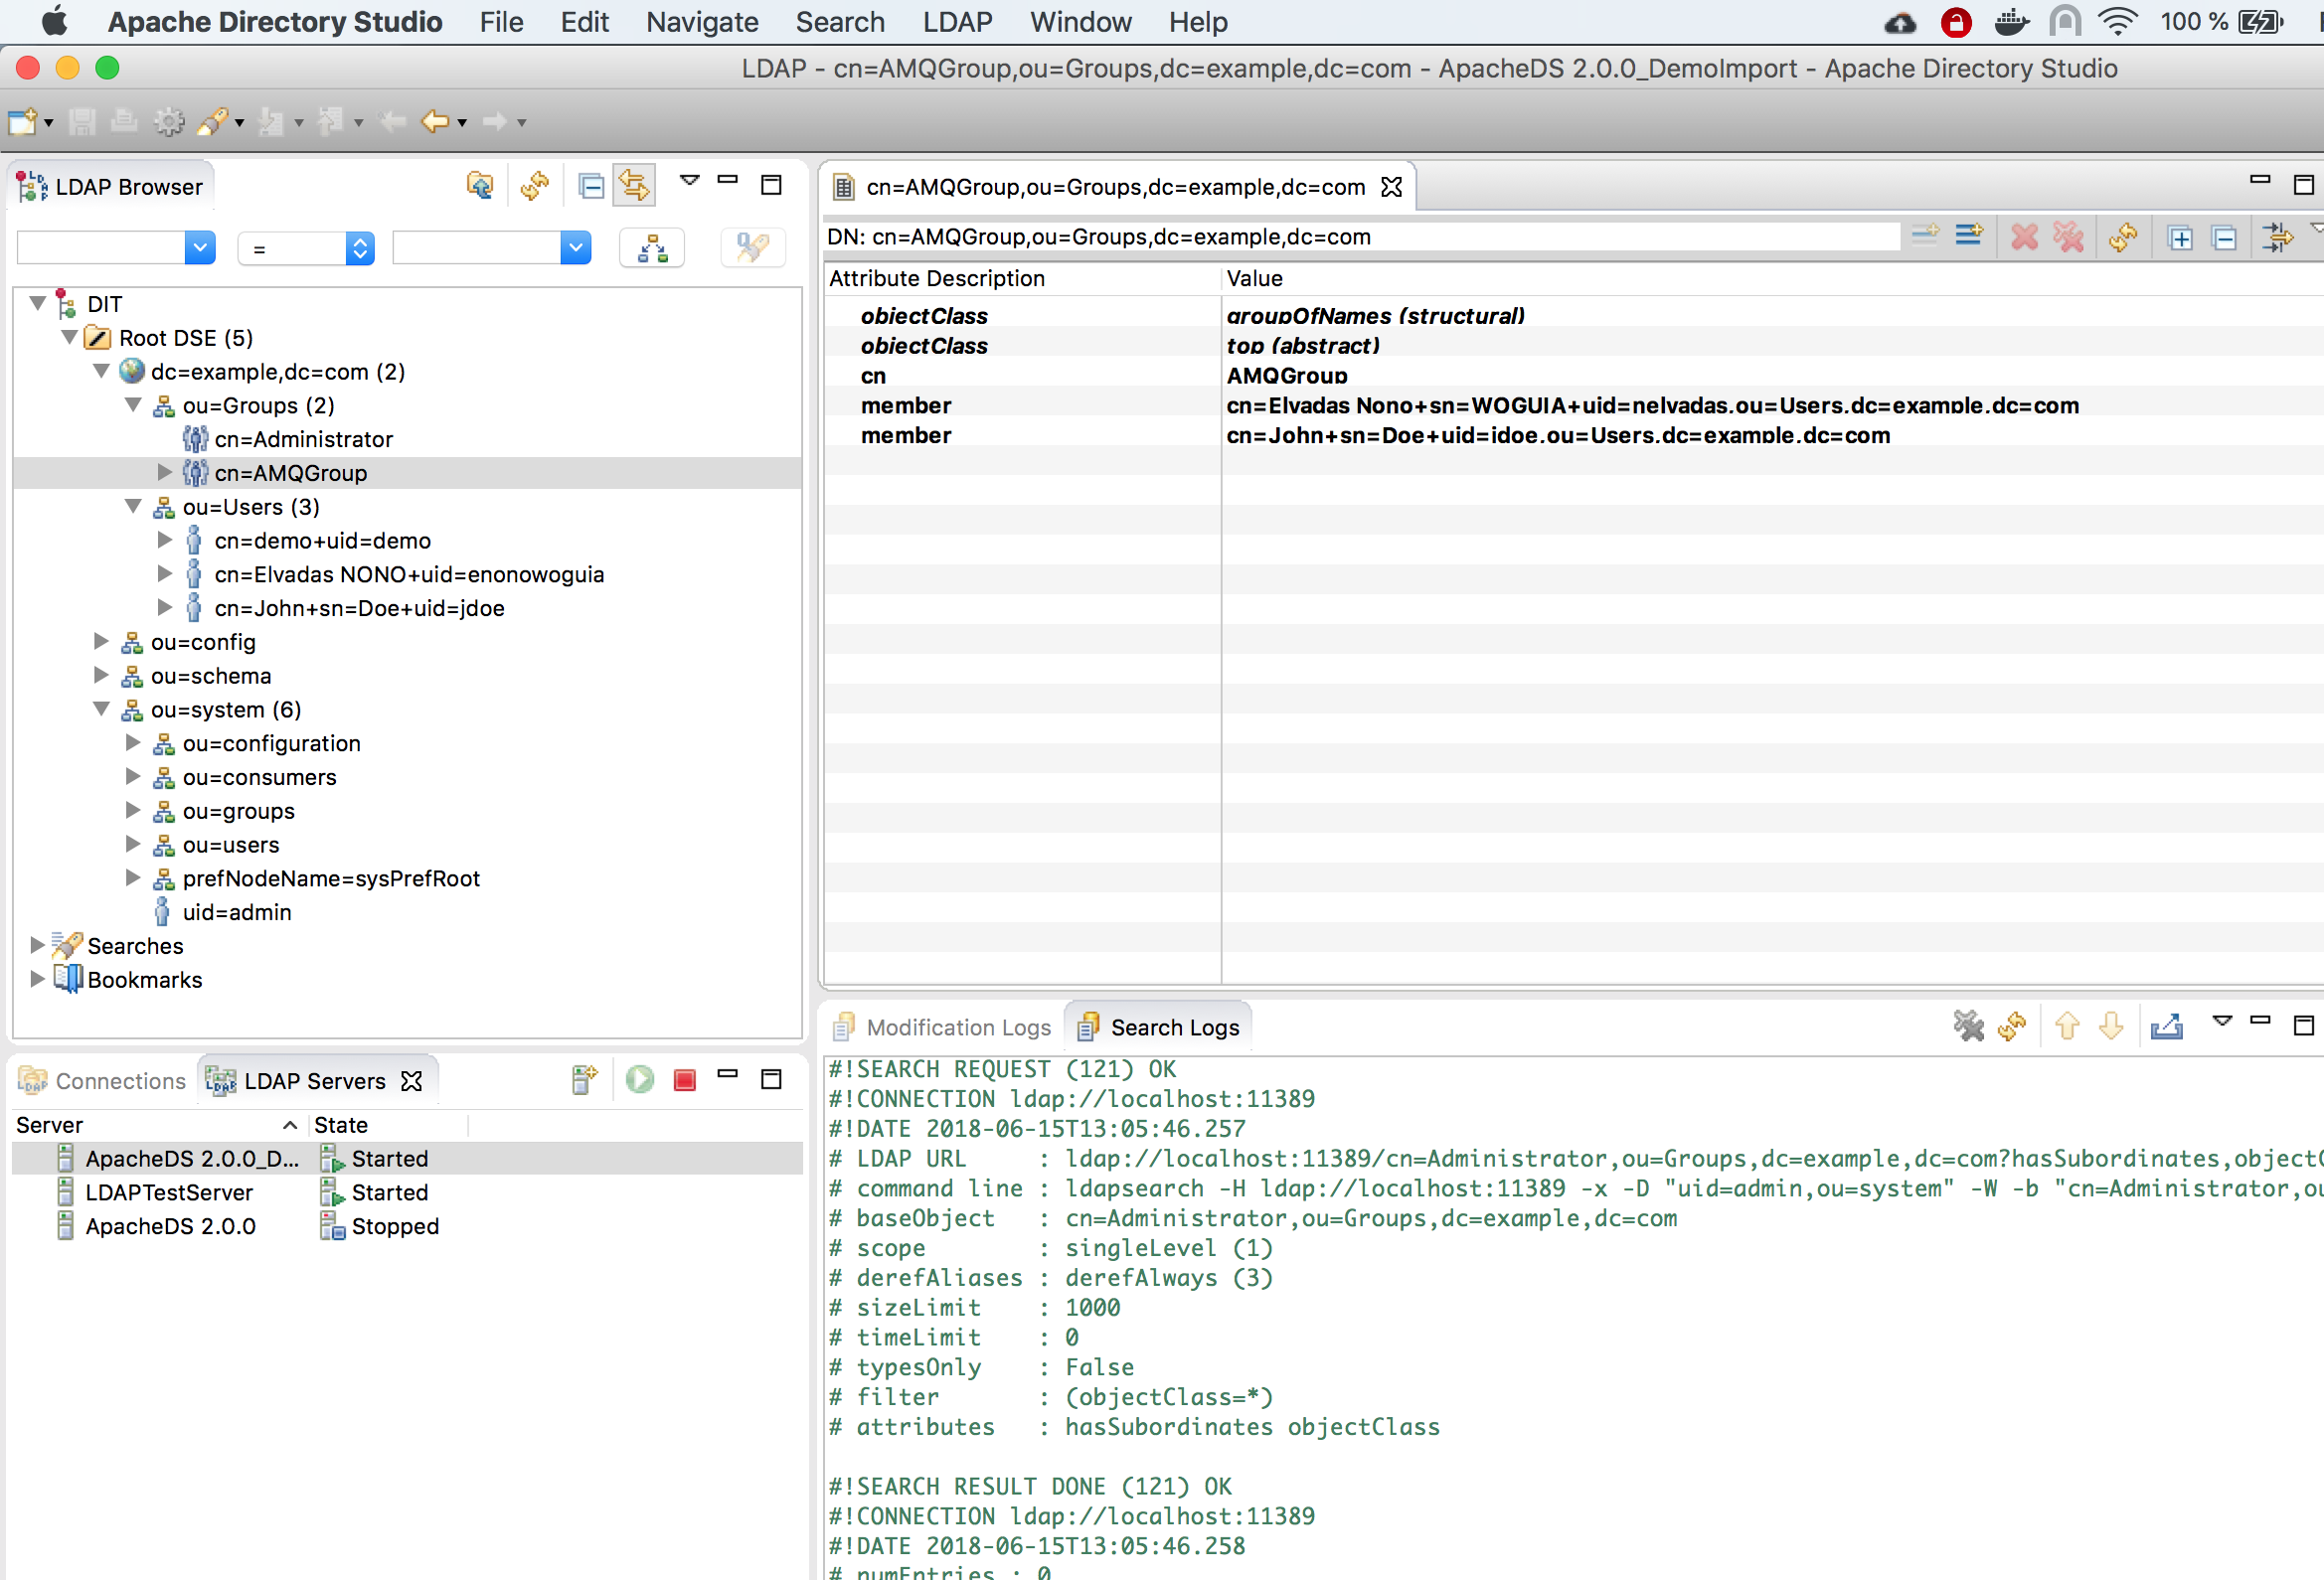
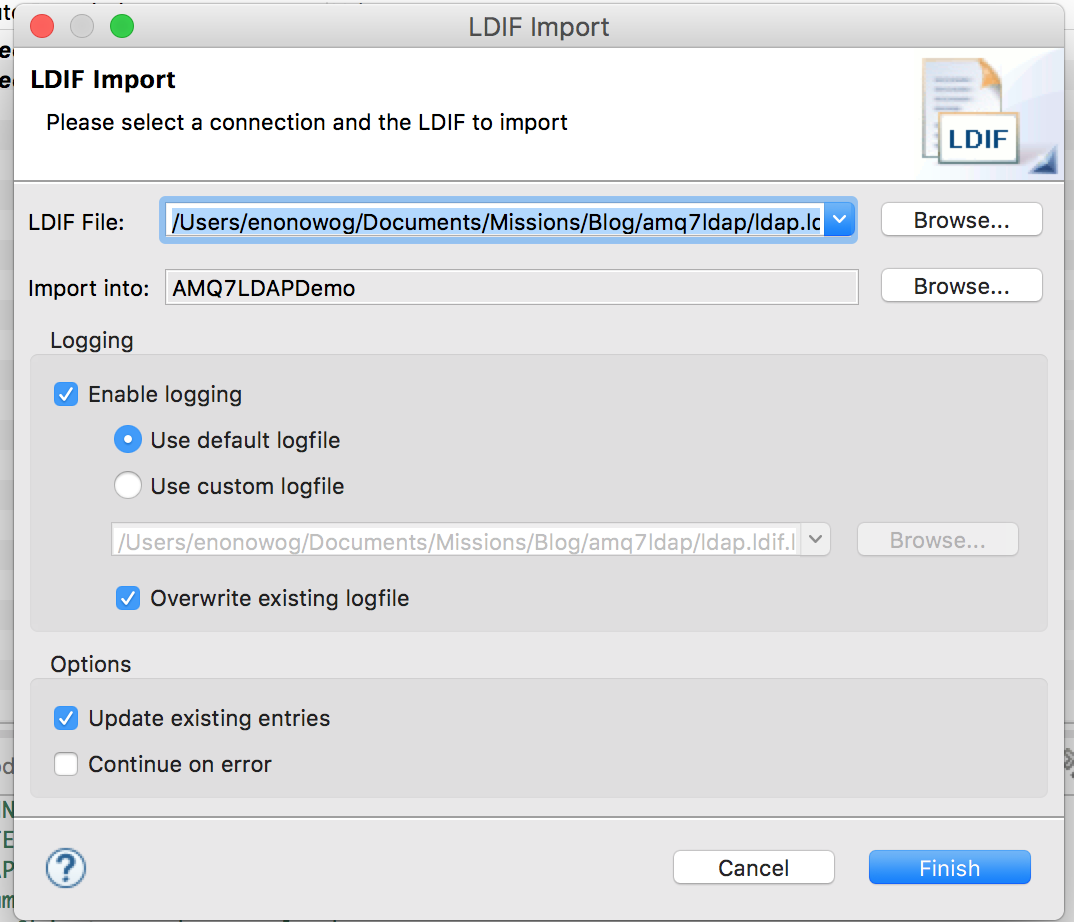
You can use this github.com/nelvadas/amq7_ldap_lab/blob/master/ldap.ldif file to reproduce the LDAP environment. From your root directory, import the ldap.diff file.
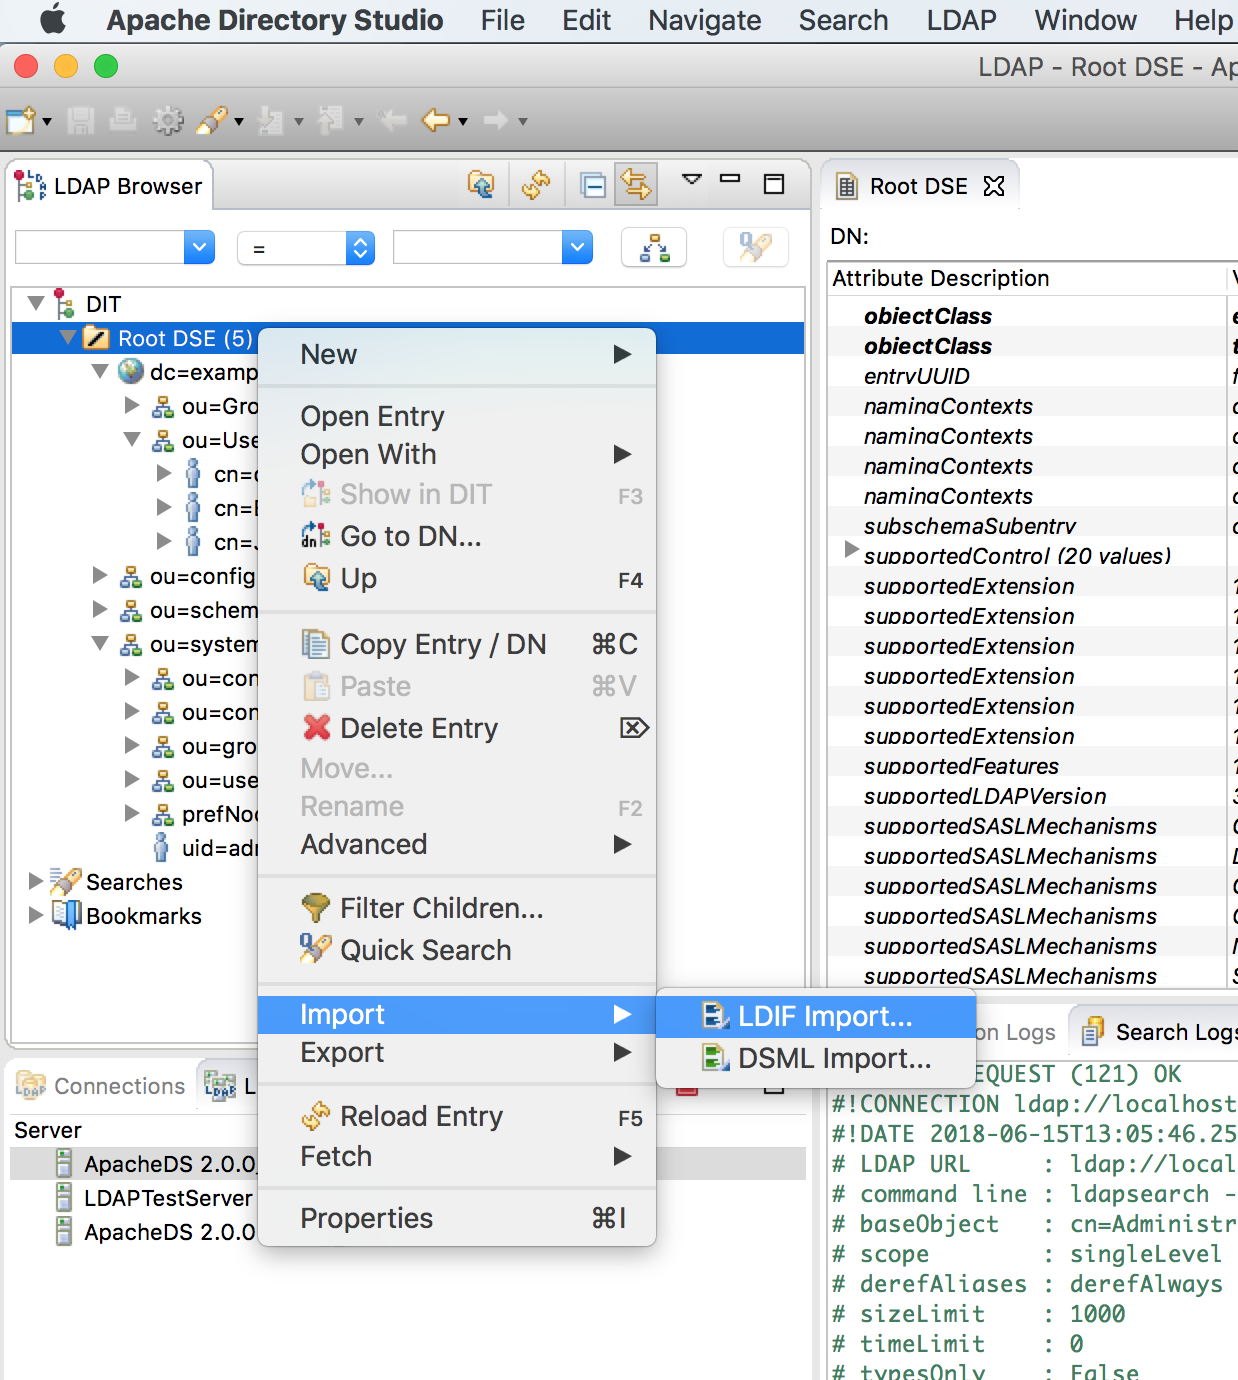
Then, select the file you want to import, select the Update existing entries checkbox, and import the file.
For demonstration and simplicity purposes, all user passwords have been set to redhat, for example:
jdoe/redhat, enonowoguia/redhat...
The Dind DN username and password to access LDAP server is admin/secret.
Once the LDAP server is set up and started, we can check the existing users with the following ldapsearch command:
$ ldapsearch -H ldap://localhost:11389 -x -D "uid=admin,ou=system" -w "secret" -b "ou=Users,dc=example,dc=com" -LLL cn
dn: cn=John+sn=Doe+uid=jdoe,ou=Users,dc=example,dc=com
cn: John

dn: cn=Elvadas NONO+uid=enonowoguia,ou=Users,dc=example,dc=com
cn: elvadas nono

dn: ou=Users,dc=example,dc=com

dn: cn=demo+uid=demo,ou=Users,dc=example,dc=com
cn: demo
In the same context, we may want to display the different groups of user jdoe:
$ ldapsearch -H ldap://localhost:11389 -x -D "uid=admin,ou=system" -w "secret" -b "ou=Groups,dc=example,dc=com" "(member=cn=John+sn=Doe+uid=jdoe,ou=Users,dc=example,dc=com)" -LL cn
# extended LDIF
#
# LDAPv3
# base <ou=Groups,dc=example,dc=com> with scope subtree
# filter: (member=cn=John+sn=Doe+uid=jdoe,ou=Users,dc=example,dc=com)
# requesting: -LL cn
#

# Administrator, Groups, example.com
dn: cn=Administrator,ou=Groups,dc=example,dc=com
cn: Administrator

# AMQGroup, Groups, example.com
dn: cn=AMQGroup,ou=Groups,dc=example,dc=com
cn: AMQGroup

# search result
search: 2
result: 0 Success

# numResponses: 3
# numEntries: 2
At this point, we have set up our LDAP server and made sure it is up and running by using various ldapsearch commands.
In the next section, we will configure Red Hat AMQ to authenticate users from LDAP and allow only users from AMQGroup to access the Management console and publish messages in queues.
Start the Red Hat AMQ 7 Broker
Red Hat AMQ 7 is a lightweight, high-performance, robust messaging platform freely available for development use through Red Hat Developer Program.
Download and unzip the last version on your computer:
$ unzip ~/Downloads/amq-broker-7.1.1-bin.zip
$ cd amq-broker-7.1.1/bin
Create a broker instance with the default authentication mechanism:
$ ./bin/artemis create ../../brokers/amq7-broker1 --name amq7-node1 --user admin --password admin --allow-anonymous
Creating ActiveMQ Artemis instance at: /Users/enonowog/Documents/Missions/Blog/amq7ldap/brokers/amq7-broker1

Auto tuning journal ...
done! Your system can make 16.67 writes per millisecond, your journal-buffer-timeout will be 59999
You can now start the broker by executing this command:
"/Users/enonowog/Documents/Missions/Blog/amq7ldap/brokers/amq7-broker1/bin/artemis" run
Or you can run the broker in the background using this command:
"/Users/enonowog/Documents/Missions/Blog/amq7ldap/brokers/amq7-broker1/bin/artemis-service" start
Start the broker as a background process.
$ cd ../brokers
$ "./amq7-broker1/bin/artemis-service" start
Starting artemis-service
artemis-service is now running (2804)
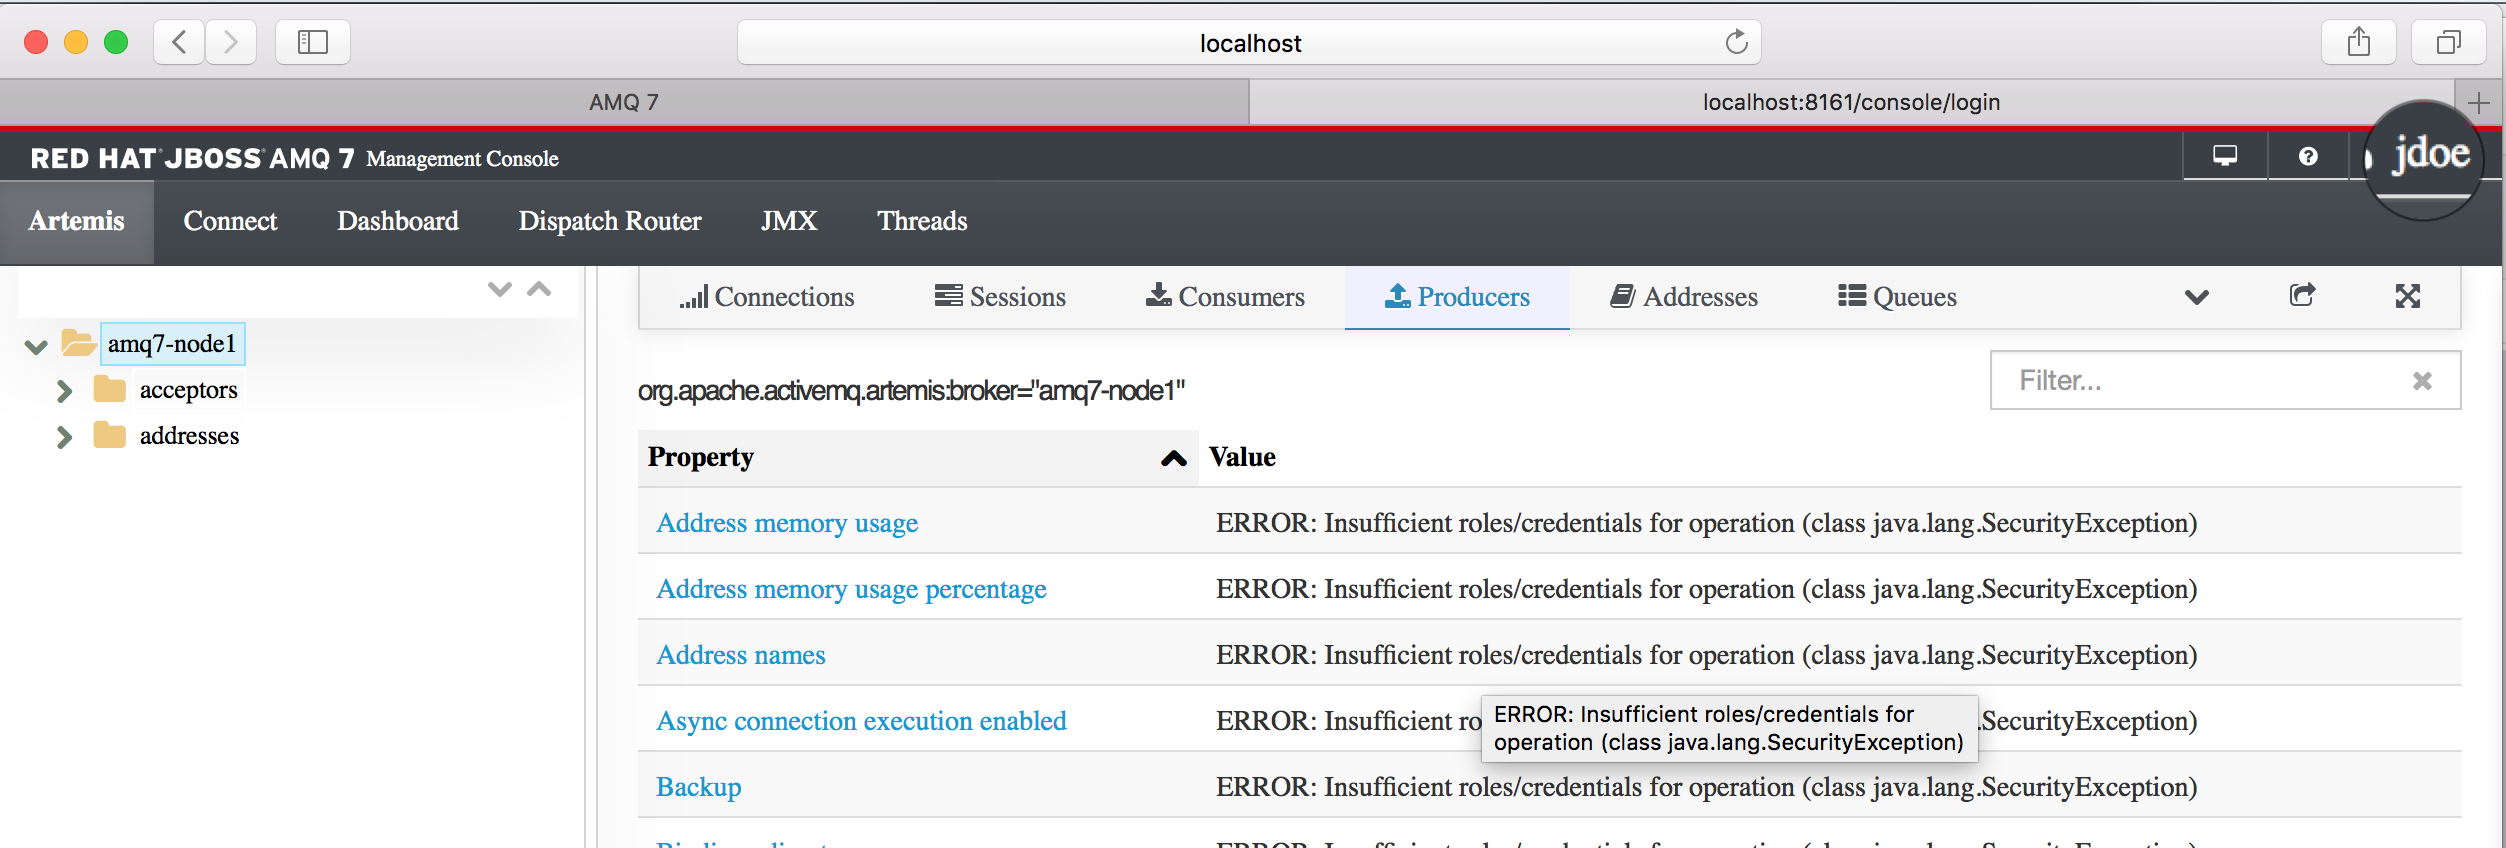
Access the management console at http://localhost:8161/console/login:

In the next section, we will see how to rely on the previously set up LDAP server to authenticate users.
Configure LDAP authentication
In order to enable LDAP authentication, the first step is to change the default etc/login.config file to add the LDAP authentication provider.
Add the LDAP authentication provider
You can retrieve a working example here.
$ cd brokers/amq7-broker1/etc/
MacBook-Pro-de-elvadas:etc enonowog$ cat <<EOF> login.config
> activemq {
>
>   org.apache.activemq.artemis.spi.core.security.jaas.LDAPLoginModule required
>      debug=true
>      initialContextFactory=com.sun.jndi.ldap.LdapCtxFactory
>      connectionURL="ldap://localhost:11389"
>      connectionUsername="uid=admin,ou=system"
>      connectionPassword=secret
>      connectionProtocol=s
>      authentication=simple
>      userBase="ou=Users,dc=example,dc=com"
>      userSearchMatching="(uid={0})"
>      userSearchSubtree=true
>      roleBase="ou=Groups,dc=example,dc=com"
>      roleName=cn
>      roleSearchMatching="(member={0})"
>      roleSearchSubtree=false
>      reload=true
>   ;
>
> };
> EOF
This file contains your LDAP configuration and states that the JAAS LDAPLoginModule is required. Connection parameters such as the LDAP URL and the Bind BD user details are provided.
For example, UserBase="ou=Users,dc=example,dc=com"defines the organizationalUnit from which users will be found. And userSearchMatching="(uid={0})" indicates users will be authenticated based on their UID.
roleBase="ou=Groups,dc=example,dc=com" defines the base group in which user searches will be performed.
Define the Hawtio console role
The etc/artemis.profile file defines the LDAP group you want to grant access to the management console. In that file, replace the -Dhawtio.role=amq with your LDAP group: -Dhawtio.role=AMQGroup.
# Java Opts
 JAVA_ARGS=" -XX:+PrintClassHistogram -XX:+UseG1GC -XX:+AggressiveOpts -XX:+UseFastAccessorMethods -Xms512M -Xmx2G
-Dhawtio.realm=activemq -Dhawtio.offline="true" -Dhawtio.role=amq
-Dhawtio.rolePrincipalClasses=org.apache.activemq.artemis.spi.core.security.jaas.RolePrincipal
-Djolokia.policyLocation=${ARTEMIS_INSTANCE_URI}/etc/jolokia-access.xml -Djon.id=amq"
You can do that by running the following command:
sed -i.bak 's/hawtio.role=amq/hawtio.role=AMQGroup/g' artemis.profile
You should now be able to log on to the management console using your LDAP credentials (jdoe/redhat).
Test and debug
To see what is happening behind the scenes, you can enable debug logs on the spi core security package.
Edit the etc/logging.properties file.
Add the org.apache.activemq.artemis.spi.core.security package to the root loggers.
Also add the DEBUG logging level for this package:
logger.org.apache.activemq.artemis.spi.core.security.level=DEBUG
Then restart your Red Hat AMQ instance.
# Additional logger names to configure (root logger is always configured)
 19 # Root logger option
 20 loggers=...,org.apache.activemq.artemis.integration.bootstrap
,org.apache.activemq.artemis.spi.core.security
 21 # Root logger level
 22 logger.level=INFO
 23 # ActiveMQ Artemis logger levels
 24 logger.org.apache.activemq.artemis.core.server.level=INFO
 25 logger.org.apache.activemq.artemis.journal.level=INFO
 26 logger.org.apache.activemq.artemis.utils.level=INFO
 27 logger.org.apache.activemq.artemis.jms.level=INFO
 28 logger.org.apache.activemq.artemis.integration.bootstrap.level=INFO
 29 logger.org.apache.activemq.artemis.spi.core.security.level=DEBUG
 30 logger.org.eclipse.jetty.level=WARN
 31 # Root logger handlers
 32 logger.handlers=FILE,CONSOLE
You can see which roles are retrieved when the user tries to authenticate with LDAP:
2018-06-15 17:26:18,824 INFO [org.apache.activemq.artemis] AMQ241001: HTTP Server started at http://localhost:8161
2018-06-15 17:26:18,825 INFO [org.apache.activemq.artemis] AMQ241002: Artemis Jolokia REST API available at http://localhost:8161/console/jolokia
2018-06-15 17:26:18,825 INFO [org.apache.activemq.artemis] AMQ241004: Artemis Console available at http://localhost:8161/console
2018-06-15 17:26:31,794 INFO [io.hawt.web.LoginServlet] hawtio login is using 1800 sec. HttpSession timeout
2018-06-15 17:26:31,814 DEBUG [org.apache.activemq.artemis.spi.core.security.jaas.LDAPLoginModule] Create the LDAP initial context.
2018-06-15 17:26:31,826 DEBUG [org.apache.activemq.artemis.spi.core.security.jaas.LDAPLoginModule] Get the user DN.
2018-06-15 17:26:31,826 DEBUG [org.apache.activemq.artemis.spi.core.security.jaas.LDAPLoginModule] Looking for the user in LDAP with
2018-06-15 17:26:31,826 DEBUG [org.apache.activemq.artemis.spi.core.security.jaas.LDAPLoginModule] base DN: ou=Users,dc=example,dc=com
2018-06-15 17:26:31,827 DEBUG [org.apache.activemq.artemis.spi.core.security.jaas.LDAPLoginModule] filter: (uid=jdoe)
2018-06-15 17:26:31,830 DEBUG [org.apache.activemq.artemis.spi.core.security.jaas.LDAPLoginModule] LDAP returned a relative name: cn=John+sn=Doe+uid=jdoe
2018-06-15 17:26:31,831 DEBUG [org.apache.activemq.artemis.spi.core.security.jaas.LDAPLoginModule] Using DN [cn=John+sn=Doe+uid=jdoe,ou=Users,dc=example,dc=com] for binding.
2018-06-15 17:26:31,831 DEBUG [org.apache.activemq.artemis.spi.core.security.jaas.LDAPLoginModule] Binding the user.
2018-06-15 17:26:31,834 DEBUG [org.apache.activemq.artemis.spi.core.security.jaas.LDAPLoginModule] User cn=John+sn=Doe+uid=jdoe,ou=Users,dc=example,dc=com successfully bound.
2018-06-15 17:26:31,834 DEBUG [org.apache.activemq.artemis.spi.core.security.jaas.LDAPLoginModule] Get user roles.
2018-06-15 17:26:31,834 DEBUG [org.apache.activemq.artemis.spi.core.security.jaas.LDAPLoginModule] Looking for the user roles in LDAP with
2018-06-15 17:26:31,834 DEBUG [org.apache.activemq.artemis.spi.core.security.jaas.LDAPLoginModule] base DN: ou=Groups,dc=example,dc=com
2018-06-15 17:26:31,834 DEBUG [org.apache.activemq.artemis.spi.core.security.jaas.LDAPLoginModule] filter: (member=cn=John+sn=Doe+uid=jdoe,ou=Users,dc=example,dc=com)
2018-06-15 17:26:31,839 DEBUG [org.apache.activemq.artemis.spi.core.security.jaas.LDAPLoginModule] Roles [Administrator, AMQGroup] for user jdoe
In this part, we defined authentication policies, but what about authorizations?
Enable custom authorizations to LDAP groups
To grant specific roles to your LDAP group, edit the broker.xml configuration file and set specific permissions for your role:
<security-settings>
<security-setting match="#">
<permission type="createNonDurableQueue" roles="amq,AMQGroup"/>
<permission type="deleteNonDurableQueue" roles="amq"/>
<permission type="createDurableQueue" roles="amq,AMQGroup"/>
<permission type="deleteDurableQueue" roles="amq"/>
<permission type="createAddress" roles="amq,AMQGroup"/>
<permission type="deleteAddress" roles="amq,AMQGroup"/>
<permission type="consume" roles="amq,AMQGroup"/>
<permission type="browse" roles="amq,AMQGroup"/>
<permission type="send" roles="amq,AMQGroup"/>
<!-- we need this otherwise ./artemis data imp wouldn't work -->
<permission type="manage" roles="amq,AMQGroup"/>
</security-setting>
</security-settings>
When the permissions are defined, they are automatically ingested by the running Red Hat AMQ instance. You can now produce a set of messages using the jdoe user.
$ ./artemis producer --url tcp://localhost:61616 --user jdoe --password redhat --destination queue://RH_DEV_BLOG --message-count 10
Producer ActiveMQQueue[RH_DEV_BLOG], thread=0 Started to calculate elapsed time ...
Producer ActiveMQQueue[RH_DEV_BLOG], thread=0 Produced: 10 messages
Producer ActiveMQQueue[RH_DEV_BLOG], thread=0 Elapsed time in second : 0 s
Producer ActiveMQQueue[RH_DEV_BLOG], thread=0 Elapsed time in milli second : 50 milli seconds
Conclusion
In this blog post, we saw how to set up a simple LDAP directory using Apache Directory Studio and configured LDAP authentication on Red Hat AMQ 7 for both messaging operations and the management console with custom authorization policies.
Last updated: November 16, 2023
