Red Hat JBoss AMQ 7 provides fast, lightweight, and secure messaging for internet-scale applications. In addition, AMQ 7 components use industry-standard message protocols and support a wide range of programming languages and operating environments.
Therefore, AMQ 7 gives you the strong foundation you need to build modern distributed applications. Especially relevant is that multiple instances of AMQ 7 brokers can be grouped together to share message processing load.
Each broker manages its own messages and connections and is connected to other brokers with "cluster bridges" that are used to send topology information, such as queues and consumers, as well as load balancing messages.
AMQ 7 supports two different strategies for backing up a server: shared store and replication.
An analysis of the installation procedure was done, it was decided to provide a layer on top of the manual setup of the AMQ 7 configuration. As a result, the following project was implemented to provide deployment automation for an AMQ 7 high availability (HA) shared store:
https://github.com/AbrahamArellano/amq-ha-shared-store-demo
What's Covered in This Article?
- Overview of the deployment automation AMQ 7 HA shared store project
- What does this project provide?
- What scripts are provided?
- Installation prerequisites
- Downloading the project
- Configuring the project
- Executing the project: AMQ 7 deployment
- Testing AMQ 7
- Test setup
- Uninstalling AMQ 7
- Collaboration
Overview of the Deployment Automation AMQ 7 HA Shared Store Project
First, it is important to mention that AMQ has two policies using different strategies to enable failover:
- Replication: The master and slave brokers synchronize data over the network.
- Shared store: Master and slave brokers share the same location for their messaging data.
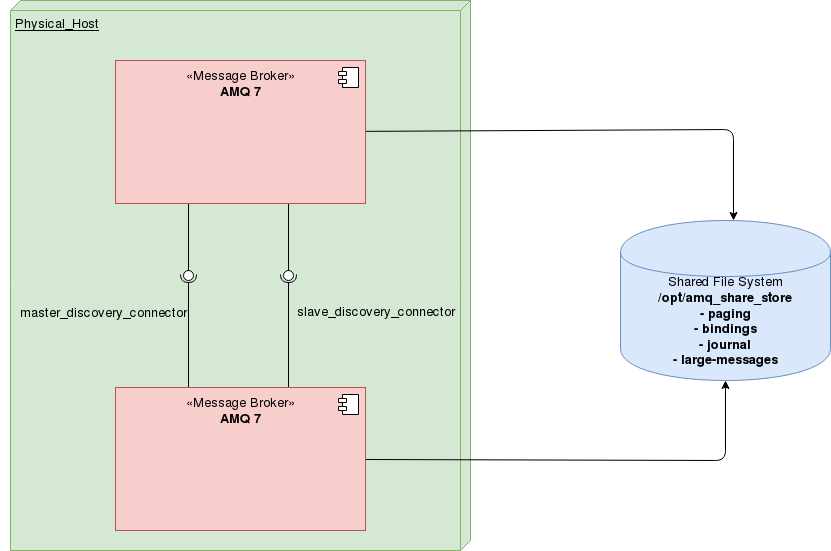
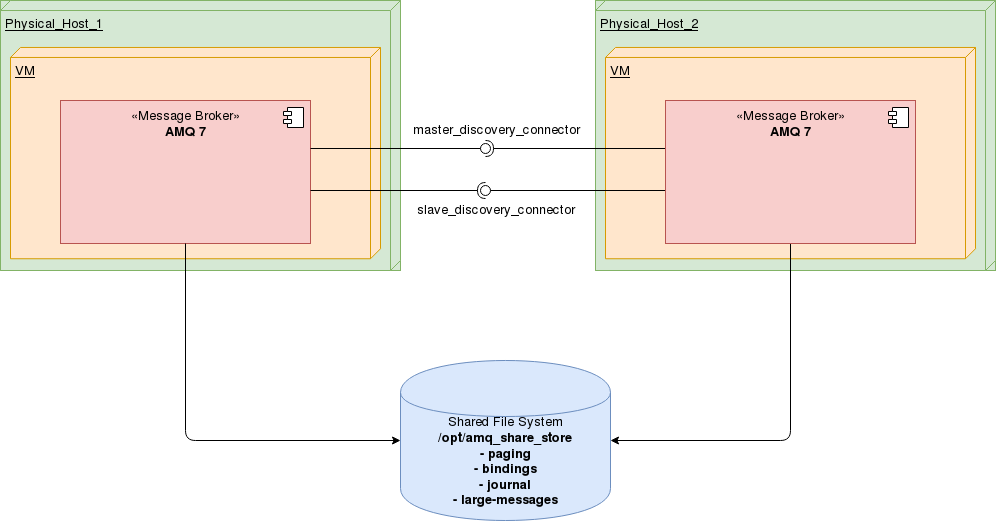
When using a shared store, both the master and slave brokers share a single data directory using a shared file system. This data directory includes the paging directory, journal directory, large messages, and binding journal.
A slave broker loads the persistent storage from the shared file system if the master broker disconnects from the cluster. Clients can connect to the slave broker and continue their sessions.
The advantage of shared-store HA is that no replication occurs between the master and slave nodes. This means there are no performance penalties due to the overhead of replication during normal operation.
The disadvantage of shared-store replication is that it requires a shared file system. Consequently, when the slave broker takes over, it needs to load the journal from the shared store, which can take some time depending on the amount of data in the store.
This style of HA differs from data replication in that it requires a shared file system that is accessible by both the master and slave nodes. Typically this is some kind of high-performance Storage Area Network (SAN). It is recommended that you do not use Network Attached Storage (NAS).
What Does This Project Provide?
The scripts provided by this project are intended to be used for test or production environments where you have the following requirements:
- A cluster with two nodes (master/slave) deployed on different hosts or on the same host
- Cluster security and additional settings configuration
- HA using a shared store
- An Admin user
- Address/queue security: An additional user with limited permissions (using properties; no certificates)
- AMQ tuning for:
- Message redelivery
- Redelivery delay
- Message expiration
- Dead-letter address
- Slow consumer handling
- Paging
- Access to the console from localhost and from a remote host
- A configurable test suite: consumer and producer
- Uninstaller script
- Web console port configuration
- The possibility to install—with few changes—multiple instances in the same host
The overall requirement is to have an automated way to deploy your AMQ cluster with a minimum amount of effort and configuration.
What Scripts Are Provided?
Product Deployer Script
product_installer_script.shdeploys the AMQ 7 binary at the given location. It is a prerequisite before other scripts are executed.
Installer Scripts
The installer scripts allow you to deploy a master and a slave AMQ 7 HA configuration. The project can be deployed on the same host or on different hosts.
master_installer_scriptinstalls the master.slave_installer_scriptinstalls the slave.
Uninstaller Scripts
The uninstaller scripts allow you to remove the AMQ 7 HA installation for the master and slave and the clean up the persistence.
uninstaller_script.shuninstalls the AMQ 7 instance(s) deployed on the host where it is executed.uninstaller_persistence_script.shuninstalls the AMQ 7 persistence storage.
Installation Prerequisites
The provided scripts can be used to install AMQ in two different ways:
- Master and slave on the same machine: one machine with the prerequisites described below is required.
- Master and slave on different machines: two machines with the prerequisites described below are required.
Hardware Requirements
- Operating system: Mac OS X (10.8 or later), Microsoft Windows 7 (SP1), Fedora (21 or later), or Red Hat Enterprise Linux 7
- Memory: At least 2 GB; preferably 4 GB
Software Requirements
- Web browser (preferably Chrome or Firefox)
- Git client, which can be downloaded here
- Access to http://github.com
Requirements for Running JBoss AMQ 7 Broker
- Java Runtime Engine (JRE) 1.8, which can be download here.
- LibAIO (optional).
- AMQ 7 Broker from Red Hat Developer Portal, which can be download here. If you are using two different servers, install it on each server. Place the downloaded file
amq-broker-7.1.0-bin.zipin the installs directory:[SRC_DIR]. - A prepared, shared file system.
If you are installing from a supported version of Red Hat Enterprise Linux, you can use the following yum command to install prerequisites:
$ sudo yum install java-1.8.0-openjdk-devel git
Downloading the project
Git clone this repository to [GIT_SOURCE] and then change the directory name to amq-ha-shared-store.
Configuring the Project
Please read carefully the following configuration setup.
As mentioned in a previous section, the master and slave can be configured on the same machine or on different machines. A specific configuration, described below, is required in each case.
Master and Slave on the Same Machine
Check and adjust the following scripts:
master_installer_script.sh
Set the variables correctly:
PRODUCT_HOME: location of the AMQ 7 broker distribution.SRC_DIR: location of the AMQ 7 installeramq-broker-7.1.0-bin.zipfile.SHARED_FILESYSTEM: shared file system location used for the master and the slave. "Escape" the characters.
slave_installer_script.sh
Set the variables correctly:
PRODUCT_HOME: location of the AMQ 7 broker distribution.SRC_DIR: location of the AMQ 7 installeramq-broker-7.1.0-bin.zipfile.SHARED_FILESYSTEM: shared file system location used for the master and the slave. "Escape" the characters.
Master and Slave on Different Machines
Check and adjust the following scripts:
- master_installer_script.sh
- slave_installer_script.sh
Set the variables correctly:
PRODUCT_HOME: location of the AMQ 7 broker distribution.SRC_DIR: location of the AMQ 7 installeramq-broker-7.1.0-bin.zipfile.SHARED_FILESYSTEM: location of the shared file system used for the master and the slave. Be sure to "escape" the characters.MASTER_IP: IP address of the host where the AMQ master instance is deployed.MASTER_PORT: port of the master AMQ instance.SLAVE_IP: IP address of the host where the slave AMQ instance is installed.SLAVE_PORT: port of the slave AMQ instance.CONSOLE_PORT: port of the web console.CLUSTER_CONNECTION_NAME: name of the cluster connection.AMQ_MASTER: name of the current AMQ master instance. This allows you to install multiple instances on the same host.AMQ_SLAVE: name of the current AMQ slave instance. This allows you to install multiple instances on the same host.
Executing the Project: AMQ 7 Deployment
Follow the instructions below to proceed with the installation of the project.
Configure the Installer Script
Configure the product_installer_script.sh and execute it, as follows:
1. First, configure the following variables:
PRODUCT_HOME: variable that contains the location of the AMQ 7 broker distributionSRC_DIR: location of the AMQ 7 installeramq-broker-7.1.0-bin.zipfile
2. Then, execute the script product_installer_script.sh:
[GIT_SOURCE]/amq-ha-shared-store/product_installer_script.sh
Install the Product with the Master and Slave on the Same Machine
1. Run the script master_installer_script.sh on the host:
[GIT_SOURCE]/amq-ha-shared-store/master_installer_script.sh
2. Run the script slave_installer_script.sh on the host:
[GIT_SOURCE]/amq-ha-shared-store/slave_installer_script.sh
Install the Product with the Master and Slave on Different Machines
1. Run the script master_installer_script.sh on the master host:
[GIT_SOURCE]/amq-ha-shared-store/master_installer_script.sh
2. Run the script slave_installer_script.sh on the slave host:
[GIT_SOURCE]/amq-ha-shared-store/slave_installer_script.sh
Finally, after successful deployment, you can test the cluster.
Testing AMQ 7
In order to test your installation, the project provides a test suite composed of the following test scripts:
[GIT_SOURCE]/amq-ha-shared-store/test_scripts/producer_master_test_execution.shproduces 10 messages in the test queue of the master broker.[GIT_SOURCE]/amq-ha-shared-store/test_scripts/producer_slave_test_execution.shproduces 10 messages in the test queue of the slave broker.[GIT_SOURCE]/amq-ha-shared-store/test_scripts/consumer_master_test_execution.shconsumes 100 messages from the test queue of the master broker.[GIT_SOURCE]/amq-ha-shared-store/test_scripts/consumer_slave_test_execution.shconsumes 100 messages from the test queue of the slave broker.
In addition, there is a support script that sets up the test environment:
[GIT_SOURCE]/amq-ha-shared-store/test_scripts/create_queue_test.sh creates the test queue in the master broker. This script is triggered on the master broker.
Set Up the Test Scripts
Check that the following variables have the correct values in the following tests scripts:
[GIT_SOURCE]/amq-ha-shared-store/test_scripts/create_queue_test.sh
PRODUCT_HOME: location of the AMQ 7 installationAMQ_MASTER: name of the current AMQ master instance
[GIT_SOURCE]/amq-ha-shared-store/test_scripts/producer_master_test_execution.sh and
[GIT_SOURCE]/amq-ha-shared-store/test_scripts/consumer_master_test_execution.sh
PRODUCT_HOME: location of the AMQ 7 installationAMQ_MASTER: name of the current AMQ master instance
[GIT_SOURCE]/amq-ha-shared-store/test_scripts/producer_slave_test_execution.sh and
[GIT_SOURCE]/amq-ha-shared-store/test_scripts/consumer_slave_test_execution.sh
PRODUCT_HOME: location of the AMQ 7 installationAMQ_SLAVE: name of the current AMQ slave instance
Master Active Test
Producing Messages on the Master
To send messages to the master broker, execute the following scripts:
[GIT_SOURCE]/amq-ha-shared-store/test_scripts/create_queue_test.sh
and
[GIT_SOURCE]/amq-ha-shared-store/test_scripts/producer_master_test_execution.sh
Browsing Messages on the Master
Check the queue in the broker web console to verify that the queue received the messages:
- Open a web browser and navigate to the AMQ web console at
http://localhost:8161/hawtio. - In the left tree, navigate to 127.0.0.1 > addresses > haQueue > queues > anycast > haQueue.
- Click Browse (refresh if necessary).
The script should produce 10 messages.
Consuming Messages on the Master
To consume messages from the master broker, execute the following script:
[GIT_SOURCE]/amq-ha-shared-store/test_scripts/consumer_master_test_execution.sh
Slave Active Test
Producing Messages on the Slave
To send messages to the slave, execute the following script:
[GIT_SOURCE]/amq-ha-shared-store/test_scripts/producer_slave_test_execution.sh
Browsing Messages on the Slave
Check the queue in the broker web console to verify that the queue received the messages:
- Open a web browser and navigate to the AMQ web console at
http://localhost:8261/hawtio. - In the left tree, navigate to 127.0.0.1 > addresses > haQueue > queues > anycast > haQueue.
- Click Browse (refresh if necessary).
The script should produce 10 messages.
Consuming Messages on the Slave
To consume messages from the slave broker, execute the following script:
[GIT_SOURCE]/amq-ha-shared-store/test_scripts/consumer_slave_test_execution.sh
Uninstalling AMQ 7
In addition, the project provides two uninstallers for uninstalling the deployed AMQ 7 HA configuration.
1. First of all, execute the uninstaller_script.sh script to stop and uninstall the AMQ 7 HA configuration.
2. Also, if required, configure and then execute the uninstaller_persistence_script.sh script to delete the persistence.
3. On the scripts: uninstaller_script.sh and uninstaller_persistence_script.sh check that the following variables contain the correct values:
PRODUCT_HOME: location of the AMQ 7 broker distributionSHARED_FILESYSTEM: location of the shared file system used for the master and the slave
Collaboration
This project is based on a project created by Hugo Guerrero, which is available on GitHub: jbossdemocentral/amq-ha-replicated-demo
Last updated: February 24, 2024