In this article, I'll give you a quick tour of how to use the new MicroProfile Starter (Beta) site to generate, download, and build a Maven-based MicroProfile project with just a few clicks. Using this online project generator, you choose the MicroProfile version and server (such as Thorntail) that you want your project to be based on. Then you'll be able to choose what example code to include in your project to see how to use the APIs that are part of the MicroProfile specifications such as Config, Health Check, Metrics, CDI, and more.
Introduction
On February 6, 2019, the MicroProfile community announced the release of Eclipse MicroProfile Starter (Beta), whose goal is to aid developers to quickly get started using and exploiting the capabilities of the community-driven open-source specification for enterprise Java microservices, Eclipse MicroProfile, by generating working sample code in a Maven project.
The idea of having a MicroProfile Starter has been around since the creation of the project back in mid-2016 and was publicly discussed at Devoxx BE 2016 (the week of November 7, 2016). In its first two weeks of being available, developers around the world have created over 1,200 projects through the MicroProfile Starter (Beta), which is a good and positive indication of its adoption worldwide.
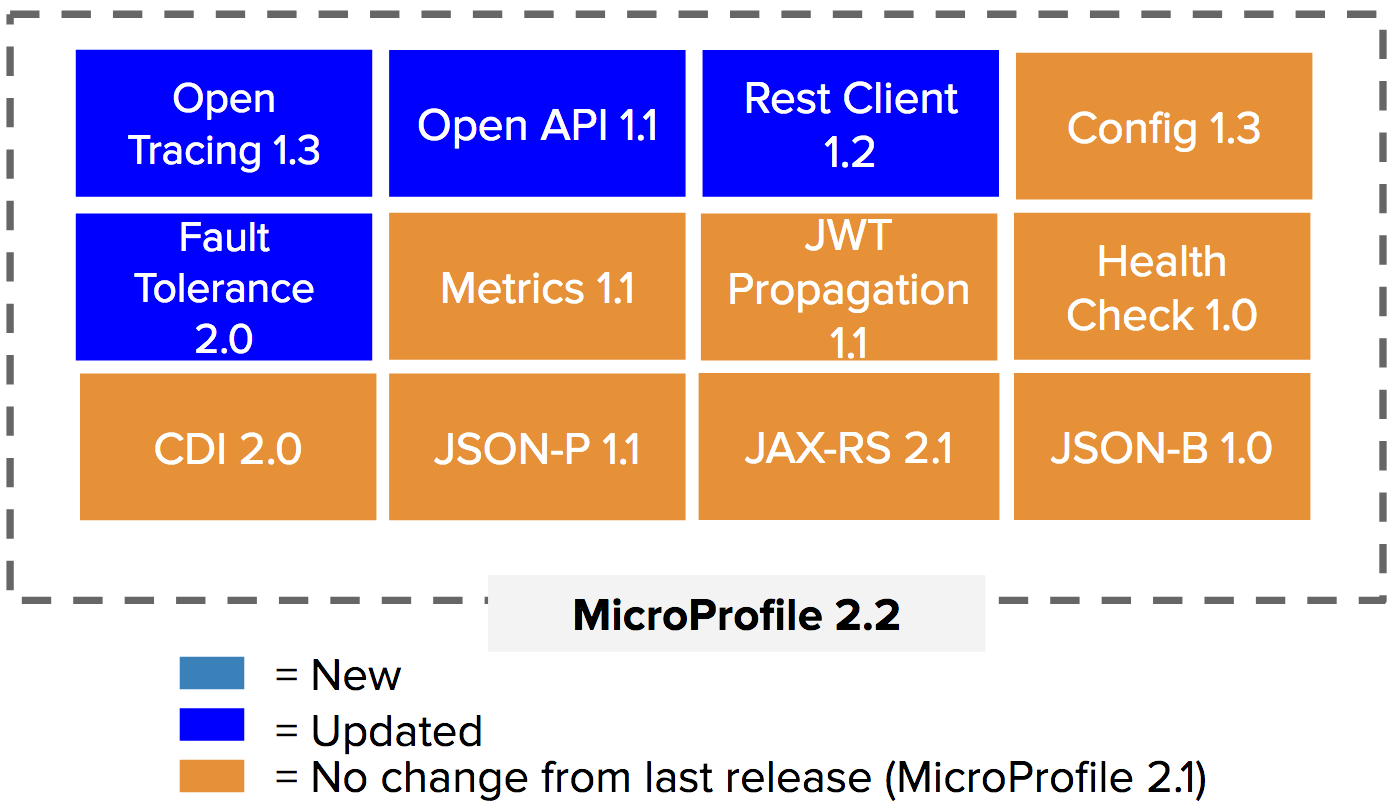
As of this writing, there are 12 sub-projects/APIs that are under the MicroProfile umbrella and 8 open-source implementations in the market, which demonstrates the collaborative and cooperative nature of this truly community-led open-source project. On a weekly basis, individuals, communities, and vendors work together in the development and evolution of this specification leveraging past lessons-learned and best practices in all areas related to enterprise Java microservices.
MicroProfile Starter (Beta) Quick Tour
- When you go to the MicroProfile Starter (Beta) page, you will see the following landing page:
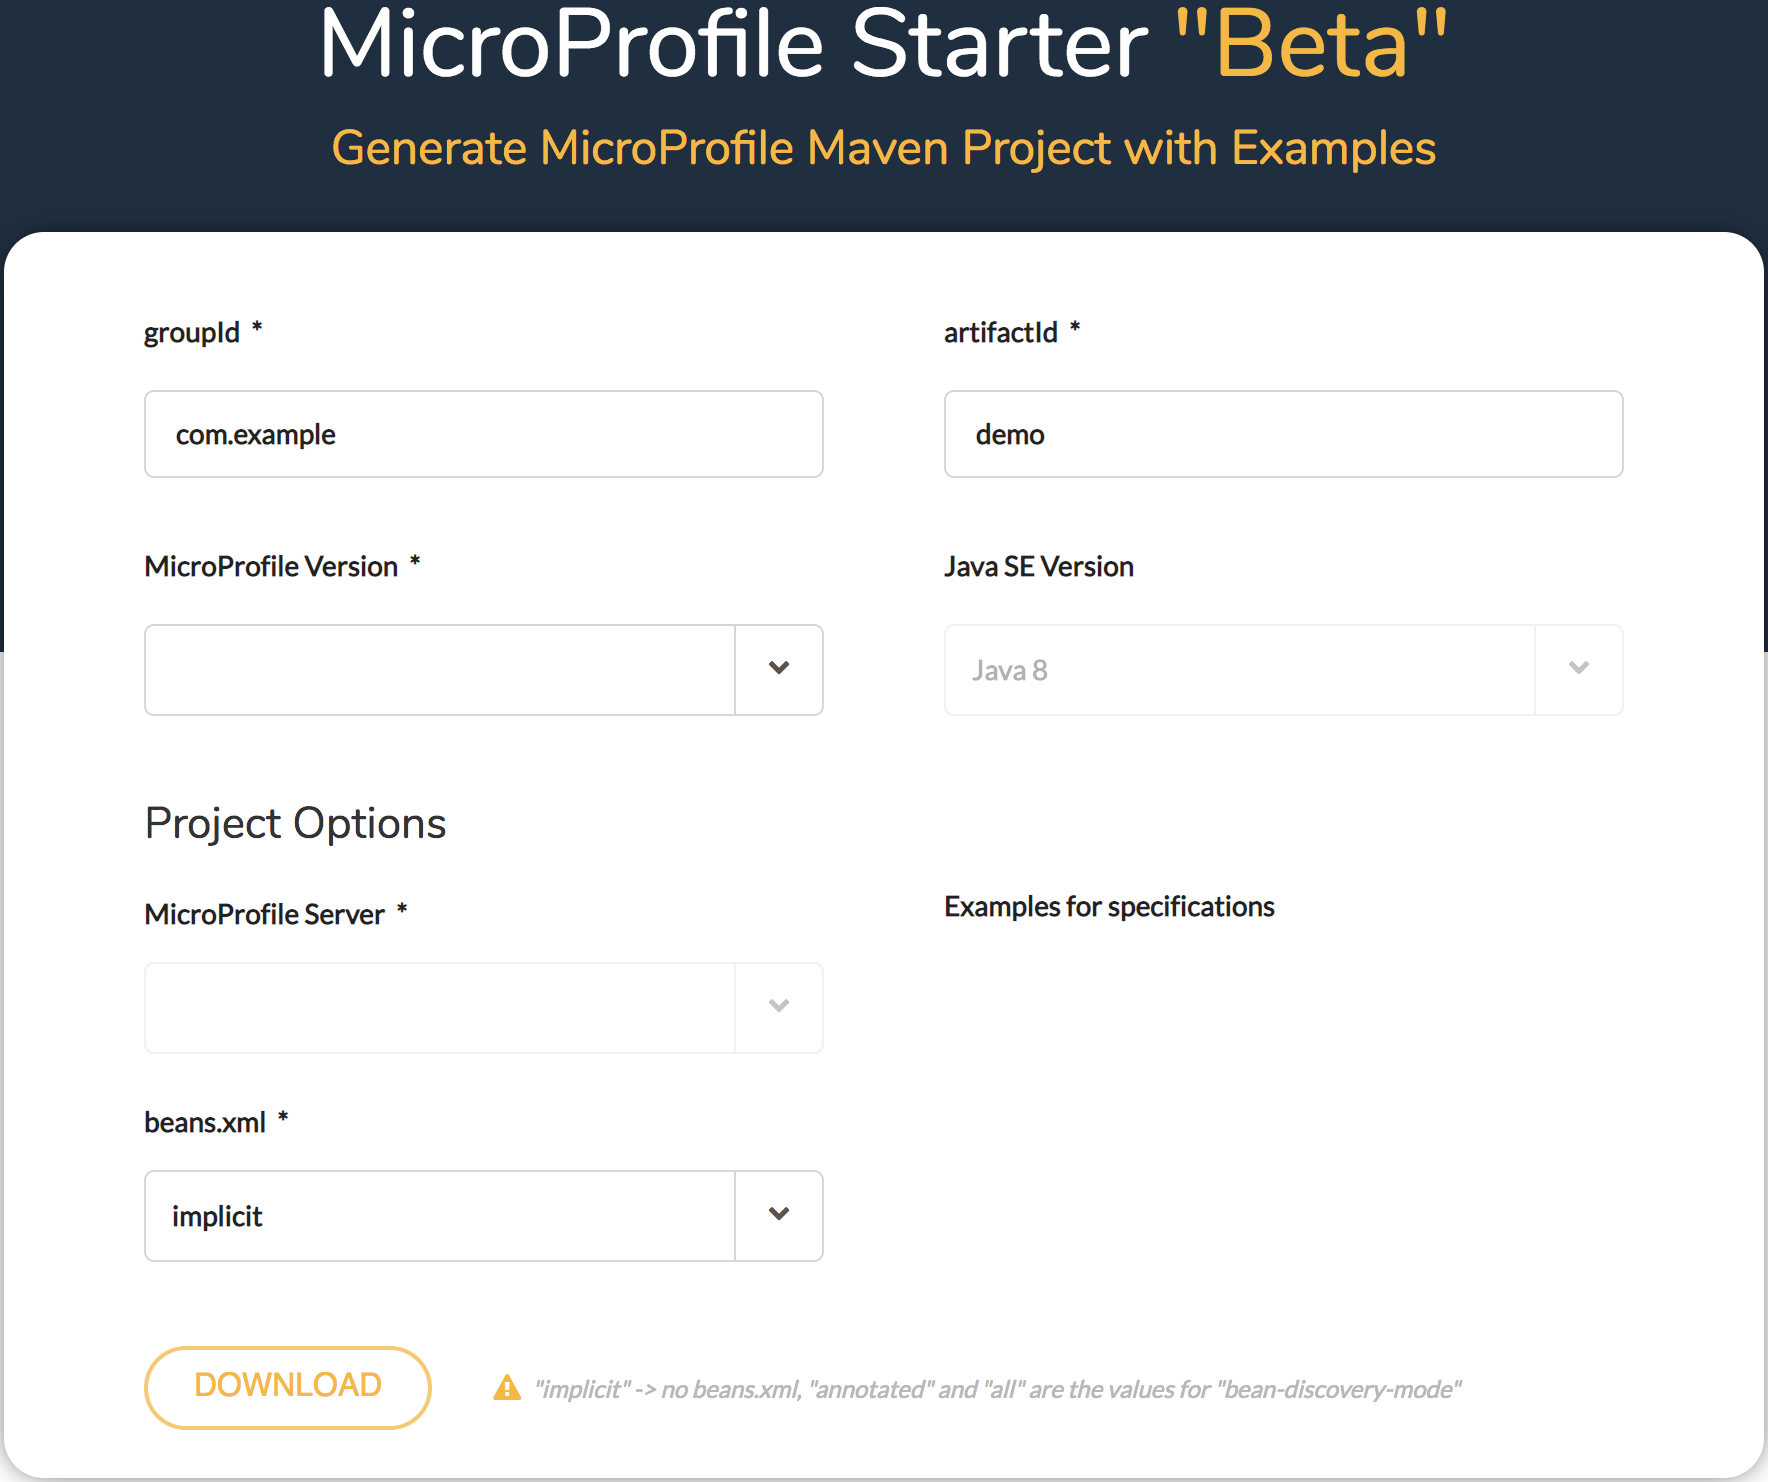
- You can accept the defaults for the Maven-related parameters
groupIdandartifactIdor change them to your liking. ThegroupIdparameter uniquely identifies your project across all projects, andartifactIdis the name of the JAR without the version. For this tour, accept the defaults. - Select the MicroProfile version from the drop-down list:
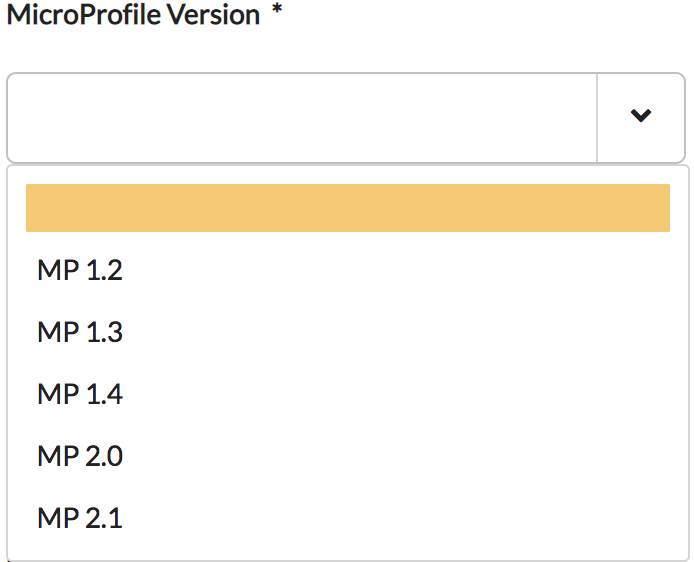
For this tour, select MicroProfile version “MP 2.1.” Notice that depending on the version of MicroProfile you select, the number of specifications listed under the “Example for specifications” section will vary. This number depends on how many APIs were included as part of each MicroProfile umbrella release. To find out what APIs were included in each release, please refer to the MicroProfile community presentation.
- Select the MicroProfile server from the drop-down list:
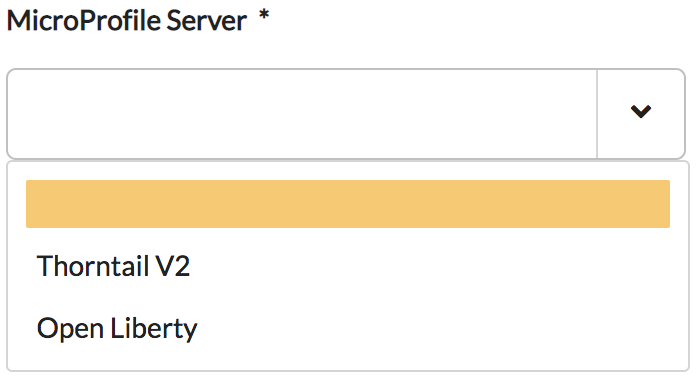
For this tour, select “Thorntail V2,” which is the open-source project that Red Hat uses to implement the Eclipse MicroProfile specification. By the way, Red Hat’s offering that includes Eclipse MicroProfile is Red Hat OpenShift Application Runtimes.
- Leave the all "Examples for specifications" checkbox selected (do not uncheck any of the checkboxes):
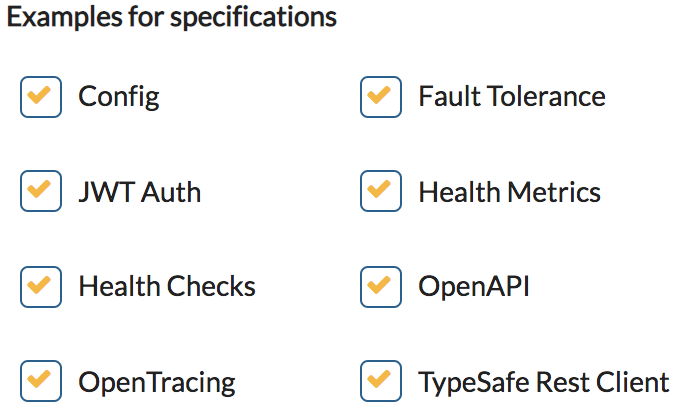
This will generate sample working code for all of the APIs included in MicroProfile 2.1.
- Select “annotated” for “beans.xml”:

This choice generates a beans archive descriptor, beans.xml, under the WEB-INF directory of the web app.
- The last step is to click the DOWNLOAD button, which will create a zip archive.
- Ensure you save the
demo.zipfile to your local drive. - Unzip demo.zip in your local drive. The contents should look like this:
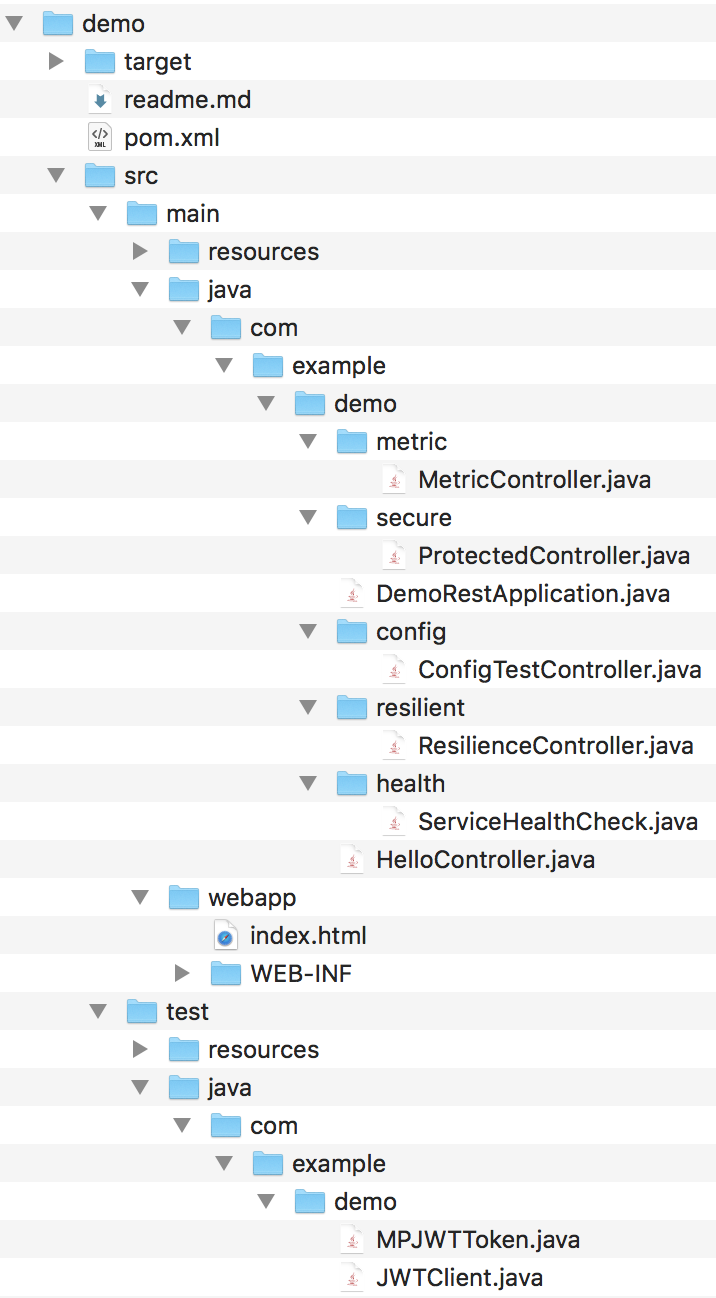
- Notice that there’s a
readme.mdfile in the generated directory content. This file contains instructions on how to compile and run the generated code, which includes a sample web application that exercises the different capabilities of MicroProfile. Change directory to wherever you unzipped the demo project. In my case, I had it in my
Downloadsdirectory:$ cd Downloads/demo
Compile the generated sample code by entering the following command:
$ mvn clean package
Run the microservice:
$ java -jar target/demo-thorntail.jar
After a few seconds, you will see the following message:
INFO [org.wildfly.swarm] (main) WFSWARM99999: Thorntail is Ready
This indicates that the microservice is up and running.
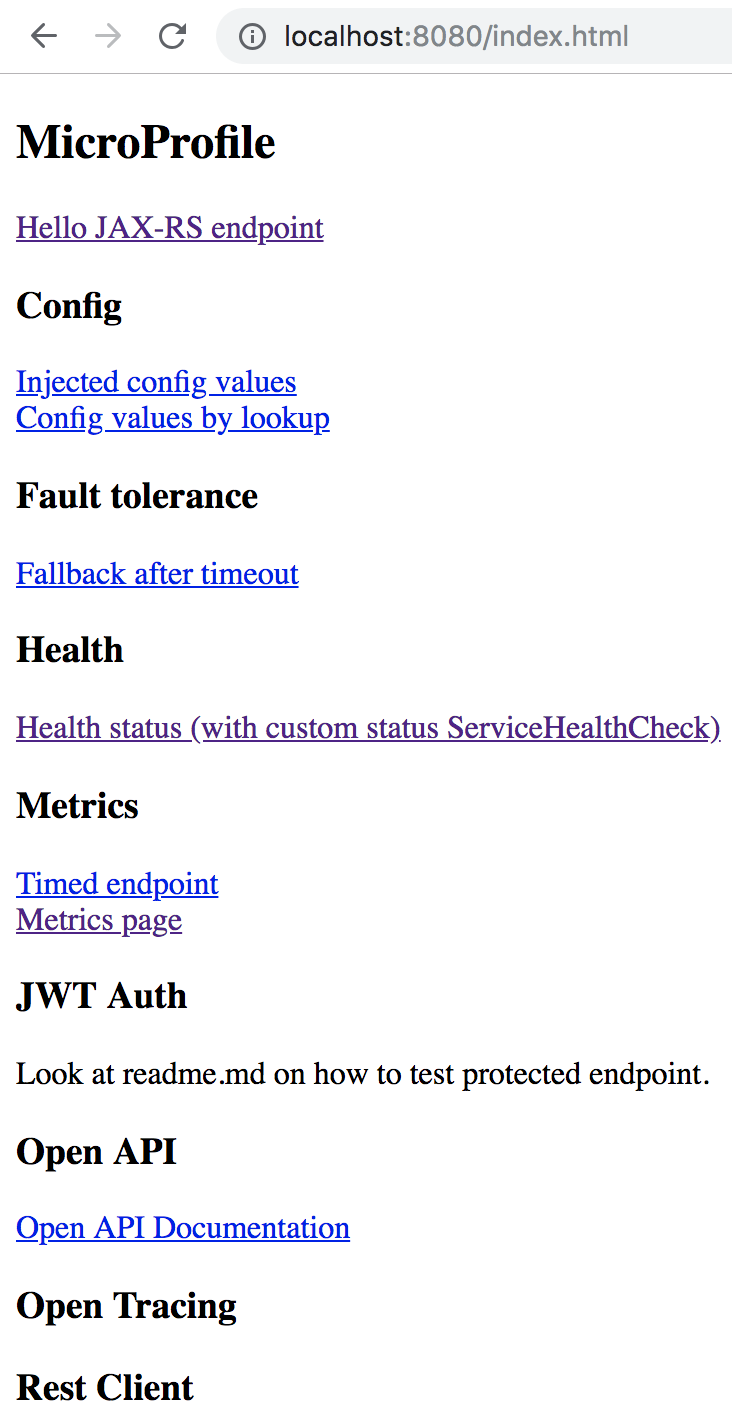
- Open your favorite web browser and point it to
http://localhost:8080/index.html. This will open up the sample web application, as follows:
- To see the capabilities of MicroProfile Config, click the link “Injected config values.” A window tab will open with the following display:

Likewise, if you click the link “Config values by lookup,” another window tab will be displayed:

The parameter values "Injected value" and "lookup value" you saw above are defined in the file ./demo/src/main/resources/META-INF/microprofile-config.properties, as follows:
$ cat ./src/main/resources/META-INF/microprofile-config.properties
injected.value=Injected value
value=lookup value
Imagine that you need to use a different value for the parameter "value” between development and system testing. You could do this by passing a parameter in the command line when starting the microservice, as follows:
$ java -jar target/demo-thorntail.jar -Dvalue=hola
Now, when you click the link “Config values by lookup,” another window tab is displayed:

By the way, the source code executing this logic is located in the generated file ./src/main/java/com/example/demo/config/ConfigTestController.java.
Also, for more information on the MicroProfile Config API, check out its documentation.
- To see the capabilities of MicroProfile Fault Tolerance, click the link “Fallback after timeout.” A window tab will open with the following display:

The sample code is exercising the @Fallback annotation in combination with the @Timeout. Here’s the sample code:
    @Fallback(fallbackMethod = "fallback") // fallback handler
    @Timeout(500)
    @GET
    public String checkTimeout() {
        try {
            Thread.sleep(700L);
        } catch (InterruptedException e) {
            //
        }
        return "Never from normal processing";
    }
    public String fallback() {
        return "Fallback answer due to timeout";
    }
The @Timeout annotation is specifying that if the method takes longer than 500 milliseconds to execute, a timeout exception should be thrown. This annotation can be used together with @Fallback, which, in this case, invokes the fallback handler called fallback when the timeout exception occurs. In the generated sample code above, the timeout exception will always happen because the method is executing—that is, sleeping for 700 milliseconds, which is longer than 500 milliseconds.
By the way, the source code executing this logic is located in the generated file ./src/main/java/com/example/demo/resilient/ResilienceController.java.
Also, for more information on the MicroProfile Fault Tolerance API, check out its documentation.
Conclusion
You can explore the rest of the MicroProfile sample code yourself at your own pace by clicking the other links of the sample web application. The MicroProfile community would love to have your feedback as well as collaboration/contributions towards the continued development of the MicroProfile Starter. To give feedback, please click on the “Give Feedback” button on the top right on the MicroProfile Starter (Beta) landing page and create an issue. I’d recommend you check out the open issues first to make sure that your request hasn’t already been created by someone else. Some outstanding requests are:
- Documenting the onboarding process onto MicroProfile Starter for new MicroProfile implementations
- Gradle support
- Adding support for Dockerfile
- Ability to run the MicroProfile Starter from the command line
- Making the dependencies of the JWT Propagation code sample specific to the corresponding server implementation
The MicroProfile Starter project is grouping and prioritizing requested items and fixes in milestones with the goal to release continuously. The MicroProfile Starter working group meets on a regular basis and if you’d like to help us with your development skills, please send an email to microprofile@googlegroups.com or you can join the discussion on its Gitter channel. The project information, including the location of its source code, can be found here.
Lastly, if you’d like to deploy and run your MicroProfile project on OpenShift using Docker, Buildah, Podman, and Quay, I recommend this post by my colleague Syed Shaaf.
Enjoy MicroProfiling!
For more information, see these community sites:
To learn more about MicroProfile, see other MicroProfile articles on the Red Hat Developers blog, for example:
Last updated: September 26, 2024