(Edit: November 22, 2019) The Node images used in this post, both community centos7 and product, are no longer being updated and maintained. For community images, please use the Universal Base Image (UBI)-based node images located here: registry.access.redhat.com/ubi8/nodejs-10
For a fully supported Product version of Node.js, please check out the Red Hat Software Collections Node.js image, RH SCL Node.js.
With the recent announcement that Node.js is generally available as part of Red Hat OpenShift Application Runtimes, I wanted to see how easy it was to deploy an Express.js app on OpenShift.
Getting Started
Before we start, there are some required prerequisites. You need to have Node 8.x and npm 5.2 or greater installed. npm comes with the official node distribution, so if you install Node from Nodejs.org, you should be good.
You'll also need access to an OpenShift environment or the Red Hat Container Development Kit (CDK) minishift environment. For this example, I'll be using minishift. You can find instructions on getting minishift up and running here. For my local minishift, I start it with this command:
$ minishift start --memory=6144 --vm-driver virtualbox
You also need to be logged in to whatever OpenShift cluster you are using (OpenShift or minishift) using oc login.
Spoiler Alert
For those who don't want to read the whole post and don't want to scroll to the end, here are the three commands that need to be run:
$ npx express-generator .
$ npx json -I -f package.json -e 'this.scripts.start="PORT=8080 node ./bin/www"'
$ npx nodeshift --strictSSL=false --expose
Generate an Express App
What is Express, you say? Well, according to the Express website, Express is a "Fast, unopinionated, minimalist web framework for Node.js."
One pretty cool thing about Express is the Express application generator tool: express-generator. This is a command-line tool that "quickly creates an application skeleton". But wait: didn't I just say that Express was unopinionated? It is, but this is the opinionated skeleton creator. ¯_(ツ)_/¯
The Express website recommends installing the express-generator module globally, like this:
npm install -g express-generator
But we aren't going to do that. Instead, we are going to use a fairly new feature from npm, called npx.
npx gives us the ability to run one-off commands with out having to install things globally. There is more to npx that just that feature, so if you are interested in all the cool things npx can do, check it out here.
With this new-found knowledge, we can now generate our Express app like this:
$ npx express-generator .
Let's take a quick look at what is actually happening with this command. First, npx sees that we want to run the express-generator command, so npx does some magic to see if we have it installed locally (in our current directory), and then it checks our global modules. Because it is not there, it downloads it for this one-time use.
express-generator is run in our current directory, which is denoted by that . at the end of the command.
The result should look something like this:
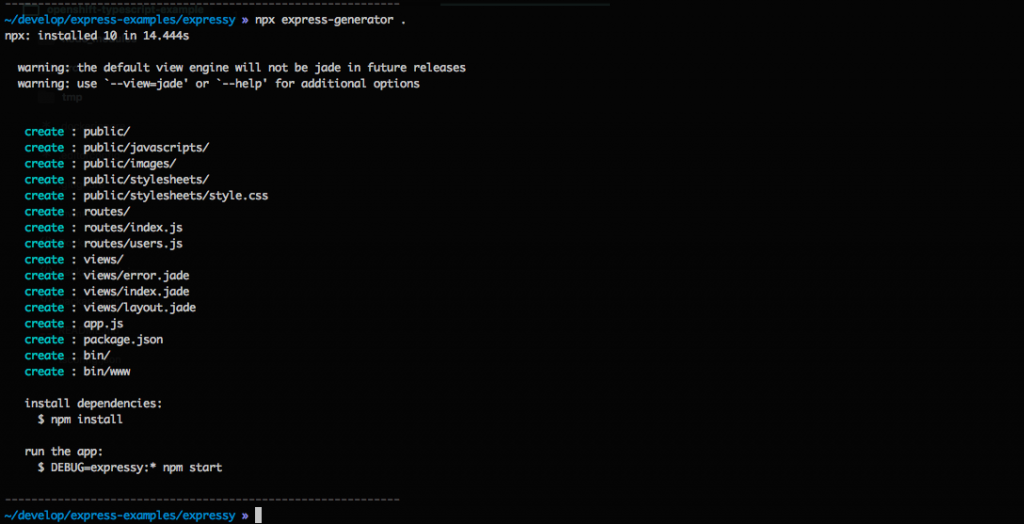
express-generator also gives us some instructions on how to install the dependencies and then how to run the application. You can skip that for now.
Update the package.json File
Now that we created our basic Express application using one command, we need to add one thing to package.json before we deploy our app.
We need to pass a PORT environment variable to our start script.
One way to do this is to open a text editor and do it that way, but that would add a few more steps. To do this in one command, we can use the json module.
$ npx json -I -f package.json -e 'this.scripts.start="PORT=8080 node ./bin/www"'
As before, we are using the npx command to allow us to not have to install the json module globally.
Let's see what is going on with the options passed to the json module.
-I -f package.json means that we want to edit in place the file package.json. The -e option will execute some JavaScript code, which in this case is setting the scripts.start property from package.json with the string "PORT=8080 node ./bin/www".
For more information on the json module, check out the documentation.
Deploy the Application to OpenShift
And now, the final step is to run this command:
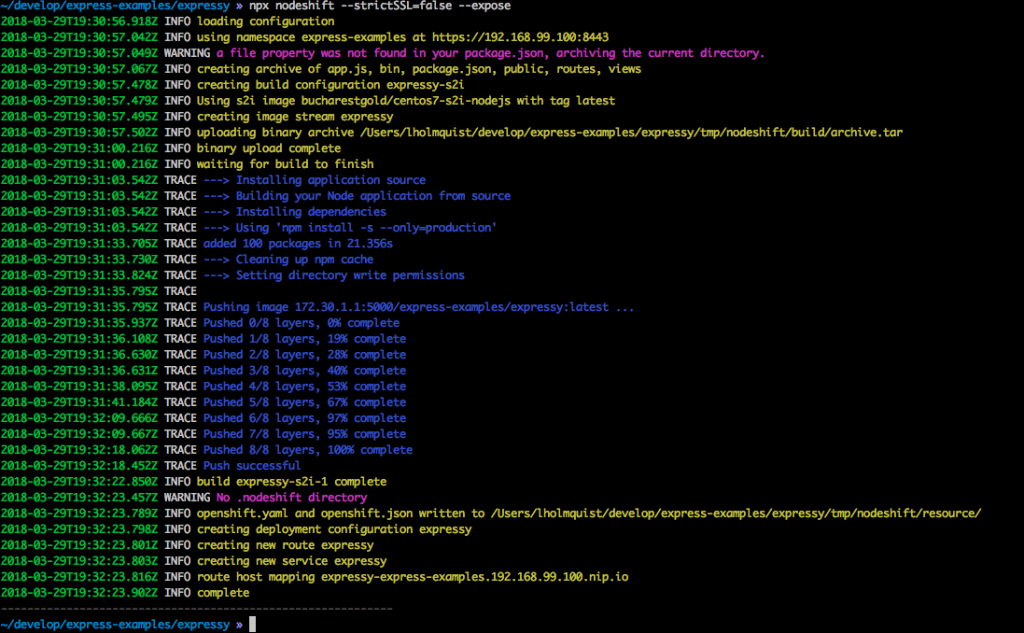
$ npx nodeshift --strictSSL=false --expose
Here, we are using the nodeshift module to deploy our application. nodeshift is a CLI or programmable API that helps with deploying Node apps to OpenShift.
npx is doing the same thing as in the previous examples.
nodeshift is using two flags. The first, strictSSL=false, is needed when deploying to minishift or someplace that is using a self-signed certificate. If we were deploying to a real OpenShift cluster, we could leave that out.
The second flag, expose, tells nodeshift that it should create a route for us, which allows our application to be seen by the outside world. (If you are running minishift locally, only you can see the application.)
The output of this command will look something like this:
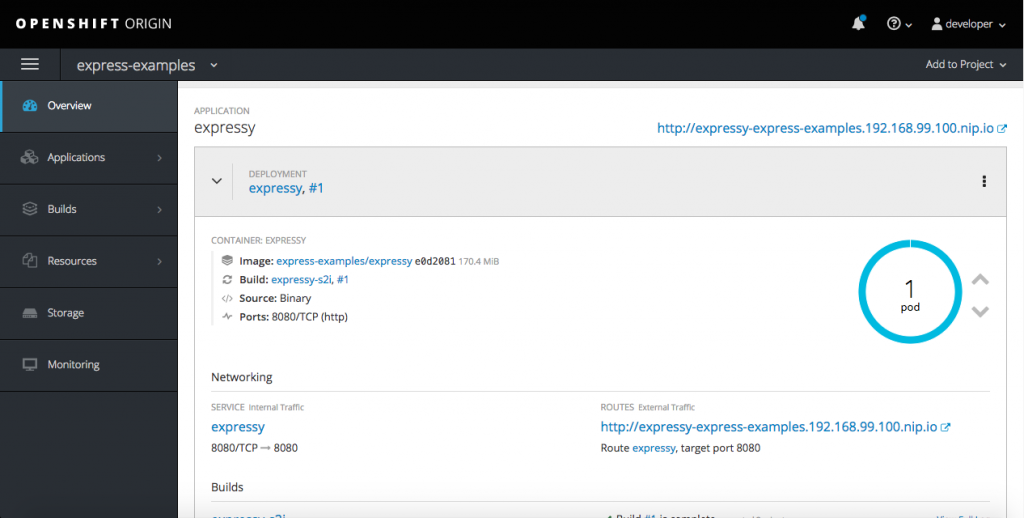
If we head over to the web UI of our running minishift, we can see that the created pod is now running successfully.
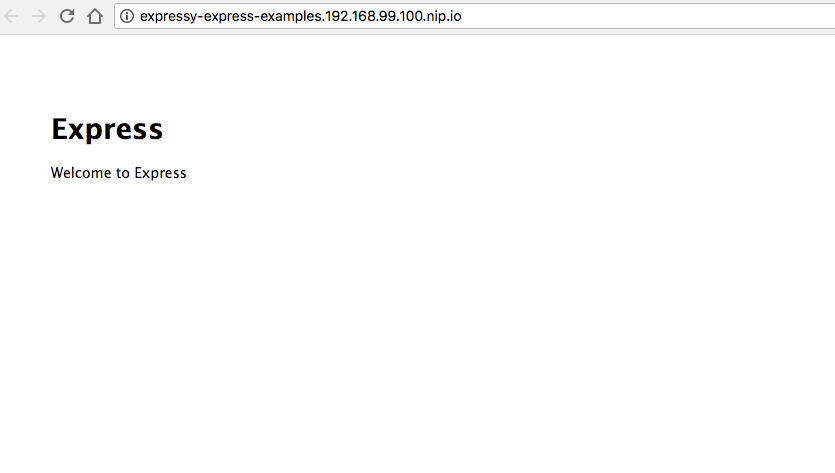
Then, if we click the link, we can see our example app running:
Note: The example above will use the latest community s2i images (9.x at the time of this writing). To use a fully supported version of Node.js on OpenShift all you need is to add the "--dockerImage" flag.
This will integrate the Red Hat OpenShift Application Runtime version Node.js (8.x) which you can get full production and developer support as part of our product subscription.
This might look something like this:
$ npx nodeshift --strictSSL=false --expose --dockerImage=registry.access.redhat.com/rhoar-nodejs/nodejs-8
Recap
In this post, the commands were a little spread out, so let's see them all together again:
$ npx express-generator .
$ npx json -I -f package.json -e 'this.scripts.start="PORT=8080 node ./bin/www"'
$ npx nodeshift --strictSSL=false --expose
The example app we created was very simple, but it shows how quickly you can get started using Node.js on OpenShift.
Last updated: January 12, 2024