Red Hat JBoss EAP 6 introduced some new concepts like configuration simplification, Modularity, new management CLI , user-friendly management console and an amazing feature called "Domains". Domain mode changes the way applications are deployed on EAP instances.
JBoss EAP 7.0 was just released and announced by Red Hat.
In this series of articles, I will present several ways to deploy an application on an EAP Domain. The series consists of four parts. Each one will be a standalone article, but the series as a whole will present a range of useful topics for working with JBoss EAP.
- Part 1: Set up a simple EAP 7.0 Domain (this article).
- Part 2: Domain deployments through the new EAP 7.0 Management Console
- Part 3: Introduction to DMR (Dynamic Model Representation) and domain deployments from the Common Language Interface CLI
- Part 4: Domain deployment from the REST Management API
Part 1: Set up a simple EAP 7.0 Domain.
The JBoss EAP "Domain" mode differs from traditional Standalone mode and allows you to deploy and manage EAP instances in a multi server topology. In this first article we are going to set up a JBoss EAP 7.0 domain with the following requirements:
- 1 Domain Controller on a machine called host0
- 1 Host Controller on a machine host1 with two EAP instances Server11 and Server12
- 1 Host Controller on a machine host2 with Three EAP Instances Servers21, Server22 and Server23
- Host0 should be run as the master controller,
- Host1 and Host2 are slaves connecting to Host0
- Server11 and Server21 are members of the primary server group ( name=primary-server-group)
- Server12 and Server22 belong to the secondary server group (name=secondary-server-group)
- Server23 is the only member of the singleton server group ( name= singleton-server-group)
- In real life Machine Host1, Host2 are mostly in different physical location but for the purpose of this tutorial we are going to simulate them on the same localhost using a signed EAP 6.4 installation and different configuration folders for each Machine.
- To keep it simple we will not cover JVM Configuration in depth details in this part.

Workspace Setup
To complete the installation step we are first going to prepare a the workspace, create the directory structure, download and install EAP 7.0, then configure master and slave hosts.
I will use ~/BlogWorkspace/EAPDomains as root folder for this tutorial, but you are free to use what you want. Let us export this folder as $EAP_DOMAIN to keep it simple in the next steps.
In this root folder, you should create a labs subfolder, and 3 subfolders therein, for the different hosts config files:
>export EAP_DOMAIN=~/BlogWorkspace/EAPDomains
>cd $EAP_DOMAIN
>mkdir labs
>cd labs
>mkdir host0 host1 host2
Install JBoss EAP
cd $EAP_DOMAIN
Visit Red Hat Developers to download the EAP 7.0 zip file and extract it into the $EAP_DOMAIN/labs folder.
>unzip jboss-eap-7.0.0.zip -d ./labs/
You will now have the following subfolders in labs:
host0
host1
host2
jboss-eap-7.0
In real life, you would have a separate installation binary for each host, but for this tutorial we will use the same installation binaries shared by the 3 hosts.
The configuration files to be use for each host will be specified in the startup command. This is a best practice that allows you to run multiple instances of EAP in Domain mode on the same machine using the same installation files. It also allows you to upgrade to a newer version of EAP without affecting or overwriting your configuration files.
Create Management User
Create a Management User(option a) admin/Admin01# using the add-user script:
[../BlogWorkspace/EAPDomains/labs/jboss-eap-7.0/bin]>./add-user.sh
Creating configuration files
Now we are going to replicate the current configuration on the 3 individual hosts before continuing. Initialize configuration files for each host by copying the jboss-eap-7.0/domain folder into each of the three hosts.
[../BlogWorkspace/EAPDomains/labs]>cp -r jboss-eap-7.0/domain/ host0/domain

[../BlogWorkspace/EAPDomains/labs]>cp -r jboss-eap-7.0/domain/ host1/domain

[../BlogWorkspace/EAPDomains/labs]>cp -r jboss-eap-7.0/domain/ host2/domain

[../BlogWorkspace/EAPDomains/labs]>
This should include three subfolders in hostX/domain:
configuration/
data/
tmp/
Now we have the basic configuration on which we can rely to setup a Master Domain controller on host0 and slaves Host controllers on host1 and host2.
Configure the Domain Controller/Master on Host0
The domain controller configuration is set in two files: host.xml, and domain.xml
Host.xml
Using your favorite text editor, Edit the host-master.xml located in host0/domain/configuration
Replace the hostname master with host0-master:
<host name="host0-master" xmlns="urn:jboss:domain:1.7">
Check the Domain controller configuration:
<domain-controller>
   <local/>
</domain-controller>
This means host0 is our domain controller; we will see the difference with simple host controller in the next section.
Now check the management interface parameters:
<inet-address value="${jboss.bind.address.management:127.0.0.1}"/>
Indicate the management address of the domain controller:
<socket interface="management" port="${jboss.management.native.port:9999}"/>
Indicate the native port on which this domain controller is listening:
<socket interface="management" port="${jboss.management.http.port:9990}"/>
Indicate the HTTP port to access the management Interface ( REST API or Management Console)
Domain.xml
The domain.xml file contains the global domain configuration, but for now we are just going to create the three servers groups that will be referenced by host1 and host2.
JVM and socket binding groups are defaulted and we will customize these items on each host. Add the following items to your server-groups section in order to add primary, secondary and singleton server group:
<server-group name="primary-server-group" profile="full">
            <jvm name="default">
                <heap size="1000m" max-size="1000m"/>
                <permgen max-size="256m"/>
            </jvm>
            <socket-binding-group ref="full-sockets"/>
        </server-group>
<server-group name="secondary-server-group" profile="full">
            <jvm name="default">
                <heap size="1000m" max-size="1000m"/>
                <permgen max-size="256m"/>
            </jvm>
            <socket-binding-group ref="full-sockets"/>
        </server-group>
        <server-group name="singleton-server-group" profile="default">
            <jvm name="default">
                <heap size="1000m" max-size="1000m"/>
                <permgen max-size="256m"/>
            </jvm>
            <socket-binding-group ref="full-sockets"/>
        </server-group>
Now we can start the Domain controller.
Start the domain controller
[…/labs/jboss-eap-7.0/bin]>./domain.sh --host-config=host-master.xml -Djboss.domain.base.dir=../../host0/domain/
By default the domain.sh script start with file host.xml, so we have to use the option --host-config to point on host-master.xml,
Second we have to specify the boss base dir for host0: host0/domain
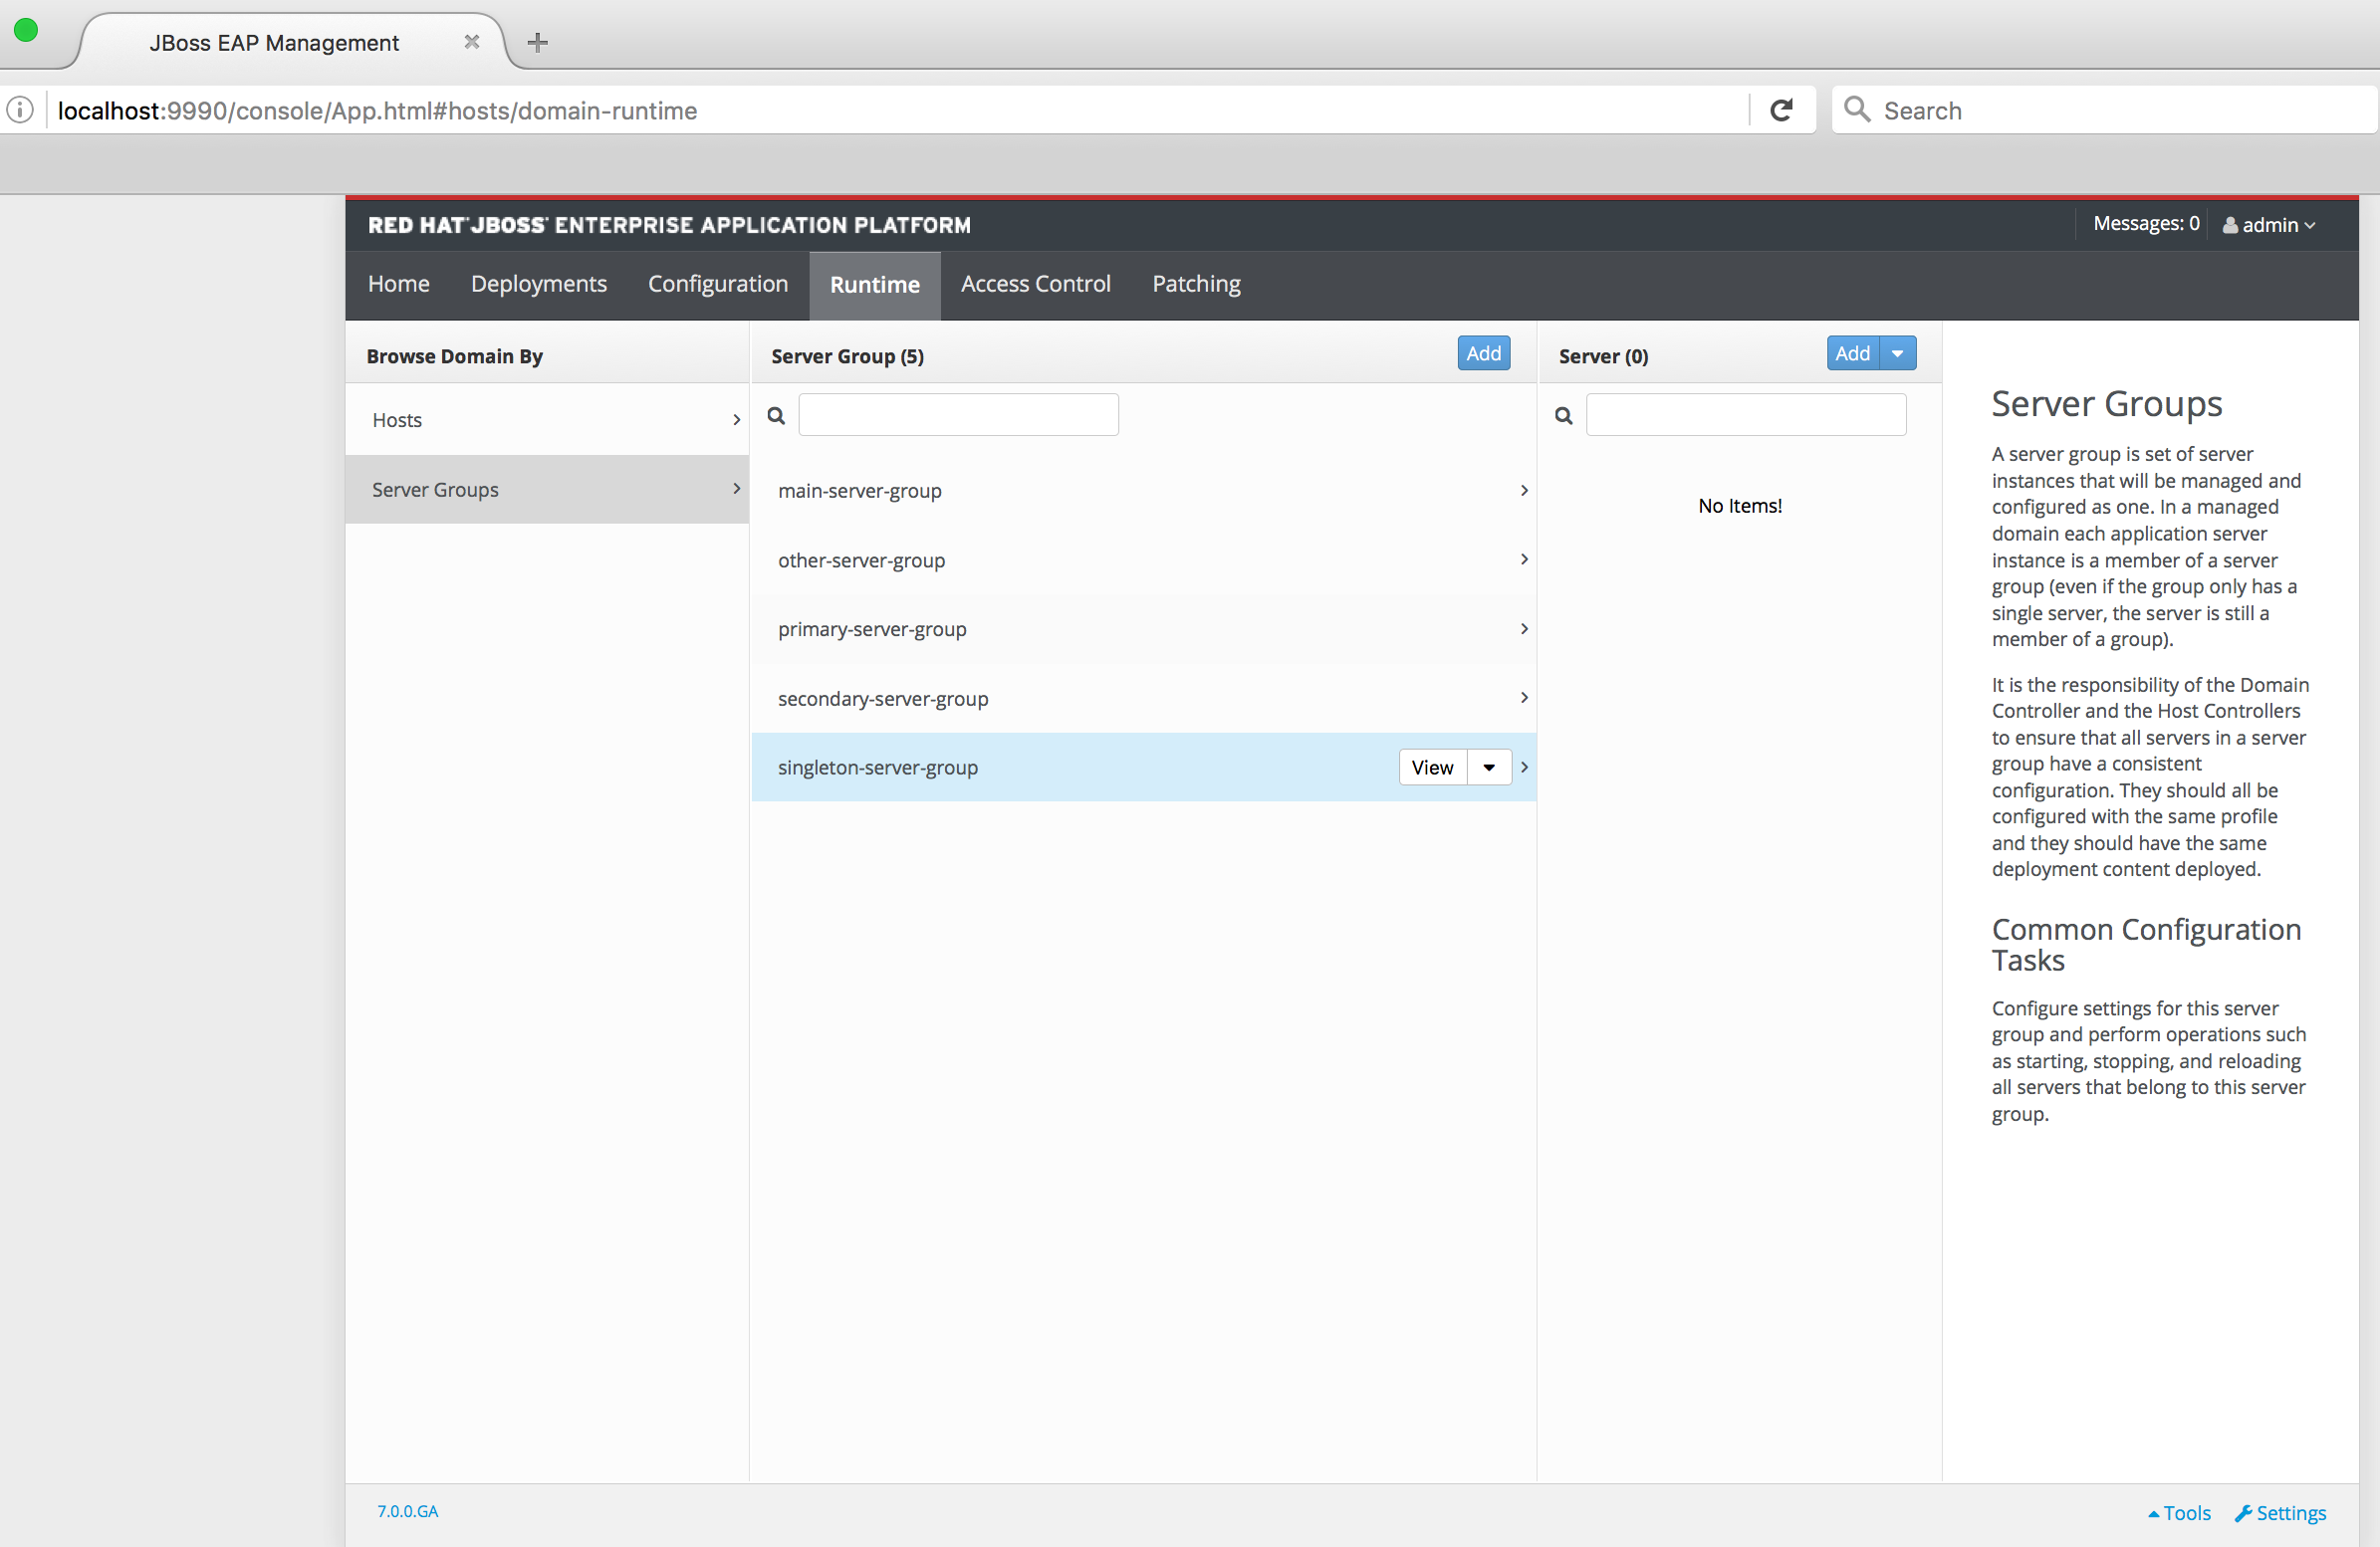
Now we can connect on the domain using http://localhost:9990 using the admin/Admin01# user and browse the domain configuration. You can see the host0-master and the different server groups we added in domain.xml. All these configurations can be done on the management console as well:
Configure the Host Controller on Host1 and Host2
A Host controller interacts with the domain master controller to manage Servers instances located on the same machine. Each controller is configured in a domain/configuration/host.xml file.
To set up a slave on host1, the first thing to do is to register the remote domain controller in host-slave.xml file. Here is the general structure of this file:
<host name="host1" xmlns="urn:jboss:domain:1.7">
    <system-properties>
        ...for defining system properties
    </system-properties>
    <paths>
        ...for defining filesystem paths of the host
    </paths>
    <vault>
         ...for storing encrypted passwords
    </vault>
    <management>
        ...the management interfaces: Make sure your are not using the same port with host0 or host2
    </management>
    <domain-controller>
        ...the settings for how to connect to the remote domain controller ( host0-master)
    </domain-controller>
    <interfaces>
        ...interfaces are defined here
    </interfaces>
    <jvms>
        ...JVMs definitions
    </jvms>
    <servers>
   ...Servers hosted on this host
    </servers>
</host>
To reference the remote domain controller, we have to use the following configuration in order to reference the master defined on host0:
<domain-controller>
   <remote host=« ${jboss.domain.master.address:127.0.0.1}" port="${jboss.domain.master.port:9999}" security-realm="ManagementRealm"/>
</domain-controller>
Because the native management interface on host0 domain controller is already using the default port 9999 to avoid port conflicts, we are going to use ports 19999 for the host1 native management interface. Use 29999 for host2. Note that we do not have an HTTP management interface for slave host controllers. The domain HTTP management interface on host0:9990 is enough .
<socket interface="management" port="${jboss.management.native.port:19999}"/>
Now we are going to set up the servers --- Server11 and Server12 of host1 in the servers section:
<servers>
 <server name="Server11" group="primary-server-group">
      <socket-bindings port-offset="100"/>
 </server>
 <server name="Server12" group="secondary-server-group">
      <socket-bindings port-offset="200"/>
 </server>
</servers>
The group attribute refers to server group name defined in domain.xml on host0, to avoid port conflicts, we are assigning a port offset of 100 to Server11 and 200 to Server12. With this configuration, for example, since the full-socket/socket-binding used port 8080 for HTTP traffic, server11 will listen on http port 8180, and server12 on port 8280
Now we can start the host1 controller with the following command:
[~/BlogWorkspace/EAPDomains/labs/jboss-eap-7.0/bin ]>./domain.sh --host-config=host-slave.xml -Djboss.domain.base.dir=../../host1/domain/
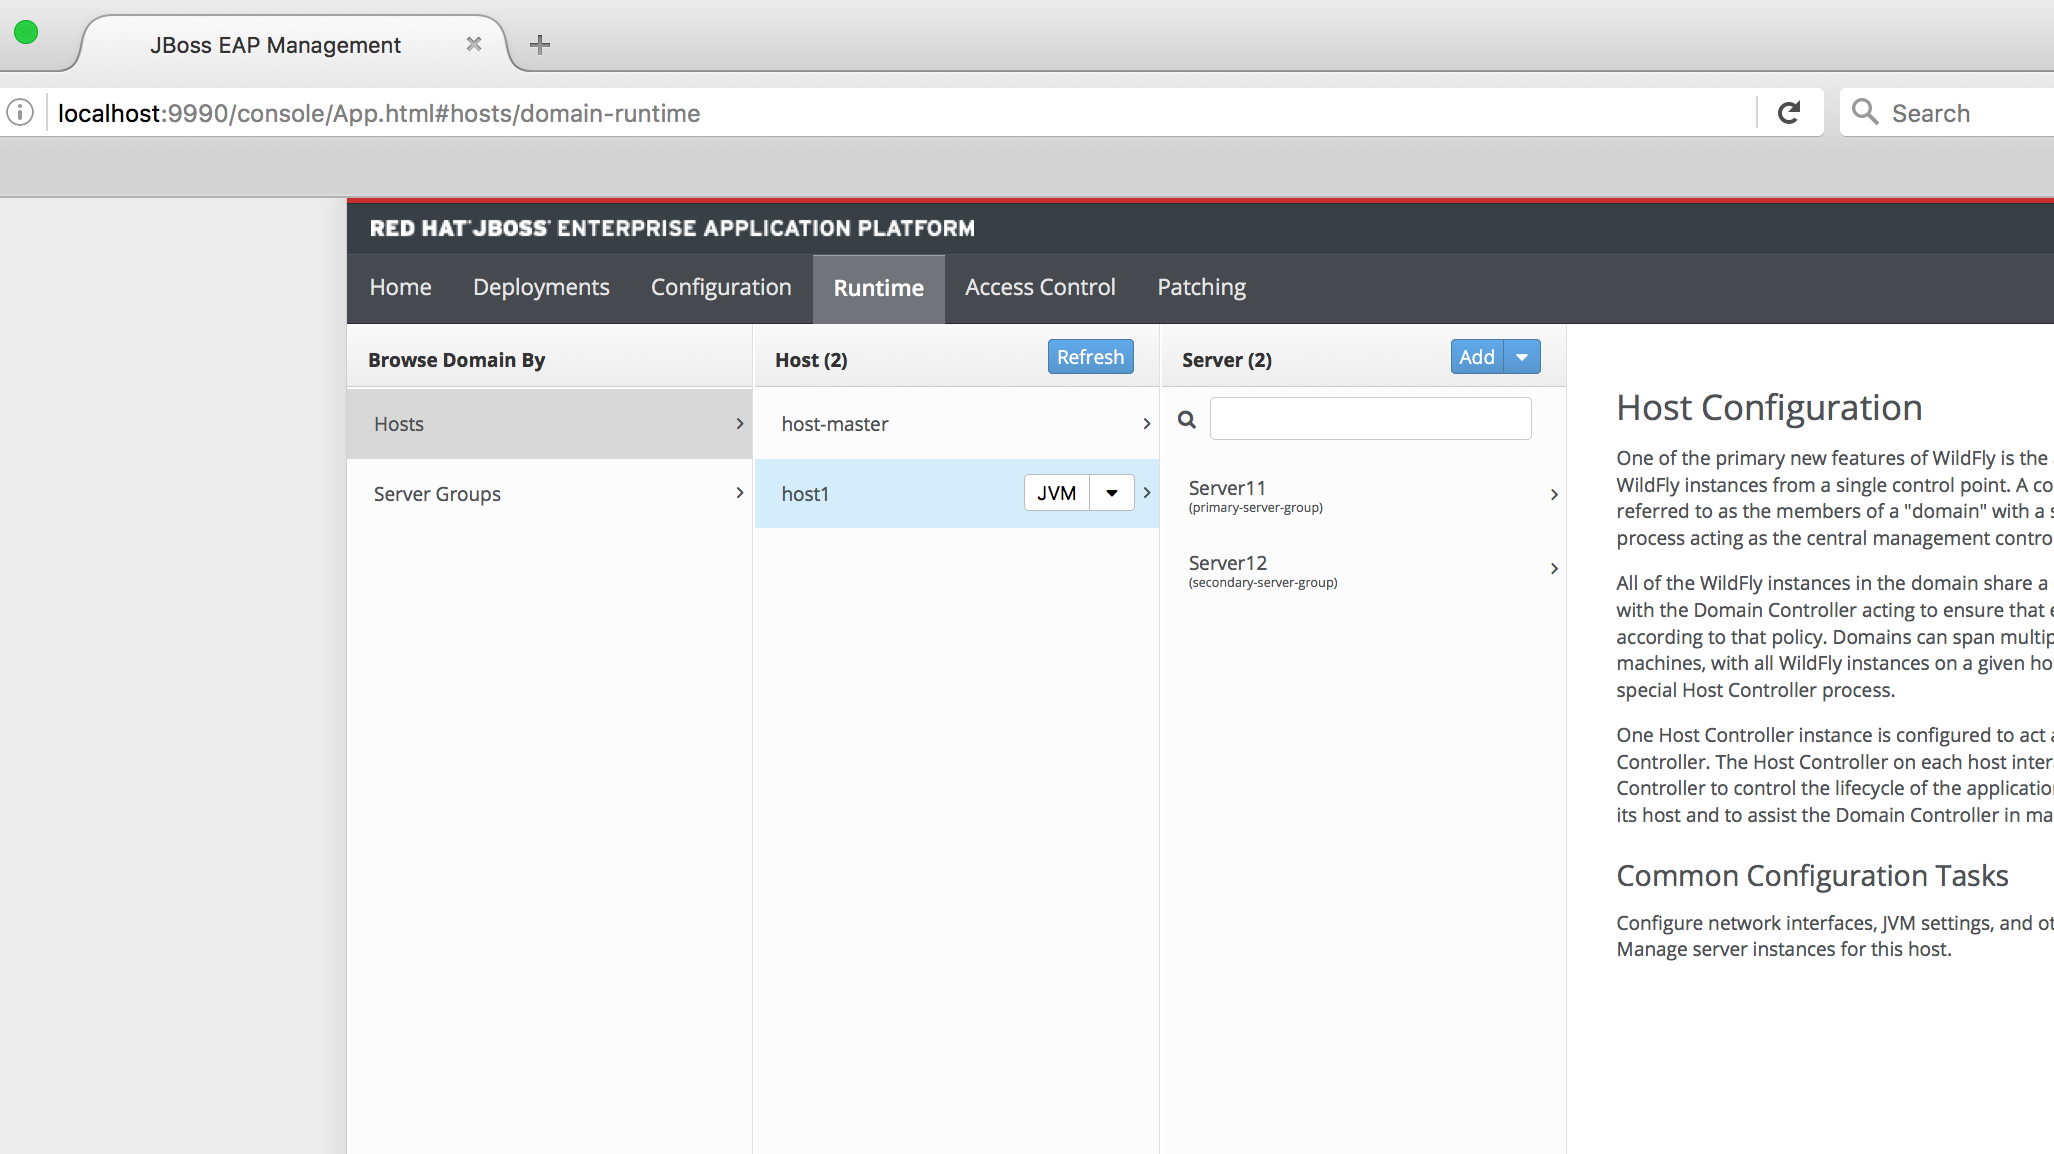
You can see servers11 and server12 startup logs
[Server:Server12] 16:08:11,607 INFO [org.jboss.as.connector.services.resourceadapters.ResourceAdapterActivatorService$ResourceAdapterActivator] (MSC service thread 1-5) IJ020002: Deployed: file://RaActivatoractivemq-ra
[Server:Server12] 16:08:11,608 INFO [org.jboss.as.connector.deployment] (MSC service thread 1-4) WFLYJCA0002: JCA liée ConnectionFactory [java:/JmsXA]
[Server:Server12] 16:08:11,608 INFO [org.wildfly.extension.messaging-activemq] (MSC service thread 1-3) WFLYMSGAMQ0002: Object de messagerie lié au nom jndi java:jboss/DefaultJMSConnectionFactory
[Server:Server12] 16:08:11,700 INFO [org.jboss.as] (Controller Boot Thread) WFLYSRV0025: JBoss EAP 7.0.0.GA (WildFly Core 2.1.2.Final-redhat-1) a démarré en 4070ms - 297 sur 583 services ont démarré (384 services sont passifs ou à la demande)
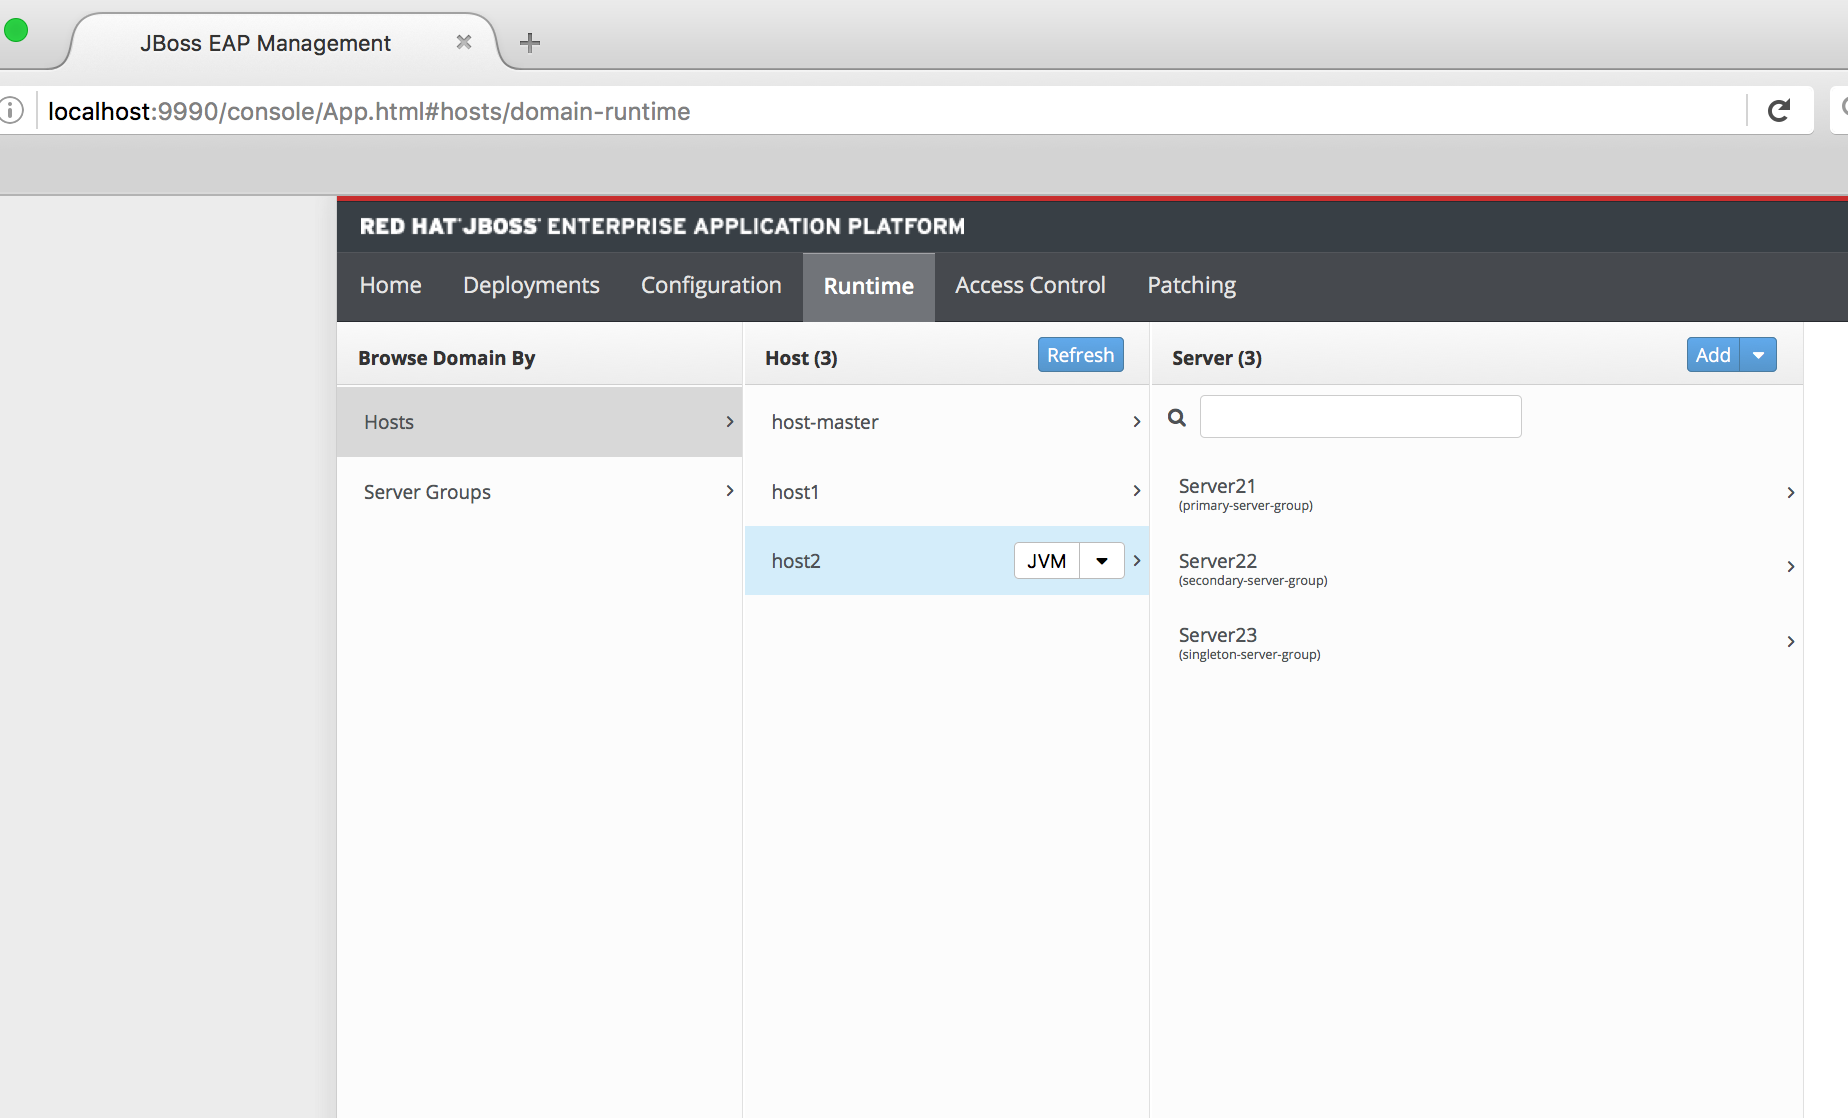
In this article, we are showing only the configuration steps to set up Host1, the process is similar for Host2 but you can use the management console to complete the configuration after staring host2 with the following command:
[~/BlogWorkspace/EAPDomains/labs/jboss-eap-7.0/bin ]>./domain.sh --host-config=host-slave.xml -Djboss.domain.base.dir=../../host2/domain/
On socket binding Do the same port-offset configuration on host2 to have http trafic on the following ports
server21(8380), server22(8480) and server23(8580)

<servers>
        <server name="Server21" group="primary-server-group">
            <socket-bindings port-offset="300"/>
        </server>
        <server name="Server22" group="secondary-server-group">
            <socket-bindings port-offset="400"/>
        </server>
       <server name="Server23" group="singleton-server-group">
            <socket-bindings port-offset="500"/>
        </server>
    </servers>
After setting up Host2, the domain configuration is complete and we can see our infrastructure topology with the list of EAP instances at http://localhost:9990/console/App.html#topology:
On EAP 6.4 the domain topology looks like this. 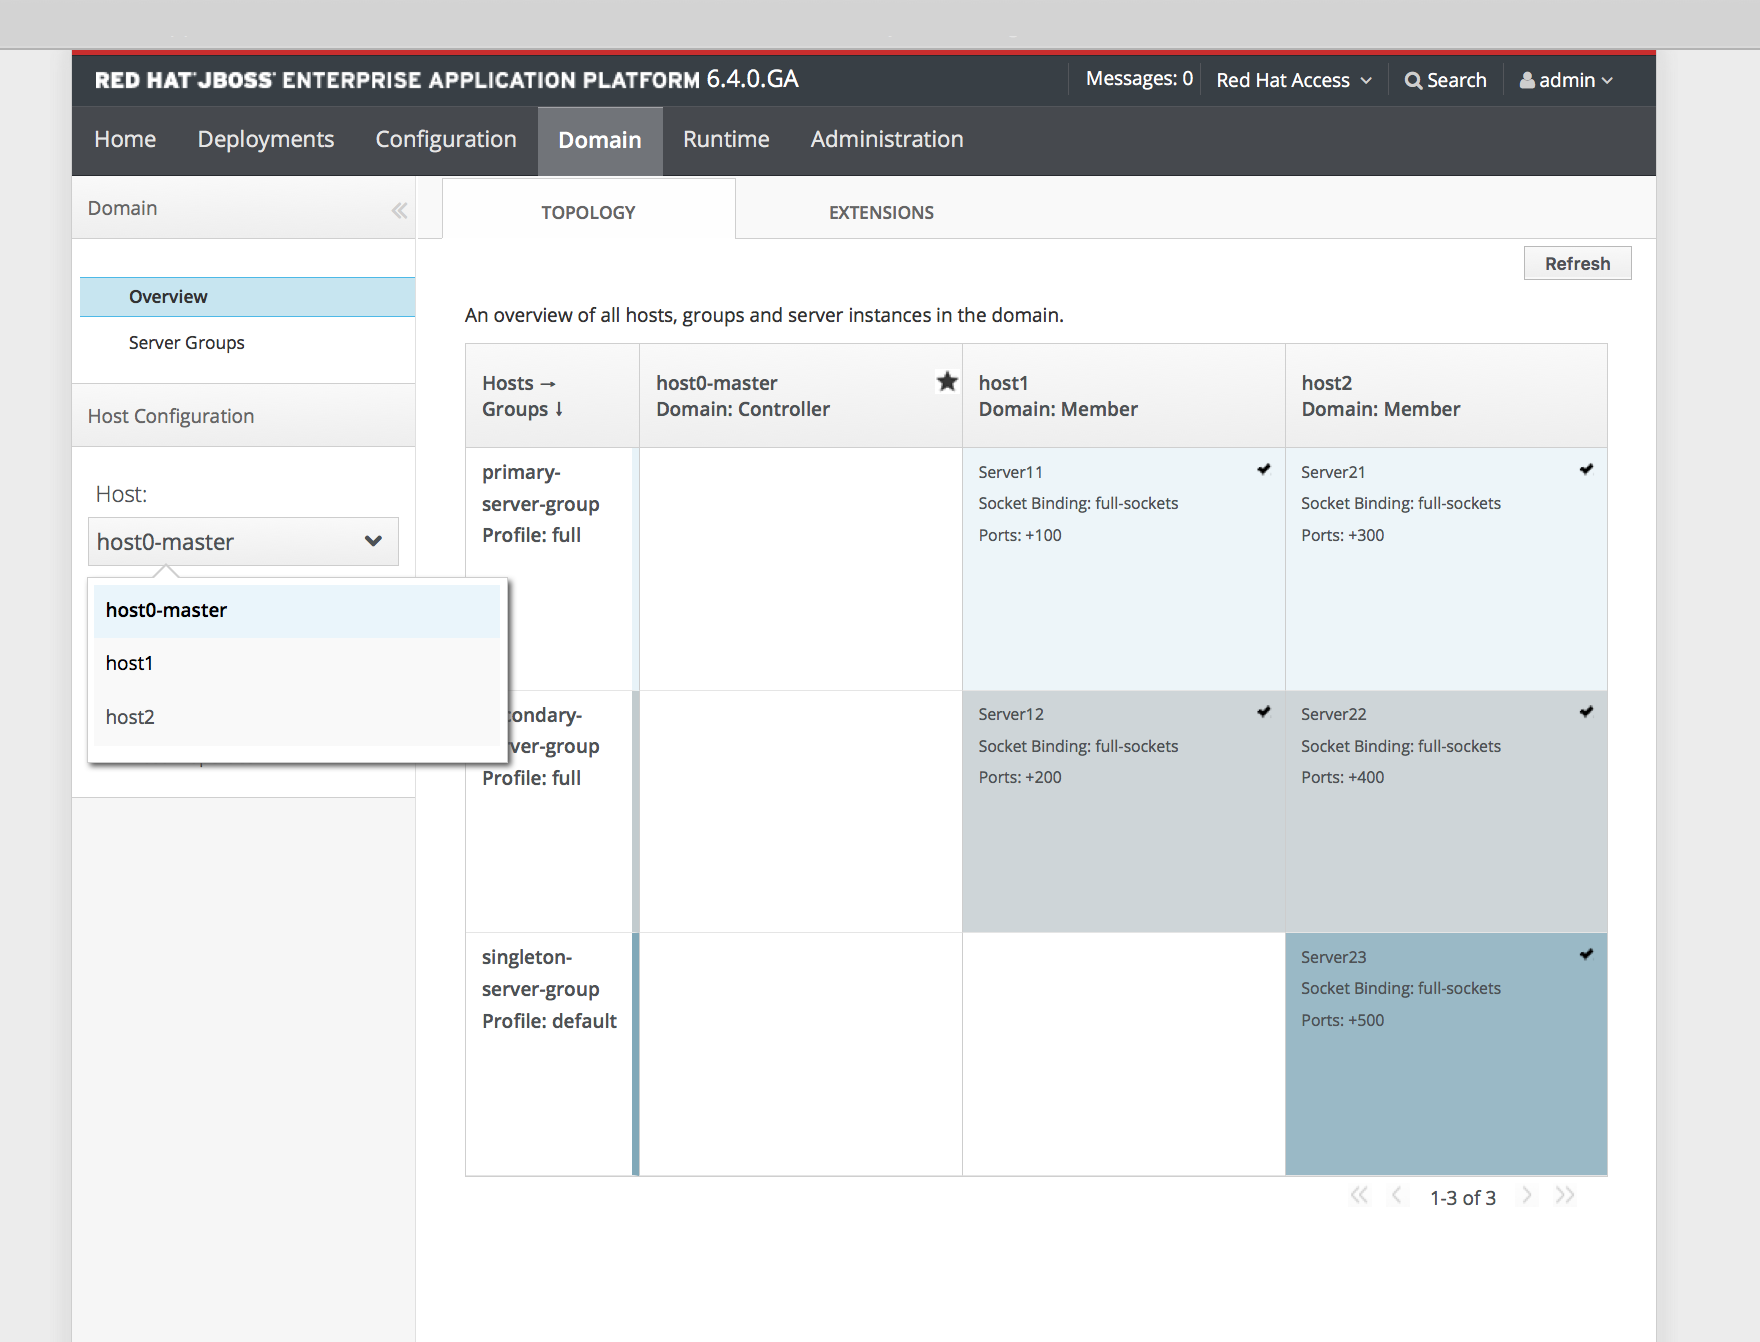
JBoss EAP 7 includes an updated management console user interface, including easier navigation, and much better support for large scale domain configurations.
In the next parts we will explore the different deployments options on this domain.
Lab Zip files
You can download the code for this lab at https://github.com/nelvadas/jboss-eap7-domains-labs
Last updated: February 22, 2024