In this article, we will set up a CI/CD pipeline. This integrated CI/CD workflow leverages Red Hat OpenShift Dev Spaces to provide developers with a consistent, containerized environment defined by a devfile.yaml. Then using a pipelines-as-code approach, the CI pipeline will initiate directly from Git events, which builds the Go binary, packages it using Buildah, and updates the deployment manifest with the new image tag. Red Hat OpenShift GitOps (ArgoCD) monitors that manifest, automatically reconciling the cluster state whenever the pipeline commits a change.
Set up the workflow
This workflow is seamless. First, you will load a Git project in Red Hat OpenShift Dev Spaces, then make a change via the IDE, and trigger a PipelineRun (Red Hat Openshift Pipelines). Upon success, OpenShift GitOps syncs the application, updating the latest application image.
Prerequisites:
- Golang project: We will use the linked golang project to work through this use case.
- Tekton Pipeline: We will use pipeline as code, where the pipeline is stored with the code.
- Dev file: To start a workspace, we will use following devfile.yaml.
Note: Fork the Git repository to follow along and create your own CI/CD pipeline. In case you have forked the repository, then you will have to change the GitHub URL with your own GitHub URL.
OpenShift Dev Spaces configuration
OpenShift Dev Spaces provides a consistent, containerized development environment defined by a devfile. Configure OpenShift Dev Spaces with the following steps.
Step 1. Install OpenShift Dev Spaces
First, install the OpenShift Dev Spaces operator on your cluster. You can install it via the OpenShift web console using the OperatorHub. Create the CheCluster (with default values) after installing OpenShift Dev Spaces.
Step 2. Define the dev environment
We will utilize a devfile.yaml to define the workspace. This file specifies the projects to clone, container components (i.e., runtime and tooling), and commands (i.e., build, run, test) available to the developer.
You can review the example Devfile configuration used for this article.
Step 3. Configure Git OAuth for workspace access
To ensure the workspace has the necessary permissions to interact with your Git provider (e.g., to push changes that trigger the pipeline), you must configure Git OAuth. This loads a personal access token (PAT) into the workspace upon startup.
You must register an OAuth application with your Git provider (e.g., GitHub) and create a Kubernetes secret containing the client ID and client secret in the namespace where the CheCluster was created.
- Navigate to GitHub Settings: Open your browser and go directly to the GitHub New OAuth Application page.
- Define the Application Name: In the Application name field, enter a name that helps you identify this connection (e.g., OpenShift-Dev-Spaces).
- Set the Homepage URL: Enter your specific OpenShift Dev Spaces address: https://<openshift_dev_spaces_fqdn>/
- Set the Authorization Callback URL: This is the most critical step for the handshake to work. Enter: https://<openshift_dev_spaces_fqdn>/api/oauth/callback
- Finalize Registration: Click the green Register application button at the bottom of the form.
Secure your credentials as follows:
- Create a secret: On the application's general settings page, look for the Client secrets section and click Generate a new client secret.
- Record the ID: Locate the client ID (a string of alphanumeric characters). Copy this and save it securely; you’ll need it for your OpenShift configuration.
- Secure the Secret: Copy the client secret immediately.
Apply the secret in the OpenShift cluster:
Create the secret by adding the client ID, client secret created in the previous section, and the GitHub URL.
kind: Secret
apiVersion: v1
metadata:
  name: github-oauth-config
  namespace: openshift-operators
  labels:
    app.kubernetes.io/part-of: che.eclipse.org
    app.kubernetes.io/component: oauth-scm-configuration
  annotations:
    che.eclipse.org/oauth-scm-server: github
    che.eclipse.org/scm-server-endpoint: https://github.com
    che.eclipse.org/scm-github-disable-subdomain-isolation: 'false'
type: Opaque
stringData:
  id: CLIENT_ID_FROM_GIT_OAUTH_APP
  secret: CLIENT_SECRET_FROM_GIT_OAUTH_APP
Apply the secret in OpenShift cluster as follows.
$ oc apply -f - <<EOF
<Secret_prepared_in_the_previous_step>
EOF
ArgoCD and application creation
We use Red Hat OpenShift GitOps (ArgoCD) to manage the deployment of the application. It continuously reconciles the state in the Git repository to the OpenShift cluster. In this article, we will update the image tag to the latest version and allow OpenShift GitOps to reconcile the updated deployment to the OpenShift cluster.
Step 1. Install and configure the namespace
Install the Red Hat OpenShift GitOps Operator. For this POC, we will use a specific namespace for our application testing.
Create the namespace pipeline-test.
$ oc new-project pipeline-testNext, label the namespace. To allow the default ArgoCD instance (running in openshift-gitops) to manage resources in this new namespace, you must apply a specific label.
$ oc label namespace pipeline-test argocd.argoproj.io/managed-by=openshift-gitopsThis enables the ArgoCD instance to manage your namespace.
Step 2. Create and apply the ArgoCD application
You can create the application using the ArgoCD dashboard or CLI.
- Source: Point to your Git repository URL and the specific path (e.g., app).
- Destination: Set the server to
https://kubernetes.default.svcand the namespace topipeline-test. - Sync policy: Set it to Automatic to ensure changes reflected in the Git repository are immediately synced to the cluster.
The following is the sample application which deploys the application manifest in pipelines-test namespace. This will create the list of objects in the OpenShift cluster and continue to track the manifests in the Git repository with live state in the OpenShift cluster.
apiVersion: argoproj.io/v1alpha1
kind: Application
metadata:
 name: simple-go
 namespace: openshift-gitops
spec:
 destination:
   namespace: pipeline-test
   server: https://kubernetes.default.svc
 project: default
 source:
   path: manifests
   repoURL: https://github.com/rishabhsvats/devspaces-pipeline-examples.git
   targetRevision: HEAD
 syncPolicy:
   syncOptions:
   - CreateNamespace=true
   ignoreDifferences:
   - group: route.openshift.io
     jsonPointers:
     - /spec/host
     kind: Route
Once the application is ready, we can apply the application in openshift-gitops namespace.
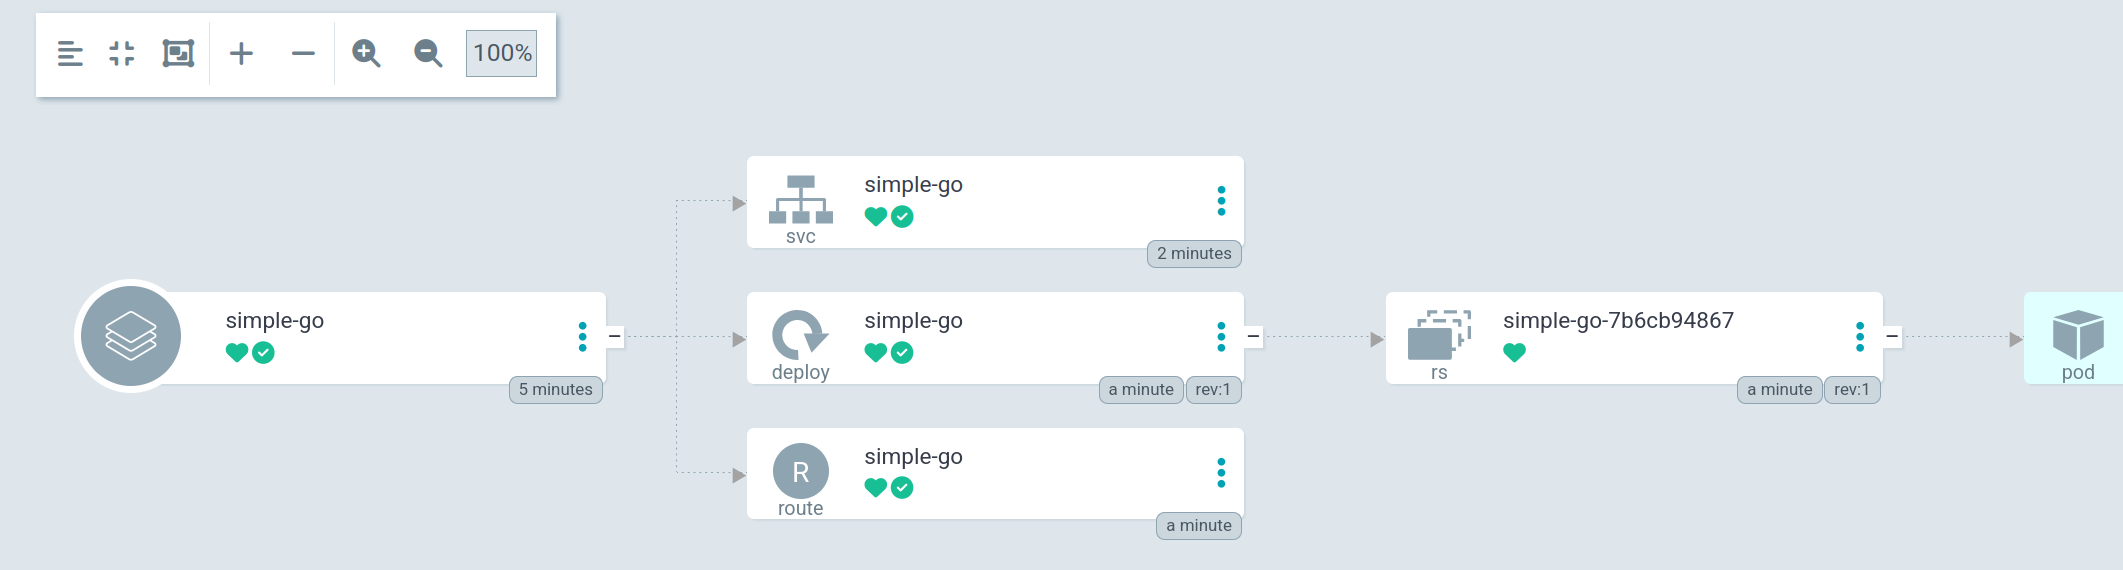
$ oc apply -f application.yamlFigure 1 shows the ArgoCD application status.
Pipeline configuration
We use OpenShift Pipelines (based on Tekton) to handle the CI process. This involves configuring pipelines-as-code to listen for Git events. In OpenShift Pipelines, pipeline-as-code refers to the practice of defining your CI/CD workflows using YAML manifests that are stored and versioned directly within your Git repository. Instead of configuring builds manually in a UI, you use the pipelines-as-code (PaC) controller to automatically trigger, manage, and report the status of these pipelines based on Git events like pull requests or pushes.
In this article, we will use the PipelineRun object placed in ./tekton/push.yaml.This PipelineRun is a pipelines-as-code definition that automates the end-to-end CI/CD lifecycle for a Go application whenever code is pushed or a pull request is opened on the main branch.
It sequentially executes four tasks: cloning the source code, building the Go binary, creating a container image via Buildah, and committing the updated image tag back to the Git deployment manifest. Once the deployment manifest updates, the OpenShift GitOps controller will reconcile the updated manifest in the OpenShift cluster.
Step 1. Install OpenShift Pipelines
Install the OpenShift Pipelines operator from the OperatorHub. This will automatically install pipelines-as-code in the openshift-pipelines namespace.
Step 2. Configure secrets and service accounts
Pipelines require credentials to interact with Git and image registries. Create a secret to hold the Git user credentials. This is required for the pipeline to clone private repositories or push tags.
- Type: kubernetes.io/basic-auth or kubernetes.io/ssh-auth.
- Annotation: Annotate the secret (e.g., tekton.dev/git-0: github.com) to ensure Tekton uses it for the specific Git host.
- The username will be the GitHub username, and the password will be the password access token (PAT).
apiVersion: v1
kind: Secret
metadata:
 name: git-credentials
 annotations:
   tekton.dev/git-0: https://github.com   # match your git host
type: kubernetes.io/basic-auth
stringData:
 username: GIT_USERNAME
 password: GIT_PERSONAL_ACCESS_TOKEN
Apply the secret in pipeline-test namespace.
$ oc apply -f - <<EOF
<Secret_prepared_in_the_previous_step>
EOF
Create a secret to allow the pipeline to push the built image to your container registry.
apiVersion: v1
kind: Secret
metadata:
 name: regcred
 annotations:
   tekton.dev/docker-0: https://index.docker.io/v1/   # replace with quay.io or registry URL
type: kubernetes.io/basic-auth
stringData:
 username: DOCKER_USERNAME
 password: DOCKER_PASSWORD
Apply the secret in pipeline-test namespace.
$ oc apply -f - <<EOF
<Secret_prepared_in_the_previous_step>
EOF
The Docker secret stores the docker config.json. This will be required to pull images from the Docker Registry. Extract the docker config.json from your local machine. This file will be generated as per the runtime you are using for Podman. You can find his file under ${XDG_RUNTIME_DIR}/containers/auth.json. The config.json/auth.json has been renamed to dockerconfig.json in the current use case.
$ oc create secret generic registry-credentials --from-file=.dockerconfigjson=dockerconfig.json --type=kubernetes.io/dockerconfigjson -n pipeline-testCreate a service account (pipeline-sa) and link the secrets previously created. This allows the TaskRuns associated with this service account to access the credentials automatically.
apiVersion: v1
kind: ServiceAccount
metadata:
 name: pipeline-sa
secrets:
 - name: regcred
 - name: git-credentials
imagePullSecrets:
 - name: registry-credentials
Apply the service account in the pipeline-test namespace. This will create a pipeline-sa service account.
$ oc apply -f - <<EOF
<service_account_prepared_in_the_previous_step>
EOF
Step 3. Security context constraints
To ensure the pipeline has the necessary permissions to build images (e.g., using Buildah) and manage resources, you must grant the service account appropriate security context constraints (SCC). The pipeline-sa is created in pipeline-test namespace, hence the following command has to execute in same namespace.
oc adm policy add-scc-to-user pipelines-scc -z pipeline-sa -n pipeline-testThe pipelines-scc is designed specifically for pipeline workloads.
Step 4. Git configuration: pipelines-as-code
To trigger pipelines via Git events (pull requests/push), you must configure a GitHub App as follows.
- Create GitHub app: Create a GitHub app manually in your organization settings.
- Permissions: Grant read & write access to checks, contents, and pull requests.
- Events: Subscribe to check run, commit comment, issue comment, pull request, and push events.
- Connect to cluster: Create a secret in the
openshift-pipelinesnamespace containing the GitHub app's private key, app ID, and webhook secret.
To set up a GitHub app for OpenShift Pipelines as code, follow these steps.
Register the GitHub app:
- Navigate to Settings > Developer settings > GitHub Apps > New GitHub App.
- Name: OpenShift Pipelines
- Homepage URL: OpenShift console URL.
- Webhook URL: Pipelines as code route URL.
- Webhook Secret: Generate a random string (e.g., via
openssl rand -hex 20).
Configure permissions and events:
Set the following permissions to ensure the app can interact with your code:
Category | Permission | Level |
Repository | Checks, Contents, Issues, Pull requests | Read & Write |
Repository | Metadata | Read-only |
Organization | Members | Read-only |
Subscribe to events: check run, check suite, commit comment, issue comment, pull request, and push.
Finalize and secure:
- Click Create GitHub App.
- Note the App ID displayed on the app's general page.
- In the Private keys section, click Generate Private key and download the .pem file.
- Install the app on your desired repositories.
Connect OpenShift to the Github app:
Create the secret for pipelines-as-code to access the newly created GitHub app.
$ oc -n openshift-pipelines create secret generic pipelines-as-code-secret \
--from-literal github-private-key="$(cat <PATH_TO_PRIVATE_KEY>)" \
--from-literal github-application-id="<APP_ID>" \
--from-literal webhook-secret="<WEBHOOK_SECRET>"
Step 5. Create a repository
Now let's define a repository custom resource (CR) in your target namespace. This CR links your specific Git repository URL to the namespace where the pipeline will run.
This informs pipelines-as-code to process events coming from that specific URL and execute the pipeline defined in the.tekton/ directory of your project.
$ oc -n pipeline-test create secret generic github-webhook-config \
  --from-literal provider.token="<GITHUB_PERSONAL_ACCESS_TOKEN>" \
  --from-literal webhook.secret="<WEBHOOK_SECRET_CREATED_IN_PREVIOUS_STEP>"
Once we create the secret, we can create the repository object as follows:
apiVersion: pipelinesascode.tekton.dev/v1alpha1
kind: Repository
metadata:
  name: git-devspaces-pipeline-examples
  namespace: pipeline-test
spec:
  git_provider:
    secret:
      key: provider.token
      name: github-webhook-config
    webhook_secret:
      key: webhook.secret
      name: github-webhook-config
  url: 'https://github.com/rishabhsvats/devspaces-pipeline-examples'
By following this configuration, you establish a closed loop: Code Change (DevSpaces) -> CI Build (OpenShift Pipelines) -> CD Sync (OpenShift GitOps).
Pipeline execution
Now we will execute the pipeline. First, log in into the OpenShift Dev Spaces dashboard (Figure 2).
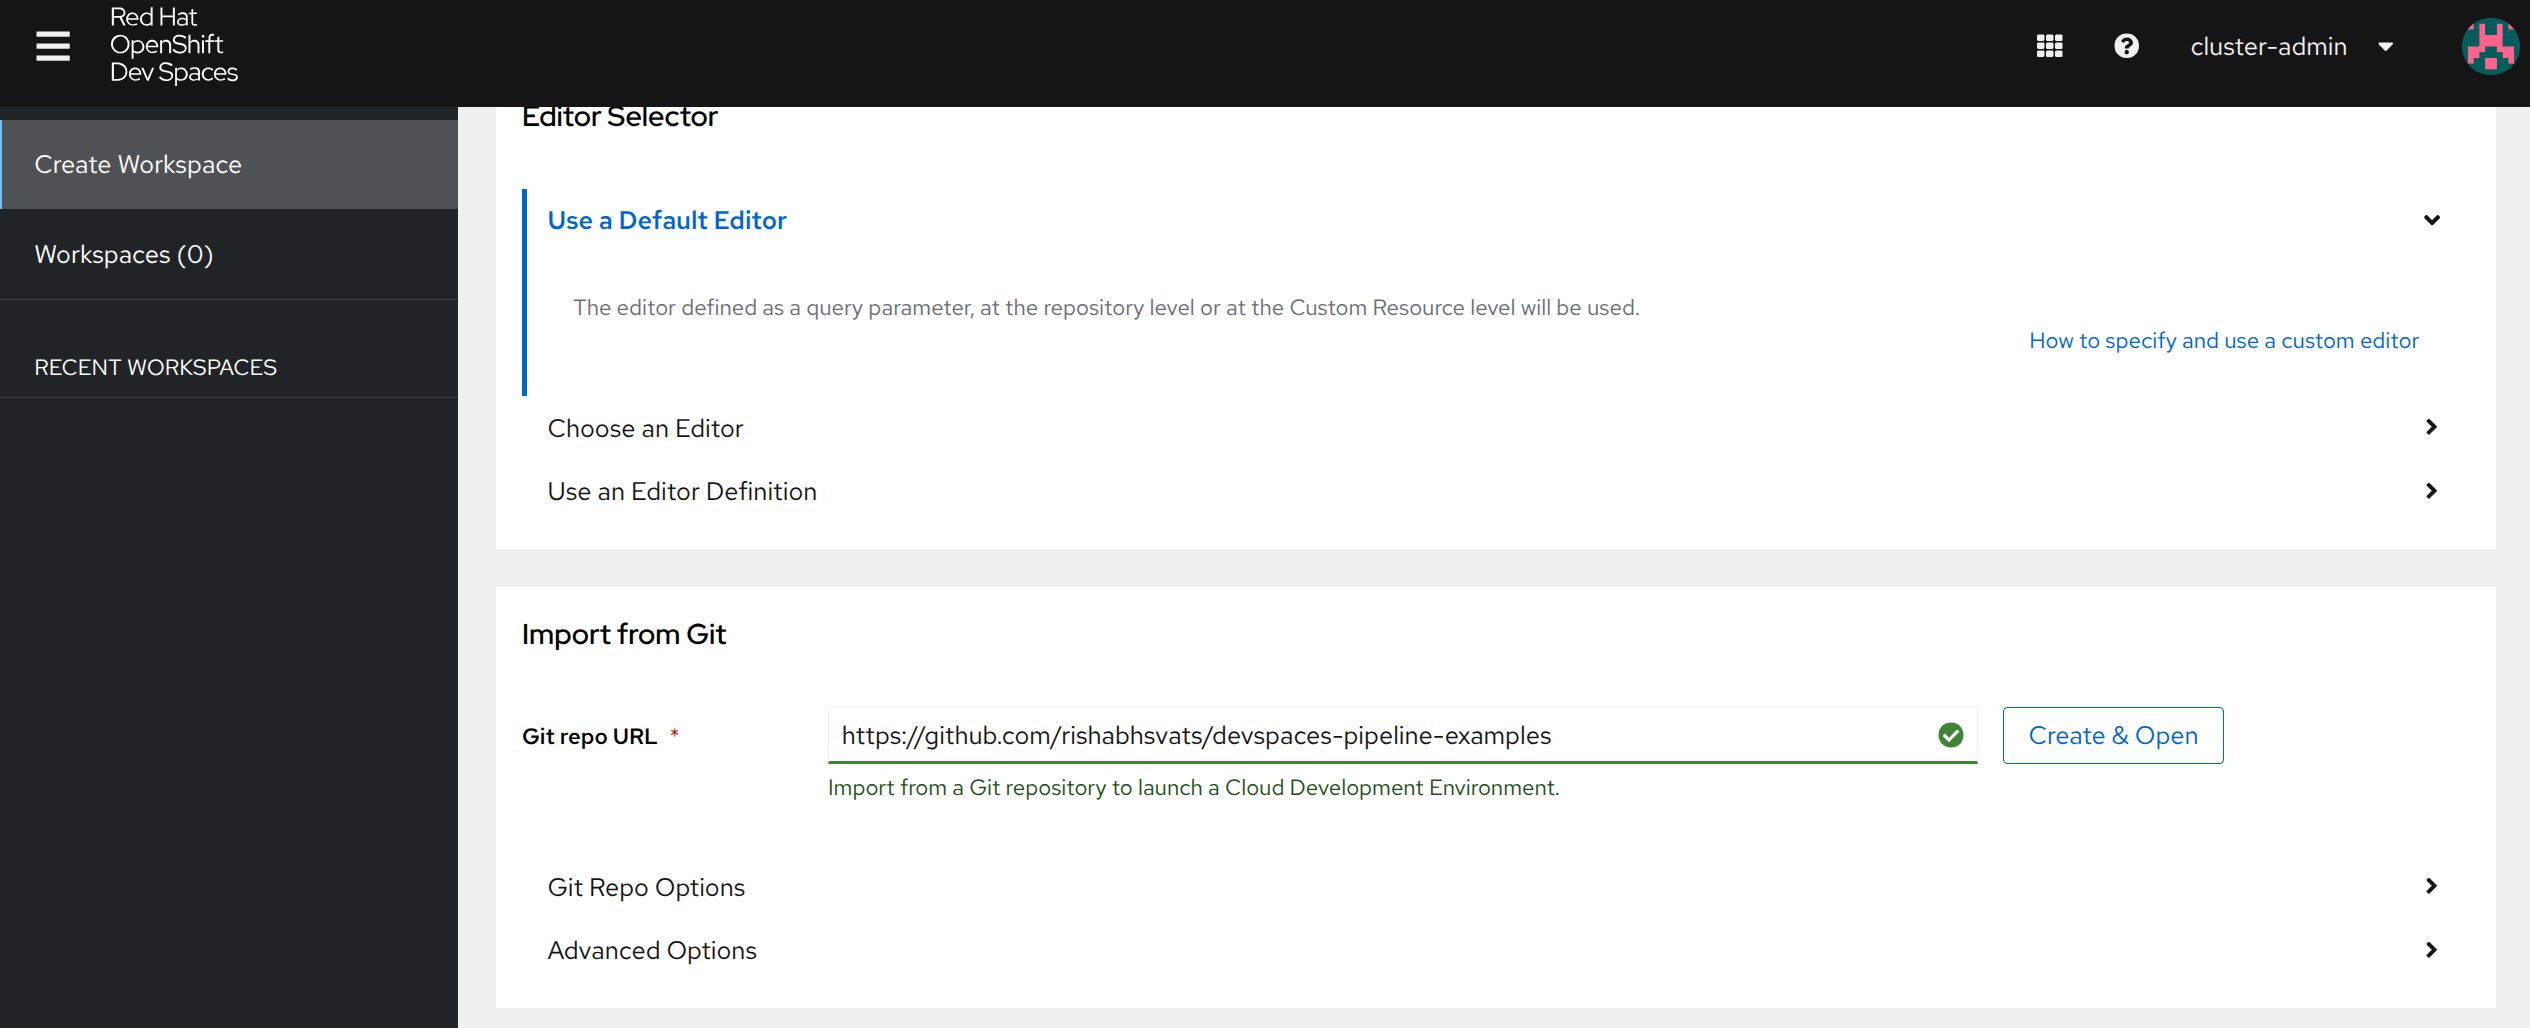
Next launch the workspace by passing the URL of the Git repository that contains the devfile (Figure 3).
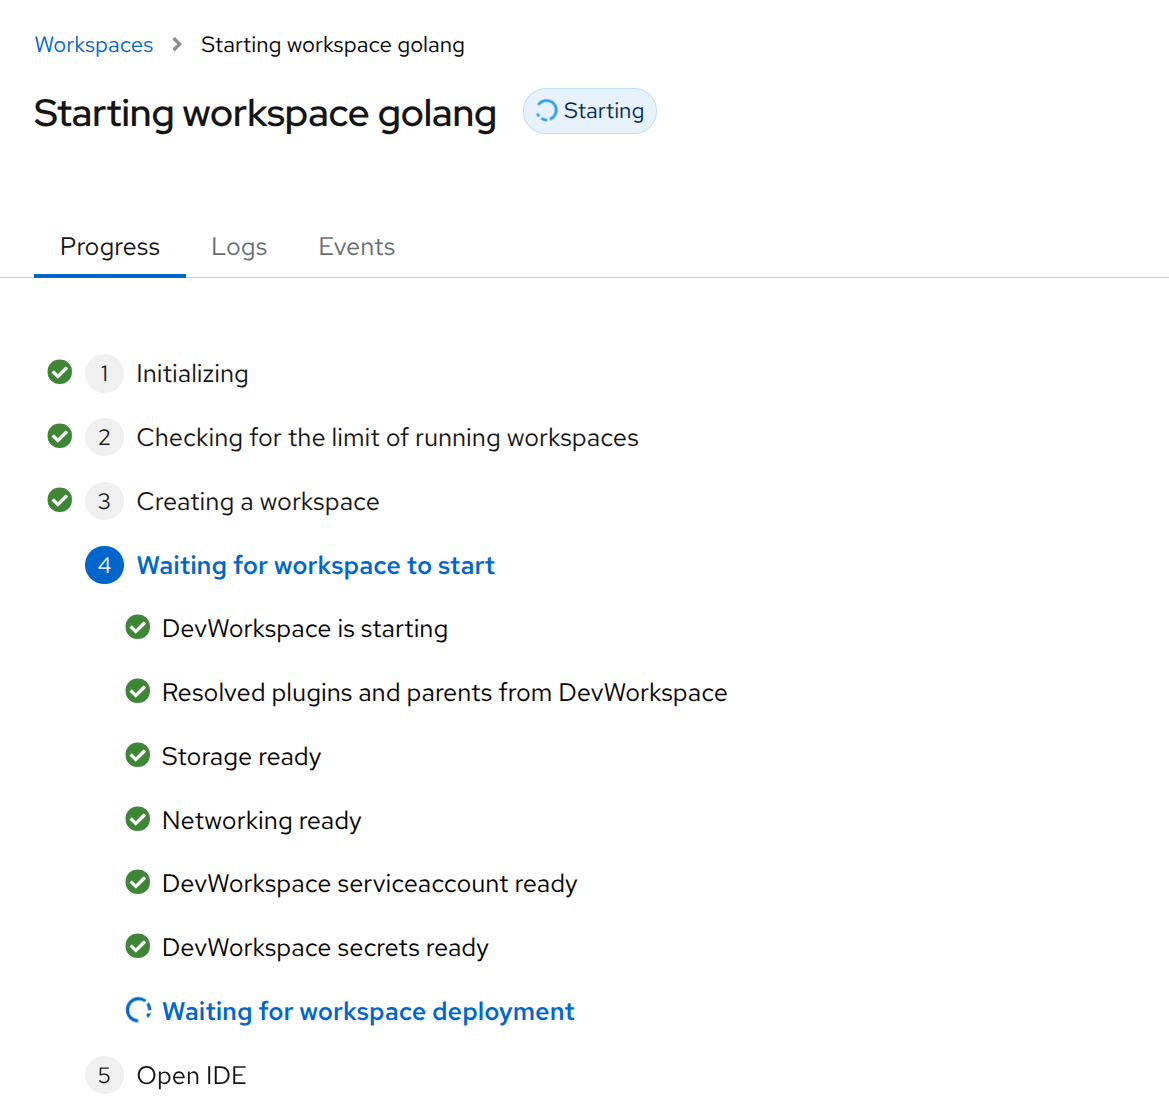
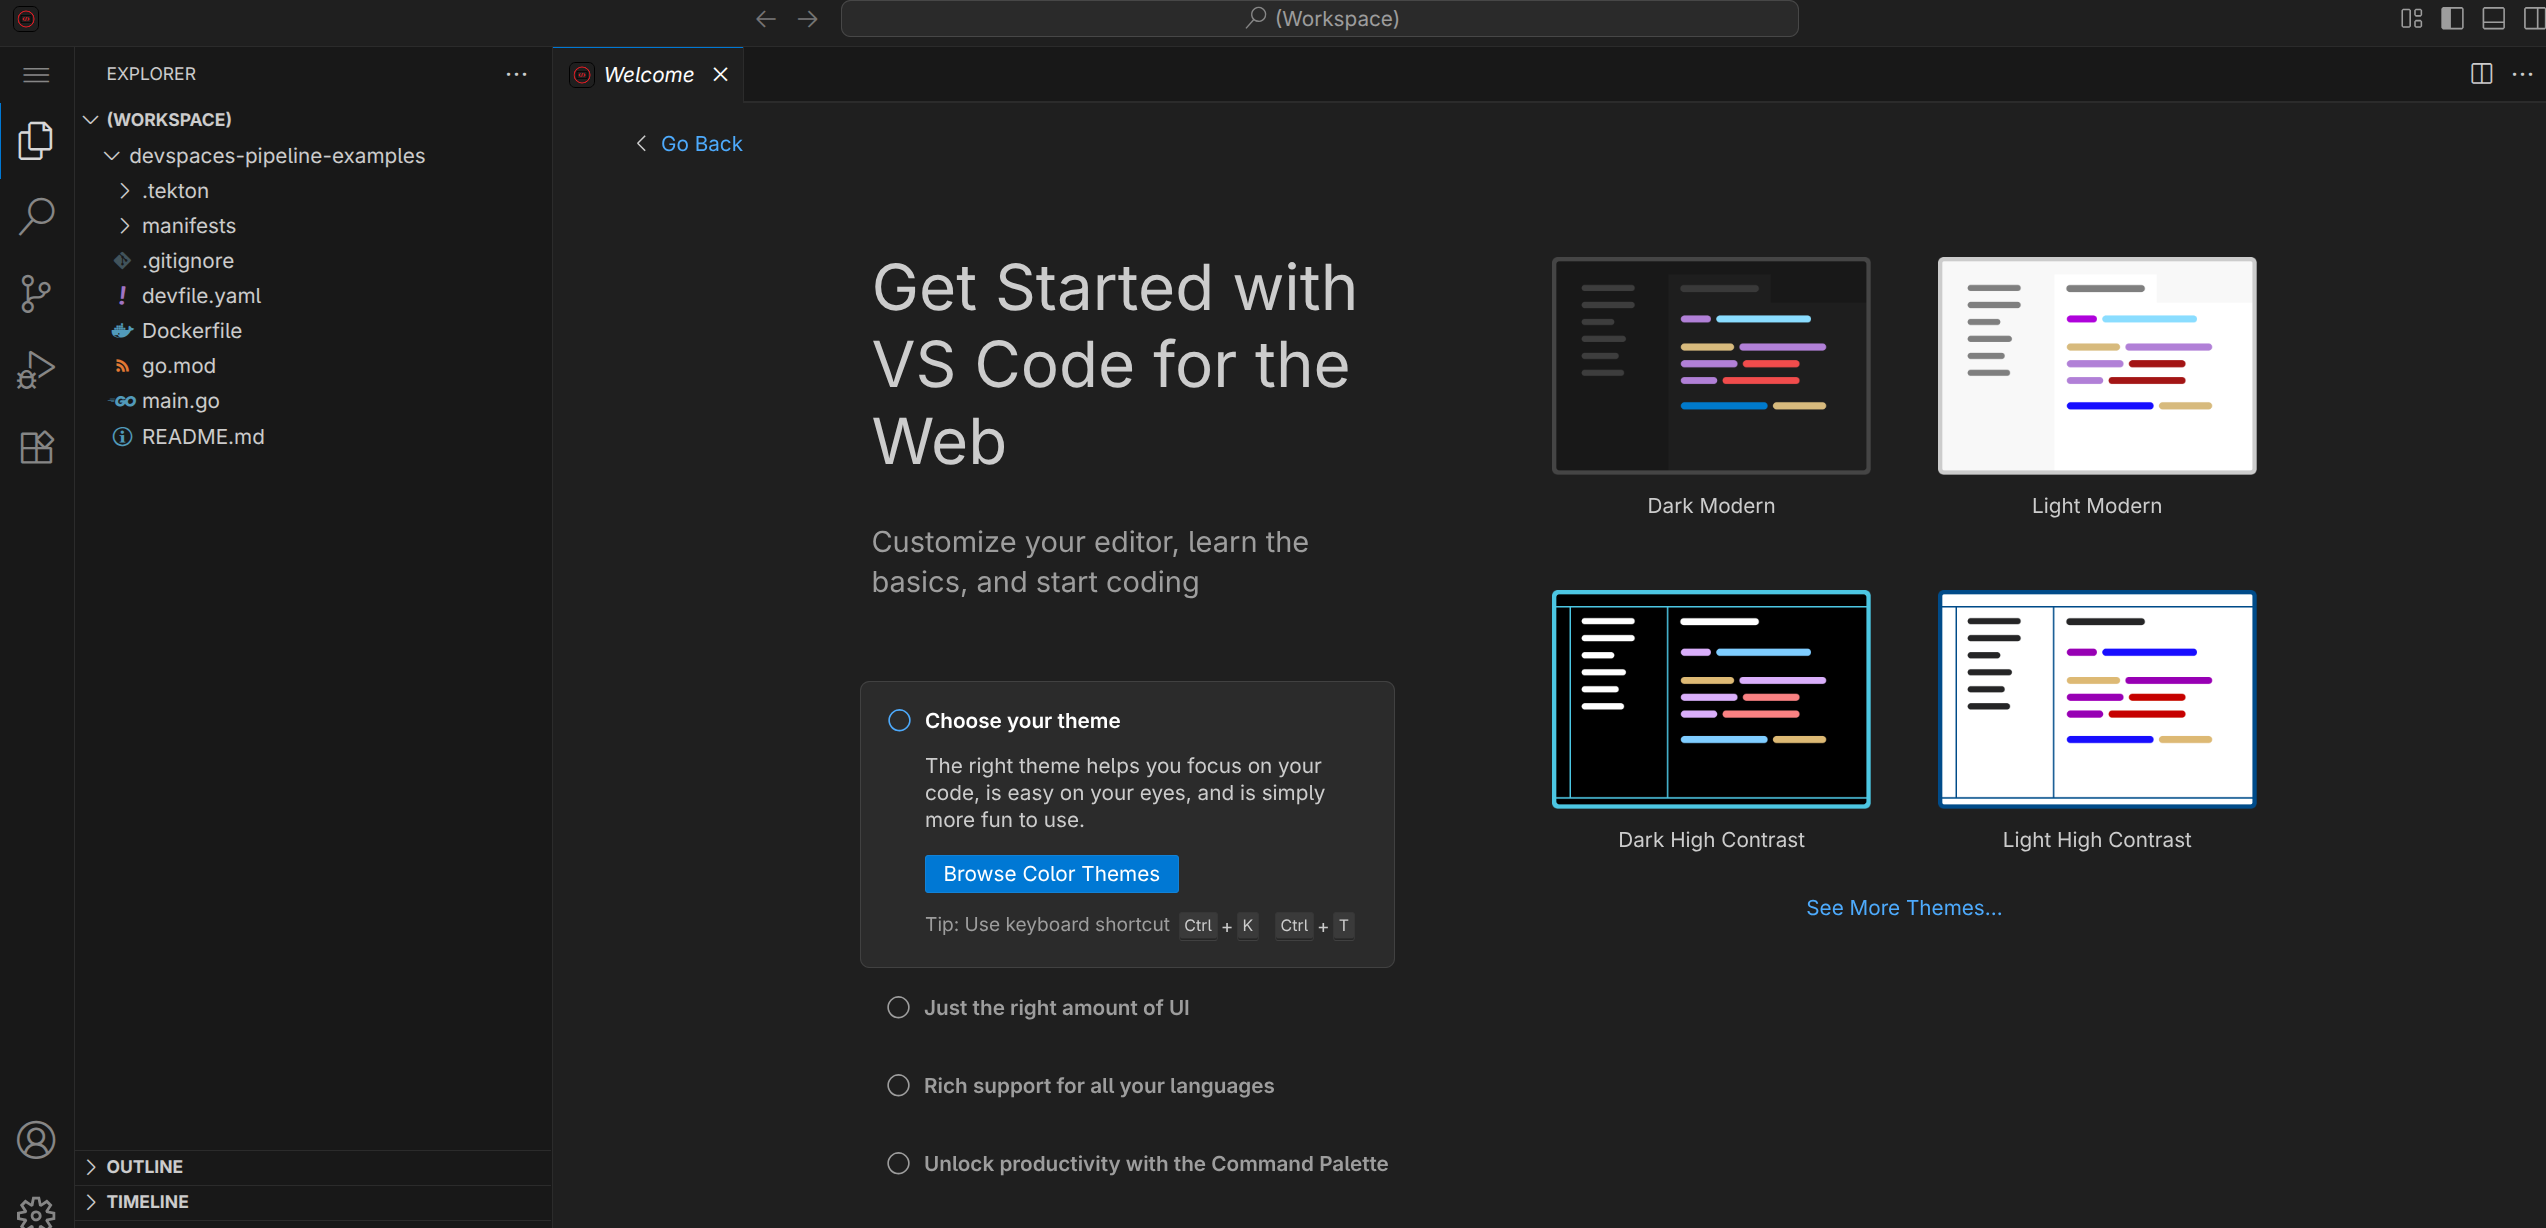
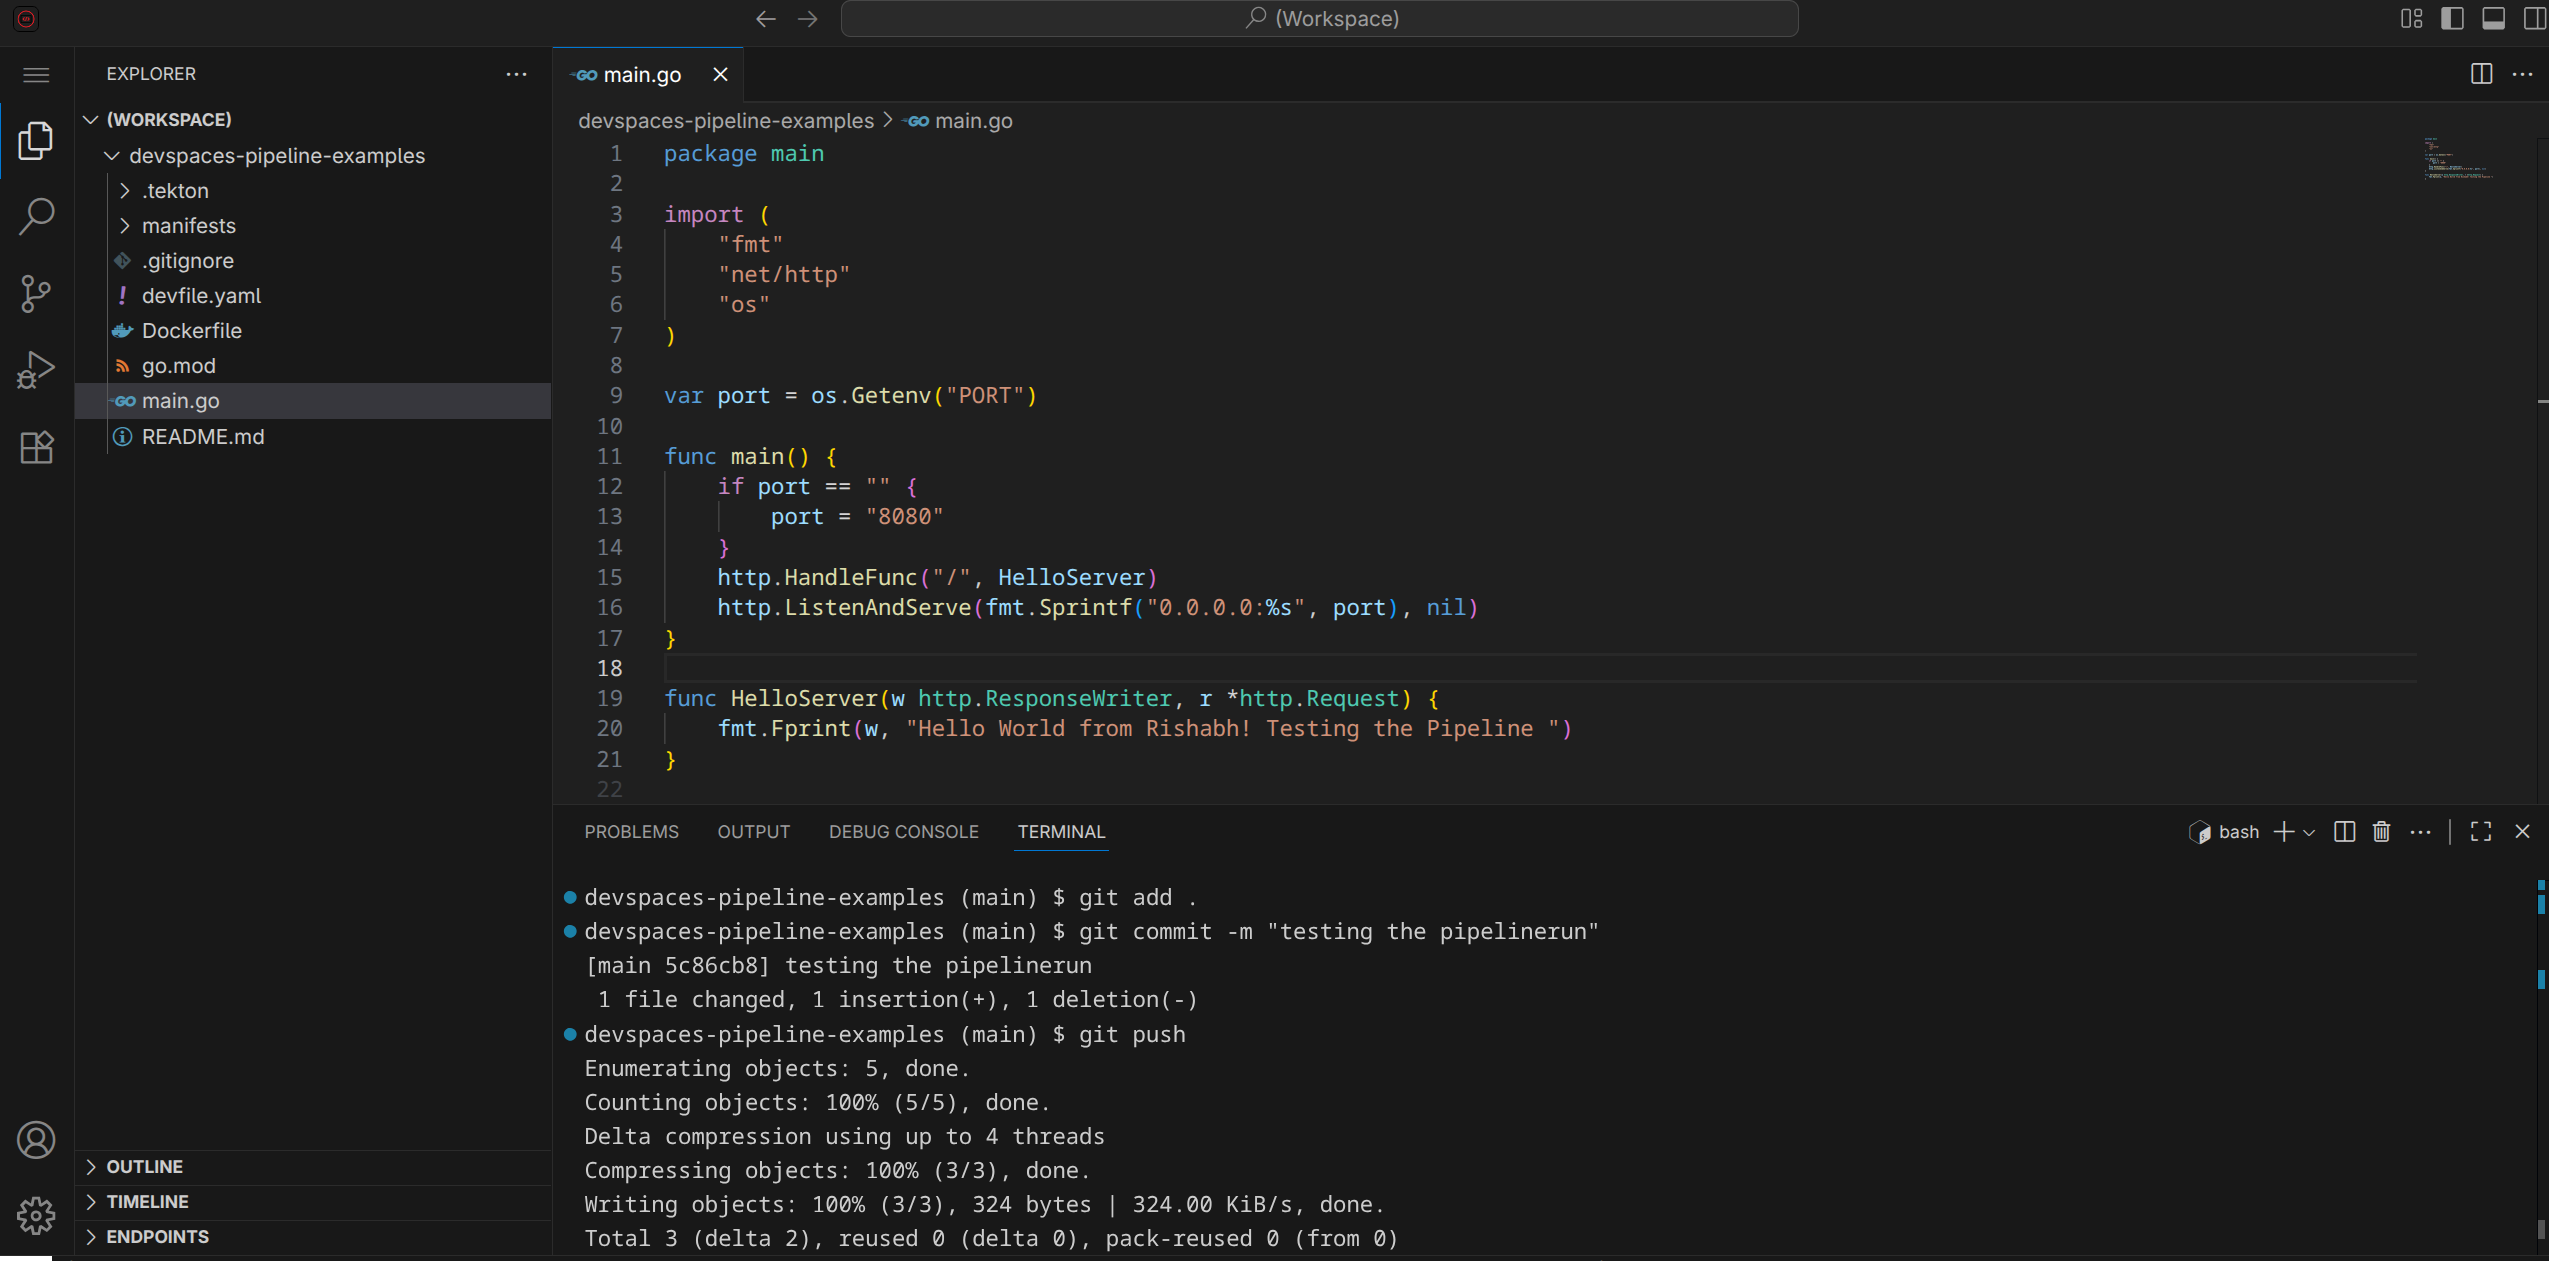
Figure 4 shows the application project opened in Visual Studio Code.
Make changes in the application code and push it to the Git repository. Figure 5 shows the application change (updated line 20) committed and pushed to the Git repository.
When you push code to the main branch, the pipelines-as-code controller detects the event and automatically executes this PipelineRun to clone your repo, compile the Go binary, and build a new container image.
Once the image is ready, the pipeline updates your manifests/deployment.yaml with the new image tag and pushes that change back to your Git repository to complete the deployment cycle (Figure 6).
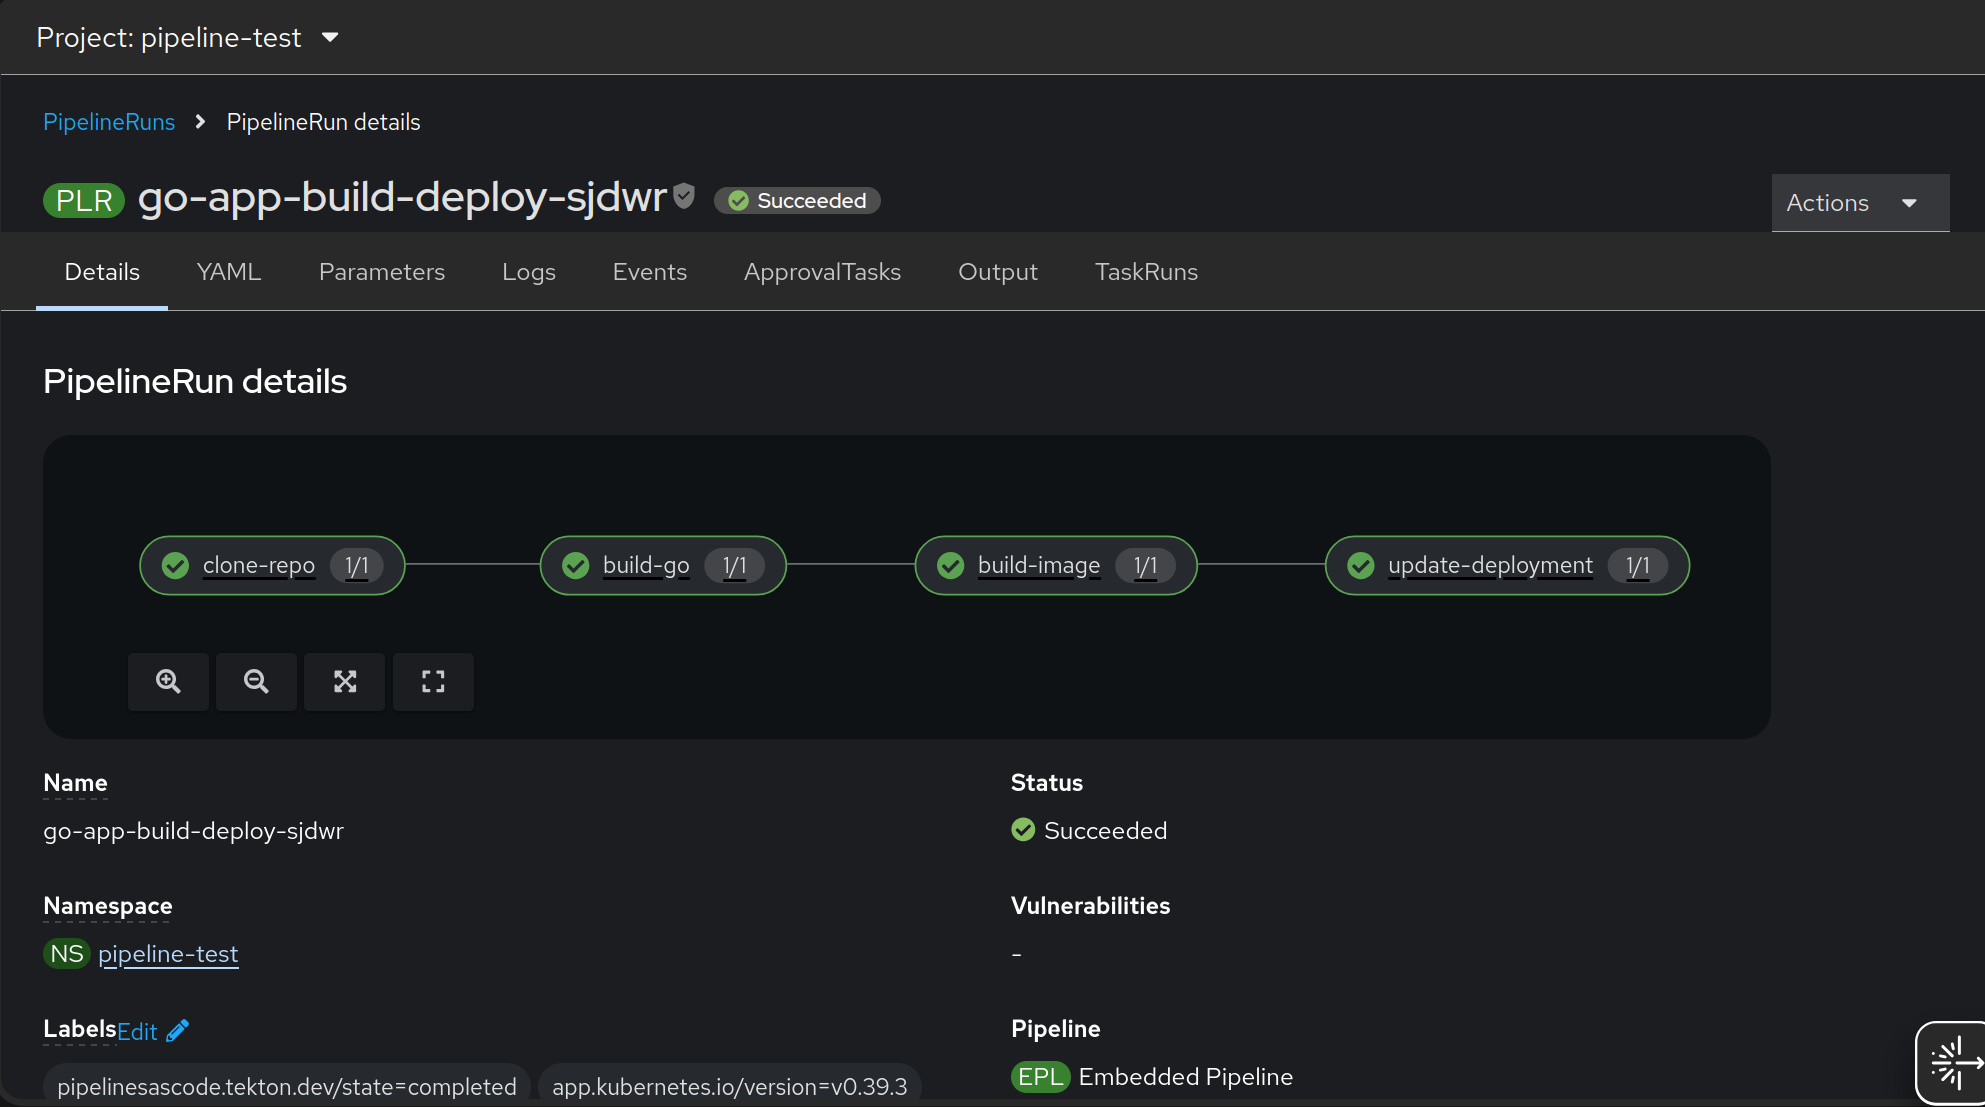
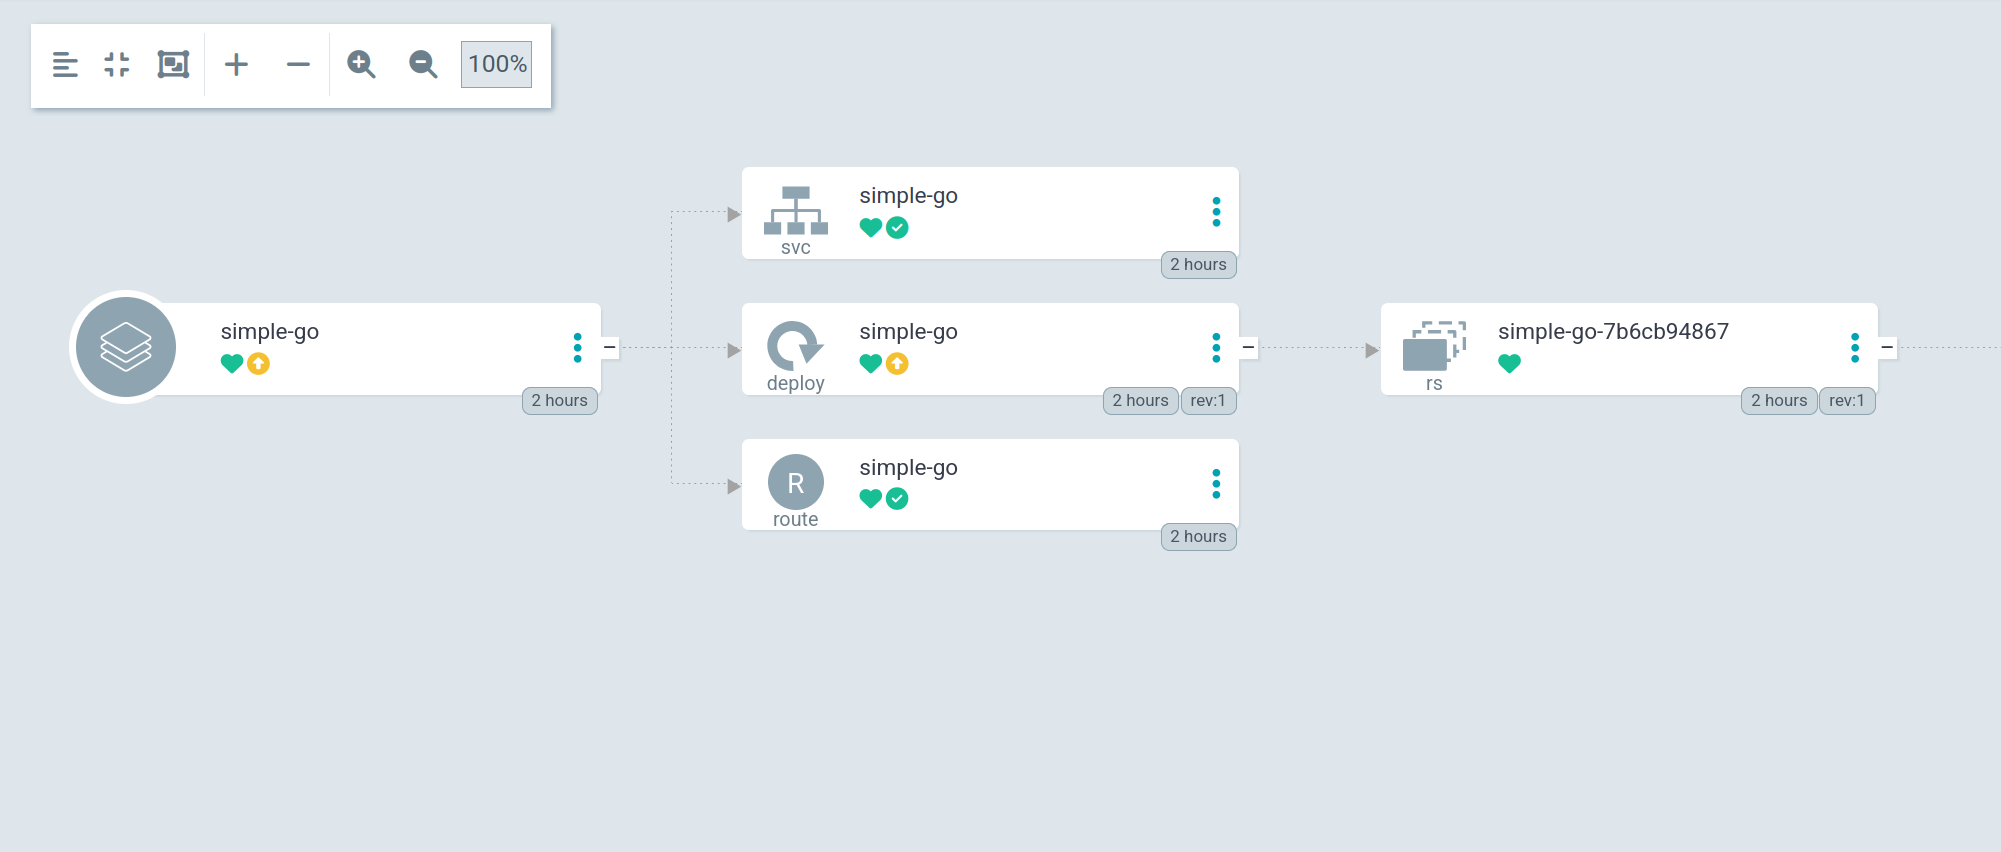
Upon successful PipelineRun, observe the ArgoCD application status. If the status is not synced, refresh the application. Sync the application once the application status changes to OutofSync (Figure 7).
Access the application and observe if the change is effective, as shown in Figure 8.

Final thoughts
This guide demonstrated the power of integrating Red Hat OpenShift Dev Spaces, OpenShift Pipelines (Tekton), and OpenShift GitOps (ArgoCD) to forge a truly modern, end-to-end CI/CD solution. By leveraging the principles of GitOps, where Git is the single source of truth, the architecture ensures that every code change made in an OpenShift Dev Spaces workspace automatically triggers the pipeline, which builds, tags, and updates the deployment manifest. This seamless, closed-loop system—Code Change -> CI Build -> CD Sync—establishes a repeatable, reliable, and automated path from commit to production, ultimately enabling faster and more consistent application delivery.
