Building reliable AI agents requires a careful balance between automated orchestration and precise control over conversation flow. By adopting the Responses API within the Llama Stack ecosystem, we automated complex tool calling while using LangGraph to maintain granular control over our agent’s state.
This is the fourth post in a series covering what we learned while developing the it-self-service-agent AI quickstart:
- Part 1: AI quickstart: Self-service agent for IT process automation
- Part 2: AI meets you where you are: Slack, email & ServiceNow
- Part 3: Prompt engineering: Big vs. small prompts for AI agents
- Part 4: Automate AI agents with the Responses API in Llama Stack
- Part 5: Eval-driven development: Build and evaluate reliable AI agents
- Part 6: Distributed tracing for agentic workflows with OpenTelemetry
- Part 7: 3 lessons for building reliable ServiceNow AI integrations
- Part 8: Guardrails: Enterprise safety shields with Llama Stack
- Part 9: Deploy with confidence: Continuous integration and continuous delivery for agentic AI
For more detail on the business benefits of using agentic AI to automate IT processes, read AI quickstart: Implementing IT processes with agentic AI on Red Hat OpenShift AI.
What is the Responses API?
If you have developed AI applications for several years, you are likely familiar with the OpenAI chat completions API. The chat completions API allows you to interact with a model and gives you full control, but it has limited support for the features agents need. For example, while tool calling is supported, your application must handle the call to the tool and return the results to the agent in the next API call. You can read more about implementing tools in your application in Exploring Llama Stack with Python: Tool calling and agents.
The Responses API, released in early 2025, focuses on agents. It automatically handles tool calls, knowledge bases, and conversation state. It replaced the Assistants API and provides more control over the conversation while handling tool calls and knowledge base lookups.
In our experience, the Responses API balances automation with manual control. For example, you can add request-specific headers that pass to MCP servers when the agent calls a tool. This feature was essential for our implementation.
Why use the Responses API with Llama Stack?
When we started the rh-ai-quickstart/it-self-service-agent AI quickstart, we used the Llama Stack agent API. It provided an API that automatically handled calls to MCP servers, knowledge base lookups, and conversation state. Exploring Llama Stack with Python: Tool calling and agents provides a simple example of using the original Llama Stack agents API.
During development, it became clear that the open source Llama Stack project was moving toward supporting OpenAI-compatible APIs and deprecating original Llama Stack APIs, including the agents API. This change makes it easier for developers to use Llama Stack with existing code and write portable code for different back ends. The same trend is seen in other frameworks.
Interestingly, the capabilities in the original Llama Stack agents API mapped pretty well to those in the Responses API. We believe much of the code was reused for the Llama Stack implementation of the Responses API. This brought along the advantages of using Llama Stack when using the new API. As a few examples:
- Configure components through plug-in APIs to modify vector databases or LLM providers without affecting your agent's code.
- Scale the pods that implement Llama Stack components (which we verified as part of our work on the AI quickstart)
For more information on moving from the original Llama Stack agents API to the Responses API, see Your AI agents, evolved: Modernize Llama Stack agents by migrating to the Responses API.
A sample call
Let's look at an example of calling the Responses API in responses_agent.py:
            if tools_to_use:
                response = self.llama_client.responses.create(
                    input=messages_with_system,
                    model=self.model,
                    **response_config,
                    tools=tools_to_use,
                )
            else:
                response = self.llama_client.responses.create(
                    input=messages_with_system,
                    model=self.model,
                    **response_config,
                )
Note: We could have used the OpenAI client instead of the OpenAI-compatible llama_client.
The Responses API returns a response object that contains the agent's reply after automatically handling any tool calls. The simplest way to extract the response text is:
response_text = response.output_textUsually, the output_text field contains the final text after the agent completes tool calls and reasoning. Behind the scenes, the Responses API orchestrates the agentic workflow: it determines which tools to call, executes them, and provides the results to the agent until the process is complete. The API handles this complexity automatically and provides the final result in output_text.
We make a different call depending on whether tools are available. From our experience, we found that we got better behavior if the agent was not aware of any tools at all if a specific request did not need to use tools. We configured the graph so that each node in the Responses API call used one of the following:
skip_all_tools: No tools availableskip_mcp_servers_only: Include knowledge bases onlyallowed_tools: Restrict to specific named toolsdefault: All MCP tools and knowledge bases are available
To make an MCP server available, pass the tool configuration as shown in this example:
[
      {
          "type": "mcp",
          "server_label": "snow",
          "server_url": "http://mcp-self-service-agent-snow:8000/mcp",
          "require_approval": "never",
          "headers": {
              "AUTHORITATIVE_USER_ID": "user123",
              "SERVICE_NOW_TOKEN": "snow_api_key_value"
          }
      }
  ]
The following example shows how to make a vector search database available:
  [
      {
          "type": "file_search",
          "vector_store_ids": ["1234"]
      }
  ]
In this example, 1234 is the ID of a previously created vector store.
When you provide MCP servers or knowledge bases to responses.create(), the agent decides if it must call a tool, consumes the results, and incorporates them into the response.
In the code, you might notice that we do not use the conversation history feature in the Responses API. We manage the conversation and pass the appropriate set of messages to each request to the Responses API. We'll explain why in a later section.
Configuring model behavior
The response_config parameter controls how the model generates responses. Our implementation configures two key parameters:
stream: False: We use non-streaming responses to simplify processing. The API waits until the complete response is ready before returning it, which simplifies error handling and retry logic.temperature: Controls the randomness of the model's responses.
The temperature parameter parameter is important because different tasks require different levels of randomness. Our implementation supports three layers of temperature configuration:
- Agent-level defaults: Set in the agent YAML configuration through
sampling_params. - State-level overrides: Different states in the state machine can specify different temperatures.
- Call-time overrides: Individual calls can override the temperature.
For example, we use lower temperatures (0.1-0.3) for classification and validation tasks where we want deterministic behavior, and higher temperatures (0.7) for conversational responses where some creativity is beneficial. This flexibility allows the agent to behave differently depending on its task in the workflow.
The following example shows a runtime configuration using these three layers:
response_config = {
    "stream": False,
    "temperature": 0.3,
}
response = self.llama_client.responses.create(
    input=messages_with_system,
    model=self.model,
    **response_config,
    tools=tools_to_use,
)
Retries
We sometimes saw requests to the Responses API fail or return empty responses, especially with smaller models. For this reason our implementation includes a retry mechanism with exponential backoff that wraps calls to the Responses API.
If a request fails, the system retries up to three times with increasing delays (1 second, 2 seconds, 4 seconds, capped at 8 seconds). This exponential backoff prevents overwhelming the service during temporary issues while giving enough time for transient problems to resolve themselves.
The retry logic is implemented in the create_response_with_retry method, which detects and retries on network-related errors (timeouts, connection failures), empty responses, and responses that fail validation checks.
Limiting agent capabilities
As mentioned earlier, you can add headers that pass to MCP servers. In the example above you can see that we include the following header:
          "headers": {
              "AUTHORITATIVE_USER_ID": "user123",
          }
We only wanted the agent to be able to access the laptop information for the user associated with the request and to create laptop refresh requests on behalf of that user. Using request-specific headers allows us to hide user details from the agent. The agent can only ask that MCP server to get the laptop information for the "current" user or create laptop refresh requests for the "current" user. The "current" user being passed directly to the MCP server. Even if the agent tried to get laptop information for a different user, the MCP server would only return either an error or information for the "current user" limiting the damage done by the agent's error.
This was one of the areas where we believe feedback on the earlier OpenAI Assistants API led to key improvements in the Responses API.
Managing conversation state with LangGraph
When we migrated to the Responses API, we decided to support both big and small prompts, as outlined in Prompt engineering: Big vs. small prompts for AI agents. You can read that post to understand why we made that decision and the tradeoffs between the two approaches.
At the time LangGraph was also one of the most capable libraries for managing a graph where each of the nodes could include an LLM request with a "Small" prompt. It helps you manage the conversation state for each request to the Responses API. BWe chose LangGraph to manage the conversation state instead of the Responses API features.
If we were only going to support monolithic prompts we would likely have used the conversation management built into the Responses API as there are advantages to doing that, particularly in reducing what needs to be exchanged between the client and the Llama Stack, and other optimizations that can be done in Llama Stack when it is managing the conversation state on the server side.
The AI quickstart includes a number of LangGraph graphs, with the "big" graph being used by default. The different graphs are in agent-service/src/agent_service/langgraph.
The graphs are defined in YAML files rather than programmatically. We chose this approach to iterate on graphs and agent behavior quickly without changing code. Because we could not find an open source library with this functionality, we created a YAML-driven method. For details, see PROMPT_CONFIGURATION_GUIDE.md to define a graph in YAML and lg_flow_state_machine.py for the generation code.
The default big prompt graph, lg-prompt-big.yaml, is shown in Figure 1.
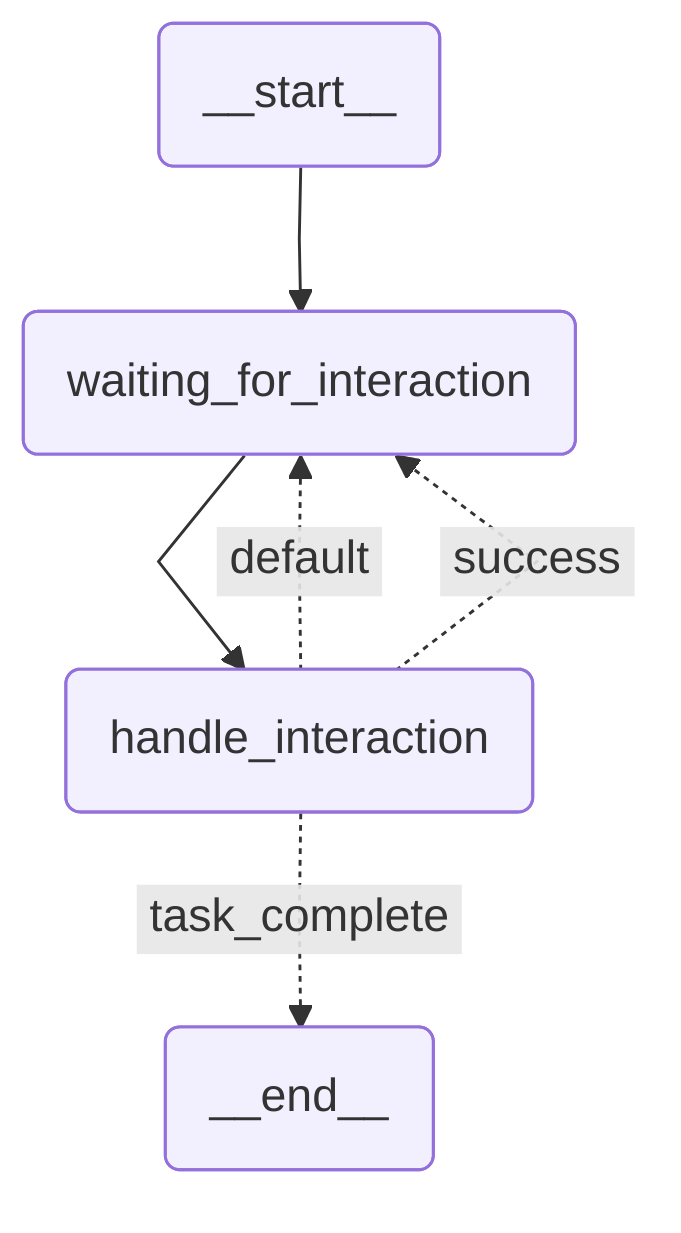
It consists of a single big prompt in handle_interaction. We alternate between that state and waiting for a user response in waiting_for_interaction. In each request to the Responses API for this graph, we provide the full conversation history and the agent uses that as the context to handle the latest user request in the multi-step conversation.
The graph for the small prompt lg-prompt-small has a lot more states as shown in Figure 2 and a set of smaller prompts that cooperate to handle the laptop refresh process.
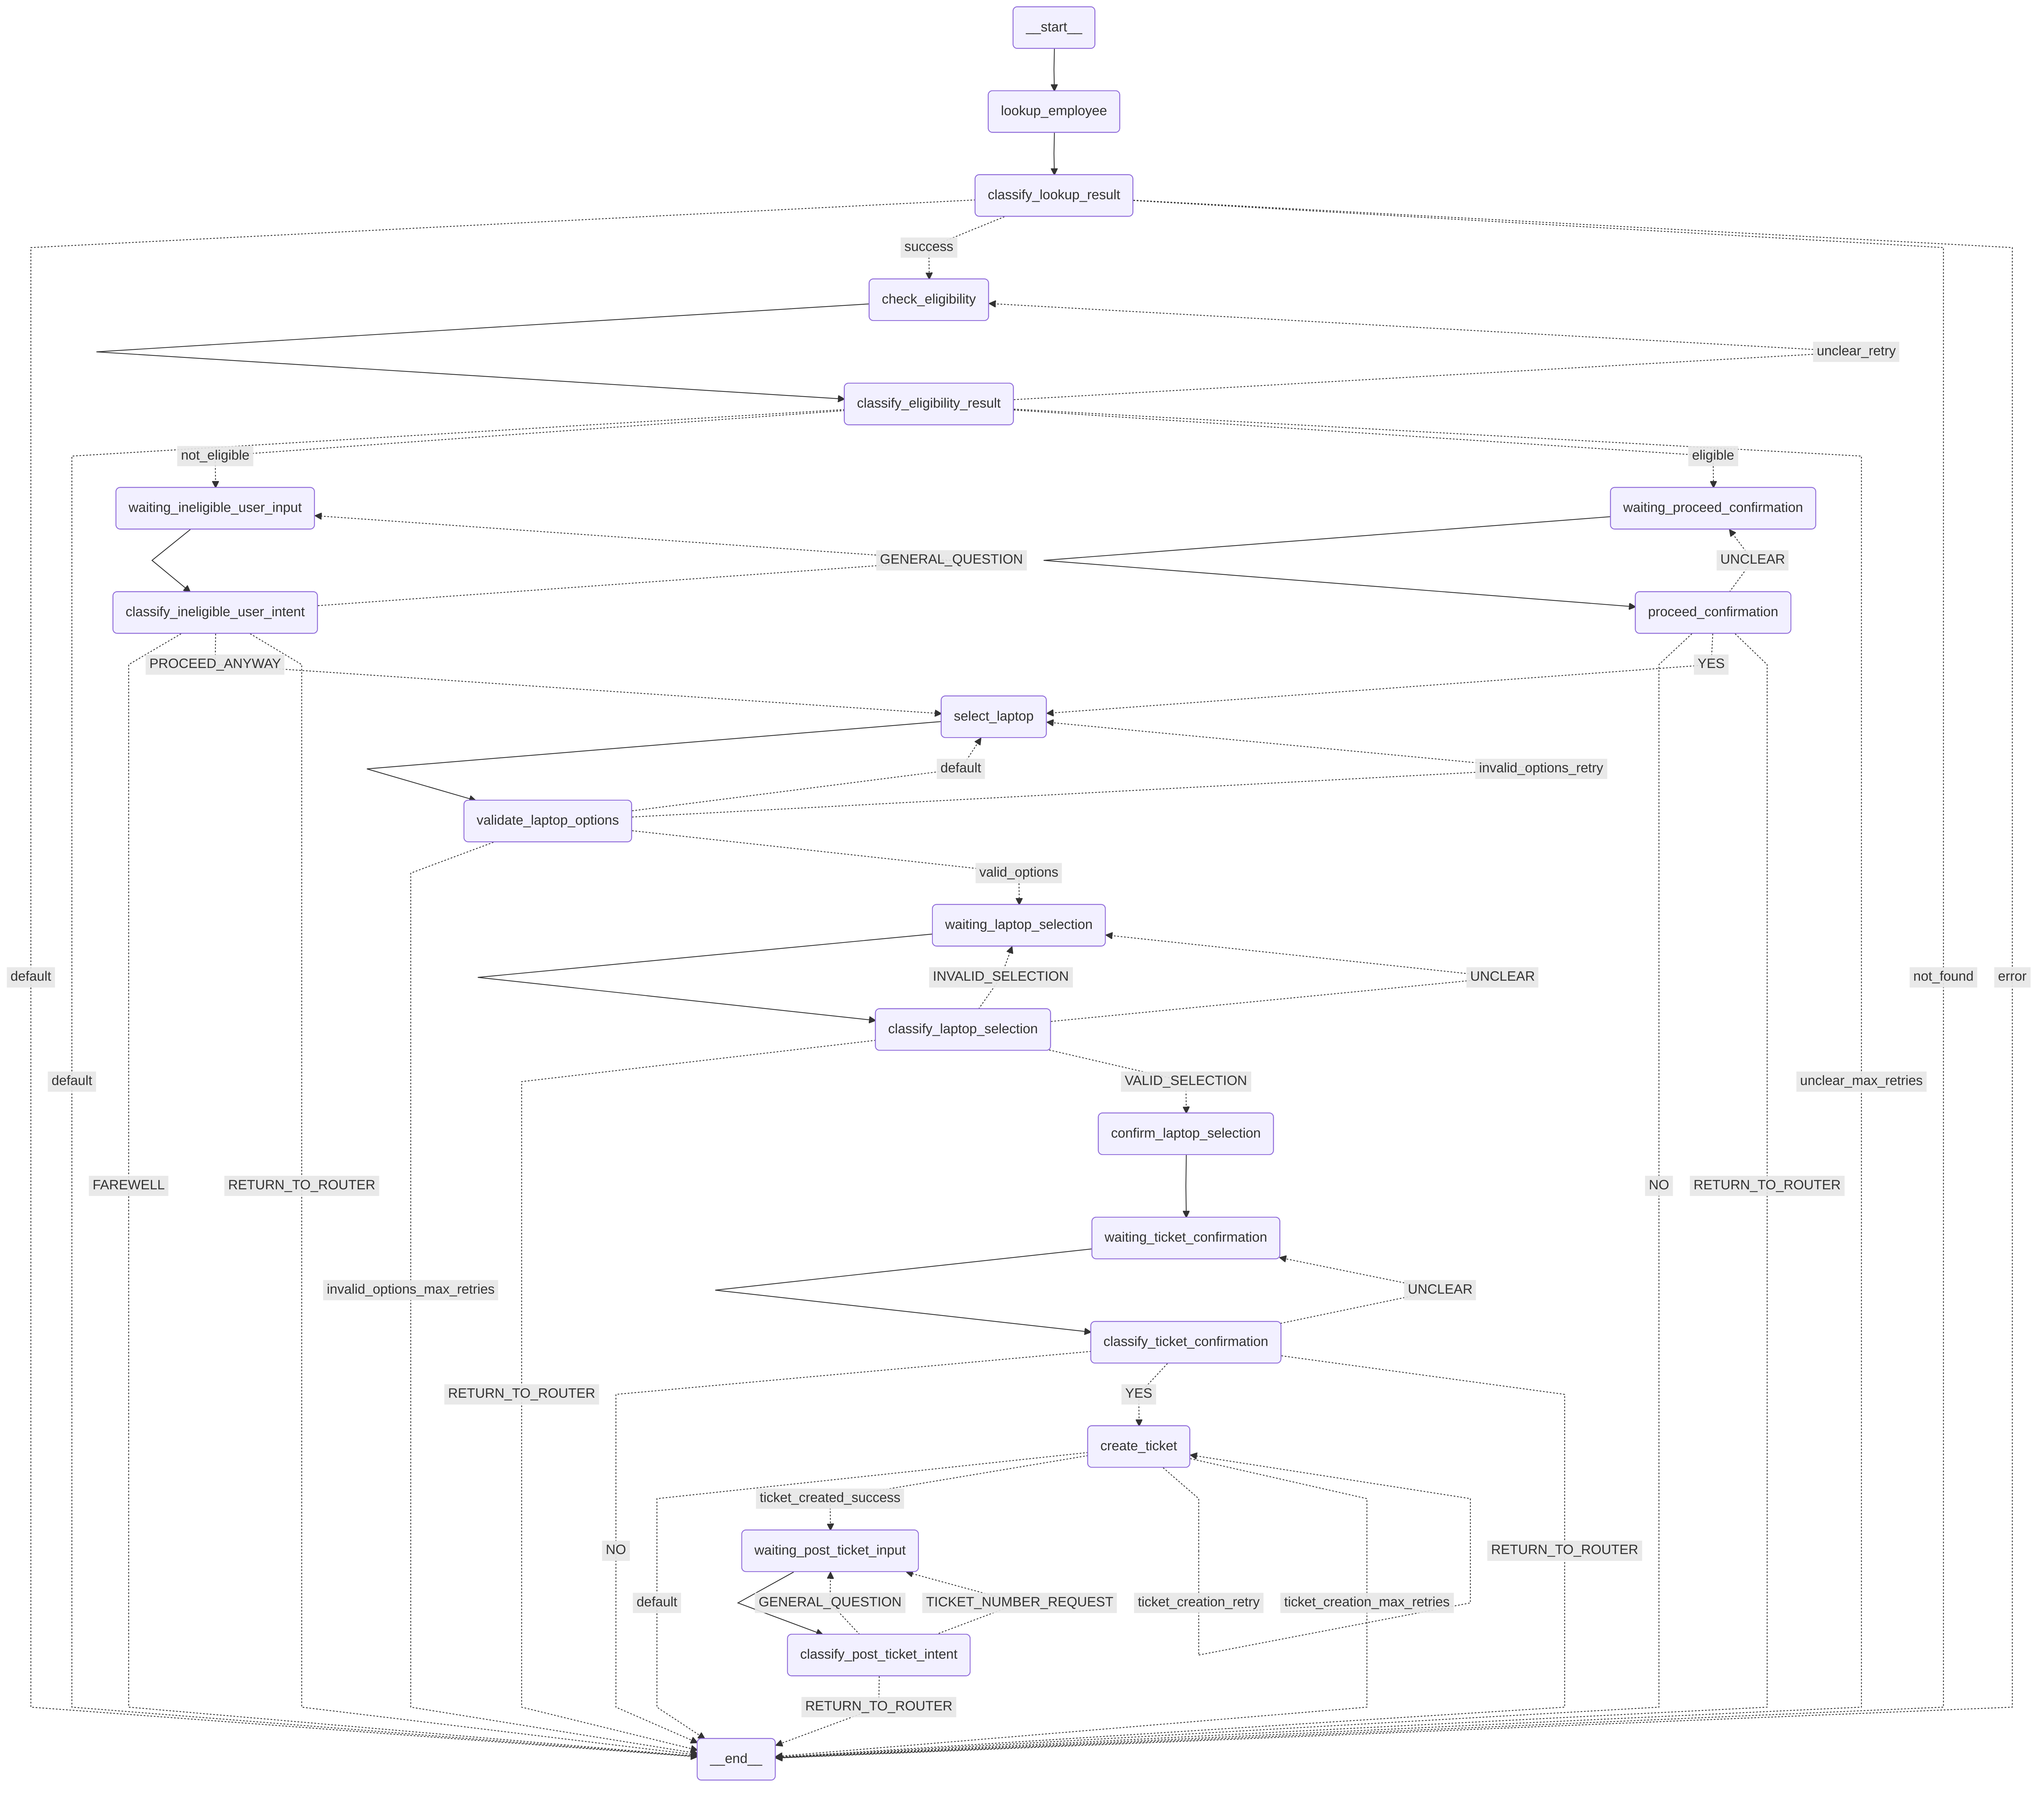
Instead of passing the full message history in each request to the Responses API, we pass only the last user message and include only the necessary information from the LangGraph state.
Persisting LangGraph state
Because the request manager already managed the non-AI state for a conversation, we extended it to persist the LangGraph state. We used PostgreSQL Saver, as shown in postgres_checkpoint.py, and compiled the LangGraph workflow with the checkpointer:
        # Compile with checkpointer only
        return workflow.compile(checkpointer=self.checkpointer, debug=False)
The request manager handled getting the appropriate LangGraph thread ID when passing a request to the agent.
Wrapping the Responses API in an agent
The post we mentioned earlier describes several approaches, including simplified agent classes ("a pragmatic middle ground"). We took an approach similar to that. We already had a wrapper that encapsulated our calls to the Llama Stack API in order to handle integration with the other components like LangGraph. During the migration, we created a new encapsulation that implemented the same APIs as before with extensions as needed to support any new functionality we leveraged from the Responses API.
This led to the creation of the Agent class, which handles requests for the agent service. Initially, we supported both the Llama Stack agent API and the Responses API. After testing and refining our implementation, we removed the original agent API. The Agent class that uses the Responses API is in responses_agent.py and includes the following methods:
  Agent (standalone class)
  ├── __init__
  │   └── Initialize agent with configuration and Llama Stack client
  │
  ├── Public Methods
  │   ├── create_response_with_retry
  │   │   └── Create a response with retry logic for empty responses and errors
  │   └── create_response
  │       └── Create a response using Llama Stack responses API
  │
  └── Private Methods
      ├── _get_model_for_agent
      │   └── Get the model to use for the agent from configuration
      ├── _get_response_config
      │   └── Get response configuration from agent config with defaults
      ├── _get_default_system_message
      │   └── Get default system message for the agent
      ├── _get_vector_store_id
      │   └── Get the vector store ID for a specific knowledge base
      ├── _get_mcp_tools_to_use
      │   └── Get complete tools array for Llama Stack responses API
      ├── _run_moderation_shields
      │   └── Run moderation checks using OpenAI-compatible moderation API
      ├── _check_response_errors
      │   └── Check for various error conditions in the Llama Stack response
      └── _print_empty_response_debug_info
          └── Print detailed debug information for empty responses
Agents are configured through YAML definitions in agent-service/config/agents, which include laptop-refresh-agent.yaml and routing-agent.yaml. You can retrieve instances by name using the ResponsesAgentManager class. The ResponsesAgentManager is a standalone class that manages multiple Agent instances.
  ├── agents_dict (property - stores Agent instances)
  ├── __init__
  │   └── Load agent configurations and create Agent instances
  ├── get_agent
  │   └── Get an Agent instance by ID, returning default if not found
  └── agents
      └── Return a dict of available agents
Try the AI quickstart
After exploring how the Responses API, Llama Stack, and LangGraph work together, you can see these patterns in action by deploying the it-self-service-agent AI quickstart. Run through the quickstart (60 to 90 minutes) to deploy a working multi-agent system.
- Save time: Rather than spending two to three weeks building agent orchestration, evaluation frameworks, and enterprise integrations from scratch, you'll have a working system in under 90 minutes. Start in testing mode (simplified setup, mock eventing) to explore quickly, then switch to production mode (Knative Eventing + Kafka) when ready to scale.
- What you'll learn: Production patterns for AI agent systems that apply beyond IT automation, such as how to test non-deterministic systems, implement distributed tracing for async AI workflows, integrate LLMs with enterprise systems safely, and design for scale. These patterns transfer to any agentic AI project.
- Customization path: The laptop refresh agent is just one example. The same framework supports Privacy Impact Assessments, RFP generation, access requests, software licensing, or your own custom IT processes. Swap the specialist agent, add your own MCP servers for different integrations, customize the knowledge base and define your own evaluation metrics.
This will give you hands-on experience and context for the deep dives in this series.
Learn more
If this blog post has sparked your interest in the IT self-service agent AI quickstart, here are additional resources.
- Browse the AI quickstarts catalog for other production-ready use cases including fraud detection, document processing and customer service automation.
- Questions or issues? Open an issue on the GitHub repository
Learn more about the tech stack:
- Responses API
- Llama Stack documentation
- LangGraph
- MCP Protocol specification
- Red Hat OpenShift AI documentation
