In this article, we will demonstrate how to run the fraud detection model using confidential virtual machines (CVMs) on Red Hat Enterprise Linux (RHEL) running in the Microsoft Azure public cloud. Our goal is to provide the technical aspects and code details to replicate an end-to-end scenario.
We will demonstrate how to run an AI model for fraud detection on the public cloud without risking the cloud or infrastructure administrator accessing the data, or anyone else that has potential access to the storage, network, and memory that the model will use.
Fraud detection use case
The use case in this demo is offline fraud detection analysis of credit card transactions. By analyzing data like geographical distance from a previous transaction and PIN usage, it is possible to determine if a transaction is fraudulent.
The assumptions in this scenario are as follows:
- The model is publicly available, so it doesn’t need to be protected.
- The inference datasets to provide to the model are real credit card transactions, therefore they need to be protected.
We achieve full protection with the following security mechanisms:
- The datasets are encrypted in a trusted environment before being uploaded in any remote or local storage, achieving data at rest security. Anyone (including a cloud provider) trying to mount the storage will not be able to read what's inside since the data is encrypted.
- The dataset is sent to the confidential virtual machine using an encrypted authenticated connection, achieving data in transit security. Anyone trying to intercept the data transit between the remote storage and the CVM will not be able to use the data since it's encrypted.
- The model running in a CVM processes the dataset. This means encryption doesn't take place solely at the root disk level (data at rest security). When the data downloads, it is not stored in plain text or at memory level. This addresses the data in use aspect.
- To prove that the CVM is actually confidential, we will leverage attestation. The goal of attestation is to decrypt the downloaded dataset in the CVM only if the VM is truly confidential.
Figure 1 depicts this workflow.
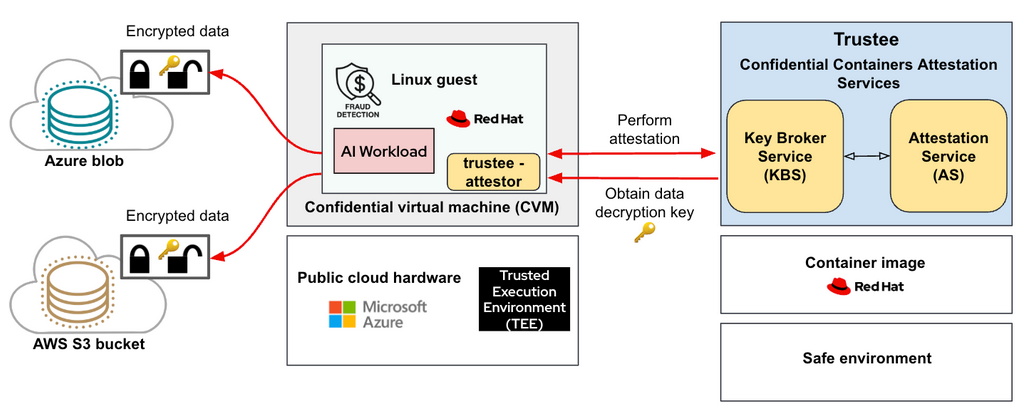
Follow these steps:
- Credit card transactions are encrypted in a secure user-defined environment.
- The key used to encrypt the model is stored in the Trustee remote attester. In order to simplify a bit, we used a single key for all datasets.
- The Trustee also contains the expected measurements that a CVM should produce to prove that it is actually confidential.
- The credit card transactions are uploaded in the cloud remote storage. In this demo, we used two datasets: one stored as a private Microsoft Azure blob storage and the other as a private Amazon Web Services (AWS) S3 bucket.
- The CVM on the Microsoft Azure public cloud, configured with root disk encryption, runs a Jupiter Notebook that contains the fraud detection model and has the credentials to download the datasets from the two clouds. Datasets are downloaded, but at this time the key is missing. At this point, they are just a blob of encrypted data.
- The Jupiter Notebook asks the key to Trustee. Here is where attestation takes place. The CVM provides measurements of its components to the Trustee remote attester, which analyzes them and compares them with the expected measurements.
- If the measurements match, then the environment is secure, and the Trustee sends the key to decrypt the data back to the CVM.
- The Jupiter Notebook also has the logic to decrypt the data with the received key.
- Data is now decrypted and loaded to the memory to feed to the fraud detection model.
Prerequisites
To set up the demo, we will need three environments:
- In a secure local environment, we will encrypt the dataset and run the Trustee remote attester, which will contain the key to decrypt the datasets.
- You need a Microsoft Azure subscription to deploy the CVMs on RHEL and upload one of the encrypted datasets as Azure blob storage.
- Optionally, we need an AWS subscription to upload a second encrypted dataset as S3 bucket storage.
The various components, (Trustee server, client, and fraud detection model) provided as container images, will ease the setup effort and prevent waiting during installation time. All such containers are publicly available in our confidential-devhub GitHub and quay.io repository.
The full notebook guide is available in this GitHub repository, and all notebooks are numerically ordered to follow this guide.
Data preparation
Now we need to generate the datasets (if needed) and encrypt them. This operation must be performed in a user-secure environment.
The data we will feed to the model is simply a .csv file where each line represents a transaction and each column a parameter to feed to the model. More specifically, as explained in this learning path, we will use the following columns:
- distance_from_last_transaction
- ratio_to_median_purchase_price
- used_chip
- used_pin_number
- online_order
We will eventually load the .csv file in memory and feed it to the fraud detection model as inference data, where it will output whether it can be considered fraud for each row.
Generate the example datasets
In case no dataset is available, we prepared a simple script that generates synthetic data based on the existing training datasets. This script simply takes an existing dataset in .csv format and shuffles the data by column, since some columns contain boolean info (online transaction yes/no) and others contain actual values (geographical distance from the previous transaction).
Because it is trivial code, we won’t explain the implementation, as there are probably better ways to get synthetic data generated for this mode.
Alternatively, it is possible to leverage Python libraries like Faker to create other synthetic datasets. For the purpose of this demo, having such a synthetic dataset is more than enough, since the goal is to show how the data is safe, not whether it’s really valid.
The main limitation of such a synthetic dataset approach is that the transactions are likely to be labeled as fraud during inference, since the data likely doesn’t make sense. As a consequence, we will tune the model to issue a fraud warning only if the likelihood is greater than 99.99%.
Encrypt the dataset
Now that we have data, we need to encrypt the files before uploading anything to the cloud storage.
The notebook to automatically encrypt two datasets is available on GitHub.
Let’s first create a simple random key (any type of key is fine):
openssl rand 128 > key.binThen we will use this key to encrypt all datasets stored in a specific folder:
KEY_FILE=key.bin # path to the key we just generated
DATASET_SRC=datasets # path to where the plaintext datasets are
DATASET_DEST=datasets_enc # path to where the encrypted datasets will be stored
mkdir -p $DATASET_DEST
for file in $DATASET_SRC/*; do
    fname=$(basename $file)
    openssl enc -aes-256-cfb -pbkdf2 -kfile $KEY_FILE -in $file -out $DATASET_DEST/$fname.enc
done
ls $DATASET_DEST
Note that the encryption algorithm (in this case -aes-256-cfb, but it is possible to pick others) has to be the same as we used when decrypting the datasets.
Before uploading the datasets in the cloud, we will store the freshly generated key inside the Trustee.
Deploy the Trustee attestation with keys
In this step, we will install and store the key generated in the previous step into the Trustee. This operation must be performed in a user-secure environment, because the Trustee holds both the key and the reference values that will be used to ensure that the cloud RHEL CVM is trusted.
The Trustee has two components:
- The server side (Trustee) runs in the user-secure environment, analyzes the attestation reports, and returns the secrets (key).
- The client side, called kbs-client, connects from the CVM with the Trustee to perform attestation.
To simplify the Trustee deployment process, we already provided containerized versions of it here:
Set up the Trustee server
The Trustee is the remote attester. Note that this server version maps with the Trustee 0.3.0 now available on Red Hat Openshift, therefore it could be possible to also run this as a OpenShift operator.
In order to simplify the install and usage of the Trustee binary locally in the secure environment, you can use a container image. You can find the source code used to build the container image on GitHub.
The following steps are also available in the notebook image.
Mandatory config files
There are mandatory configuration files that we must configure first before starting the Trustee.
First, create the kbs-config.toml file. This file sets up the http(s) server and the key to trust. An example configuration that exposes the server and uses an https certificate is available and shown on GitHub.
In case the https certificate is not needed, change insecure_http = false to true and remove the private_key and certificate. This example assumes that the https certificate exists already.
Optional configs
These optional configs for the demo are for example the reference values (defaults to empty []), default.rego policies, and so on. Such configs are documented in the Trustee upstream documentation.
Run the server
Before running the server, we also want to configure it to know the location of our key to decrypt the datasets. A secret (in this case, the key) is provided by the Trustee as a path, meaning the CVM client will not only send the local measurements, but also ask for a key at a certain path. If attestation is successful and the path is correct, the respective key will be returned back to the client:
KBS_CONFIG=./kbs-config.toml # insert kbs-config path
HTTPS_PRIVATE_KEY=./https_private_key # insert https private key path
HTTPS_CERT=./https_certificate # insert https certificate path
DECRYPTION_KEY=./key.bin # insert decryption key path
TRUSTEE_SECRETS_PATH=/opt/confidential-containers/kbs/repository/default
KBS_RETRIEVAL_PATH=fraud-detection/key.bin # insert custom path here
podman run \
  --privileged \
  -v $KBS_CONFIG:/etc/kbs-config/kbs-config.toml \
  -v $HTTPS_PRIVATE_KEY:/https_private_key \
  -v $HTTPS_CERT:/https_certificate \
  -v $DECRYPTION_KEY:$TRUSTEE_SECRETS_PATH/$KBS_RETRIEVAL_PATH
  -v /dev/log:/dev/log \
  -p 8080:8080 \
  --rm \
  quay.io/confidential-devhub/trustee-server:v0.3.0 \
  /usr/local/bin/kbs --config-file /etc/kbs-config/kbs-config.toml
In this example, we installed the key at path default/fraud-detection/key.bin (KBS_RETRIEVAL_PATH).
You must use this same path when performing attestation in the CVM.
If you don't use https, there is no need to pass HTTPS_PRIVATE_KEY and HTTPS_CERT.
If it provides the reference values, extend the Podman command with -v $REFERENCE_VALUES:/opt/confidential-containers/rvps/reference-values/reference-values.json.
Upload encrypted data to cloud storage
We will now switch to the cloud. From this step onwards, until we don’t attest the CVM, we will deal with encrypted datasets, that won't be decrypted.
As previously mentioned, we will upload the two datasets in two different clouds, to simulate multiple data sources: one on Azure, and another on AWS. For the sake of brevity, check the respective Microsoft Azure and AWS documentation to learn how to create and upload the dataset into their storage.
Note that while it is highly recommended to make the storage private and only accessible via credentials, it is not mandatory for this demo, as the datasets are encrypted with a key that has never been exposed outside the secure environment.
Make sure to upload to Azure blob and AWS S3 via the WebUI or console datasets. You can find the code in the notebook image.
Deploy a CVM on Azure cloud
To create a CVM on RHEL in the Microsoft Azure public cloud, follow the Microsoft guide (pick the latest RHEL image available). Choose the Confidential disk encryption option when you deploy. This will make the OS disk encrypted which you can verify later. The Azure infrastructure backend uses a scheme developed by Red Hat for this process.
As of now, Azure takes care of attesting the CVM at boot, creating the ssh keys and encrypting the disk for the user. A full confidential end-to-end solution should not rely on the cloud provider to perform these steps, and there is work in progress to be completely independent from the cloud provider.
Run an AI fraud detection model in a CVM
Once you have successfully created the CVM, we can access it using the ssh key. The first thing we can check is if the disk is actually encrypted by executing lsbk and observing the disk partition layout. The result should be something like this:
NAME     MAJ:MIN RM  SIZE RO TYPE  MOUNTPOINTS
sda        8:0    0   32G  0 disk
├─sda1     8:1    0    4M  0 part
├─sda2     8:2    0  252M  0 part  /boot/efi
└─sda3     8:3    0 31.7G  0 part
  └─root 253:0    0 31.7G  0 crypt /
sr0       11:0    1  628K  0 rom
Having an encrypted root disk provides data at rest security, meaning that the model and data will be encrypted before it's stored into the disk. An attacker trying to mount the disk separately will not be able to read anything without the proper key to unlock the disk.
Now, we can install the required packages from this demo as follows:
sudo dnf install -y python3 python3-pip git podman
curl -fsSL https://rpm.nodesource.com/setup_20.x | sudo bash -
sudo dnf install -y nodejs
pip3 install --user notebook  jupyterlab-git
With these packages, we are simply installing Podman and jupyterlab-git.
To conclude the Jupyter setup, we need to create a lab:
jupyter lab build
jupyter lab password # set up a password
jupyter lab
One way to access the lab locally is by setting up ssh port forwarding to expose the port 8888 to the local device too:
ssh -i your-key.pem -L 8888:localhost:8888 your-user@your-vm-ipAfter setting up the ssh port forwarding, we can access our notebook from any local browser at localhost:8888.
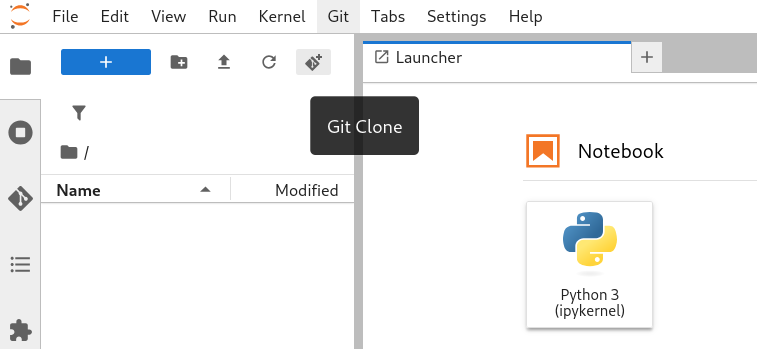
The last thing we need to do for this step is to connect to the Jupyter notebook. Log in and click the Git Clone button on the top left corner, then pull the demo repo, as shown in Figure 2.
Consume encrypted transactions for the AI model
In this step, we will download the encrypted dataset and fetch the decryption key using attestation with the Trustee remote attester.
Download the data
Now that the demo is ready, we can open the file. This file takes care of downloading the models from Microsoft Azure and AWS. Therefore, before running this notebook, we need to make sure that the correct connection string and AWS credentials are inserted in the code snippet. Since the code to download S3/blob storage is trivial, and for the sake of brevity, we will not show it here.
The datasets are encrypted and the connection with the cloud is secured, so we will show data in transit security. This means that if an attacker tries to sniff the network and captures this data while it is traveling, no data will be actually leaked, since the data is encrypted and only the sender and recipient can decrypt it.
After running the notebook, the two datasets will be downloaded in /fraud-detection-cvm/downloaded_datasets.
Decrypt the data
Having encrypted datasets is useless if we want to feed them to the model. Therefore, we will need to decrypt them. This is where attestation takes place. We need the key to decrypt the datasets, but it is stored in a remote attester (Trustee) and will be provided to us only if attestation is successful, meaning the software and hardware of the CVM have not been tampered.
By doing this, we ensure that the CVM is safe. Having the right hardware and software running prevents any attacker from fetching the transactions while they are being read by the model (data in use security). This is possible because the hardware inside the CVM ensures the encryption of all data loaded in the memory. So if an attacker tries to do a physical/virtual memory dump, the output will only be encrypted/zeroed blobs of memory.
This is what confidential computing is about, securing data in use.
Note:
In order to connect the Trustee running in the secure environment with the CVM in Microsoft Azure, we also need to set up an Azure VPN gateway. Learn more about how to set it up in this documentation.
The following steps to perform attestation are also available in the notebook image.
First, create a communication key to give to the Trustee server. This key will be provided to the Trustee that will use it to encrypt the secret to send back and ensure the key is only read by the correct client:
openssl genrsa -traditional -out tee-key.pem 2048Then start the kbs client pod. We will run a bash shell so that we can manually insert the commands as follows:
OUT_FOLDER=./keys # path where the downloaded key will be stored
mkdir -p $OUT_FOLDER
sudo podman run -it \
  --privileged \
  --device /dev/tpm0 \
  -v $OUT_FOLDER:/keys \
  -v ./tee-key.pem:/tee-key.pem \
  -v /dev/log:/dev/log \
  --rm \
  quay.io/confidential-containers/trustee-client:v0.3.0 sh
Note that here the client is not authenticated and running in a CVM, so there is no Trustee private key given to it.
Once inside the pod, let’s connect with the Trustee and ask for the dataset decryption key:
TRUSTEE_IP=<your-trustee-ip> # insert trustee machine ip
HTTPS_CERT_FILE=./https_certificate
KBS_RETRIEVAL_PATH=fraud-detection/key.bin # insert custom path here
kbs-client --url http://$TRUSTEE_IP:8080 attest --tee-key-file tee-key.pem --cert-file $HTTPS_CERT_FILE
 > attestation_token
kbs-client --url http://$TRUSTEE_IP:8080 get-resource --attestation-token attestation_token --tee-key-file tee-key.pem --path default/$KBS_RETRIEVAL_PATH --cert-file $HTTPS_CERT_FILE | base64 --decode > keys/key.bin
exit
Notice how we used the same key path that we set initially: default/fraud-detection/key.bin (KBS_RETRIEVAL_PATH).
The resulting key will be in $OUT_FOLDER/key.bin.
In case https custom certificates are not used, remove --cert-file $HTTPS_CERT_FILE.
Now that we have the key to decrypt the datasets (meaning the CVM can be considered trusted and therefore providing data in use protection) we can finally use the key to decrypt our datasets:
KEY_FILE=keys/key.bin # path to the key
DATASET_SRC=downloaded_datasets # where the encrypted datasets are
DATASET_DEST=datasets_dec # where the decrypted datasets will be stored
mkdir -p $DATASET_DEST
rm -rf $DATASET_DEST/*
for file in $DATASET_SRC/*; do
fname=$(basename $file)
fname=${fname%.enc}
openssl enc -d -aes-256-cfb -pbkdf2 -kfile $KEY_FILE -in $file -out $DATASET_DEST/$fname
echo "Decrypted" $DATASET_DEST/$fname":"
head $DATASET_DEST/$fname
echo ""
done
ls $DATASET_DEST
Note that here we used the same description algorithm -aes-256-cfb as in the very beginning to encrypt the data.
We are now finally ready to load the data in memory and feed it to the inference fraud detection model.
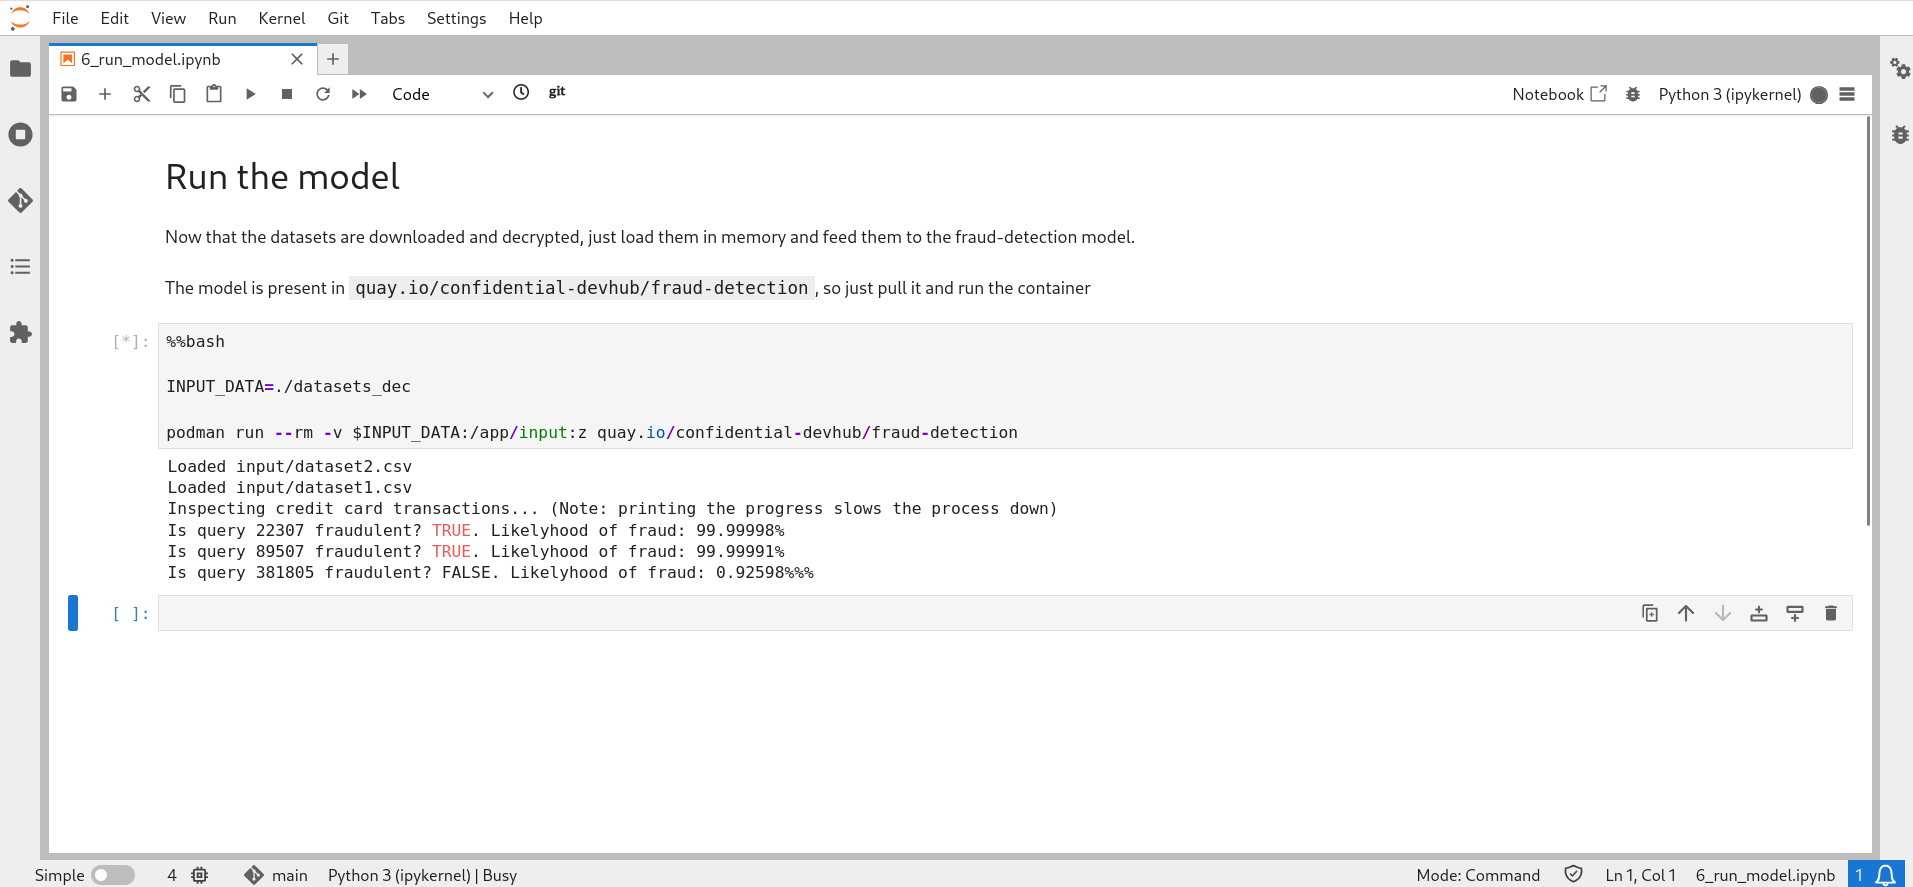
Securely executing fraud detection
To simplify the workflow, we will provide a container with the fraud detection model ready to fetch all the data files stored in a specific folder, and output which transaction is considered fraudulent. The following code is also available in the notebook image.
The model is available here. You can find the following code to develop, train, and build the container on GitHub.
INPUT_DATA=./datasets_dec # folder containing the decrypted datasets
podman run --rm -v $INPUT_DATA:/app/input:z quay.io/confidential-devhub/fraud-detection
Figure 3 shows the end result, where the model inspects the data and prints the fraudulent transactions.
More to come
In this demo, we showed you the steps to run a fraud detection AI model in the Microsoft Azure public cloud, using confidential virtual machines on RHEL and remote attestation with a Trustee.
We showed how to encrypt data in the secure environment before sending it to the cloud, and to decrypt only when we can trust the CVM. We have also protected the credit card transaction datasets while they were in all three data states: data at rest (encrypted disk and dataset), data in transit (authenticated cloud storage access, encrypted dataset), and data in use (attested CVM).
Stay tuned for our companion article that provides a high-level perspective on this demo, covering the motivation, architecture, and concepts of CVMs on RHEL and confidential computing.
Last updated: June 2, 2025