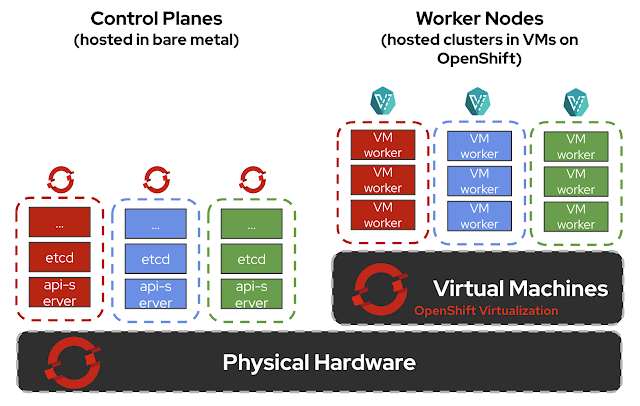
Hosted control plane (HCP) technology, through the API hypershift.openshift.io, provides a way to create and manage lightweight, flexible, heterogeneous Red Hat OpenShift Container Platform clusters at scale. The API exposes two user-facing resources: HostedCluster and NodePool. A HostedCluster resource encapsulates the control plane and common data plane configuration. When you create a HostedCluster resource, you have a fully functional control plane with no attached nodes. A NodePool resource is a scalable set of worker nodes attached to a HostedCluster resource.
This article focuses on hosted control plane topology using Red Hat OpenShift Virtualization and the kubevirt provider to provision the NodePool’s worker nodes of the HostedCluster. This is currently the only supported way to run OpenShift clusters on top of OpenShift Virtualization.
We will explain how to expose an application running on the hosted cluster and make it reachable from the outside using NodePort service, as this operation may seem complex at first glance.
Having OpenShift Virtualization as the hypervisor for your OpenShift clusters, together with the HCP form factor, offers several key benefits:
- Enhanced resource utilization by consolidating hosted clusters on the same underlying bare metal infrastructure.
- Strong isolation between hosted control planes and hosted clusters.
- Faster cluster provisioning by eliminating the bare metal node bootstrapping process.
- Simplified management of multiple releases under a single base OpenShift Container Platform cluster.
To install hosted clusters with the kubevirt provider, refer to this doc.
Figure 1 represents the hosted control plane with kubevirt provider high-level design.
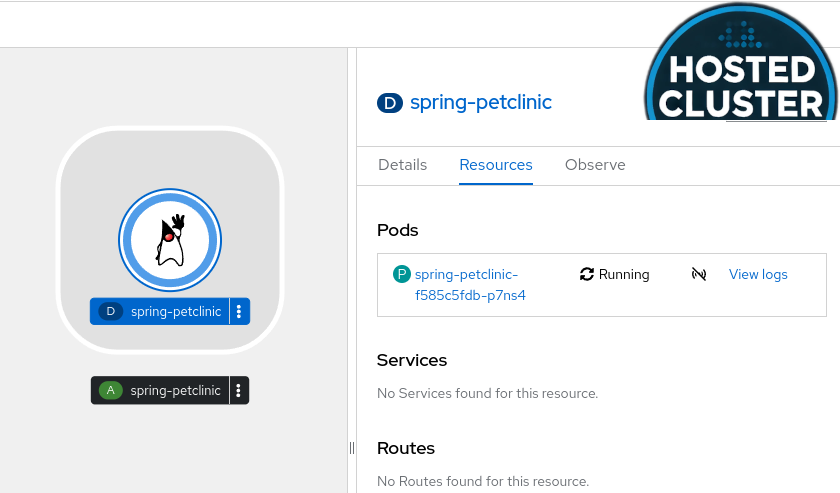
Let's now start deploying an application called "petclinic" on the hosted cluster using this YAML file, as shown in Figure 2.
The YAML file shows that the application listens on TCP ports 8080, 8443, and 8778:
 ports:
   - containerPort: 8080
     protocol: TCP
   - containerPort: 8443
     protocol: TCP
   - containerPort: 8778
     protocol: TCP
In a typical OpenShift installation, the next step would be to expose the application using one of the following Kubernetes services:
- ClusterIP
- NodePort
- LoadBalancer
Considering that the b cluster runs as virtual machines (pods) inside the software-defined network (SDN) of the OpenShift bare metal cluster, we need to find a simple way to reach our application running on the cluster from the external world.
Suppose the application running on the cluster is exposed using a ClusterIP service. In that case, the received cluster IP address belongs to the isolated hosted cluster network, and that IP address can’t be reached from the outside as it is.
When exposing the application running on the hosted cluster using a LoadBalancer Kubernetes service, different requirements must be met before the configurations:
- MetalLB must be installed on the hosting cluster.
- A secondary network interface controller (NIC) must be configured on the hosting cluster.
- A Network Attachment Definition must be configured on the hosting cluster.
- A secondary NIC must be configured on the virtual machines acting as a worker node for the hosted cluster.
- The correct IPAddressPool must be configured on the cluster (there is no need to specify the host interface in layer 2 mode).
Exposing an application running on the hosted cluster using the NodePort service could be a more straightforward solution in some cases, especially for non http/https services. In this case, the required steps would be:
- Create the NodePort service on the hosted cluster targeting the Pod application.
- Create a NodePort service on the hosting cluster that targets the virtual machines' pods, which act as the cluster's worker nodes.
Focusing on the NodePort exposition scenario, let's see how to implement the required steps.
Create the NodePort service on the hosted cluster
Apply the NodePort service YAML file on the hosted cluster as shown in Figure 3.
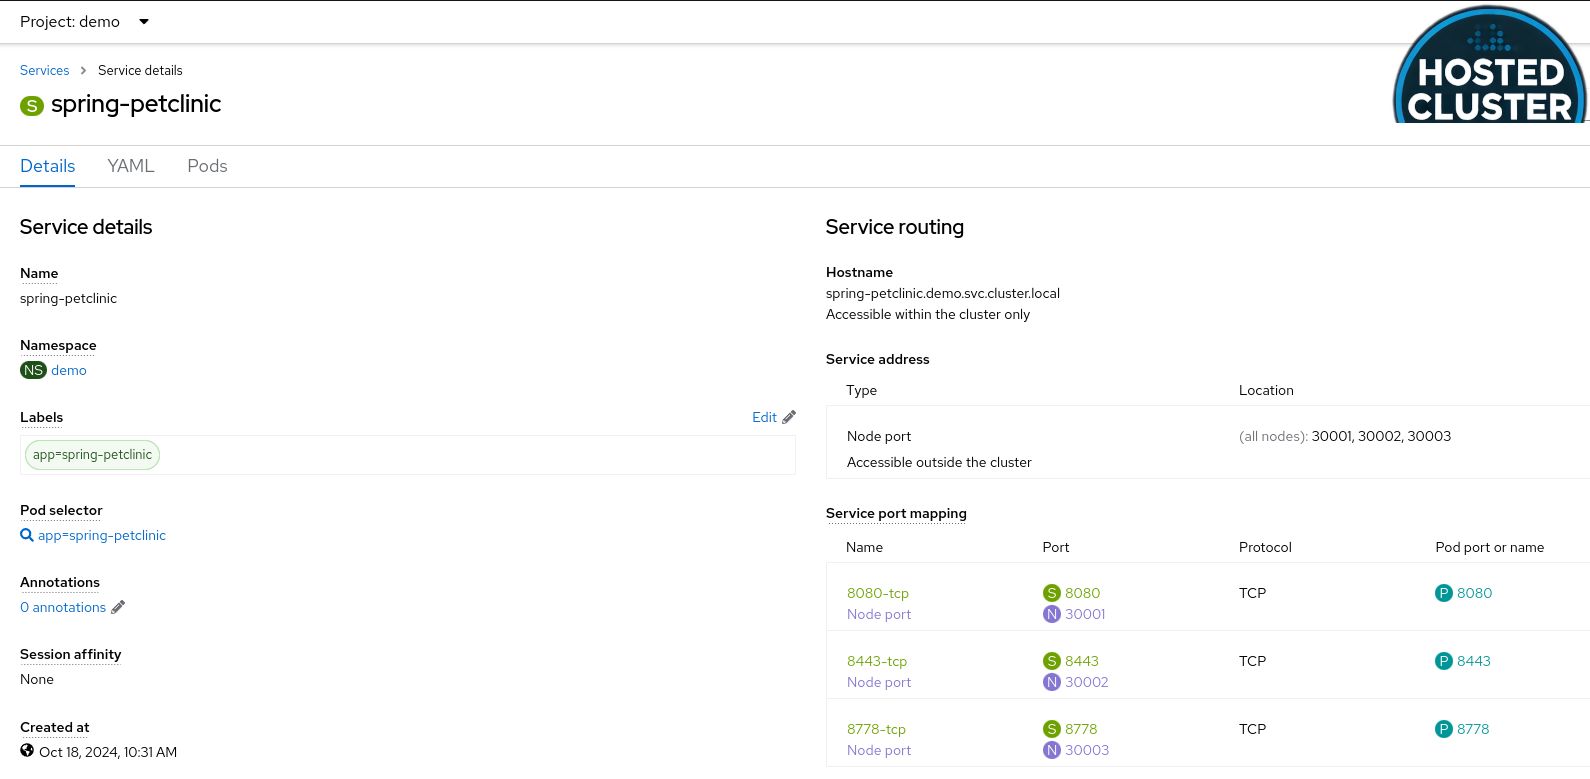
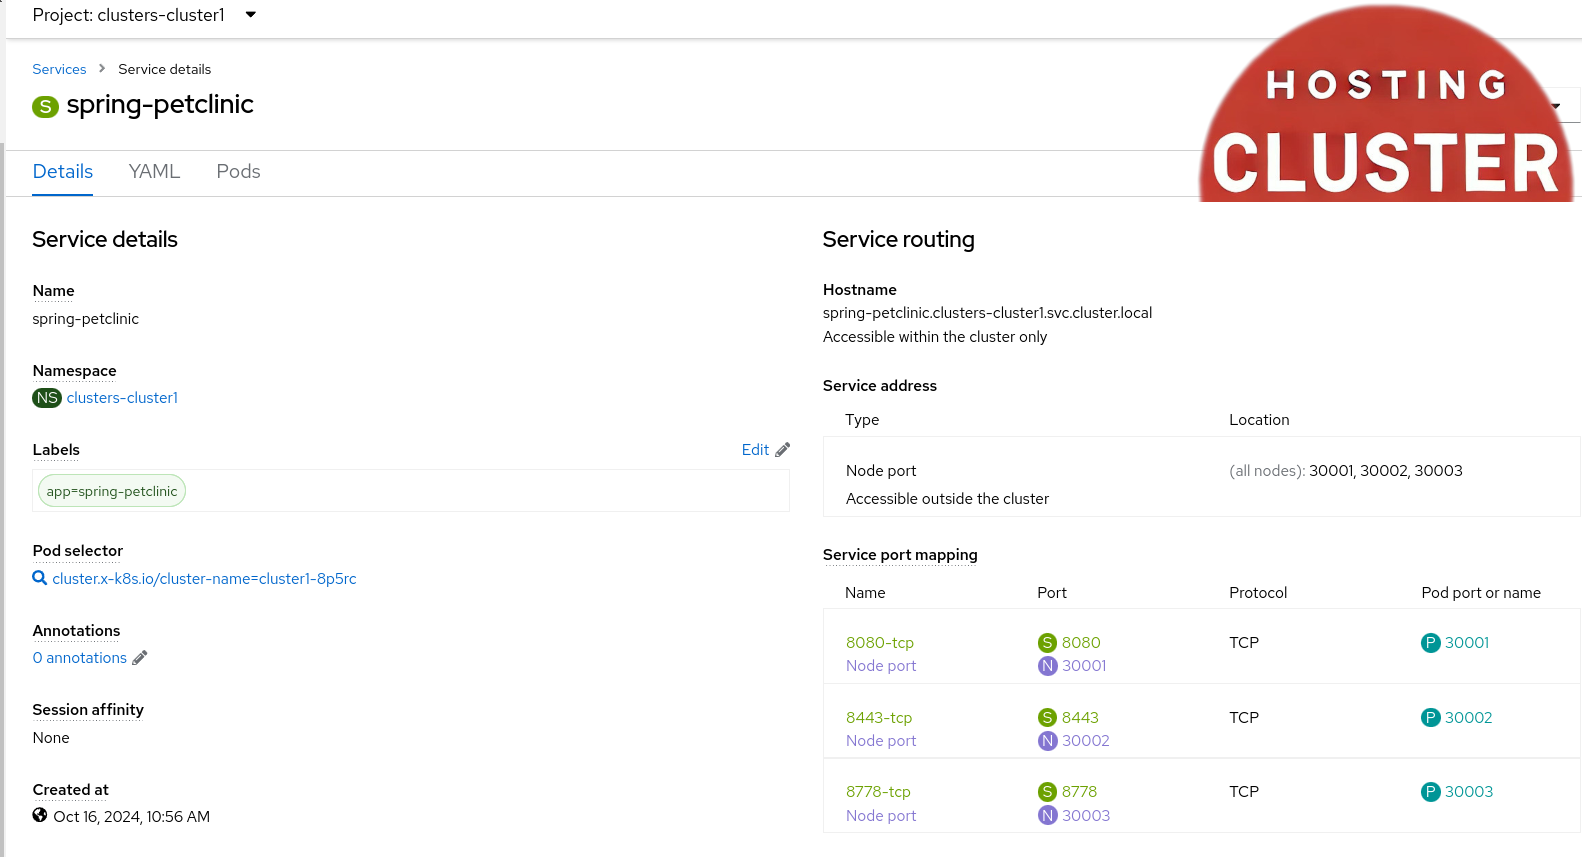
The Service is accessible using the IP address of each OpenShift node at a designated static port (TCP 30001, 30002, and 30003 in this example), referred to as the NodePort. To facilitate the availability of the node port, Kubernetes establishes a cluster IP address, similar to the process followed when a Service of type ClusterIP is requested.
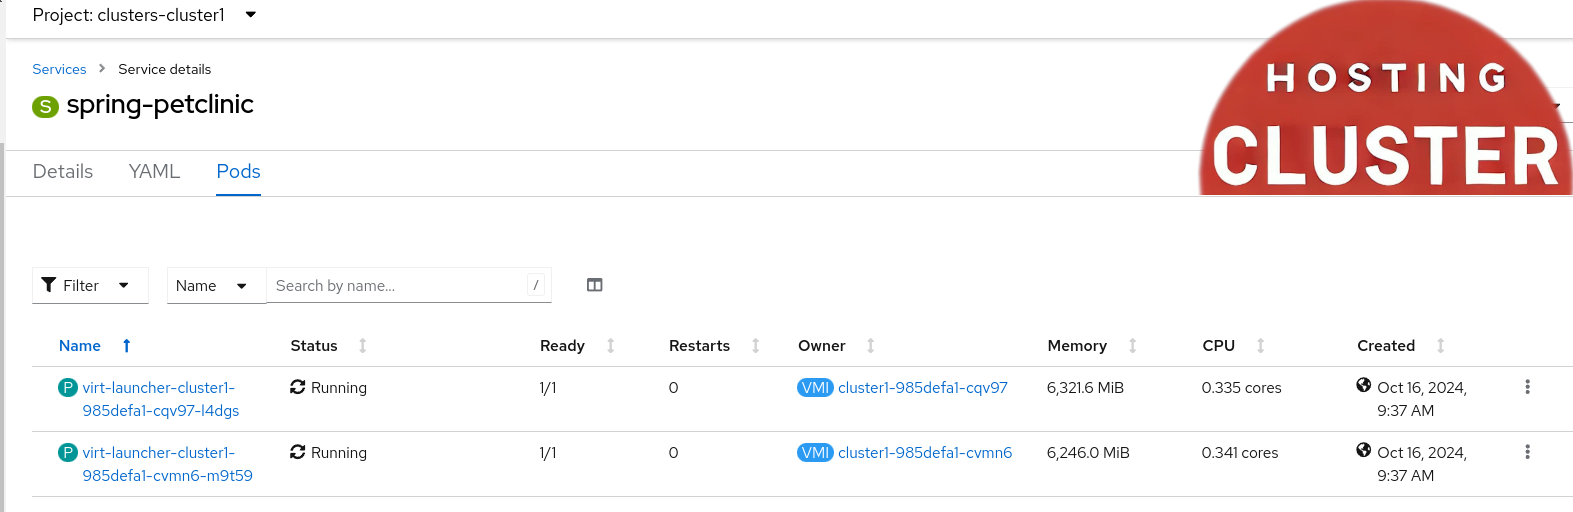
The hosted cluster nodes are shown in Figure 4.
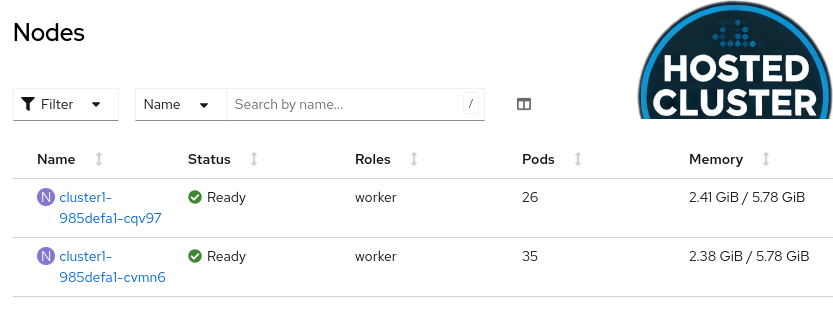
These are the hosted cluster nodes IP addresses:
$oc get nodes -o wide | awk {'print $1" "$3" "$6'} | column -t
NAME                     ROLES   INTERNAL-IP
cluster1-985defa1-cqv97  worker  10.131.0.192
cluster1-985defa1-cvmn6  worker  10.128.2.82
Because we are using the HCP kubevirt provider, the hosted cluster's nodes are virtual machines from the point of view of the hosting cluster. See Figure 5.
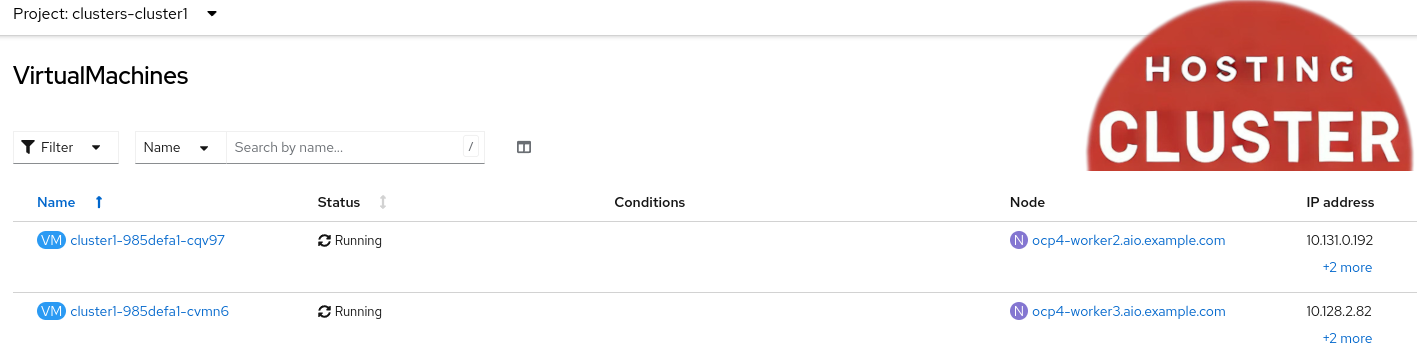
Do note that the IPs 10.131.0.192 and 10.128.2.82 assigned to the hosted cluster nodes equal the virtual machine IPs running on the hosting cluster.
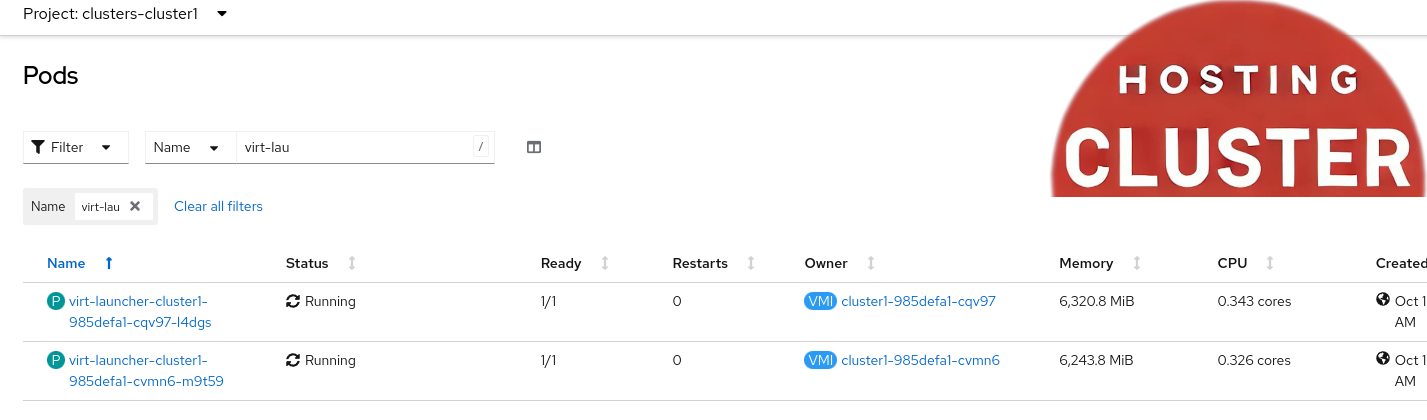
It should be clear now that when we create a NodePort service on the hosted cluster, we open some ports on the virtual machines running on the hosting cluster. The virtual machines running on the hosting run as a pod and are attached by default to the pod network of the hosting cluster. See Figure 6.
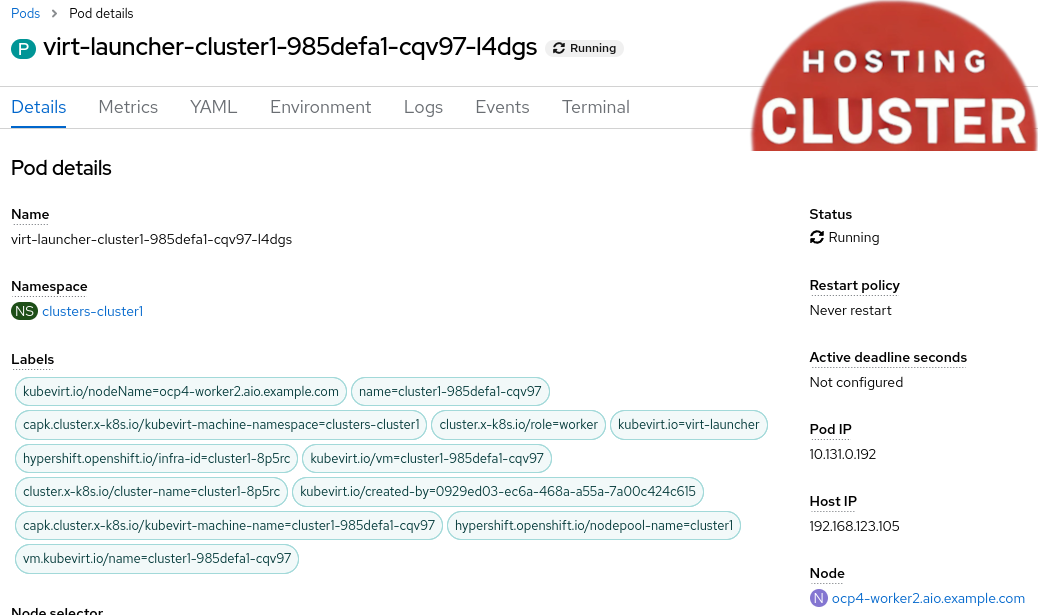
For confirmation, the virt-launcher pod of one virtual machine has the same IP address (10.131.0.192), which is part of the pod's network of the hosting cluster, as depicted in Figure 7.
Create the NodePort service on the hosting cluster
We must now create a NodePort service on the hosting cluster to expose the TCP ports 30001, 30002, and 30003 listening on the virtual machine pods. For the service's podSelector label, we have different options because the hosted control plane process adds different labels for each NodePool at installation time; in this case, the following label was chosen as it selects all the virtual machines (pods) acting as OpenShift nodes for the hosted cluster:
cluster.x-k8s.io/cluster-name=cluster1-8p5rcAfter creating the NodePort service on the hosting cluster using this YAML file, we see that the NodePort service opened the TCP ports 30001, 30002, and 30003 on the nodes of the hosting cluster, as shown in Figure 8.
Also, we see that the NodePort service correctly selected the virtual machine pods (Figure 9).
The hosting cluster nodes have the following IP addresses:
$oc get nodes -o wide | awk {'print $1" "$3" "$6'} | column -t
NAME                          ROLES                 INTERNAL-IP
ocp4-master1.aio.example.com  control-plane,master  192.168.123.101
ocp4-master2.aio.example.com  control-plane,master  192.168.123.102
ocp4-master3.aio.example.com  control-plane,master  192.168.123.103
ocp4-worker1.aio.example.com  worker                192.168.123.104
ocp4-worker2.aio.example.com  worker                192.168.123.105
ocp4-worker3.aio.example.com  worker                192.168.123.106
To confirm that the ports are correctly opened on the hosting worker node, let's open a debug pod on one of the nodes to check if one of the wanted ports is in a listening state:
$oc debug node/ocp4-worker3.aio.example.com
Temporary namespace openshift-debug-cphkq is created for debugging node... Starting pod/ocp4-worker3aioexamplecom-debug-mzrzx
To use host binaries, run `chroot/host`
Pod IP: 192.168.123.106
If you don't see a command prompt, try pressing enter.
sh-4.4# chroot/host
sh-5.1# ss -tlnp | grep 30002
LISTEN Ø  4096      *:30002       *:*   users: (("ovnkube", pid=6177, fd=26))
Now it's time to check if our "petclinic" application running on the hosted cluster is reachable from the outside through the hosting worker nodes IP addresses (192.168.123.104, 192.168.123.105, and 192.168.123.106) and 30001 TCP port:
[root@ocp4-bastion ~]# curl -s 192.168.123.104:30001 | grep "pet"
<img class="img-responsive" src="/resources/images/pets.png"/>
[root@ocp4-bastion ~]# curl -s 192.168.123.105:30001 | grep "pet"
<img class="img-responsive" src="/resources/images/pets.png"/>
[root@ocp4-bastion ~]# curl -s 192.168.123.106:30001 | grep "pet"
<img class="img-responsive" src="/resources/images/pets.png"/>
As we can see, our "petclinic" application running on the hosted cluster is now accessible from the outside world.
Conclusion
Exposing an application running on the hosted cluster created by the hosted control plane using the kubevirt provider through the NodePort service brings many opportunities, and (of course) all the described procedures could be fully automated using the GitOps approach thanks to Red Hat Advanced Cluster Management and OpenShift Gitops technologies.
Have fun!
