Red Hat Advanced Cluster Management (ACM) for Kubernetes offers end-to-end visibility and control for managing your cluster and application lifecycle. Among other features, it ensures security and compliance for your entire Kubernetes domain across multiple data centers and public clouds.
This article guides you through setting up your Red Hat OpenShift 4 environment for an ACM installation and then installing ACM. For reasons that I will explain, we'll use the command line interface (CLI) to set up the installation environment. Once the environment is set up, I will show you how to complete the installation using either the CLI or the OpenShift web console, with examples for both methods.
Note that I will not demonstrate how to install ACM in a restricted environment. Also, my examples are based on Advanced Cluster Management for Kubernetes 1.0. Tech Preview. You might need to update some of the installation steps for a newer version of ACM.
Note: See Red Hat Advanced Cluster Management for Kubernetes for more about the features and benefits of ACM.
ACM installation overview
You can use either the OpenShift 4 web console's built-in OperatorHub or the OpenShift CLI to install ACM. The installation breaks down to six steps:
- Prepare the environment for the ACM installation.
- Create a new OpenShift project and namespace.
- Create an image-pull secret.
- Install ACM and subscribe to the ACM Operator group.
- Create the MultiClusterHub resource.
- Verify the ACM installation.
We will use the OpenShift command line for the first several steps; then, I will show you how to use either the command line or the OpenShift 4 web console.
Step 1: Prepare the environment for the ACM Installation
Before starting with the installation process, make sure that you have the correct version of OpenShift and other resources set up in your development environment. Before you start setting up your development environment for ACM, make sure that you have OpenShift 4.3 or higher installed on Linux x86_64 and Red Hat Enterprise Linux (RHEL) 7.6 or higher.
There are a number of important details to consider before proceeding. One is the number of pods per node. The number of pods you need depends on the application type and how you configure the worker nodes. The maximum pod per node is 500 and the maximum pod per CPU core is 10.
Another is that the cluster size depends on the number of worker nodes. If your cluster has a few worker nodes, consider increasing the number of worker nodes while decreasing the size of each node for adequate headspace, efficiency, mobility, and resiliency.
Note: Learn more about minimum and maximum node configuration and pod resource sizing.
You also need to consider the memory that is required for the specific type of workload you will be running, plus for the other application frameworks in your environment. And, you have to be prepared to accommodate workload mobility.
As an example, if your OpenShift installation is running on Amazon Web Services (AWS), it is recommended that you use a node size of m5.2xlarge or above. Figure 1 shows the configuration options for ACM clusters running on AWS.

If you are a cluster admin, you can increase the size of worker nodes using machineset sizing operations. To upgrade to a node size of m5.2xlarge:
- List the machinesets:
$ oc get machinesets -n openshift-machine-api
- Next, upgrade the instance type of CLUSTER_NAME to m5.2xlarge:
$ oc patch machineset CLUSTER_NAME --type='merge' --patch='{"spec": { "template": { "spec": { "providerSpec": { "value": { "instanceType": "m5.2xlarge"}}}}}}' -n openshift-machine-api</pre>- Scale down CLUSTER_NAME to zero:
$ oc scale machineset CLUSTER_NAME --replicas=0 -n openshift-machine-api
- Scale back up the CLUSTER_NAME to 1 again:
$ oc scale machineset CLUSTER_NAME --replicas=1 -n openshift-machine-api
In this instance, CLUSTER_NAME is the name of one of your cluster (or worker) nodes. You can repeat the command for all of your worker nodes. Run the first command (oc get machinesets) to see a listing of all of your worker nodes, as shown in Figure 2.

Step 2: Create a new OpenShift project namespace
If you install ACM through the OpenShift OperatorHub, a new OpenShift project will be created automatically. However, I recommended creating the new OpenShift project namespace before you install ACM. The images required to deploy ACM to OpenShift are hosted in remote registries, so you can still anticipate the additional authentication issue. By providing the authentication you know for sure it works, you can ensure that the image pull error will be avoided and will work successfully. Also, among other things, creating the OpenShift project first will allow you to create an image-pull secret before you install ACM.
Note: If you are installing ACM in a restricted environment, it is especially important to create a new OpenShift project before installing ACM. Doing so will help you avoid errors in the installation process.
To create a new OpenShift project in the CLI, you need to create a new namespace and then switch to the project. For this example, run the following command to create a new OpenShift namespace named open-cluster-management:
$ oc new-project open-cluster-management
Then, run the following command to switch to the project:
$ oc project open-cluster-management
Step 3: Create an image-pull secret
While the ACM Operator is capable of determining the required credentials to pull images from the Red Hat Registry, I recommend creating the image-pull secret yourself. There are two reasons:
- Manually creating the image-pull secret eliminates a potential problem with authenticating the image pull.
- If you end up working in a restricted environment, you will have to pull the ACM images from a private image registry instead of the Red Hat Registry.
To create a new OpenShift secret in the CLI, use the following command to create a new OpenShift secret that will authenticate with the Red Hat Tech Preview Registry, where ACM is hosted:
$ oc create secret docker-registry <strong>YOUR_SECRET_NAME</strong> --docker-server=registry.access.redhat.com/rhacm1-tech-preview --docker-username=<strong>YOUR_REDHAT_USERNAME</strong> --docker-password=<strong>YOUR_REDHAT_PASSWORD</strong>
For YOUR_SECRET_NAME, provide the OpenShift secret name that you will use to pull the images from the Red Hat Registry. This name is used when you create the MultiClusterHub later. For YOUR_REDHAT_USERNAME and YOUR_REDHAT_PASSWORD, use the credentials for your Red Hat subscription.
Step 4: Install ACM and subscribe to the ACM Operator group
In this section, I will show you how to install ACM and subscribe to the ACM Operator group using both the CLI and the OpenShift web console.
Install and subscribe using the CLI
If you are using the CLI, you will need to manually create an ACM Operator group before you can subscribe to it. To start, create a YAML file named acm-operator.yaml:
apiVersion: operators.coreos.com/v1
kind: OperatorGroup
metadata:
  name: acm-operator
spec:
  targetNamespaces:
  - open-cluster-management
In this case, acm-operator is the name of Operator group that you want to call, and open-cluster-management is the name of the OpenShift project that you created in Step 2.
You can now run the following command to apply the OperatorGroup that you have just created:
$ oc apply -f acm-operator.yaml
Next, create another YAML file for an ACM subscription. I am calling the subscription file acm-subscription.yaml:
apiVersion: operators.coreos.com/v1alpha1
kind: Subscription
metadata:
  name: acm-operator-subscription
spec:
  sourceNamespace: openshift-marketplace
  source: redhat-operators
  channel: release-1.0
  installPlanApproval: Automatic
  name: advanced-cluster-management
Run the following command to install the subscription:
$ oc apply -f acm-subscription.yaml
Install ACM and subscribe using the OpenShift web console
To install and subscribe to the ACM Operator group from the OpenShift web console, the first thing you need to do is open the web console and select the OperatorHub. Search for "advanced cluster," and Advanced Cluster Management for Kubernetes will pop up. Select it, as shown in Figure 2.

You will see a brief description of Advanced Cluster Management for Kubernetes. Click the Install button, as shown in Figure 3.

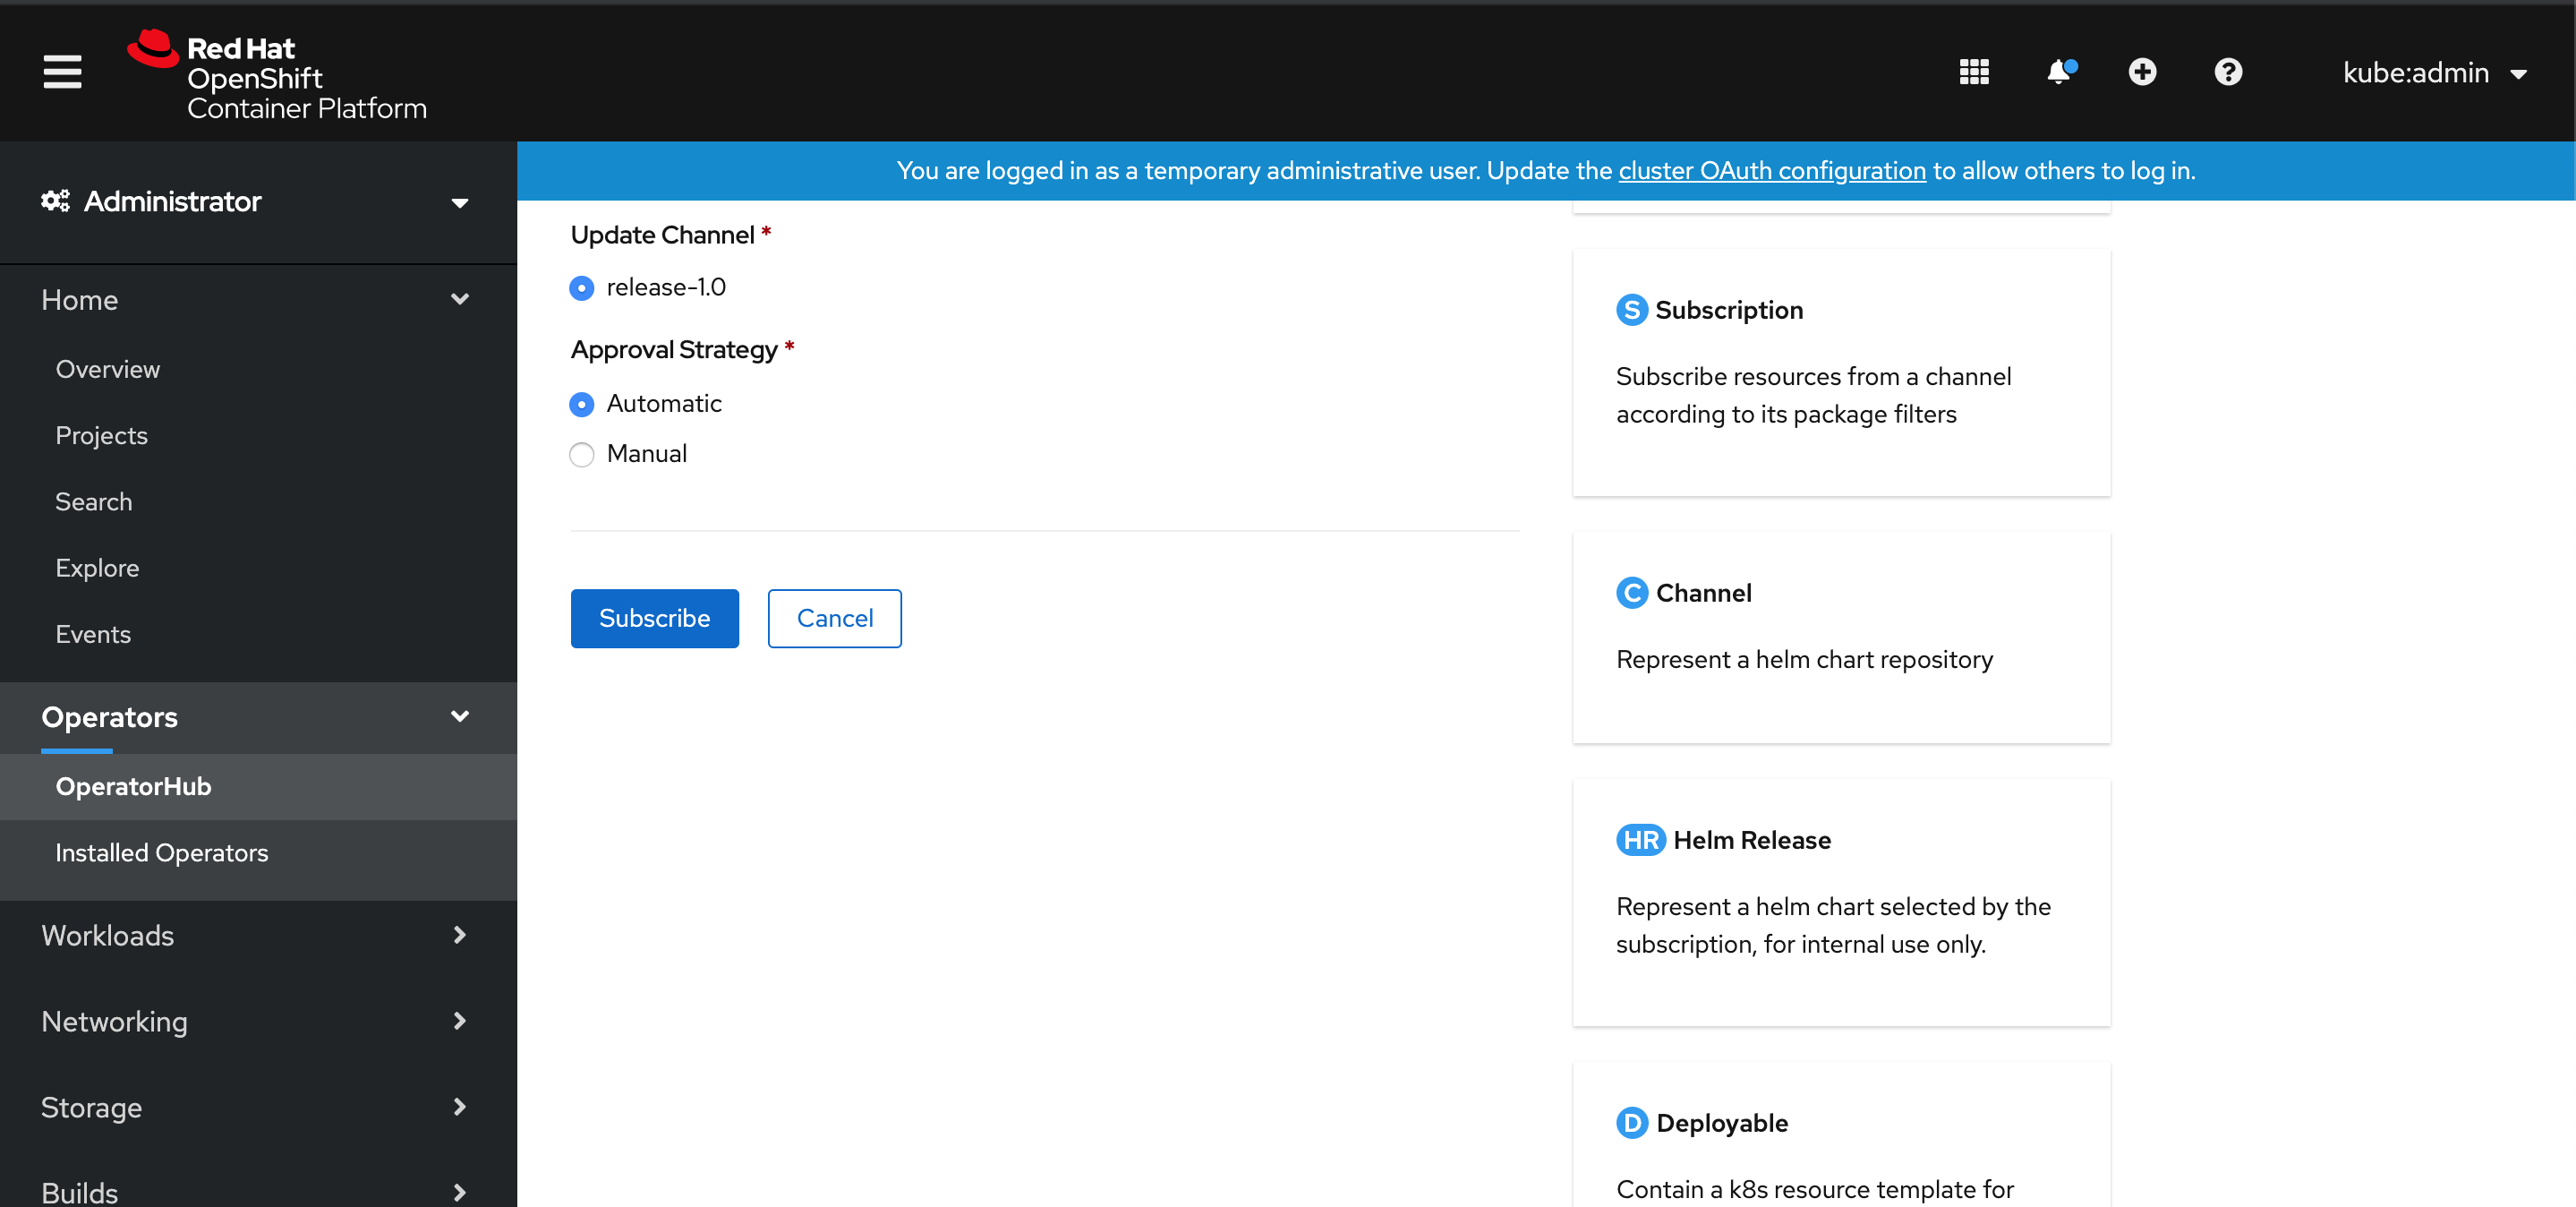
Next, set up the ACM subscription. Choose the open-cluster-management OpenShift namespace that you created earlier. As shown in Figure 4, ACM will try to install this namespace as the default.

Once you've selected the namespace, scroll down, and click Subscribe, as shown in Figure 5.
If you are still in the web console, you will see the ACM Operator installation taking place. If everything goes well, you will see the status shown in Figure 6.
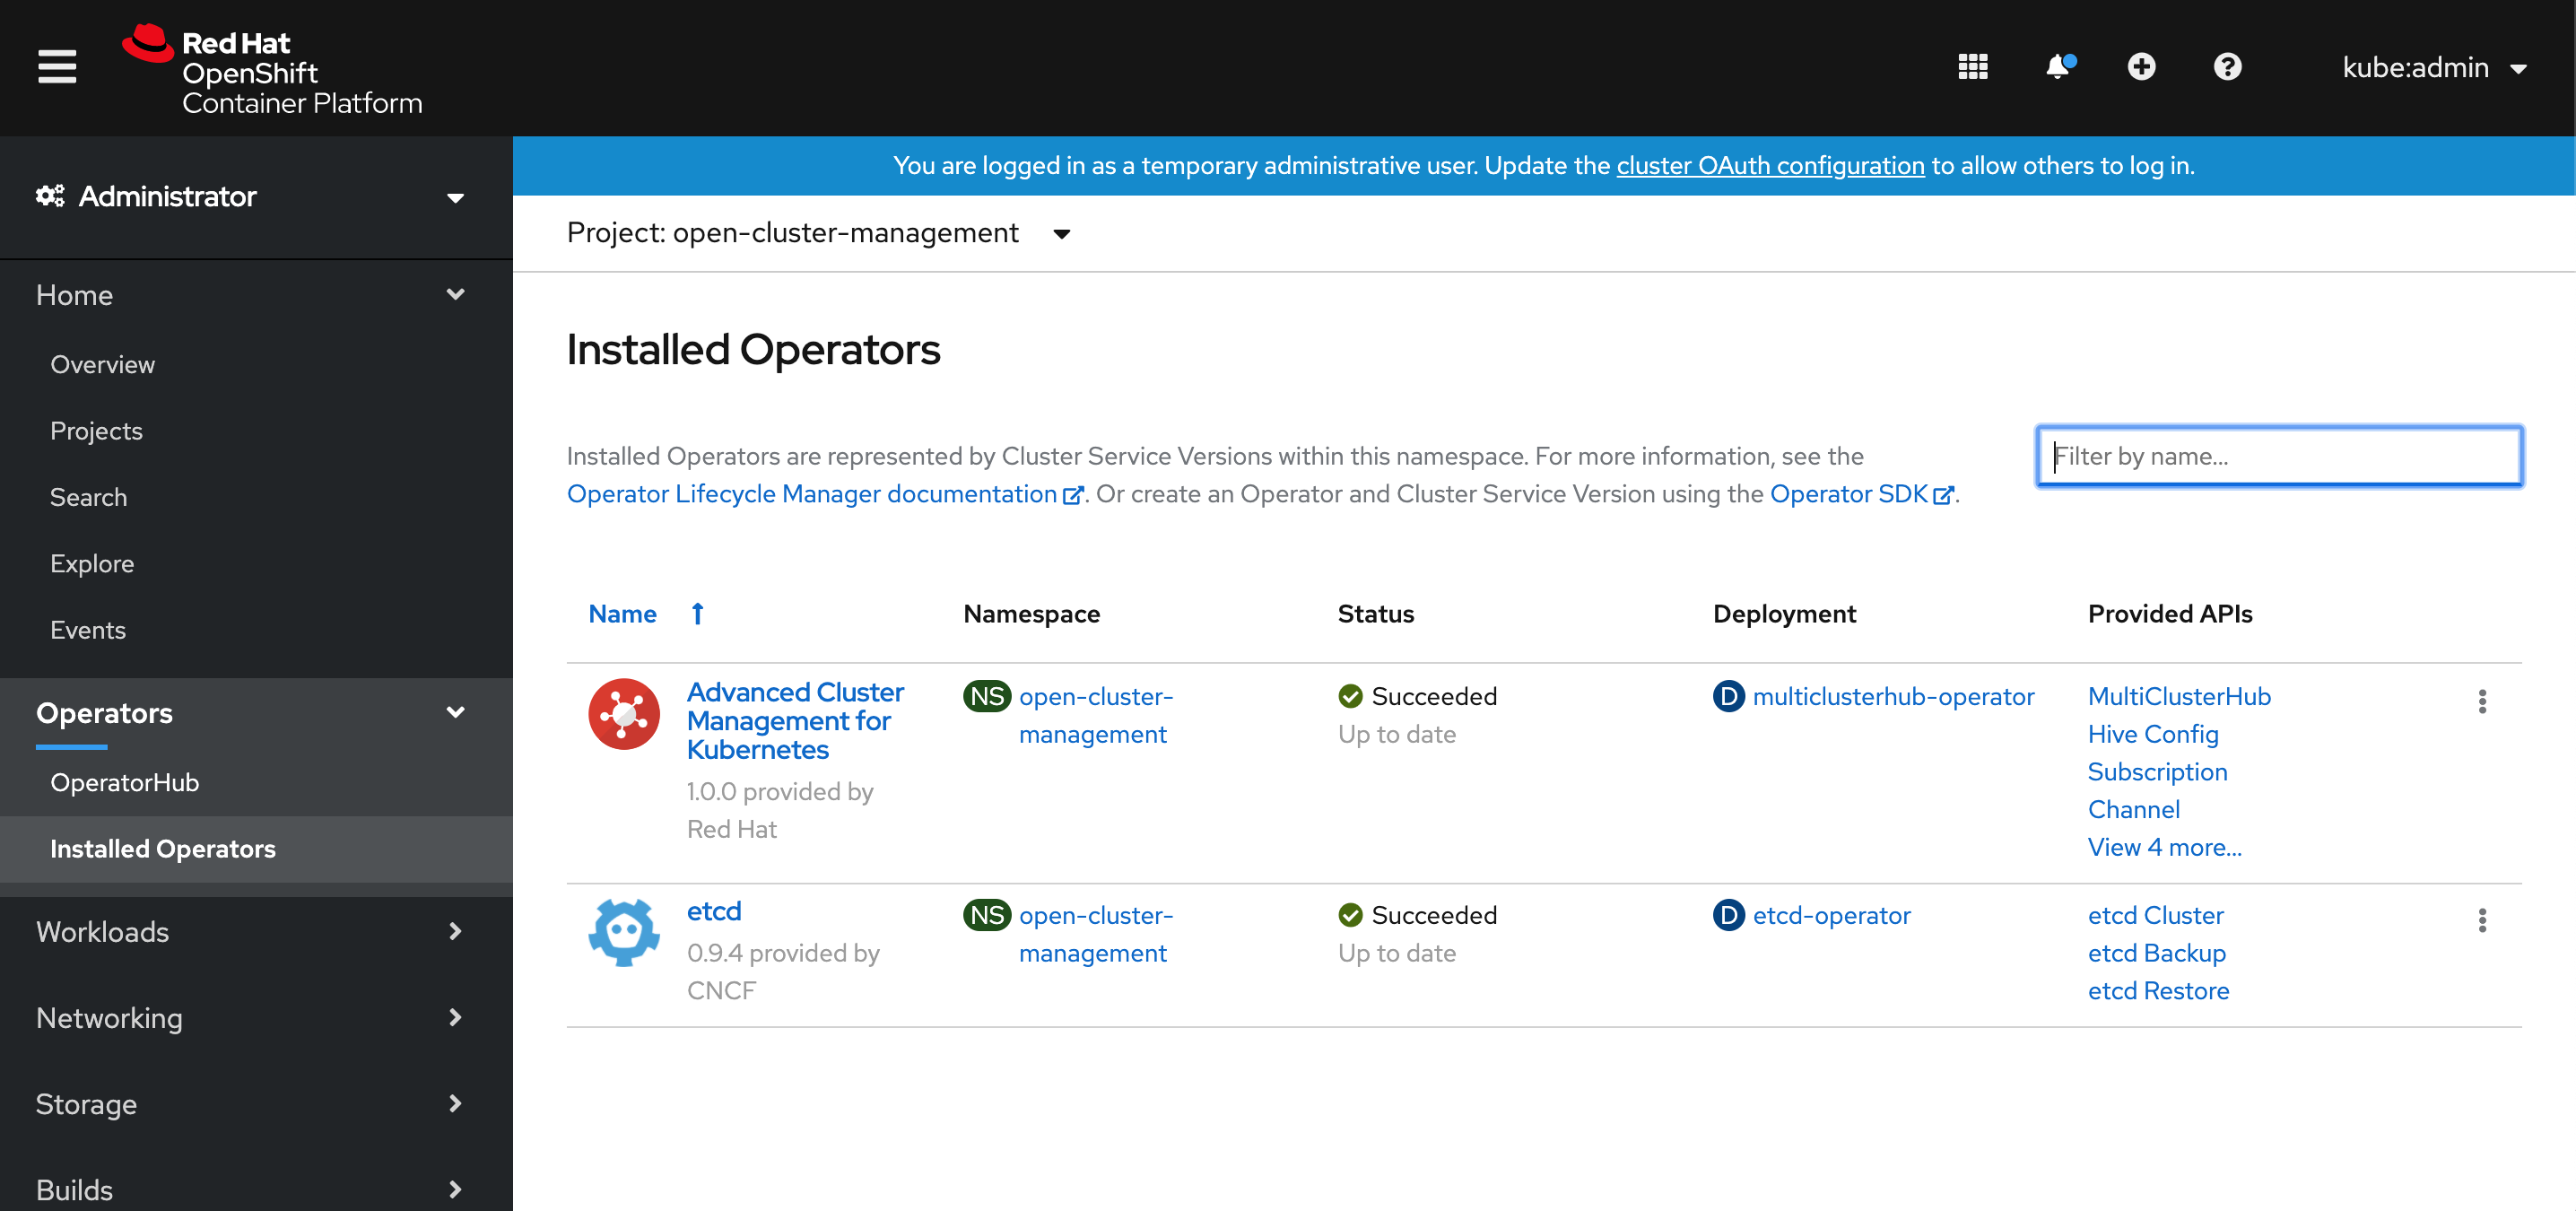
If you click Advanced Cluster Management for Kubernetes in the web console at this point, you will not initially see much of anything. You must proceed with installing the MultiClusterHub to see the running ACM application.
Step 5: Create the MultiClusterHub resource
Again, I will walk you through how to create the MultiClusterHub through both the command line and the web console. Adding the MultiClusterHub Operator—which is defined and managed through a Custom Resource Definition (CRD)—lets you manage the cluster type, policy, monitoring, cluster topology, more.
Create the MultiClusterHub from the CLI
To install the MultiClusterHub using the command line, start by creating a YAML file called multicluster-acm.yaml:
apiVersion: operators.open-cluster-management.io/v1beta1
kind: MultiClusterHub
metadata:
  name: multiclusterhub
  namespace: open-cluster-management
spec:
  imagePullSecret: YOUR_SECRET_NAME
In this case, open-cluster-management is the OpenShift project name and YOUR_SECRET_NAME is the OpenShift secret that contains the image-pull secret that you created in Step 3.
Run the following command to install the MultiClusterHub:
$ oc apply -f multicluster-acm.yaml
Run this command to get the application URL, which you will use to access the application:
$ oc get route
Create the MultiClusterHub using the web console
Now, let's follow the same steps using the web console. To start, open the ACM menu, then click the MultiClusterHub tab that is shown in Figure 7.

From the MutiClusterHub section, click Create MultiClusterHub, as shown in Figure 8.

Next, you'll be asked to provide a value in the imagePullSecret field. Enter the OpenShift secret name that you created in Step 3, then click Create (as shown in Figure 9).

Note: Some ACM users report that it is possible to leave the spec field shown in Figure 9 empty (as spec: {}) and successfully install the MutiClusterHub. I recommend providing the OpenShift secret that you will use to pull the required ACM images, with the correct credentials.
Step 6: Verify the ACM installation
As the final step, let's make sure that we have successfully installed ACM. First, confirm that the MultiClusterHub events log reports no issues in the web console, as shown in Figure 10.

Next, check the pods to ensure that they are all running successfully, as shown in Figure 11.

Note: There is a known problem with the mcmapi-server that occurs due to a cert-manager error. Execute oc get helmreleases, and then grep cert-manager to verify the version of cert-manager and correct it.
Finally, you can visit the ACM URL (which is exposed through the application route) to confirm the successful installation, as shown in Figure 12.

Conclusion
You can now install Advanced Cluster Management through Red Hat Openshift. Your next step is learning how to use these tools to manage multiple clusters. Next time, I will cover the ACM features and tricks that will get you there.
Last updated: July 22, 2020