The Red Hat build of Apache Camel is now available in the Developer Sandbox for Red Hat OpenShift, a Red Hat OpenShift environment that you can access for free to gain hands-on experience in building and deploying cloud-native applications quickly. The tutorial presented in this article will guide you through the process of rapid prototyping using Apache Camel, from the initial concept to the final deployment on OpenShift, all within a fully web-based, low-code interface.
Apache Camel is an open source integration framework that simplifies system integration by providing a domain-specific language for defining integration routes and a rich set of pre-built components. It is inspired by the Enterprise Integration Patterns book by Gregor Hohpe and Bobby Woolf, making it a powerful tool for addressing complex integration scenarios.
Rapid prototyping on the Developer Sandbox
To begin, join the Developer Sandbox, which offers a free, hands-on environment for building and deploying cloud-native applications. Here, you can leverage Apache Camel's capabilities without the need for local installations.
Key steps for rapid prototyping
There are 4 key steps for rapid prototyping:
- Utilize low-code tools.
- Leverage pre-built components.
- Deploy on OpenShift.
- Integrate with Quarkus or Spring Boot.
1. Utilize low-code tools
Take advantage of Camel JBang (Camel's CLI) and the low-code Kaoto UI provided in the Developer Sandbox to quickly prototype your integration flows. This interface allows you to create, test, and refine your integrations without extensive coding.
2. Leverage pre-built components
Apache Camel offers a wide range of pre-built components for data mapping, transformation, and service composition, with extensive support for Enterprise Integration Patterns (EIPs). These components simplify the process of integrating diverse systems and data formats.
3. Deploy on OpenShift
Use tools like the Camel JBang Kubernetes plug-in to deploy your Apache Camel application on OpenShift. These tools streamline the process of building, deploying, and managing your application within the Kubernetes environment.
4. Integrate with Quarkus or Spring Boot
For more complex applications, you can export your Apache Camel prototype into a Camel on Quarkus or Camel on Spring Boot project, providing a robust combination for deploying microservices that can efficiently integrate with other systems, transform data, and route messages with minimal boilerplate code.
Get started with Apache Camel
If you are accessing the Developer Sandbox for the first time, you’ll have to create a Red Hat account. Other than that, you are one click away from kicking off this unique experience. Click the link below to get started.
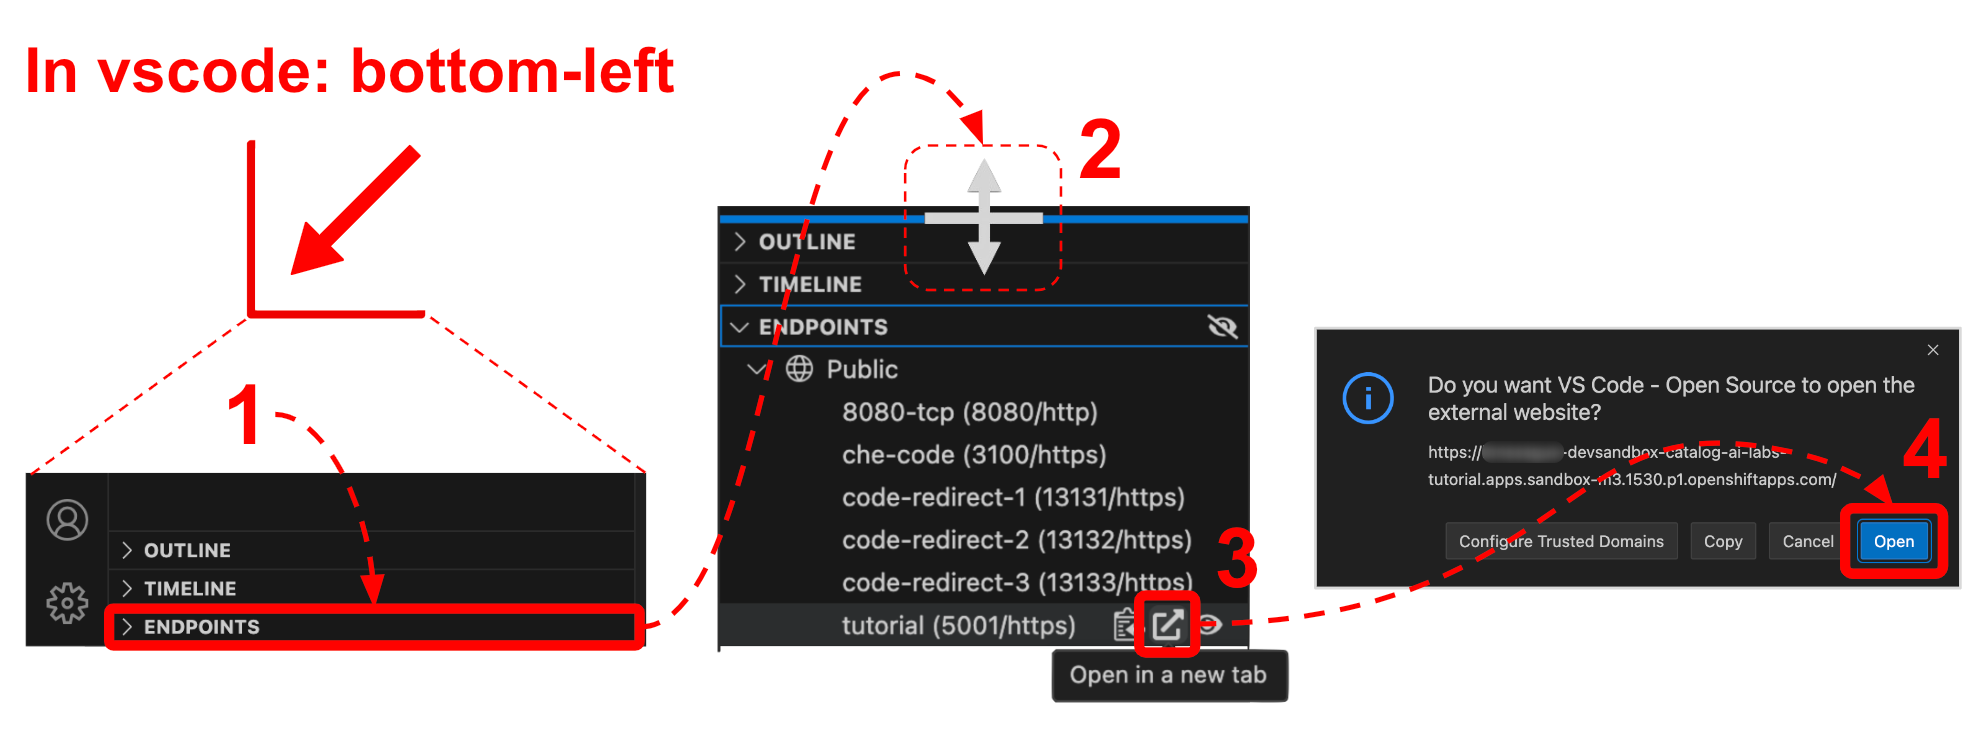
After Red Hat OpenShift Dev Spaces finishes preparing your workspace and opens VS Code in your browser tab, the Readme file might not appear by default. If so, follow the actions illustrated in Figure 1:
- Click ENDPOINTS near the bottom left corner of the screen to unroll the list of endpoints.
- Drag the divider upwards to reveal the tutorial's endpoint.
- Click the middle icon (external link) to open in a new tab the tutorial's documentation.
- In the confirmation panel, click Open.

Then, select the Camel - Prototype and deploy on OpenShift tile to get started (Figure 2).

In summary, unfold the ENDPOINTS group at the bottom-left corner on the left panel of VS Code, click the tutorial’s link to open the menu, and select the tile (in red) to get started, as per the actions shown in Figures 1 and 2.
Watch the intro video
To help you get started and get a glimpse of the tutorial, watch the video below to see how to provision your sandbox environment and some of its highlights.
How to recover from failures
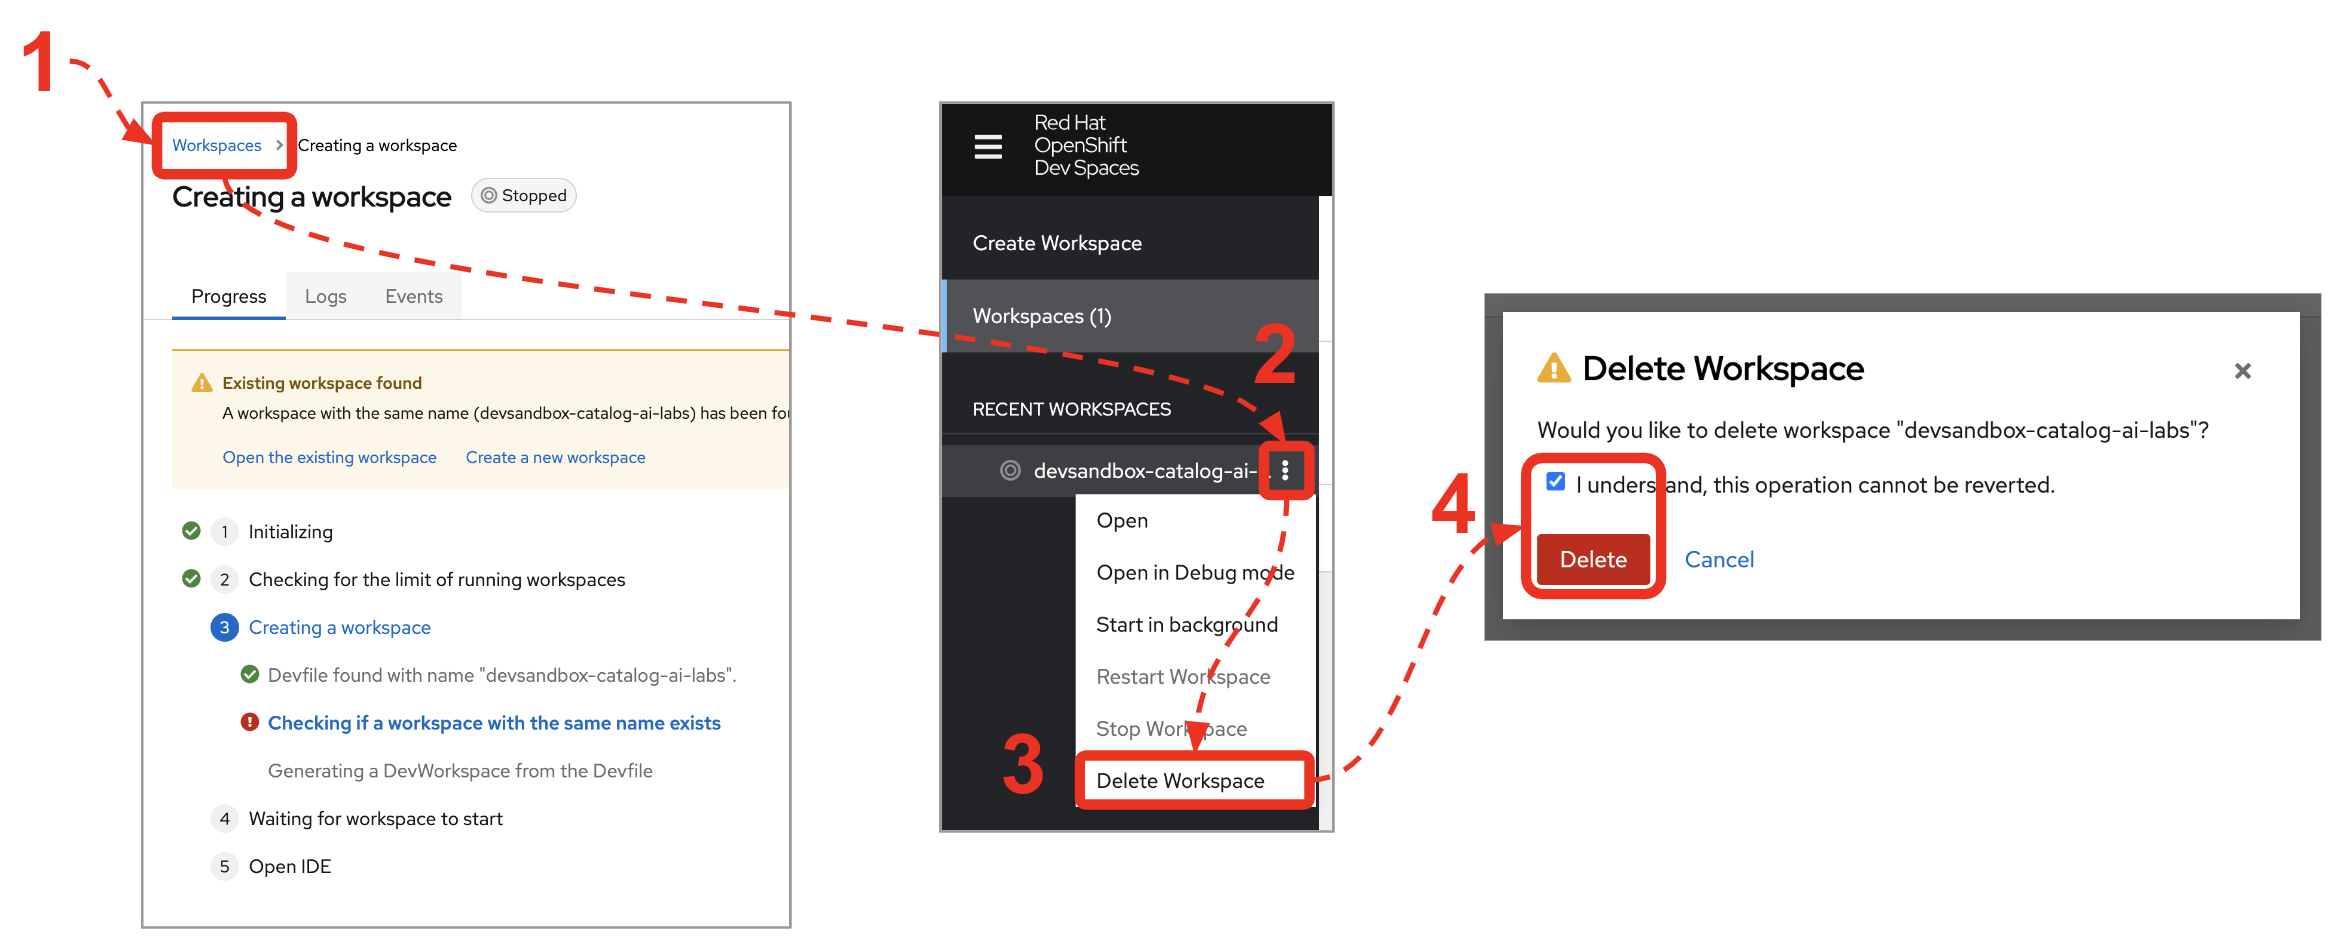
Sometimes, the provisioning process fails to complete. Try following the steps below to delete the failed workspace and try again:
- Click Workspaces at the top of the screen, as illustrated in Figure 3. The Dev Spaces dashboard will open.
- Click the three vertical dots (⋮) button (failed workspace).
- Select Delete Workspace.
- In the confirmation panel, tick the box, and click Delete.

After the actions above, retry provisioning your lab. Jump back to Getting Started with Apache Camel
Final words
Rapid prototyping with Apache Camel is not only the starting point for powerful integration processes but also a valuable tool throughout the application lifecycle. This streamlined approach enables developers to quickly create, test, and deploy integration applications while also facilitating efficient code reviews, bug fixes, and feature enhancements.
By leveraging the low-code UI, pre-built components, and robust capabilities of Apache Camel, teams can swiftly move from concept to deployment. This agile method ensures that complex integration scenarios are addressed with speed and precision, making it ideal for dynamic development teams to continuously improve and maintain their applications.
Tutorial’s repository
You can find all the sources for this tutorial under the following GitHub repository: devsandbox-camel.
Never stop learning
Find below a list of recommended resources:
- Try the AI Basics tutorial to see Camel+AI in action, also hosted in the Developer Sandbox.
- Visit the Red Hat build of Apache Camel product page on Red Hat Developer.
- Discover the Solution Pattern Edge to Core data pipelines for AI/ML.
- For first-timers, read How to access the Developer Sandbox for Red Hat OpenShift.
- Learn more about the Red Hat build of Apache Camel in Red Hat Application Foundations offering.
