Task scheduling with Red Hat Ansible Automation Platform offers a powerful solution for automating repetitive tasks and optimizing workflows, boosting productivity and efficiency. With its user-friendly interface and robust scheduling capabilities, Ansible Automation Platform simplifies the process of automating playbook execution at specific intervals, providing administrators with enhanced control over their infrastructure.
In this article, we will explore the ease and effectiveness of task scheduling in Ansible Automation Platform through a practical use case: SSH key rotation. We will demonstrate how administrators can effortlessly rotate SSH keys used by developers to access virtual machines, ensuring security and compliance, thereby saving time and effort.
Understanding the current scenario
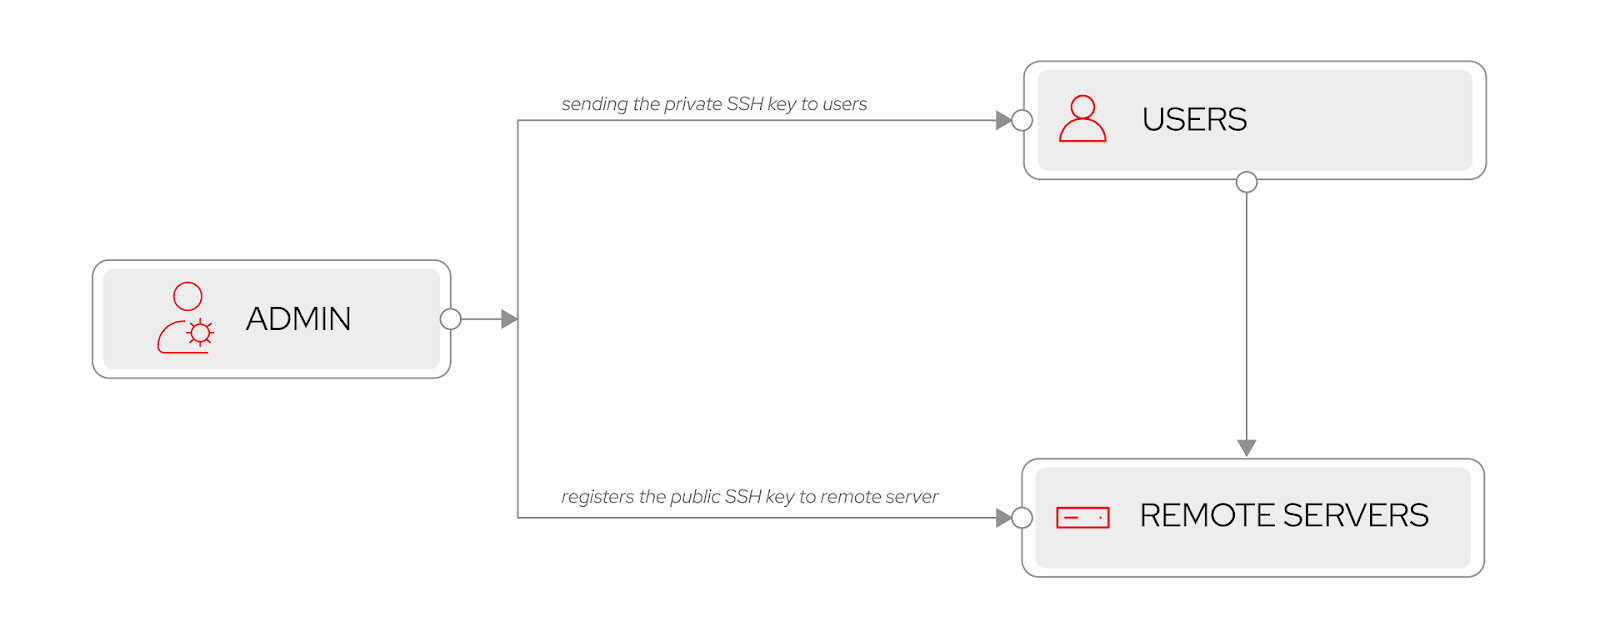
In the scenario shown in Figure 1, two developers need to regularly access remote servers via SSH. To ensure security, the SSH key used by the developers must be changed every fifteen days, and server passwords are not shared with the developers. Administrators rely on cron jobs, scheduled tasks, to handle SSH key rotation. However, using cron jobs for this purpose introduces challenges. Administrators must manually configure and maintain cron job settings, leading to potential errors and time-consuming tasks. Monitoring cron jobs becomes difficult, as failures or errors may go unnoticed, compromising server security. Troubleshooting cron job issues is complex, especially with concurrent tasks, making it challenging to identify the root cause of failures.
Simplifying SSH key management with Ansible
Ansible Automation Platform brings several advantages over cron jobs. First, it enhances security by ensuring a robust and secure SSH key rotation process, minimizing the risk of unauthorized access and security breaches. Second, it offers centralized management, enabling administrators to manage SSH keys across multiple servers from a single platform, eliminating manual interventions on each machine.
With the task scheduling feature, administrators can schedule playbook execution at regular intervals, automating the SSH key rotation process without relying on error-prone cron jobs. Additionally, Ansible Automation Platform provides error handling and notification capabilities. In the event of any errors during SSH key rotation, administrators can receive notifications, allowing them to promptly address issues and ensuring uninterrupted developer access to servers.
Demo setup
The demo includes two machines: a RHEL machine with two users, rhel8user1 and rhel8user2, a destination machine, and a RHEL machine with the configuration of user1 (Figure 2).
Our goal is to establish SSH connections between the remote machine users and the destination machine using the Ansible Automation Platform. To achieve this, we will generate a pair of public and private keys using the automation platform. Then, we will copy the private key to each user account on the remote machine.

Please note the following names used in our inventory:
- destination_machine: Refers to the machine to which the SSH connections will be established.
- remote_machine: Refers to the machine that contains the users who will SSH into the destination machine.
Prerequisites
Before you begin, make sure to download and install Ansible Automation Platform, available at no cost, on your machine. For more information about Ansible Automation Platform installation, please refer to our previous article, How to install Red Hat Ansible Automation Platform on RHEL 9.
Before you can complete any of the following tasks, you must create a registry service account. To login to SA you have to open your terminal and type the following commands.
podman login registry.redhat.io
Username: {REGISTRY-SERVICE-ACCOUNT-USERNAME}
Password: {REGISTRY-SERVICE-ACCOUNT-PASSWORD}
Login Succeeded!
Once we successfully log into SA, we need to create a container image by using a Dockerfile containing the following context:
FROM registry.redhat.io/ansible-automation-platform-22/ee-supported-rhel8:latest
RUN ansible-galaxy collection install ansible.posix
RUN ansible-galaxy collection install community.crypto
To build an image using podman:
podman build -t <image-name>.The image should be pushed into the container image registry. Log in to the private container image registry using the podman login command before pushing. For this demonstration, we use quay.io as our registry, but you can use any other container registry.
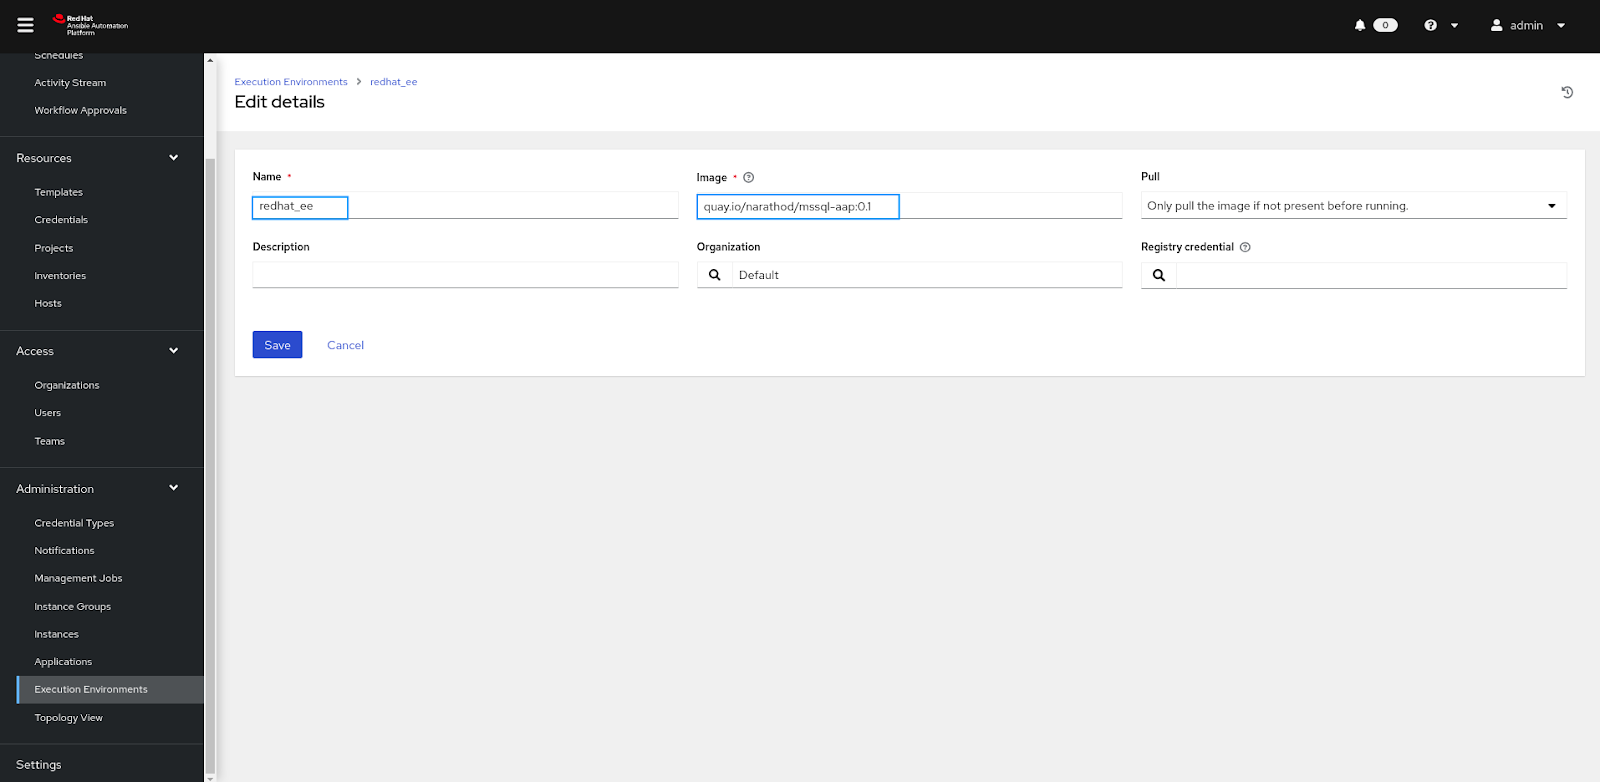
podman push <image-name>Navigate to execution environments under the administration tab and click on the Add button (Figure 3). Then, add the image name in the execution environment.
You can also try Ansible Automation Platform Builder to create a custom execution environment.
Demonstrating task scheduling with Ansible
1. Creating and Configuring the Project
- Navigate to the "Projects" tab under Resources in the left pane.
- Click on the "Add" to create a new project.
- Enter a name for the project and choose "Git" as the source control type with URL "https://github.com/decipher07/Manage-SSH-Keys-Ansible" in the Source Control URL field.
- Save the changes and wait for the operation to complete successfully.
2. Set up the inventory
- Select the inventory from the left menu.
- Click on add.
- Select add inventory.
- Give a name to the inventory and save it.
- Select the groups from inventories and click add group.
- Give a name to the group and save it. NOTE: The playbook is written to run for groups “remote_machine” and “destination_machine” only.
- Next, click on Hosts and click add a new host (Figure 4).
Give the targeted server IP and save it. NOTE: Please ensure that you organize each host into its corresponding group based on the server IP, as previously specified in the current setup section and diagram.
NOTE: In case your machine has an user and password, add the following variables:
- - - ansible_user: <YOUR USER TO SSH INTO> ansible_ssh_pass: <YOUR USER TO SSH INTO PASSWORD>
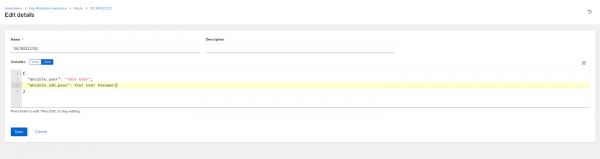
Figure 4: The host inventory configuration.

3. Creating and Configuring the Job Template
- Go to the "Templates" tab under Resources in the left pane and Click on the Add button and Select "Job template" from the options.
- Enter a name for the job you want to create, select the Demo-Inventory or Default inventory in the "Inventory" section.
- In the "Project" section, click on the project name you previously created and select the “rotate-key.yml” file.
4. Configuring Task Schedule
- Select the execution environment you previously created under the selected category and Save your changes by clicking on the Save button.
- Click on the Schedule tab and click on the Add button.
For this demonstration, We’ve used five mins for the schedule (Figure 5). You can try what works best for you.
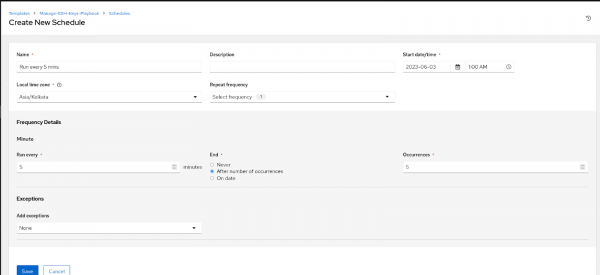
Figure 5: Creating a schedule. Navigate to the Jobs tab under Views, and depending upon the start time, you will be able to see the playbooks executed (Figure 6).

Figure 6: Output from the task schedule.


In this blog, we have seen how task scheduling in Ansible Automation Platform can effectively alleviate the challenges associated with traditional cron jobs, offering a more streamlined and efficient approach.
Continue your journey with Ansible Automation Platform
Get started with Ansible Automation Platform by exploring interactive hands-on labs. Download Ansible Automation Platform at no cost and begin your automation journey. You can refer to An IT executive's guide to automation ebook for better understanding of Ansible Automation.
Last updated: July 22, 2026