Modern businesses often require scalable, high-performance applications to meet the growing demands of their users. As organizations embrace cloud-based solutions, the need for robust application platforms becomes more critical. To address this need, Red Hat and Microsoft recently announced the general availability of Red Hat JBoss Enterprise Application Platform (JBoss EAP) clustering on Azure App Service.
JBoss EAP on Azure App Service can now automatically start as a clustered service using virtual networking for node-to-node communication. It is also enabled for auto-scaling operations through Azure App Service, a fully managed platform for creating web applications.
In this tutorial, we will go through the steps required to deploy a sample session replication application to a three-node JBoss EAP cluster on Azure App Service:
- Create a virtual network.
- Create a JBoss EAP app service.
- Configure virtual network integration.
- Deploy the application.
Prerequisites
You will need the following to follow along with this tutorial:
- A Microsoft Azure account with an active subscription.
- A GitHub account.
Set up JBoss EAP clustering on Azure App Service
Before deploying the Azure app service, we need to clone the sample clustering application repository. Open this GitHub repository and click Fork to clone to your own GitHub account.
Create a virtual network
JBoss EAP on Azure App Service uses virtual networks to enable clustering. If you have an existing virtual network configured on your Azure subscription, you can use this. Otherwise, to create a new virtual network, navigate to the Azure Virtual networks page and click + Create. You will be presented with a form, as shown in Figure 1.
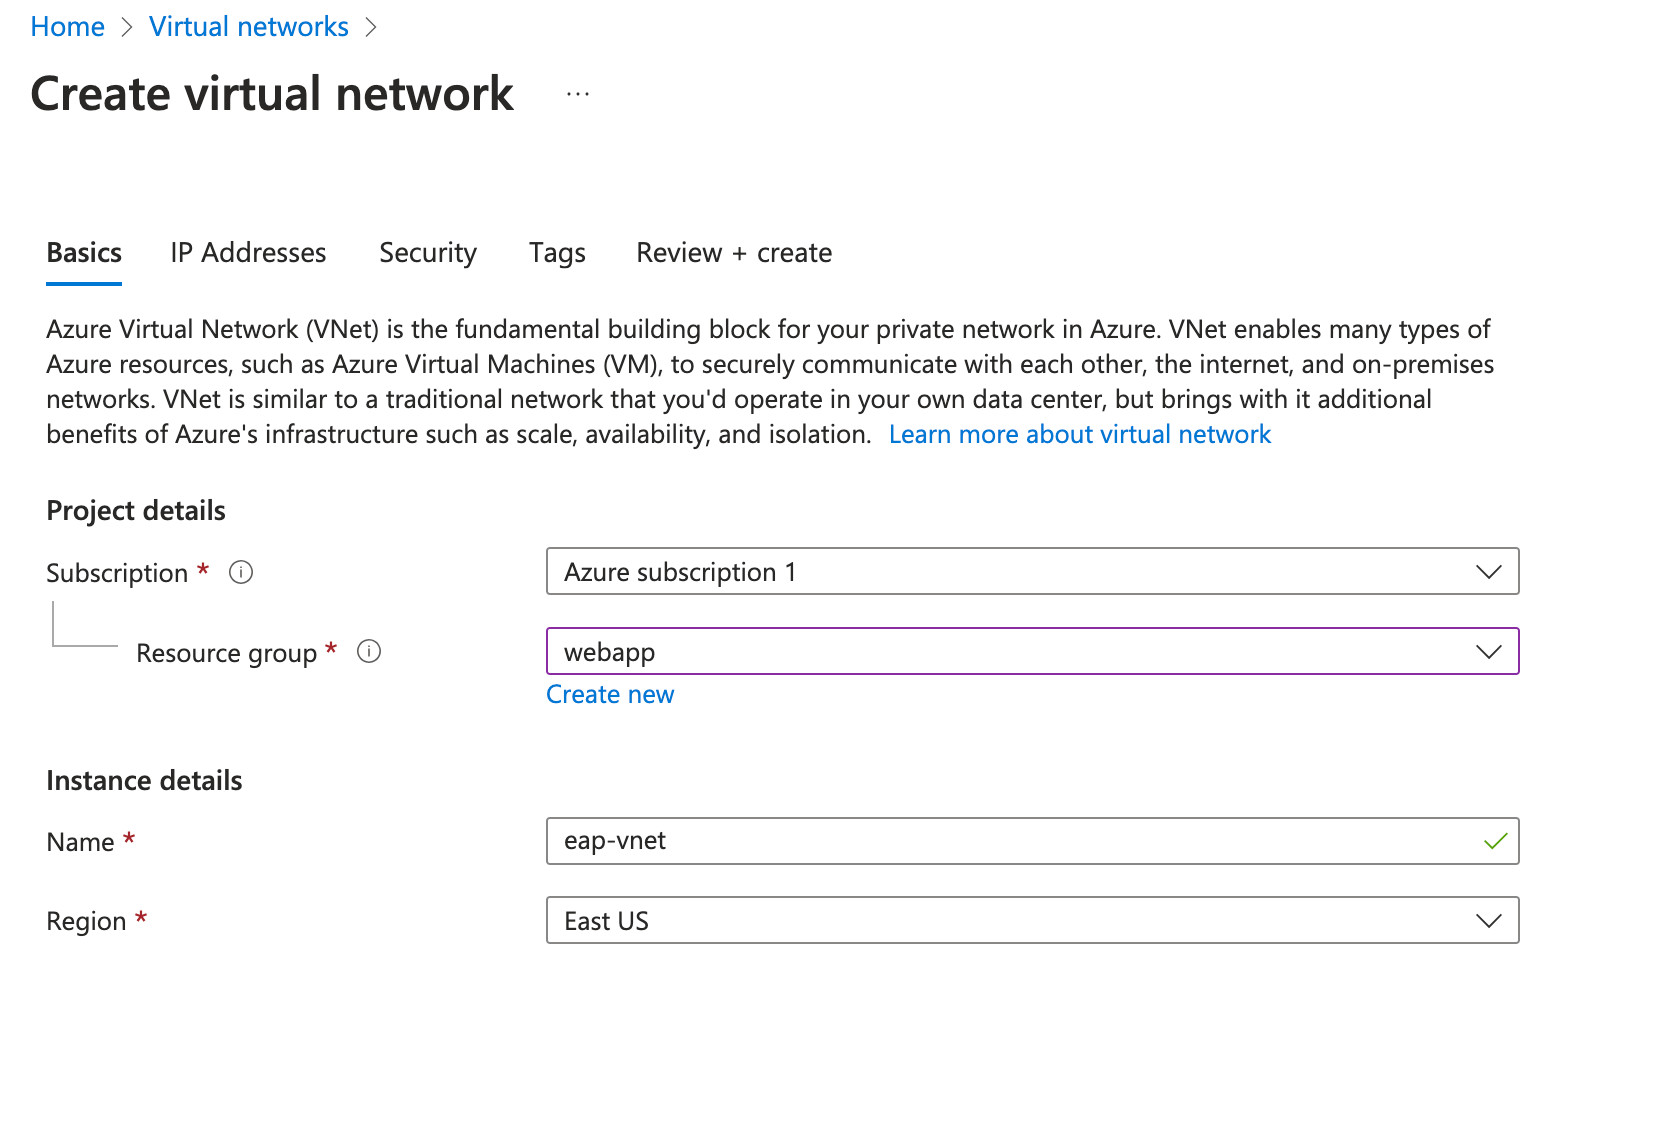
Choose a resource group (or create a new one), give the virtual network a name, and click Review + create to proceed.
Create a JBoss EAP app service
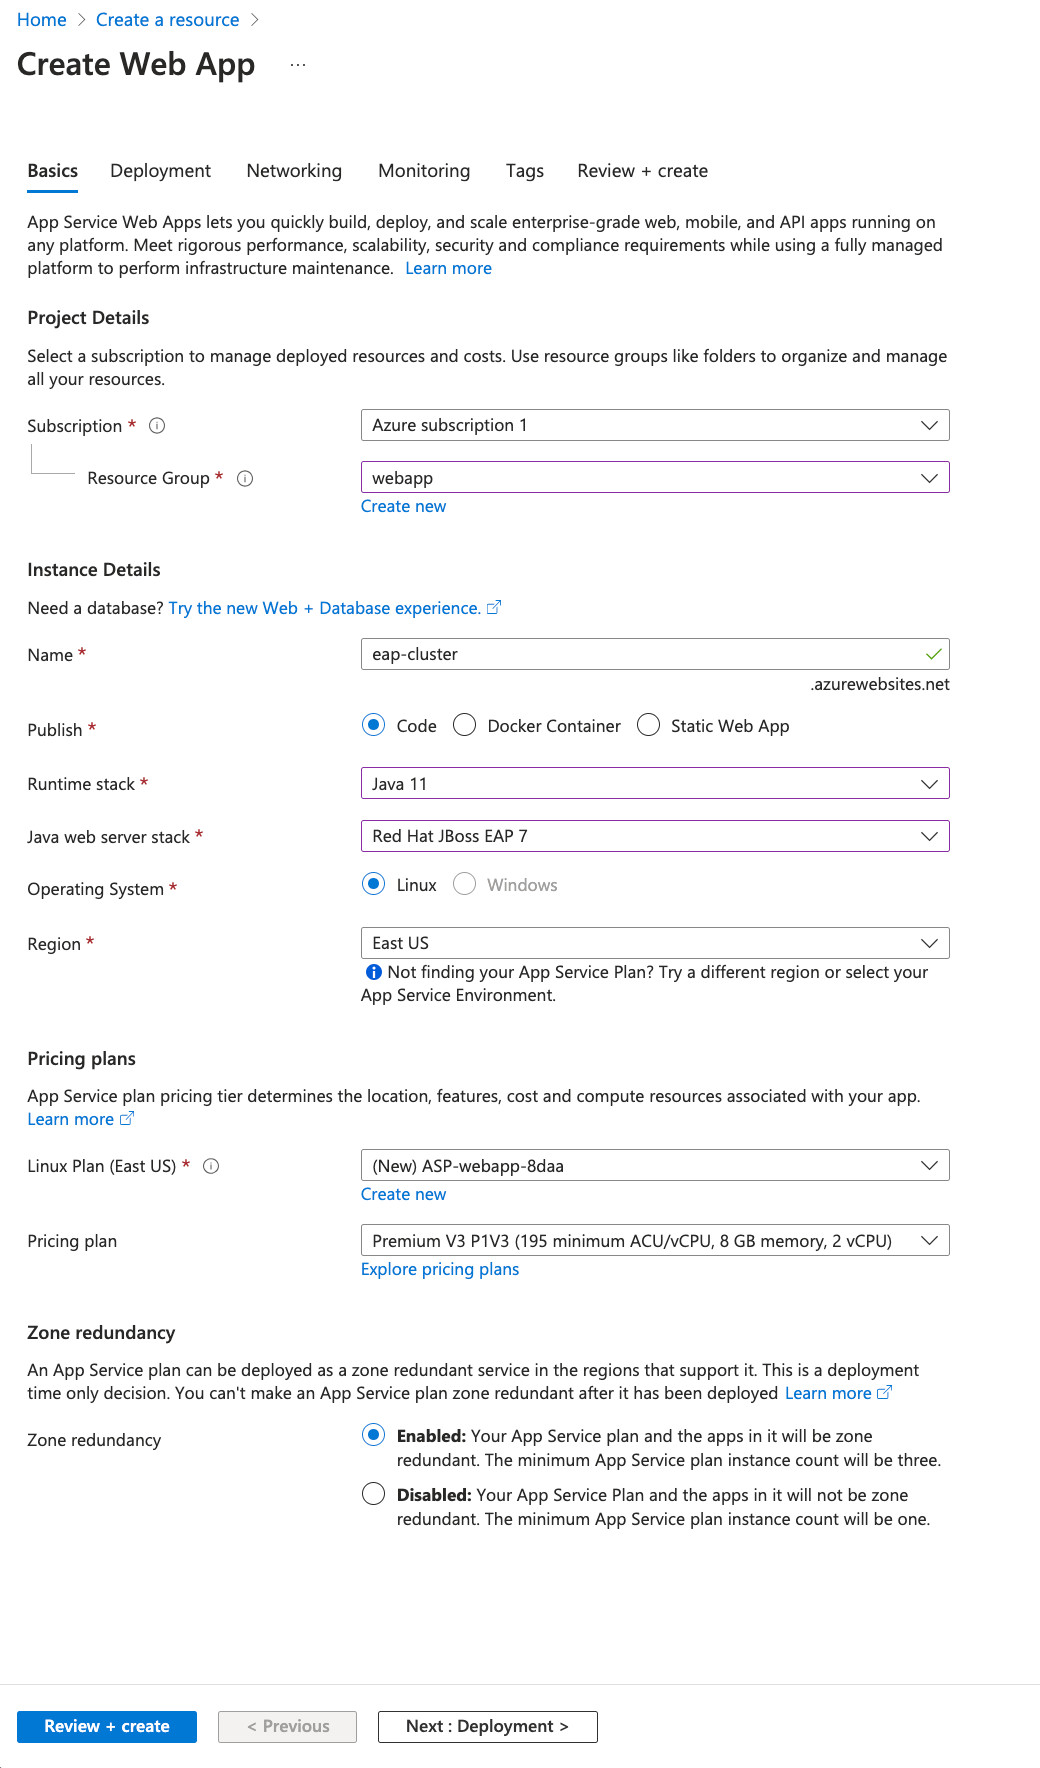
Once the virtual network is created, we can create a JBoss EAP app service and configure it to use the newly created virtual network. Navigate to the Azure App Services page and click + Create to display the Create Web App form (Figure 2).
There are a few things to note when creating the web app:
- For Runtime stack, select Java 11.
- For Java web server stack, select Red Hat JBoss EAP 7.
- Finally, under Zone redundancy, select Enabled to start with a three node cluster.
Complete the form as shown above and click Review + create, then click Create to create the web app. You will be redirected to the deployment page, shown in Figure 3.
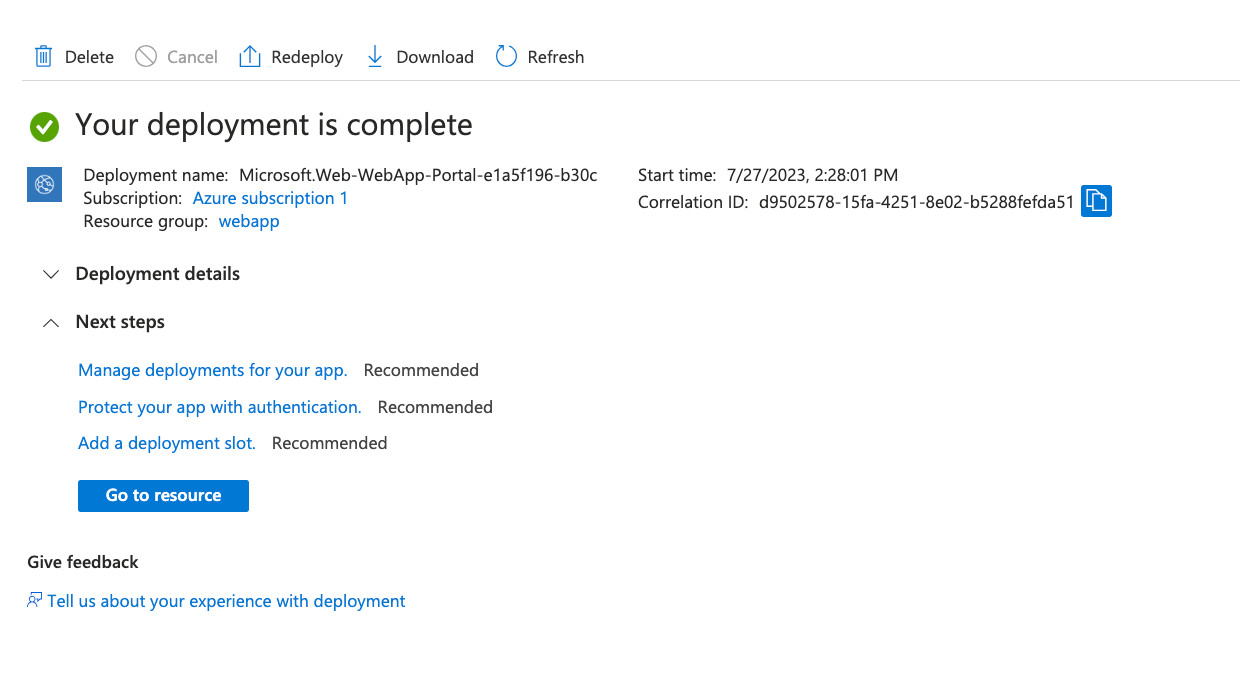
Once the deployment is complete, click Go to resource to view the web app details. From this page, you will find the URL of the web app, e.g., eap-cluster.azurewebsites.net.
Take a quick look at the Scale out page. You should see there are currently three instances of the web app deployed.
Configure virtual network integration
Before we deploy our sample application, we need to enable VNet integration. Click Networking. You will notice VNet integration is off.
Click VNet integration to link a virtual network to the web app. From the VNet Integration page, click + Add VNet to show the Add VNet Integration form (Figure 4).
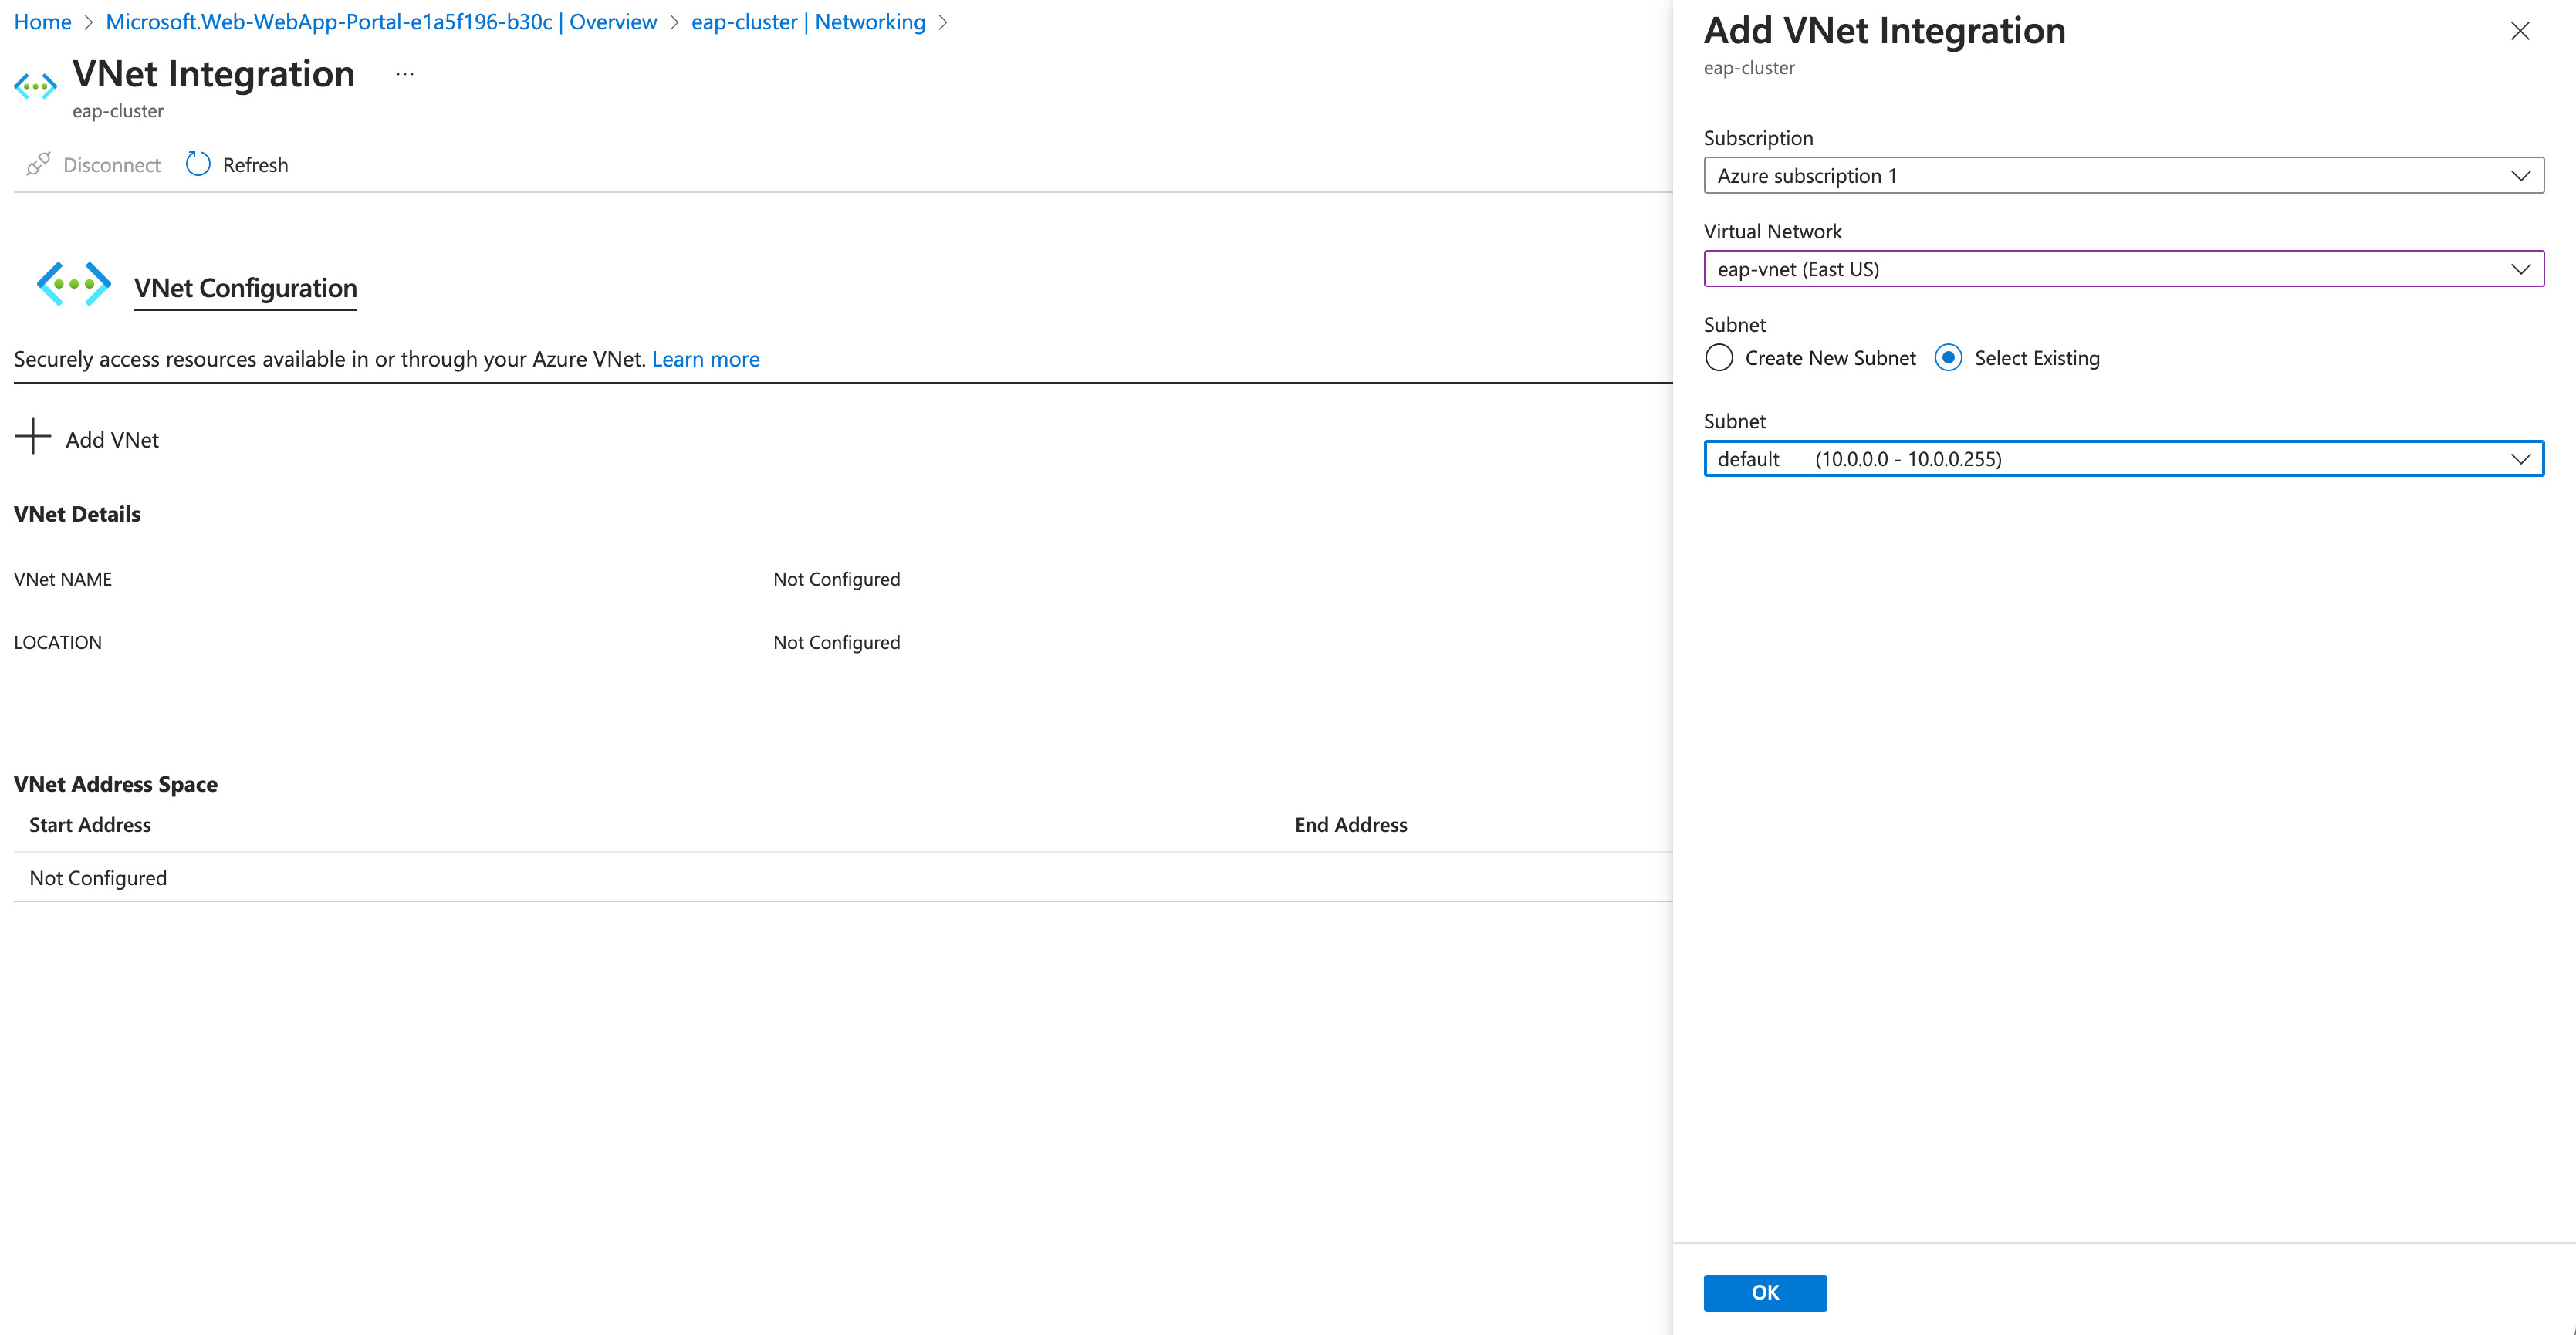
Select the VNet we created previously and select the existing "default" subnet, then click OK to continue. VNet integration should now be enabled for this web app.
Deploy the sample application
We are now ready to deploy our sample application. To do this, go to the Deployment Center. Under Settings, select GitHub from the Source dropdown.
If you have not previously authorized Azure to access your GitHub account, click the Authorize button and follow the instructions. You should then be able to select your organization, repository, and branch, similar to the options shown in Figure 5.
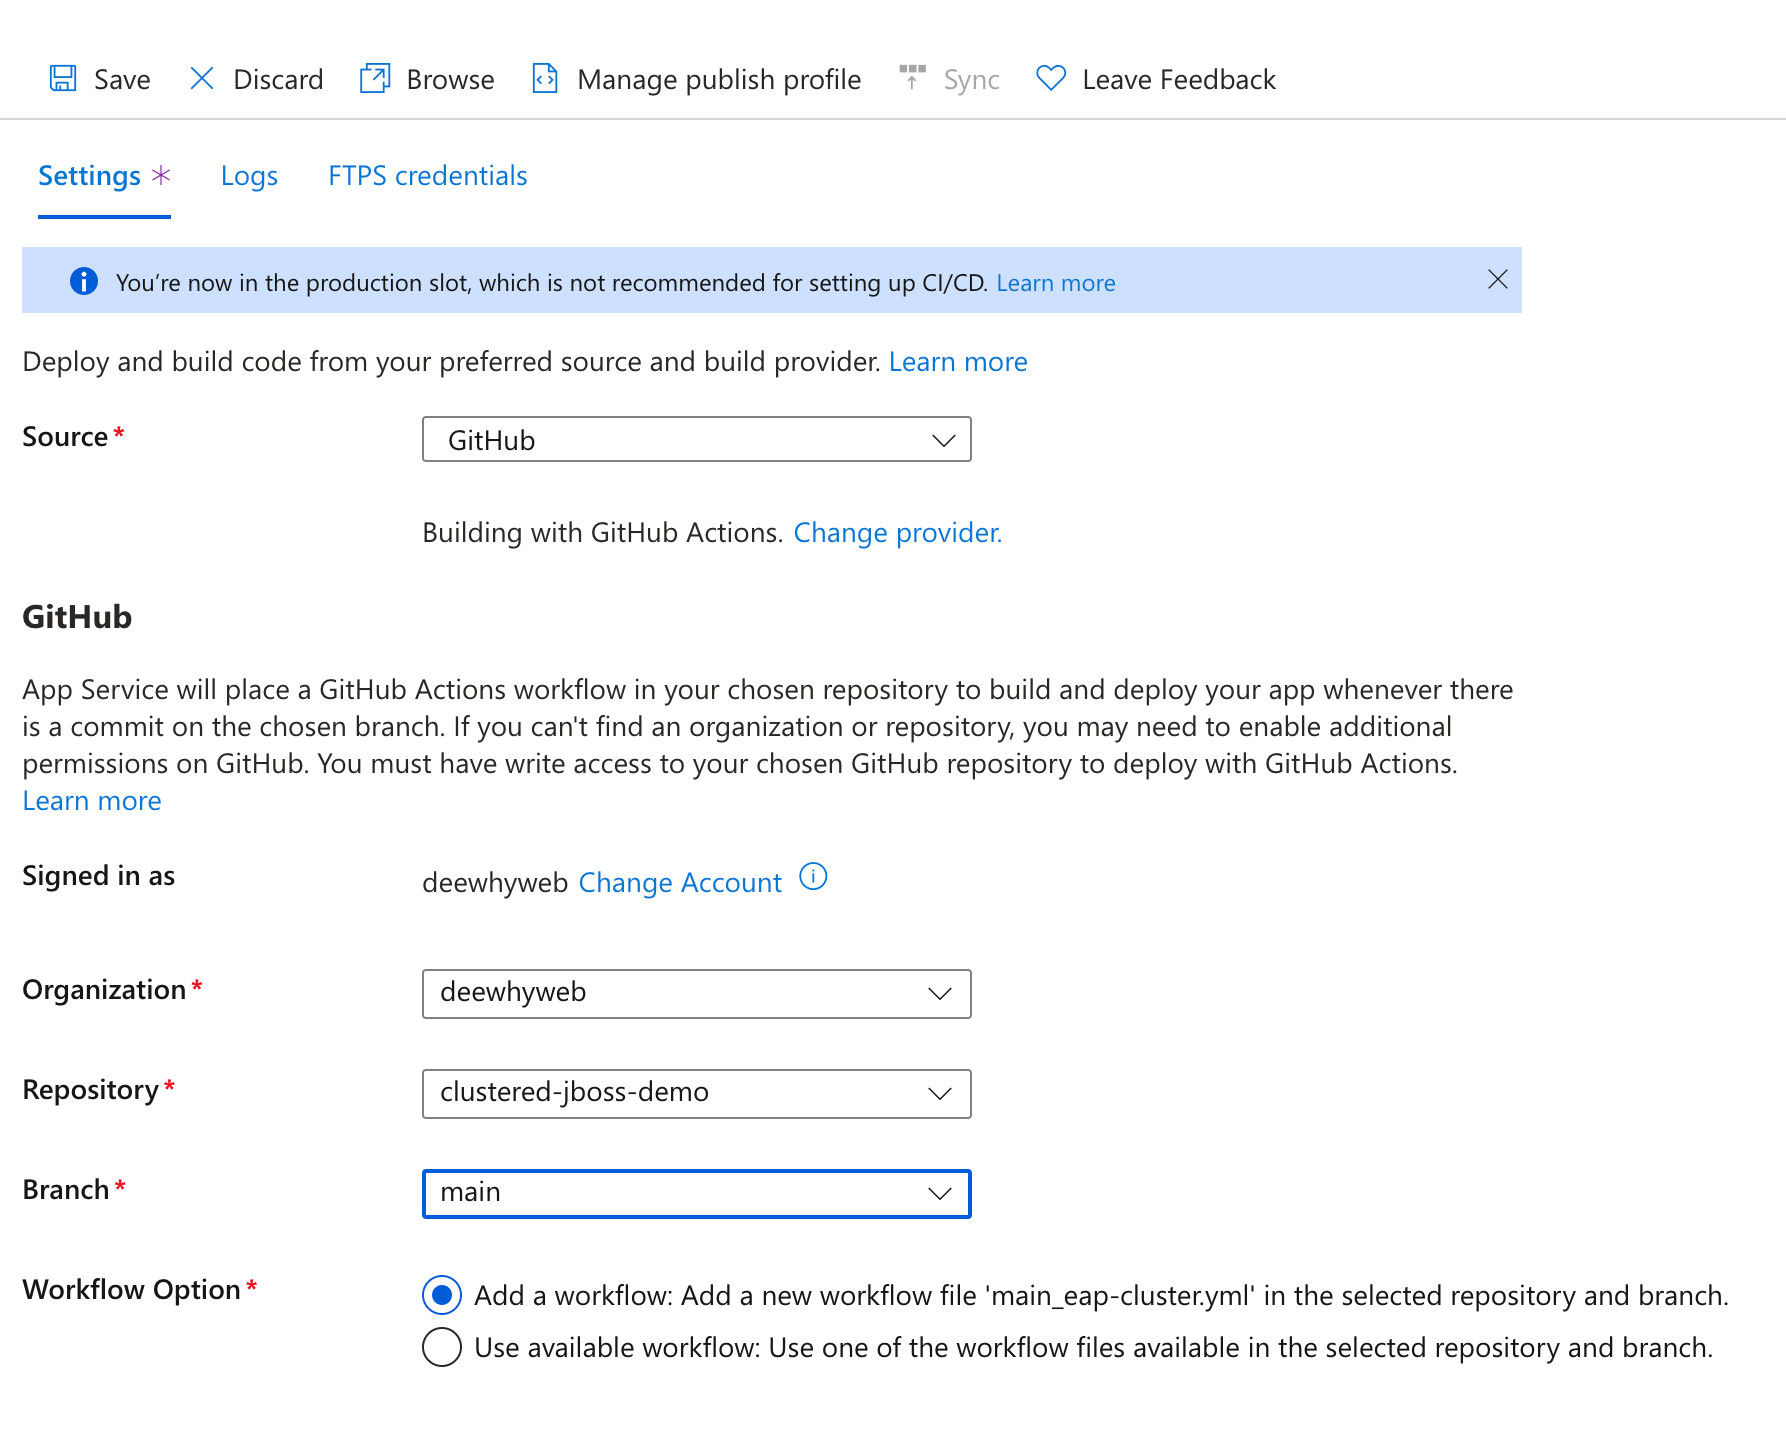
Click Save to start the deployment. When the deployment is complete, click the URL on the Overview page, adding the /session-replication/ path to access the sample application—e.g., https://eap-cluster.azurewebsites.net/session-replication/. This will display the session replication test page (Figure 6).
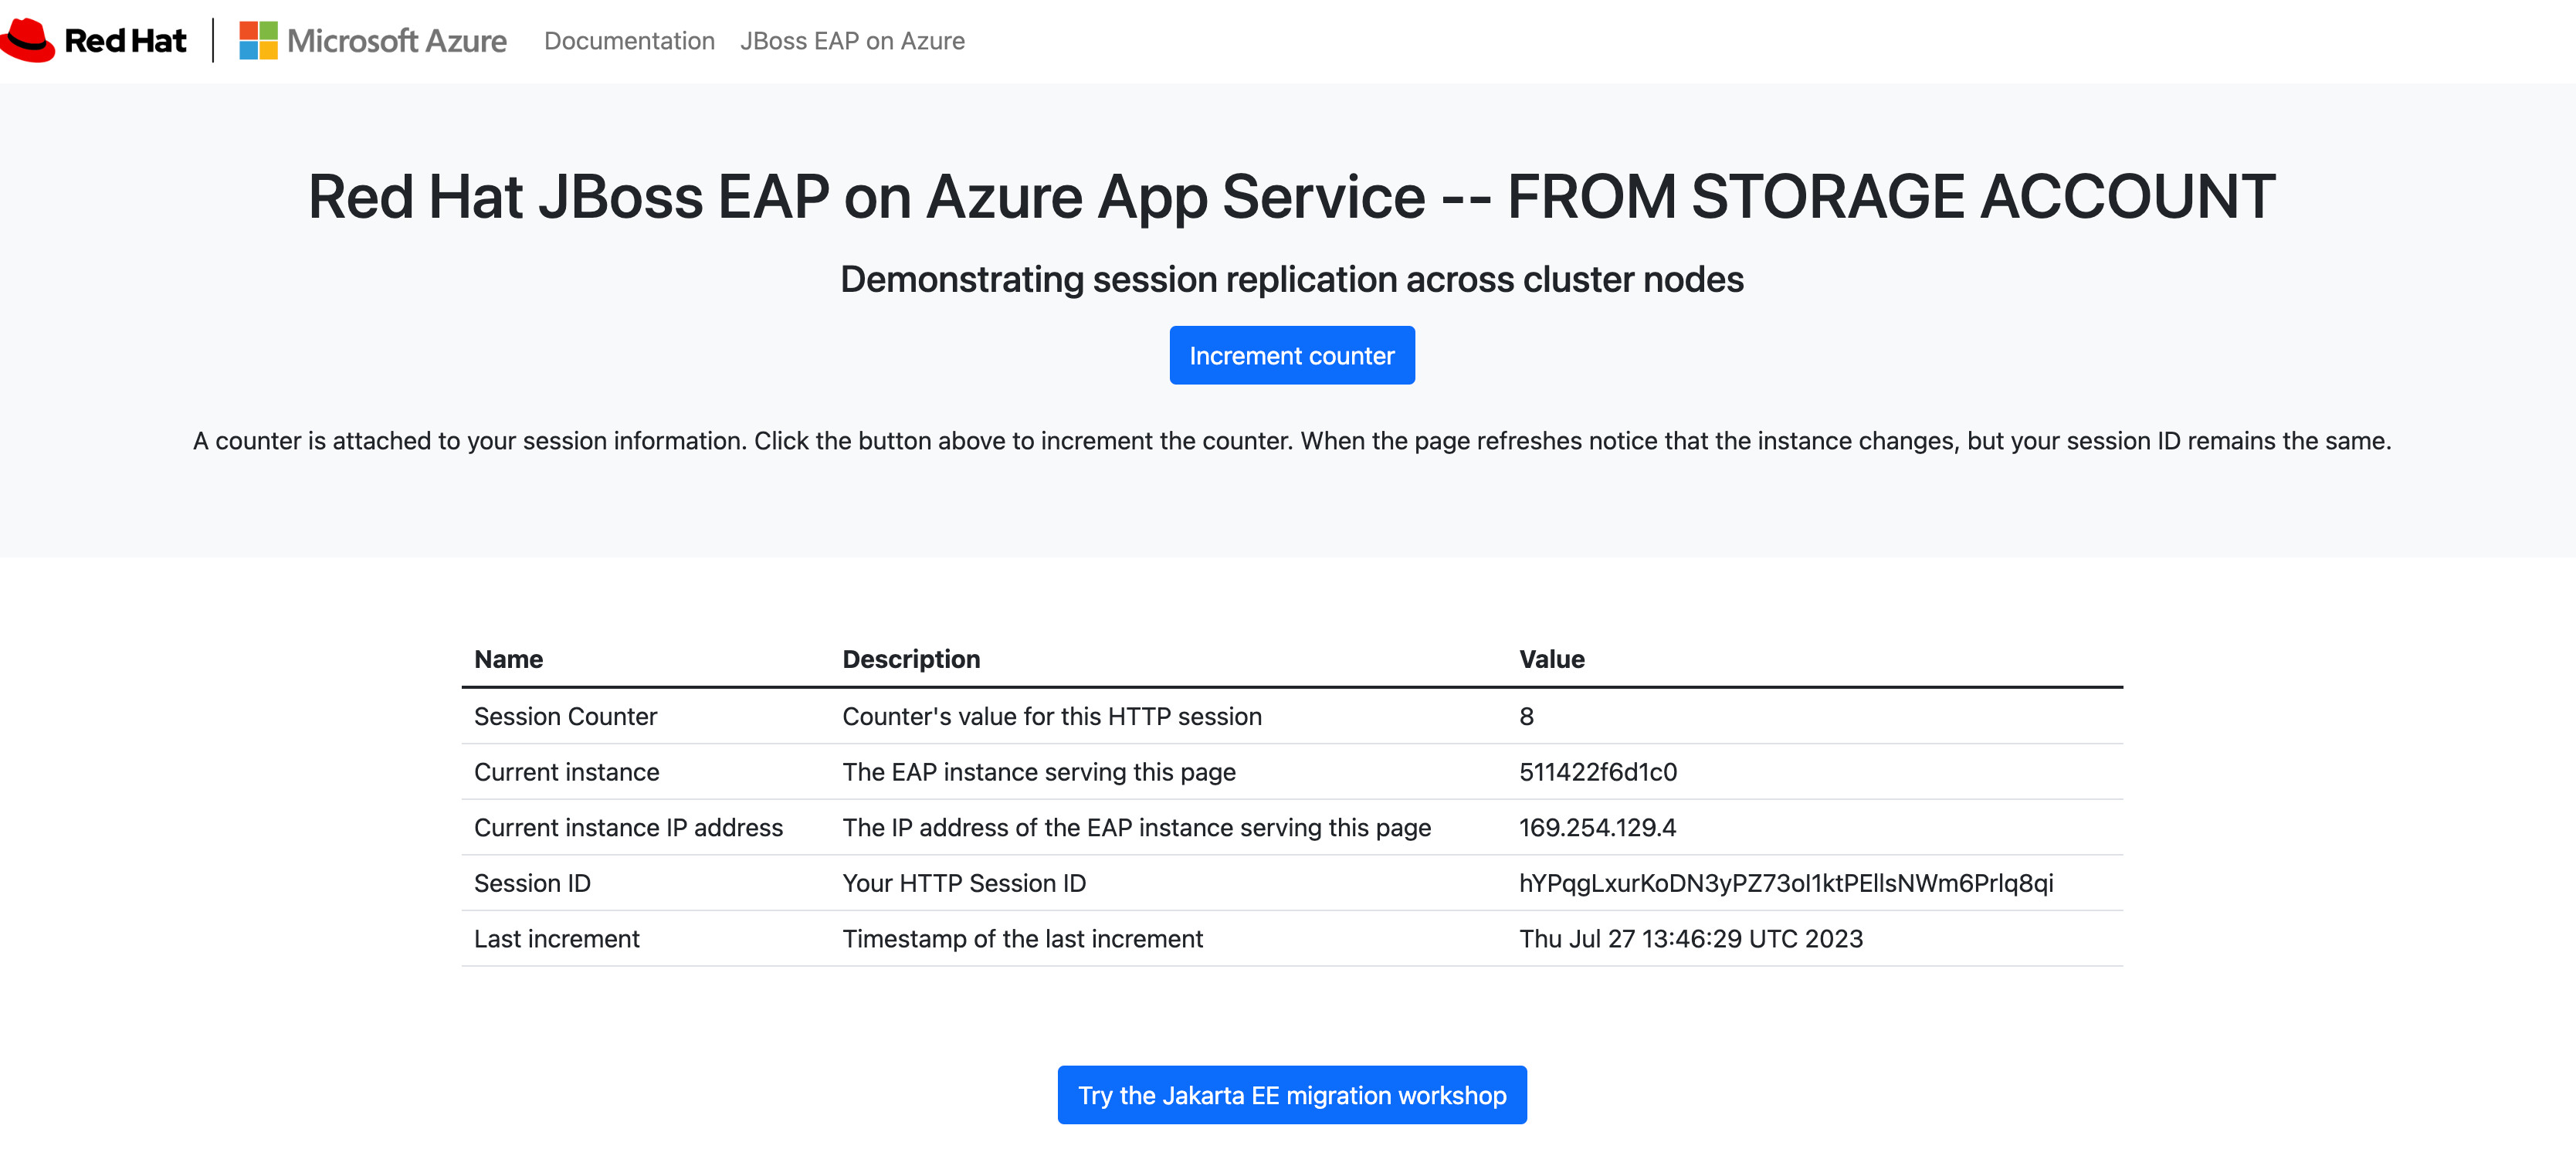
If you click the Increment counter button, you should see the session counter increase, the current instance cycling between three IDs, and the session ID remaining unchanged. This confirms clustering is working correctly.
In addition to testing via the URL, you should also see the cluster being formed from the logs. To do this, click Log Stream and search for Received new cluster view. You should see logs similar to the example below:
ISPN000094: Received new cluster view for channel ejb:
[cafe441b5f83725edc9bf516b4ea569e812ab6508c389d9aafdccfebe722c0ef] (3)
[cafe441b5f83725edc9bf516b4ea569e812ab6508c389d9aafdccfebe722c0ef,
cc0e013f3fba47255fb962319bc7c35a479c2ffc4871e41576c4db87a4f9e07a,
cafe441b5f83725edc9bf516b4ea569e812ab6508c389d9aafdccfebe722c0ef]
Conclusion
In this article, we've demonstrated how to set up and test a simple JBoss EAP session replication application with Azure App Service and virtual networks to enable clustering. By setting up a JBoss EAP cluster on Azure App Service, organizations can ensure that their applications are equipped to handle increased traffic, provide uninterrupted service, and deliver a seamless user experience.
Last updated: February 12, 2024