Provisioning strong identities for every workload using X.509 certificates and establishing mutual TLS (mTLS) as a full stack solution for transport security without requiring any code changes is one of the many features offered out of the box by Red Hat OpenShift Service Mesh (based on the upstream Istio project).
This article explores configuring HashiCorp Vault as the PKI engine (or certificate back-end) for signing OpenShift Service Mesh workloads using cert-manager and istio-csr.
Default and pluggable CA scenario
Until OpenShift Service Mesh 2.3, we had to rely on workload certificates that were either created by the auto-generated self-signed root cert and key or by a custom root / intermediate Certificate Authority (CA) and key that is exposed to the underlying control plane infrastructure, as documented here.
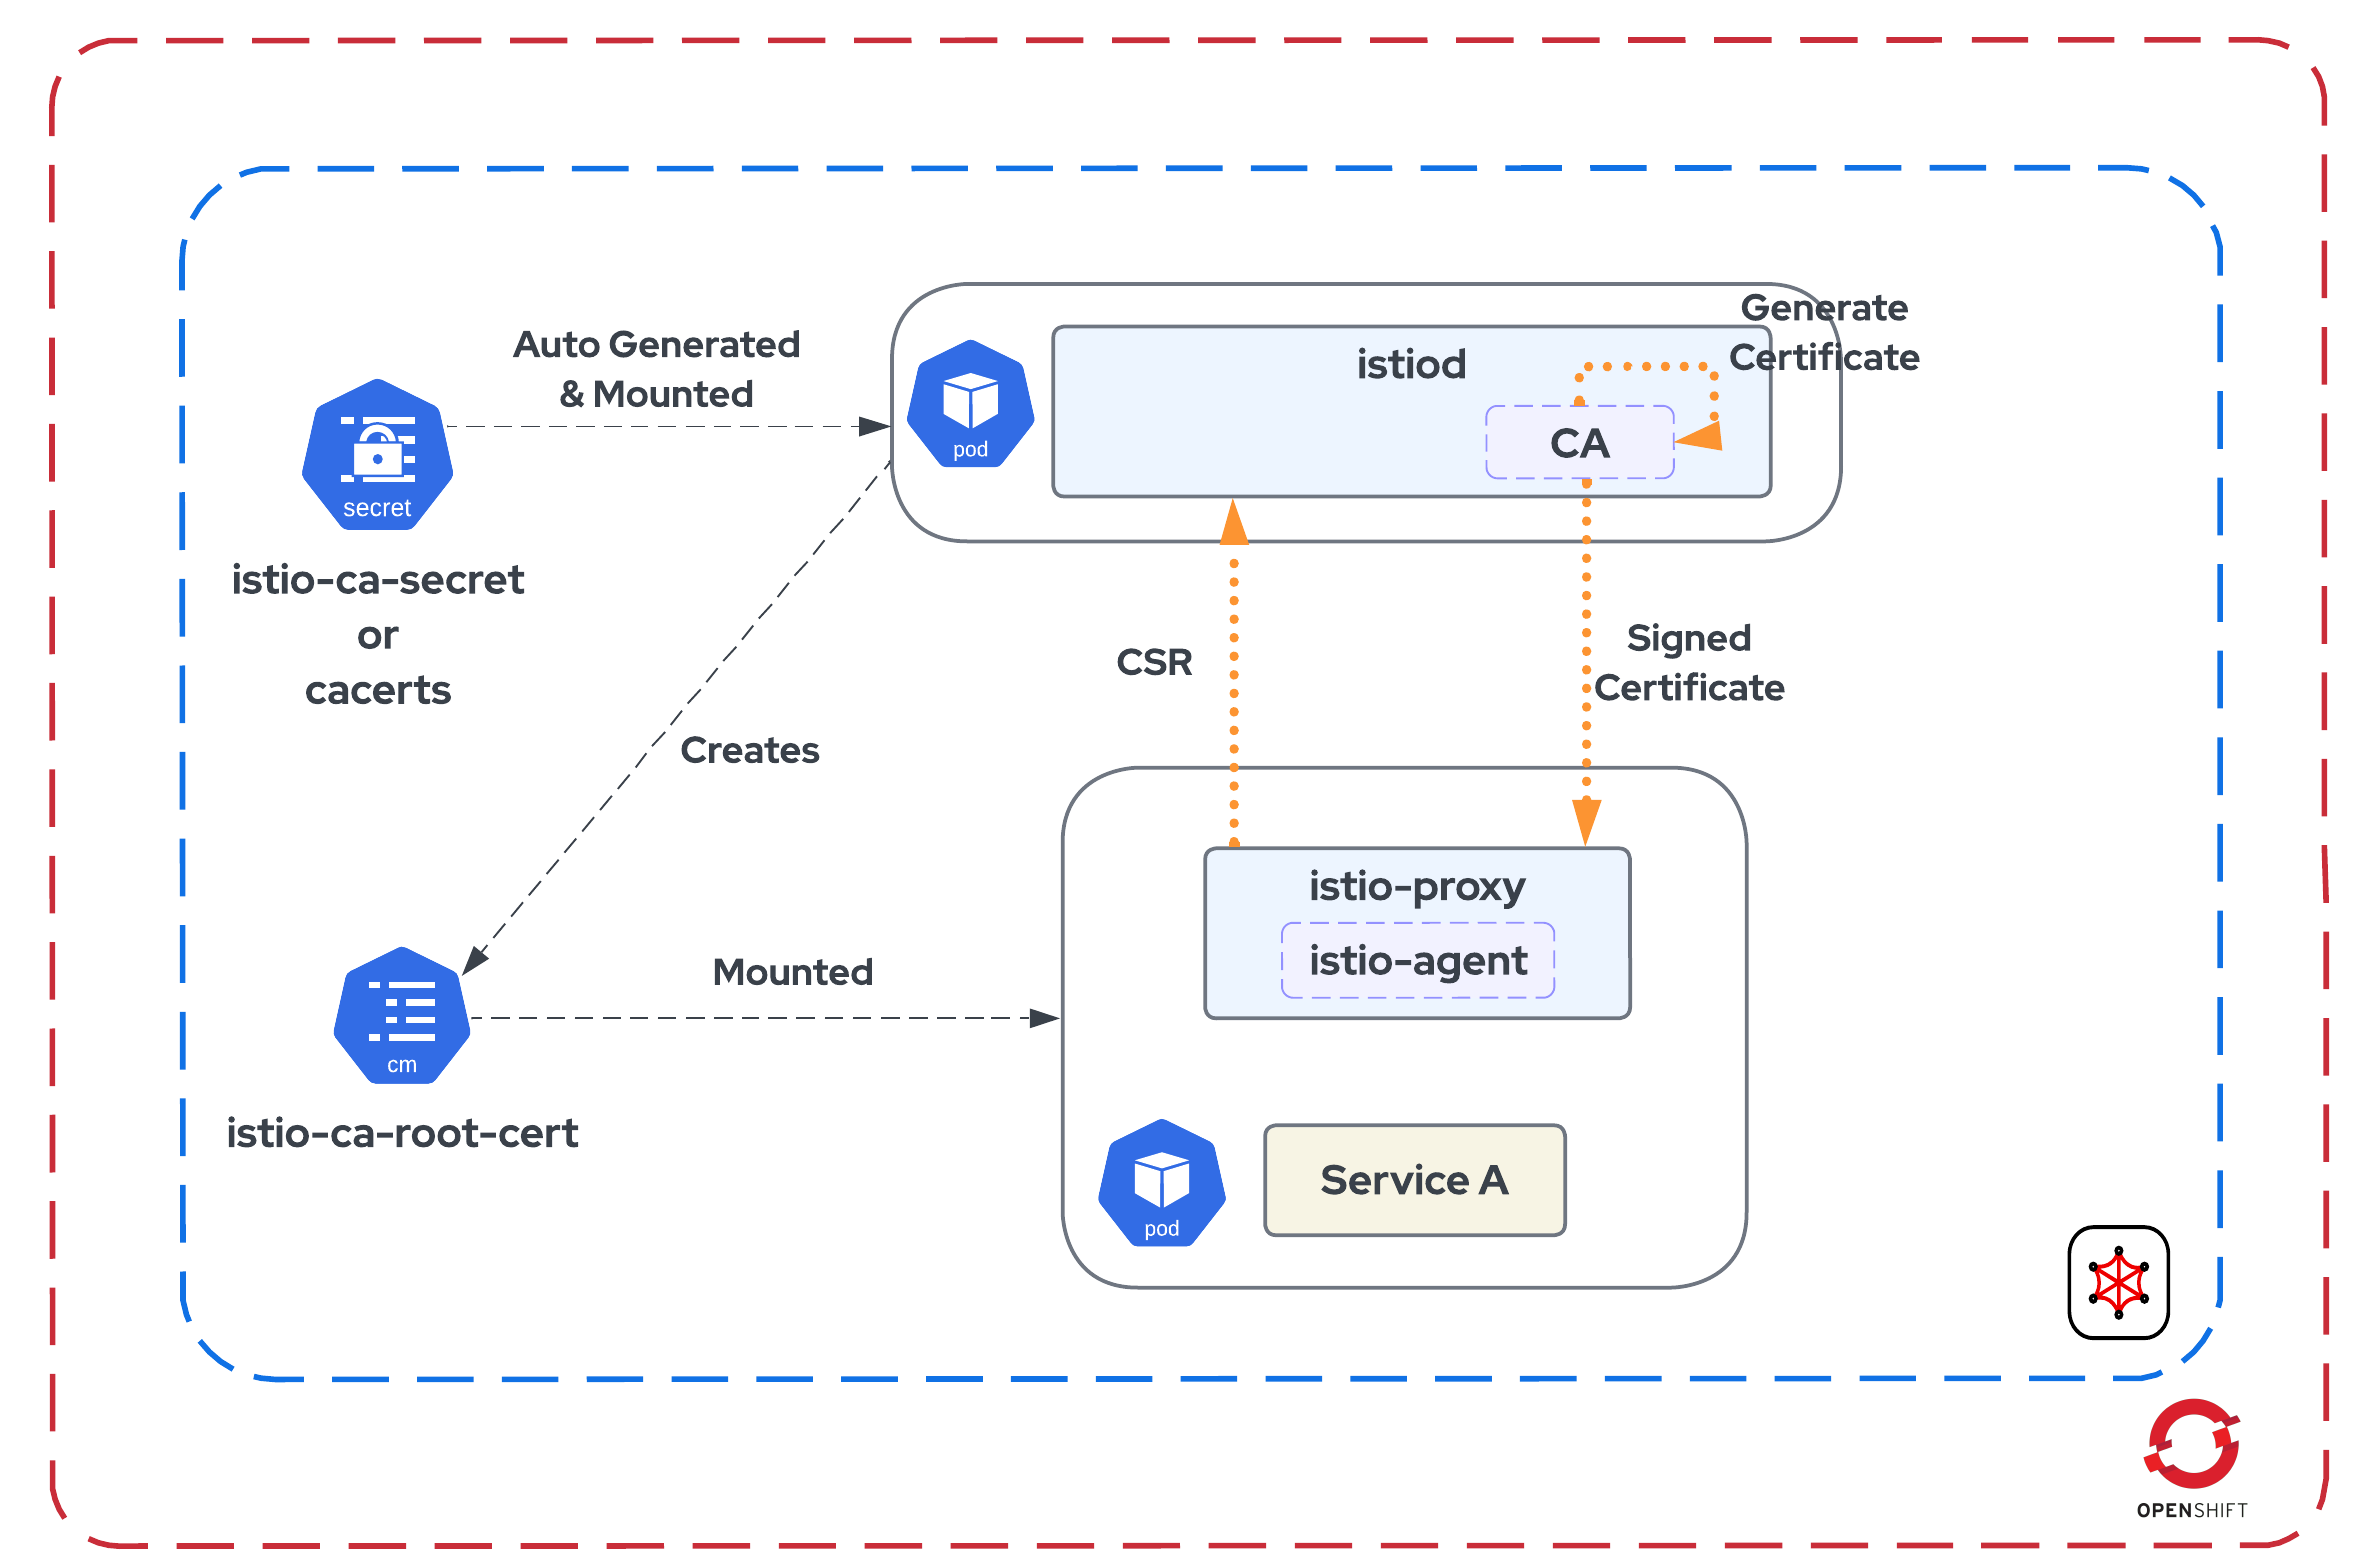
Figure 1 depicts the following scenario, where:
- istiod, while it bootstraps its CA capabilities, looks for a secret called
cacertsthat you create manually with the custom root/intermediate CA and key. If it does not find one, it generates a self-signed root cert and key and creates a secret calledistio-ca-secretthat is mounted within the pod. - istiod exposes a gRPC endpoint that accepts the incoming certificate signing request (CSR) from the workloads and hands off the signing request to the CA capability to generate certs for the workload.
- istiod creates a ConfigMap called
istio-ca-root-certwith root / intermediate CA in all the members' namespaces to be mounted inside the workload pods for handling mTLS.
External CA using cert-manager
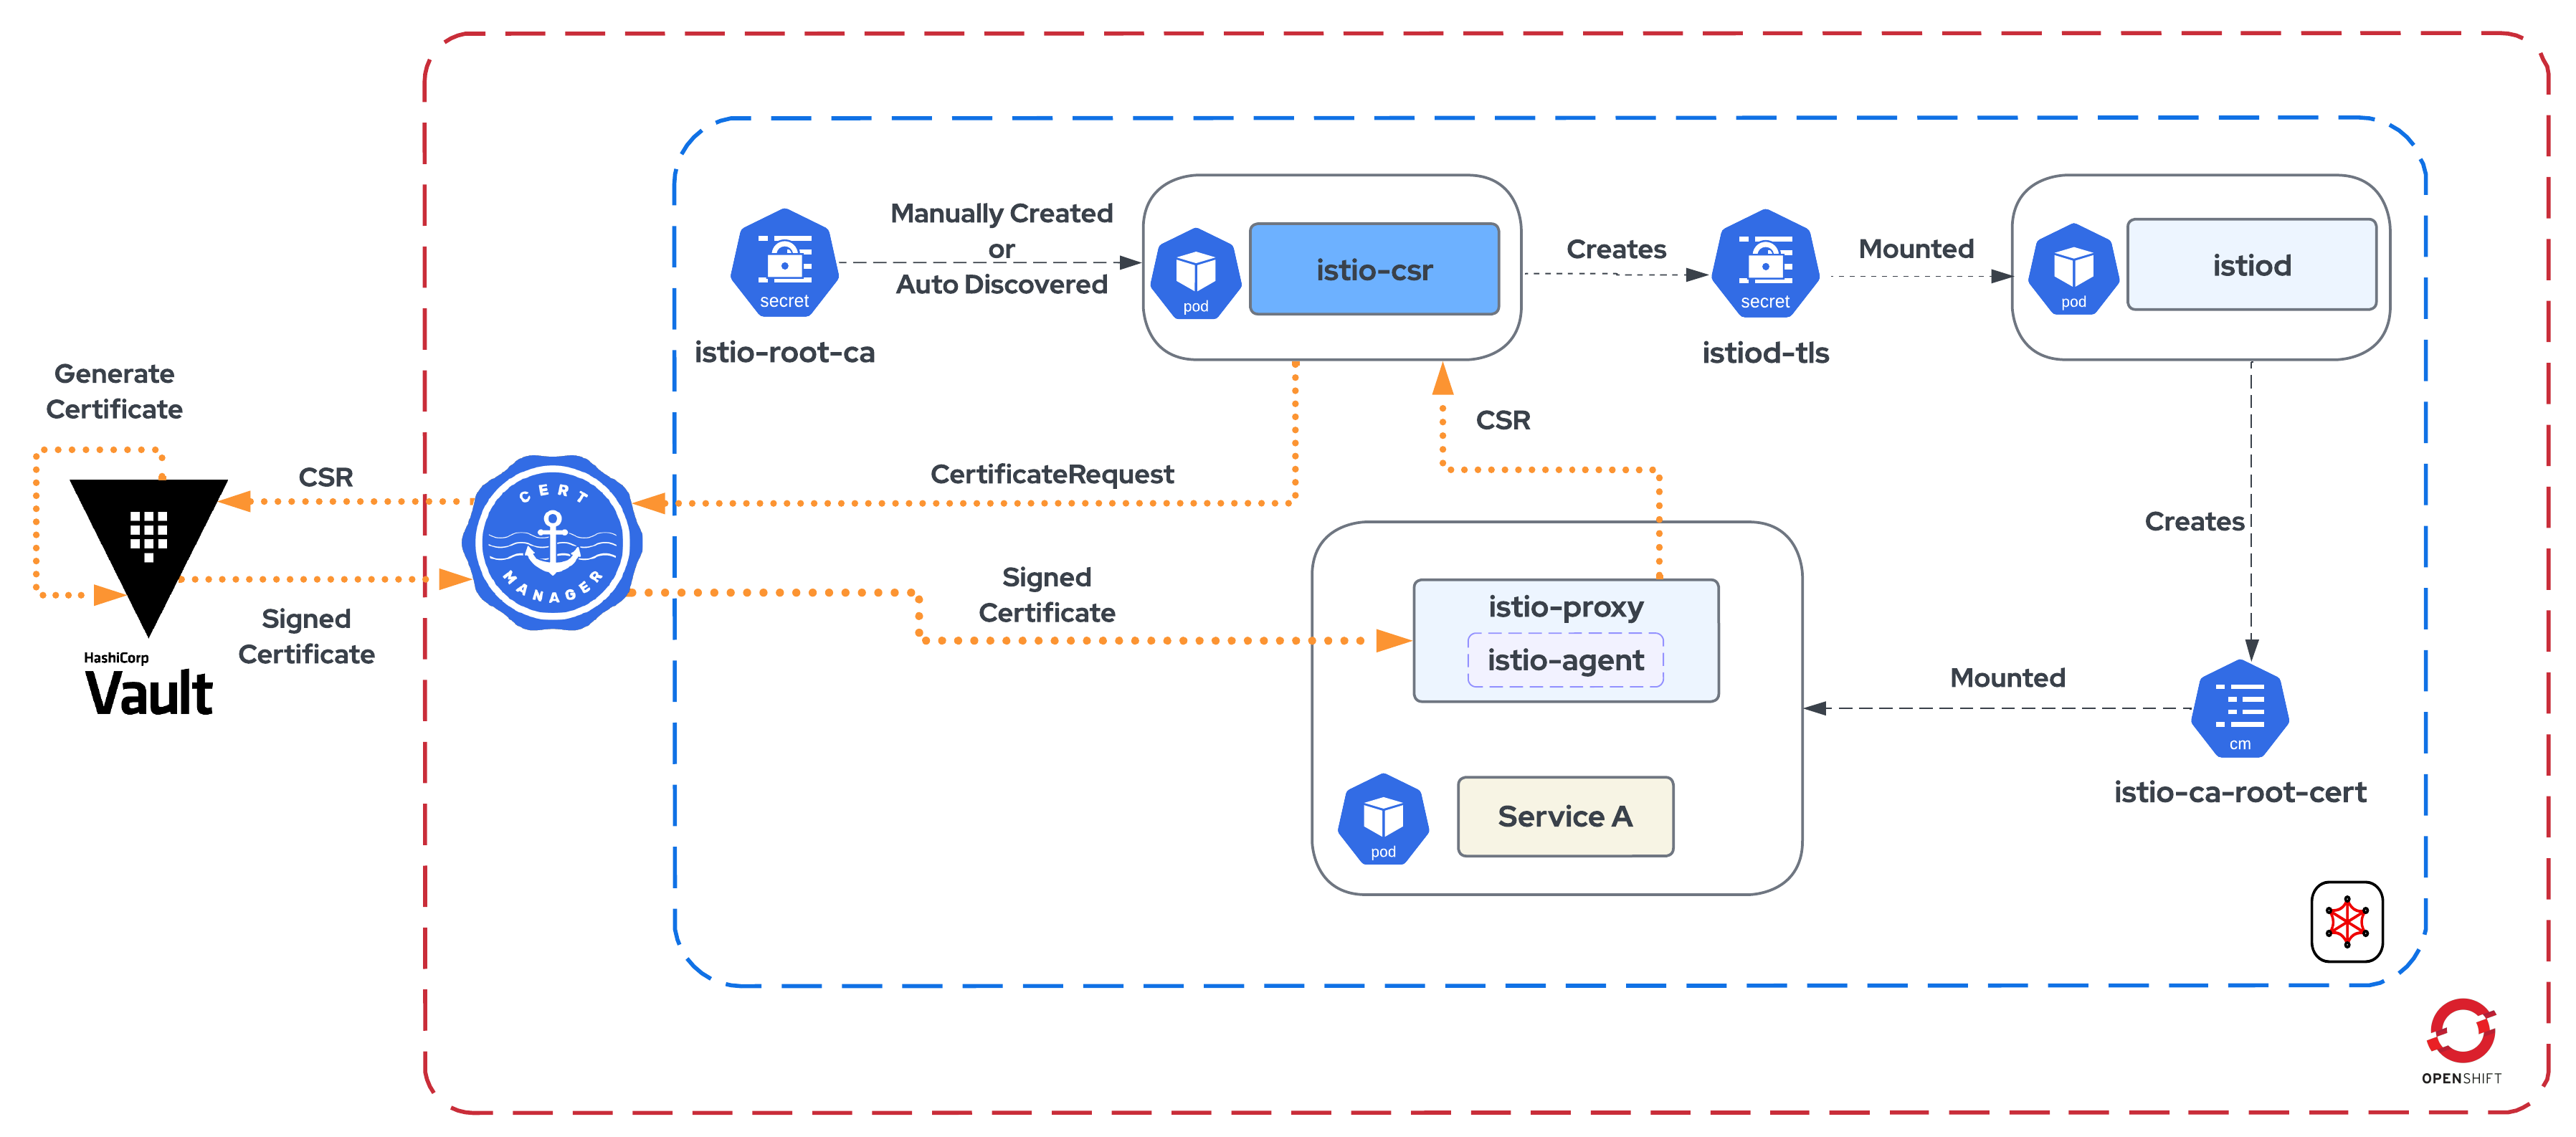
With the release of OpenShift Service Mesh 2.4 and the supported integration with the cert-manager Operator for Red Hat OpenShift, we can improve this setup and make it more secure by integrating with an external PKI engine like HashiCorp Vault. Figure 2 illustrates this setup.
Key takeaways:
- istio-csr, while bootstrapping, can be configured to auto-discover the root CA (Not Recommended) or configured to look for a manually created secret that contains the root CA—istio-root-ca, in this case—that will in turn create a secret, istiod-tls, containing the serving certs for istiod. (Note: According to the documentation, it is recommended to manually create a secret containing the root CA and configure the same to avoid signer hijacking attacks.)
- istio-csr replaces istiod as the CA and assumes the responsibility of verifying the workload while receiving the incoming CSR to sign and generate the certificate.
- Upon receiving the CSR, the istio-csr component initiates a CertificateRequest flow with the cert-manager.
- cert-manager watches for the created CertificateRequest and converts it to a CSR before requesting the Issuer (Vault PKI Engine) for a signed certificate.
- The issuer, in turn, generates a signed certificate that is then returned to the proxy to facilitate mTLS.
We will now look at how to implement the preceding setup. You can find the playbooks for this tutorial in this repository.
Prerequisites
In order to follow along with this activity, the following prerequisites are required:
- Red Hat OpenShift Service Mesh and its related operators
- cert-manager Operator for Red Hat OpenShift
- HashiCorp Vault
The name of the project/namespace for the OpenShift Service Mesh control plane is istio-system.
Configure the Vault PKI infra
Script ref: https://gitlab.com/cloudopslabs/cert-mgr-integ/-/blob/main/ansible/scripts/create-certs.sh?ref_type=heads
We will create a two-layered PKI consisting of a root CA and an intermediate CA. The OpenShift Service Mesh cert-manager infrastructure will then use the intermediate CA to sign the certificates for the workload.
Start and log in to the Vault server:
$ vault server -dev -dev-root-token-id rootNote: Starting the Vault server with the root token is for demo purposes and should not be used in production.
With the following two environment variables, the commands to interact with the server in the subsequent steps will get executed successfully:
$ export VAULT_ADDR=<Vault Server URL> $ export VAULT_TOKEN=<Vault Token>- Generate the root CA:
Enable the PKI engine and set the default path
pki. The path can be anything; the command basically creates a PKI engine under the pathpki.$ vault secrets enable pkiTune the CA max time / lease / expiry time to 10 years (87,600 hours):
$ vault secrets tune -max-lease-ttl=87600h pkiConfigure the root CA: This will generate a self-signed CA cert and private key. Note that if the path ends with
exported, the response will return the private key. If it ends withinternal, the private key will not be returned and cannot be retrieved later. We useinternaland save the private key to have a copy.$ vault write -field=certificate pki/root/generate/internal \ max_path_length=1 \ common_name= "RH Custom Root CA" \ ou= "RH-FSI" \ organization= "Red Hat Consulting" \ country= "US" \ ttl=87600h \ issuer_name="rh-custom-root-ca" \ key_bits=4096 > RH_Custom_CA.crtmax_path_lengthis set to1because we only have a 2-layer PKI. The last layer in our PKI setup, the Intermediates CA, will be0.key_bits: This is the level of encryption. The Vault default for PKI is2048, but we will change this to be higher:4096.
- Generate the intermediate CA:
Similar to generating the root CA, enable the PKI engine for intermediate certs under the path
pki_int_ca:$ vault secrets enable -path=pki_int_ca pkiTune the expiry time to 5 years:
$ vault secrets tune -max-lease-ttl=43800h pki_int_camax_path_lengthis equal to0. This signals that this is the last level in our PKI and no more intermediates will follow, meaning that the certificates this CA generates will be for end-entity (EE) users.$ vault write -format=json pki_int_ca/intermediate/generate/internal \ require_cn=false \ max_path_length=0 \ common_name="RH Custom Intermediate CA" \ ou="RH-FSI" \ organization="Red Hat Consulting" \ country="US" \ issuer_name="rh-custom-intermediate-ca" \ key_bits=4096 | jq -r '.data.csr' > RH_Custom_Intermediate_CA.csrUse the CSR above to create a new intermediate CA cert. Here, we have configured the same values for
common_name,ou,organization,country, andkey_bits, but it is not necessary to do so; we can also replace all of those values withuse_csr_values=true.$ vault write -format=json pki/root/sign-intermediate \ max_path_length=0 \ common_name= "RH Custom Intermediate CA" \ ou= "RH-FSI" \ organization= "Red Hat Consulting" \ country= "US" \ ttl=43800h \ key_bits=4096 \ format=pem_bundle \ issuer_ref="rh-custom-root-ca" \ csr=@RH_Custom_Intermediate_CA.csr | jq -r '.data.certificate' > RH_Custom_Intermediate_CA.pemWe pass the CSR file we just created locally using the
@character and then provide the file format.Once the CSR is signed and the root CA returns a certificate, you can import it back into Vault.
$ vault write pki_int_ca/intermediate/set-signed certificate=@RH_Custom_Intermediate_CA.pem
Create the Vault role for issuing certs.
$ vault write pki_int_ca/roles/rh-custom-issuer  \
  allow_any_name=true \
  allow_uri_sans=true \
  allow_ip_sans=true \
  ou= "RH-SPPRT" \
  organization= "Red Hat Consulting" \
  country= "US" \
  use_csr_common_name=true \
  ttl= "4380h" \
  max_ttl= "4380h" \
  enforce_hostnames=false \
  allow_bare_domains=true \
  require_cn=false \
  allowed_uri_sans= "istio-system.svc, opentlc.com, cluster.local, spiffe://*" \
  allow_subdomains=true
The role will utilize the intermediate CA to issue the EE or workload certs. We create a role called
rh-custom-issuer, which will issue certs usingpki_int_ca.- Create the Vault role for authentication:
Enable the
approleauthentication:$ vault auth enable approleCreate the app role that we will use to authenticate with the Vault server:
$ vault write auth/approle/role/rh-vault-pki-role \
    secret_id_ttl=0 \
    token_num_uses=10 \
    token_ttl=10m \
    token_max_ttl=15m \
    secret_id_num_uses=0 \
    policies=approle_policy
Configure the Vault issuer
Configure the secret using the Vault
approlesecret-id:$ vault read auth/approle/role/rh-vault-pki-role/role-id- Get the
role-idassociated with theapprole: Get the
secret-idassociated with theapprole:$ vault write -f auth/approle/role/rh-vault-pki-role/secret-idCreate a Kubernetes secret object using the secret from the above command:
$ oc create secret generic rh-vault-pki-role --from-literal secretId=<secret-id>
- Get the
Create the Vault issuer. This is a cert-manager resource that uses the PKI infra in Vault to issue certs.The issuer, once created, will be able to authenticate to Vault to issue the certs.
$ cat <<EOF|oc apply -f -
apiVersion: cert-manager.io/v1
kind: Issuer
metadata:
  name: istio-ca
  namespace: istio-system
spec:
  vault:
    path: pki_int/sign/cluster-dot-local
    server: https://<VAULT_SERVER_URL>
    auth:
      appRole:
        path: approle
        roleId: <APPROLE_ROLE_ID>
        secretRef:
          name: rh-vault-pki-role
          key: secretId
EOF
Verify the issuer that we just created by checking the status shows up as
Vault Verified:$ oc get issuer istio-ca -o wide
Install istio-csr
Configure the secret containing the intermediate root CA:
$ oc create secret generic istio-root-ca --from-file ca.pem=./RH_Custom_Intermediate_CA.pem -n istio-systemThe intermediate cert,
RH_Custom_intermediate_CA.pem, is the one we saved locally when we created it using the Vault command under the previous section. We created this manually in the istio-csr bootstrapping process instead of letting it be auto-discovered by istio-csr.Use Helm to install istio-csr with the overridden values:
$ helm install istio-csr jetstack/cert-manager-istio-csr -n istio-system -f ./vault-istio-csr-values.yamlvault-istio-csr--values.yaml:replicaCount: 1 image: repository: quay.io/jetstack/cert-manager-istio-csr tag: v0.6.0 app: certmanager: namespace: istio-system issuer: group: cert-manager.io kind: Issuer name: istio-ca controller: configmapNamespaceSelector: "maistra.io/member-of=istio-system" leaderElectionNamespace: istio-system istio: namespace: istio-system revisions: ["basic"] # This must match the name of the SMCP server: maxCertificateDuration: 5m tls: rootCAFile: /var/certs/ca.pem certificateDNSNames: # This DNS name must be set in the SMCP spec.security.certificateAuthority.cert-manager.address - cert-manager-istio-csr.istio-system.svc volumes: - name: istio-root-ca secret: secretName: istio-root-ca # This name of this secret should be the same as created above volumeMounts: - name: istio-root-ca mountPath: /var/certsEnsure that the istio-csr pods are running in the ServiceMeshControlPlane (SMCP) namespace,
istio-system:$ oc get pods -n istio-systemCheck that the secret
istiod-tlswas successfully created:$ oc get secret istiod-tls -n istio-systemEnsure that certificates are in Ready state:
$ oc get certificate istiod -n istio-system
Configure SMCP and deploy the sample application
Configure ServiceMeshControlPlane:
$ cat <<EOF|oc apply -f -
apiVersion: maistra.io/v2
kind: ServiceMeshControlPlane
metadata:
  name: basic
  namespace: istio-system
spec:
  version: v2.4
  addons:
    grafana:
      enabled: true
    jaeger:
      install:
        storage:
          type: Memory
    kiali:
      enabled: true
    prometheus:
      enabled: true
  security:
    certificateAuthority:
      cert-manager:
        address: 'cert-manager-istio-csr.istio-system.svc:443'
      type: cert-manager
    identity:
      type: ThirdParty# when security.certificateAuthority.type=cert-manager
    controlPlane:
      mtls: true
    dataPlane:
      mtls: true
  telemetry:
    type: Istiod
  tracing:
    type: Jaeger
EOF
Configure ServiceMeshMemberRoll:
$ cat <<EOF|oc apply -f -
apiVersion: maistra.io/v1
kind: ServiceMeshMemberRoll
metadata:
  name: default
  namespace: istio-system
spec:
  members:
  - httpbin
EOF
Deploy the sample applications:
$ oc new-project httpbin$ oc apply -f https://raw.githubusercontent.com/maistra/istio/maistra-2.4/samples/httpbin/httpbin.yaml$ oc apply -f https://raw.githubusercontent.com/maistra/istio/maistra-2.4/samples/sleep/sleep.yaml
Verify workloads
Verify workload certs:
$ oc -n httpbin exec "$(oc -n httpbin get pod -l app=sleep -o jsonpath={.items..metadata.name})" -c istio-proxy -- openssl s_client -showcerts -connect httpbin:8000 > httpbin-proxy-cert.txtInspect the first few lines from the content of the file. They should match the information that we used to set up the Vault infra:
depth=2 C = US, O = Red Hat Consulting, OU = RH-FSI, CN = RH Custom Root CA
verify return:1
depth=1 C = US, O = Red Hat Consulting, OU = RH-FSI, CN = RH Custom Intermediate CA
verify return:1
depth=0 C = US, O = Red Hat Consulting, OU = RH-SPPRT
Compare the contents of the file with the contents of the istio-root-ca secret to ensure that the cert chain from the workload matches the intermediate root CA chain.
Look for the mTLS icon in Kiali, as shown in Figure 3.
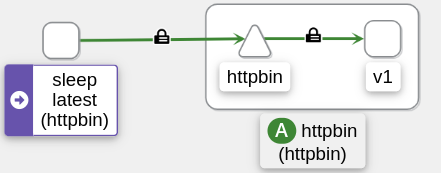
Figure 3: Kiali graph depicting the mTLS traffic with the lock icon.

References
- https://gitlab.com/cloudopslabs/cert-mgr-integ
- https://docs.openshift.com/container-platform/4.12/service_mesh/v2x/ossm-security.html#ossm-cert-manage-add-cert-key_ossm-security
- https://docs.openshift.com/container-platform/4.12/service_mesh/v2x/ossm-security.html#ossm-cert-manager-integration-istio_ossm-security
- https://cert-manager.io/docs/configuration/vault/
- https://cert-manager.io/docs/tutorials/istio-csr/istio-csr/#initial-setup
- https://developer.hashicorp.com/vault/tutorials/secrets-management/pki-engine