This article is a follow-up to A developer's guide to using OpenShift with Kubernetes which describes the nature and use of Red Hat OpenShift Service Mesh in general. This article applies these concepts using a hands-on demonstration application to run OpenShift Service Mesh.
A service mesh provides many benefits when running a microservice oriented application (MOA) under OpenShift/Kubernetes. You can think of a service mesh as a one-ring-to-rule-them-all approach to MOA management. With a service mesh, you don’t need to fiddle with the details of the security well-being and operational particulars of microservices with an MOA on a pod-by-pod, service-by-service basis. Rather, the service mesh takes care of it all.
But sadly, there is no magic. A service mesh comes with its own set of components, and they need to be configured according to the needs of the application. Thus, you need to know a thing or two about service mesh configuration details, particularly when working with a service mesh under OpenShift. OpenShift combines configuration implementation using its graphical web console and the oc command line tool. As a result, things can be a bit tricky. This article provides a demonstration of setting up the OpenShift Service Mesh, as shown in the following video.
An overview
There will be a good deal of explanation that goes with each of the following hands-on activities.
- You will learn the workflow for configuring and running a demonstration application under OpenShift Service Mesh.
- We will describe the demonstration application.
- You will learn how the service mesh controls the demonstration application from a conceptual point of view.
- Follow the steps to get the demonstration application up and running under an OpenShift Service Mesh.
- Configure service mesh destination rules that control access to the constituent components used by the application.
Prerequisites
In order to get the full benefit from this article, you will need to fulfill the following prerequisites:
- Understand the basics of how an OpenShift cluster works.
- Know how Kubernetes resources such as Namespaces, Deployments, Pods, and Services are used within an OpenShift cluster.
- Understand how a service uses labels as selectors to identify the pods with the logic that the service will represent.
- You should be familiar with OpenShift/Kubernetes configuration files written in YAML format.
- Access to a fully-operational version of OpenShift to get hands-on experience working with the service mesh described in this article.
- Know how to create projects within OpenShift.
- You need administrator permissions to install the OpenShift Operators required to implement a fully functional Service Mesh.
The Kubernetes and service mesh configuration files used to create and control the demonstration application in your OpenShift cluster are available for download. Also provided in those files is a setup shell script that will install the demonstration application automatically. However, before you run that setup script, the following prerequisite conditions must be met:
- The OpenShift Service Mesh must be installed.
- The demonstration application’s namespace must be created.
- The demonstration application’s namespace must be bound to the service mesh under the default
ServiceMeshMemberRollresource.
The article will provide the details for satisfying these three conditions.
The Service Mesh configuration files are linked throughout this article. It would be helpful to open those links in a separate browser window for easy reference.
A description of the demonstration application
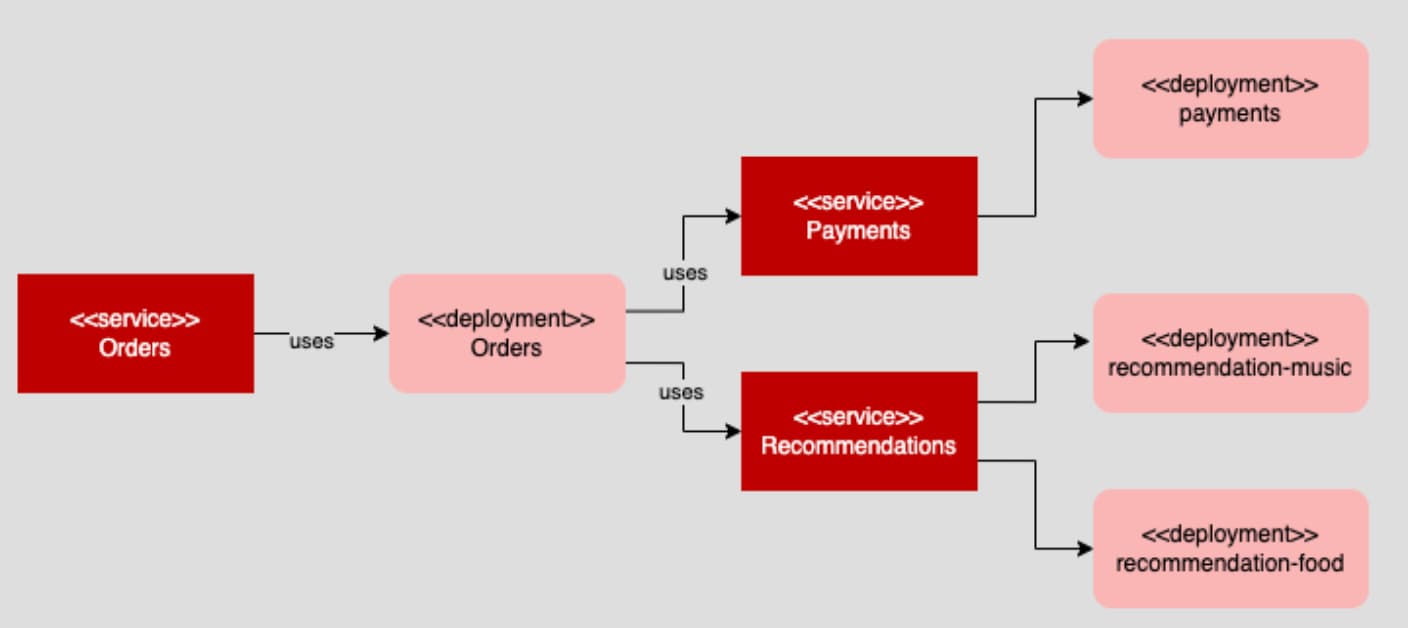
The demonstration application is an aggregate of three microservices: orders, payments, and recommendations. The main point of entry is the orders microservice represented as a RESTful API.
The orders microservice uses other microservices. These microservices are payments to receive and process payments and recommendations which the orders service uses to provide a recommendation message after a purchase has been made. Also, the recommendations microservice gets data from constituent Kubernetes deployments. These deployments are recommendations-music and recommendations-food. Recommendations-music provides recommendations about music. Recommendations-food provides recommendations about food (see Figure 1).
By default, the recommendations microservice gets a recommendation from recommendations-music and recommendations-food in a round-robin manner, alternating accordingly. However, we’re going to use the capabilities of the service mesh to apply a rule that overrides round-robin routing between the constituent recommendation services and makes a recommendation come solely from recommendations-food.
Then, we will delete that rule and apply a rule that makes a recommendation come only from recommendations-music. We won't have to configure any of the underlying deployments, pods, and services that are part of the cluster. Rather, all behavior changes will be accomplished by configuring the OpenShift Service Mesh.
How the service mesh works
As mentioned, you can think of the OpenShift Service Mesh as a one-ring-to-rule-them-all approach to controlling behavior in and around an application running within an OpenShift cluster. Once you make an application known to the service mesh, the service mesh is in charge. The service mesh controls access to the application, routing within the application, and how the application’s components interact with each other.
Three service mesh resources facilitate access, routing, and internal interaction:
- Gateway
- Virtual service
- Destination rules
The gateway is the entry point
Once a Service Mesh is in force, the gateway is the entry point for all traffic according to the port number assigned to the gateway. A Service Mesh can have many gateways. A gateway defines a port number and domain name to access the cluster.
You will learn more details about gateways in a later section. The important thing to understand now is that all external traffic going into the service mesh must pass thru this gate.
The purpose of a virtual service
You can think of a virtual service as an overlay service that the service mesh imposes on an existing OpenShift/Kubernetes service. The virtual service adds its own routing definition that gets processed according to the request URL passed to the gateway. The job of the gateway URL is to get a request into the service mesh. The purpose of the virtual service is to determine how to route the request once it’s received.
As shown in Figure 2, a user passes a request to http://istio-gateway-mydomain.io/ into the Service Mesh. The gateway knows it can allow this request to enter the service mesh. The virtual service, virtual-service-orders, is configured to recognize all requests with a root URL (/) and pass them onto the underlying orders service running in the OpenShift cluster.
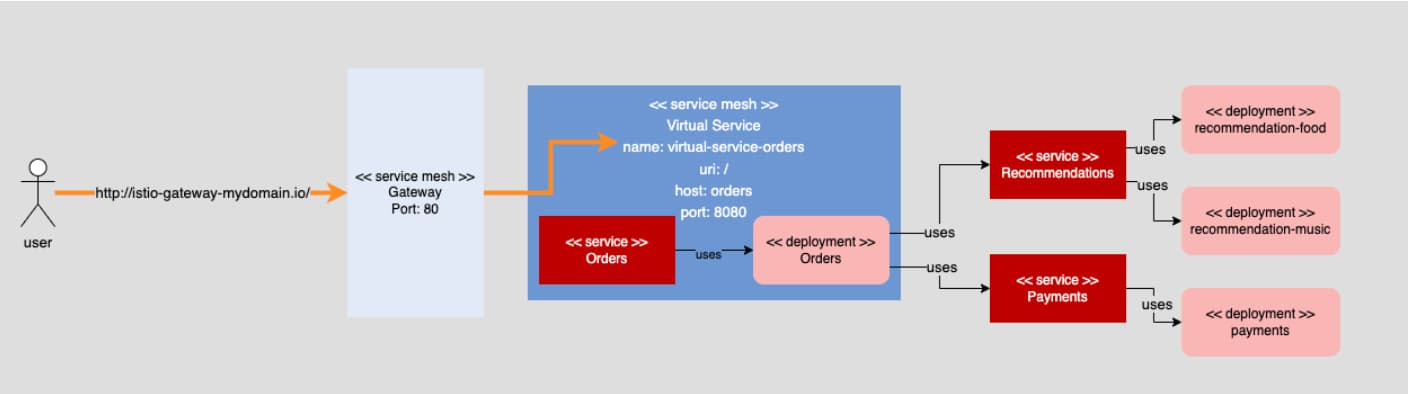
As you’ll see in the following sections, a service mesh can have many virtual services, with each service dedicated to processing some aspect of an incoming request.
How a virtual service uses destination rules
A destination rule is used by a virtual service to determine what the service must do upon receiving a request. A destination rule can describe how to configure the pods assigned to a service according to a particular label definition. Within the scope of this article, you’ll use a destination rule that knows how to work with the labels, version: food and version: music.
Figure 3 shows a virtual service, virtual-service-food, that controls the behavior of the underlying OpenShift/Kubernetes service named recommendations. Virtual-service-food uses a destination rule subset, recommendation-food, as shown at callout (1).
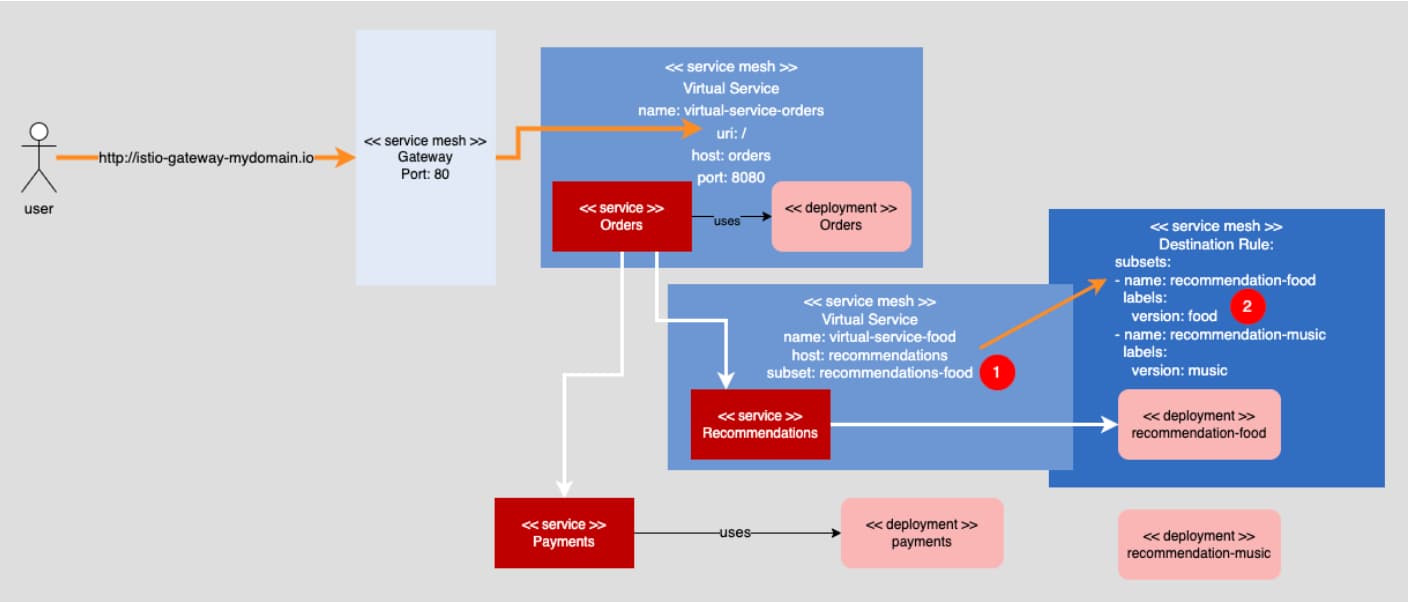
That subset rule dictates that virtual-service-food should only select pods that have the label version: food. When the rule is applied, the underlying recommendations service in the OpenShift cluster will bind to pods that have the version: food pair, as shown in callout (2) of Figure 3, along with the recommendation's original selector label, app: recommendation, which is not shown.
Admittedly, Figure 3 is a bit complex, and understanding and applying a destination rule can be a bit tricky. You need to have a firm understanding about how Kubernetes labels work as service selectors to bind pods to a service. It can take some time to absorb it all.
We’ll discuss using destination rules later in this article. The important thing to remember now is that a destination rule is applied to a virtual service by the virtual service’s configuration. Once the destination rule is applied, the virtual service will make it so the underlying Kubernetes service binds to pods according to the given destination rule in force.
Now that we have covered the essentials, let’s move on to the hands-on portion of this article.
4 steps to run an application under OpenShift Service Mesh
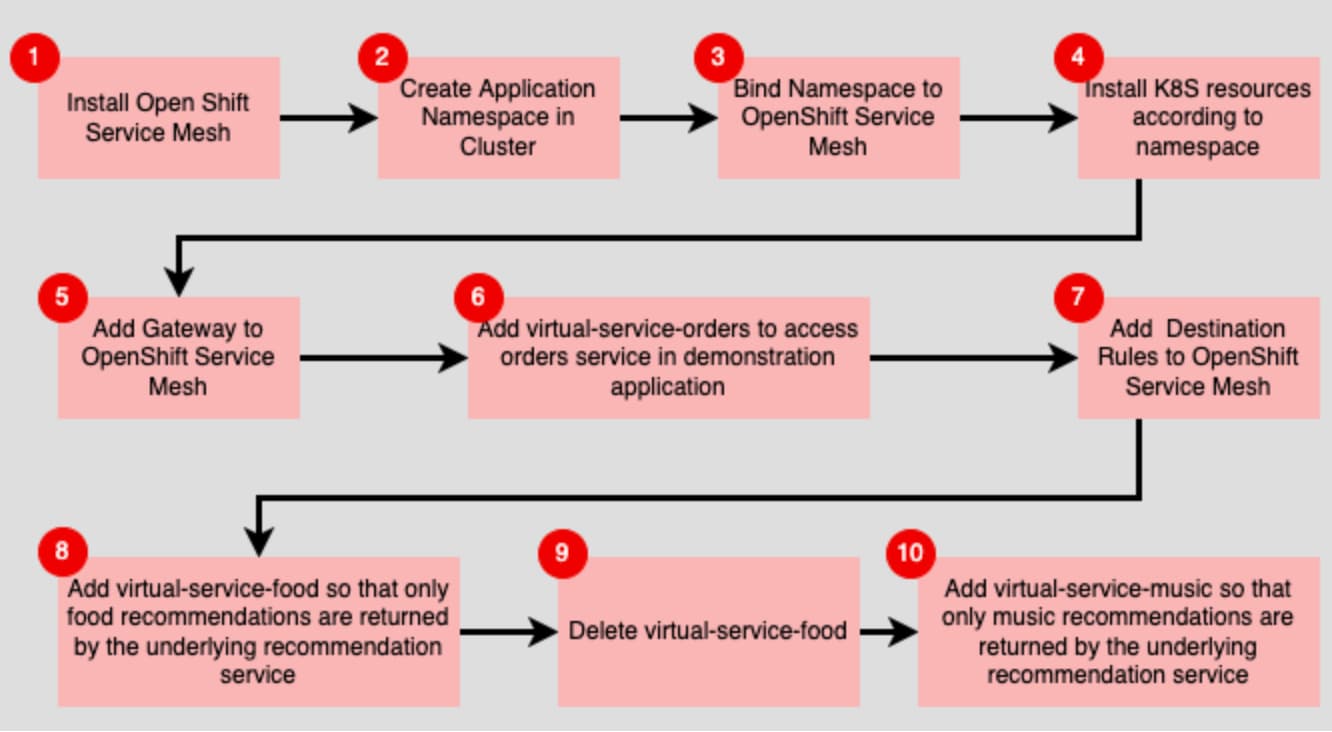
The sections that follow describe the steps to take to install the OpenShift Service Mesh Operator and the demonstration application, along with applying the various service mesh components required to run it all under the service mesh. Figure 4 illustrates an overview of the workflow.
Step 1: Install the service mesh operator
Service Mesh technology is not part of a standard installation of OpenShift. Rather, the components that are part of OpenShift Service Mesh need to be added to OpenShift. These components are represented by a set of Kubernetes Operators which are added to the OpenShift cluster by personnel that have Administrator permissions.
Figure 5 shows the operators that are part of a service mesh installation under OpenShift. These components are RedHat OpenShift Service Mesh Operator, OpenShift Elasticsearch Operator, RedHat OpenShift distributed tracing platform Operator and the Kiali Operator.
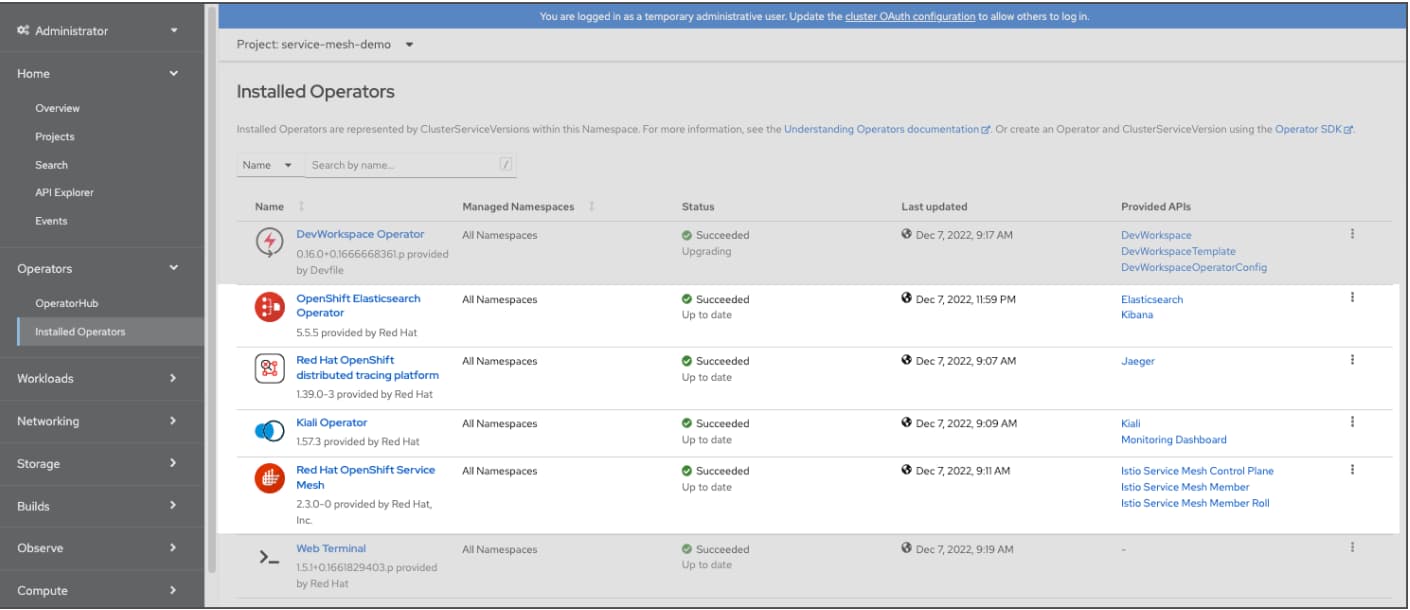
All of the operators shown in Figure 5 are available for installation from the OpenShift Operator Hub.
Table 1 describes the purpose of each Operator.
|
Operator |
Description |
|---|---|
| RedHat OpenShift Service Mesh Operator | The operator represents the control and data planes of the core service mesh. The operator is based on the Istio service mesh. |
| OpenShift Elasticsearch Operator | Used to store tracing and cluster logging information within the service mesh. |
| RedHat OpenShift distributed tracing platform Operator | Based on the Jaeger open source project, provides distributed tracing capabilities within the service mesh. |
| Kiali Operator | Provides the capability to graphically visualize a variety of the service mesh’s activities, such as circuit breaking and request rates. |
Step 2: Create a namespace for the service mesh
Once the operators are installed and running, the following steps need to be executed:
- Step 2a: Create the namespace for the application to OpenShift Cluster.
- Step 2b: Configure the service mesh to “know” about this namespace.
In order for an OpenShift Service Mesh to control an application, that application needs to run in a dedicated OpenShift namespace. In this case, we’re going to create a namespace and call it, service-mesh-demo.
One way to create a dedicated namespace in OpenShift is to create an OpenShift project. Then, OpenShift will do the work of creating the namespace as part of the project creation process.
Other ways are to create a namespace declaratively by using a YAML configuration file or imperatively by executing a command using the oc CLI tool for OpenShift at a terminal window. Both the imperative and declarative methods require that you are logged into an OpenShift cluster using the oc CLI tool as a credentialed user.
Step 2a: Create the namespace in the OpenShift cluster
Run the following oc command in a terminal window:
oc create namespace service-mesh-demo
Alternatively, you can use a configuration YAML file to create the namespace using the command: apply -f .yaml as follows:
apiVersion: v1
kind: Namespace
metadata:
  name: service-mesh-demo
  labels:
    name: service-mesh-demo
How you create the namespace is up to you. The important thing is that the namespace must be created before you add it to the Service Mesh.
Step 2b: Add the application’s namespace to the service mesh
Once the namespace is created, add it to the service mesh’s ServiceMeshMemberRoll resource using the configuration file as follows:
apiVersion: maistra.io/v1
kind: ServiceMeshMemberRoll
metadata:
  finalizers:
    - maistra.io/istio-operator
  generation: 12
  name: default
  namespace: istio-system
spec:
  members:
    - service-mesh-demo
The easiest way to add the namespace to the service mesh is to execute the following oc command in a terminal window against the YAML file that describes the ServiceMeshMemberRoll configuration. (Note: As always, you must be logged into your instance of OpenShift by way of oc login.)
oc apply -f https://raw.githubusercontent.com/redhat-developer-demos/simple-service-mesh-demo/main/service-mesh/service-member-roll.yaml
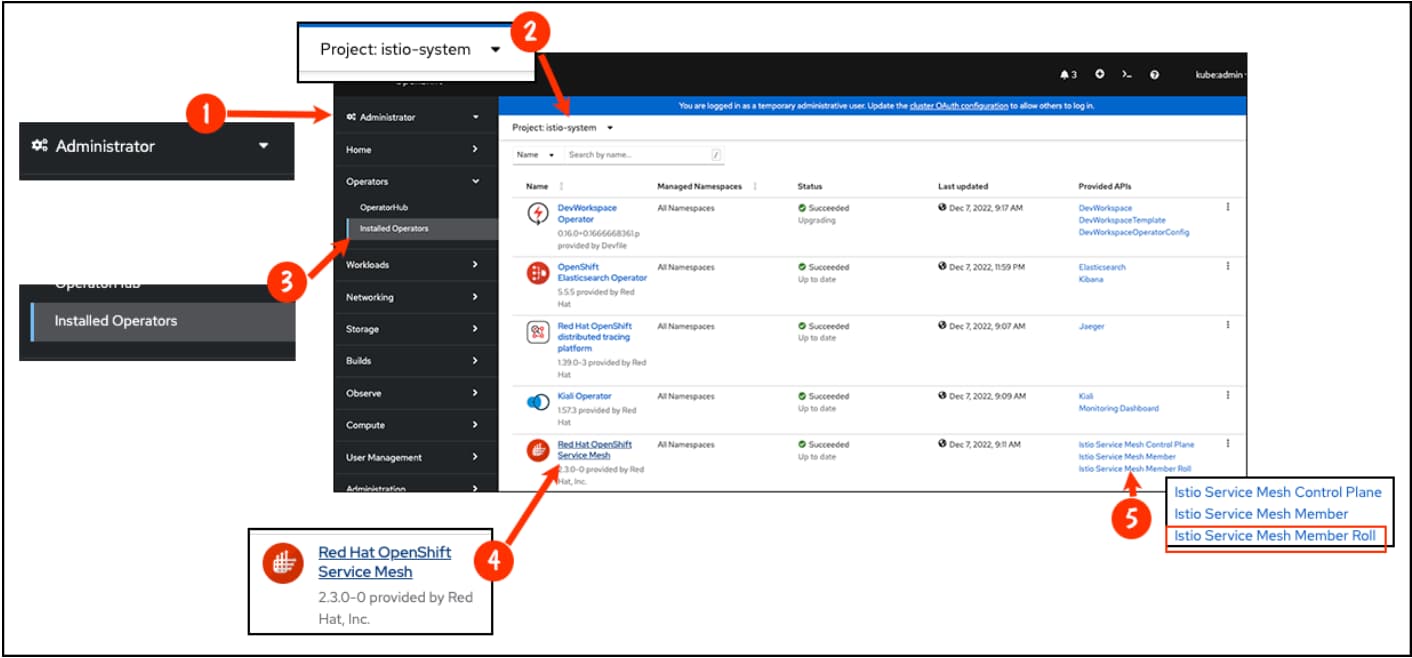
After the namespace is added to the ServiceMeshMemberRoll resource, it will appear within the OpenShift web console administrator view under Installed Operators in the web console. Click the Istio Service Mesh Roll link as shown in Figure 6 at callout (5).
Then, once the Service Mesh Roll Detail page appears, click the YAML link as shown in Figure 7 at callout (2). You’ll see the namespace service-mesh-demo added to the members attribute as shown at callout (3).
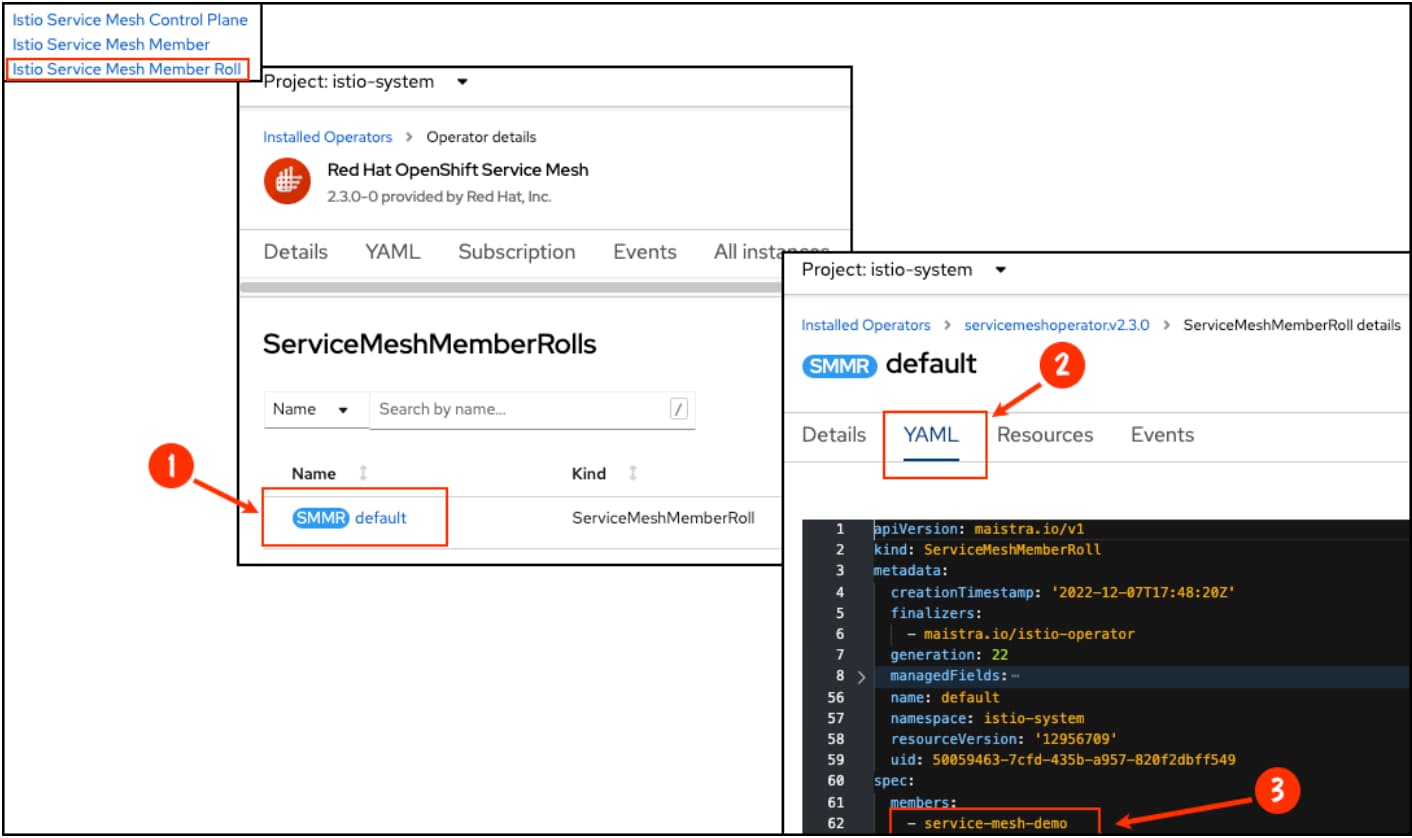
The important thing to understand about adding the demonstration application’s service-mesh-demo namespace to the service mesh via the ServiceMeshMemberRoll resource is that adding the namespace is how the service mesh “knows” about the demonstration application. This is important because once the Service Mesh “knows” about the service-mesh-demo namespace, the service mesh will automatically inject proxy sidecar containers into all pods created within the demonstration application’s namespace. These proxy sidecar containers allow the service mesh to take control of the demonstration application.
Now that the Service Mesh knows about the demonstration application’s namespace, it’s time to add the demonstration application’s Kubernetes resources to OpenShift and the Service Mesh.
Step 3: Install Kubernetes resources for the demo app
You can install the demonstration application’s Kubernetes resources into the OpenShift cluster by running a setup shell script included with the resource configuration files stored on a GitHub repository dedicated to this article. The next steps will explain how to download and install the demonstration application’s Kubernetes resources into OpenShift.
Step 3a: Clone the code
Run the following command in a terminal window to download the setup script and Kubernetes resource files onto your local computer.
git clone https://github.com/redhat-developer-demos/simple-service-mesh-demo
Step 3b: Install the pods and services
- Once the source code is downloaded from GitHub, navigate into the
./k8sfolder of the source code’s working directory by running the following command from the terminal window of your local machine:
cd openshift-service-mesh-examples/k8s/
- When you are in the
./k8sfolder, run the following command in a terminal window to install the Kubernetes resources associated with the demonstration application:
sh ./app-setup.sh
The setup script installs the pods and services that make up the demonstration application. If everything installs as expected, the circular deployment graphics will be displayed in the Developer Topology view of the OpenShift web console, as shown in Figure 8.

Once the Kubernetes resources are installed, you’re ready to make the demonstration application operational under the OpenShift Service Mesh.
Step 4: Build the service mesh
As mentioned previously, once you've installed the demo application’s Kubernetes resources in the OpenShift cluster, the next set of steps is to configure the OpenShift Service Mesh to support the application. The steps that make up the process are as follows:
- Step 4a: Install the Service Mesh Gateway.
- Step 4b: Install the Virtual Service for the Orders Service.
- Step 4c: Install the Destination Rules.
- Step 4d: Add a Virtual Service to enable filtering the Recommendations according to a version: food.
- Step 4e: Delete the existing Virtual Service.
- Step 4f: Add a new Virtual Service to enable filtering the Recommendations according to a version: music.
Step 4a: Install the service mesh gateway
As you learned earlier, the gateway is the “gate” by which requests enter the service mesh. The configuration file for the gateway is in the ./service-mesh folder of the source code you downloaded from GitHub. The following shows the contents of the Gateway configuration:
apiVersion: networking.istio.io/v1alpha3
kind: Gateway
metadata:
  name: service-mesh-demo-gateway
  namespace: service-mesh-demo
spec:
  selector:
    istio: ingressgateway # use istio default controller
  servers:
  - port:
      number: 80
      name: http
      protocol: HTTP
    hosts:
    - "*"
The gateway configuration file allows access to any request sent to port 80 of the OpenShift Cluster. The gateway is applicable to all hosts, as indicated by the last two lines of the configuration file.
Execute the following command to install the gateway into the OpenShift Service Mesh:
oc apply -f https://raw.githubusercontent.com/redhat-developer-demos/simple-service-mesh-demo/main/service-mesh/gateway.yaml
The gateway allows requests into the service mesh, but once a request is in the service mesh, it must be routed to a relevant service. This is where a virtual service comes into play.
Step 4b: Install the virtual service
The following configuration file for the virtual service supports the underlying Kubernetes order service:
apiVersion: networking.istio.io/v1alpha3
kind: VirtualService
metadata:
  name: virtual-service-orders
  namespace: service-mesh-demo
spec:
  hosts:
  - "*"
  gateways:
  - service-mesh-demo-gateway ###############################################
  http:                       # This Virtual Service listens for requests
  - match:                    # coming in on this Gateway, service-mesh-demo-gateway
    - uri:                    ###############################################
        exact: /     ###############################################
    route:           # Any root request, for example, a request coming from:
    - destination:   # http://istio-ingressgateway-istio-system.apps.mydomain.eastus.aroapp.io/
        host: orders # will be forwarded to the Kubernetes service named orders at port 8080
        port:        ###############################################
          number: 8080
The configuration file for the Virtual Service routes a request to the orders service.
The way a virtual service works in an OpenShift Service Mesh is that its configuration file declares a definition that identifies a particular URI pattern to support. Then, that request will be forwarded to an underlying OpenShift/Kubernetes service. In the case of this virtual service called virtual-service-orders, the URI pattern is the root (/). As the comments explain, the virtual service will look at requests coming in through the service-mesh-demo-gateway, the previously installed gateway. Then, it will forward all root requests to the destination host orders.
In service mesh configuration parlance, the term host corresponds to the underlying Kubernetes service called orders.
Execute the following command to install the virtual-service-orders into the OpenShift Service Mesh:
oc apply -f https://raw.githubusercontent.com/redhat-developer-demos/simple-service-mesh-demo/main/service-mesh/virtual-service-orders.yaml
Review so far
Let’s review briefly. So far, you have configured the service mesh to allow GET and POST requests to the demonstration application. The demonstration application will return behavior defined by the virtual-service-orders virtual service. The host is assigned the value orders designated in the virtual service configuration. That setting corresponds to the underlying Kubernetes orders service.
In turn, the underlying orders service uses the Kubernetes payments service as well as the Kubernetes recommendations service. Then the Kubernetes recommendations service gets recommendation data from the recommendation-food and recommendation-music pods in a round-robin manner.
In order to confirm all is working as expected, get the URL published by the service mesh to gain access to the demonstration application.
Execute the following command to get the URL to your instance of the OpenShift Service mesh:
oc -n istio-system get route istio-ingressgateway -o jsonpath='{.spec.host}'
You'll get a response that is somewhat similar but not exactly the same as the following:
http://istio-ingressgateway-istio-system.apps.mydomain.eastus.app.io
You can copy the URL returned by the command and paste it into a program such as Postman to execute a GET request to the demonstration application running in the OpenShift cluster. As mentioned previously, you’ll be getting recommendation data from the recommendation-food and recommendation-music pods.
However, we can restrict the recommendation information returned by the application to a particular recommendation pod by using a destination rule and an additional virtual service.
Step 4c: Install the destination rules
As mentioned previously, a destination rule is an instruction (a.k.a. policy) that tells a virtual service what to do with a request. A destination rule can be configured in a variety of ways. In the case of the demonstration application, we’ve created a destination rule that declares two subsets. A subset is a named configuration setting that defines particular labels applied to a designated host as follows:
apiVersion: networking.istio.io/v1alpha3
kind: DestinationRule
metadata:
  name: service-mesh-demo-destination-rule
  namespace: service-mesh-demo
spec:
  host: recommendations
  subsets:                     ##############################################
  - name: recommendation-food  # Have the K8S service recommendations
    labels:                    # use pods that have, version: food defined
      version: food            # as labels in the pods metadata attribute.
  - name: recommendation-music ##############################################
    labels:                    # Have the K8S recommendations service use
      version: music           # pods with the label version: music
                               ##############################################
This destination rule has two subsets that describe the type of recommendation used by the demonstration application.
One subset named recommendation-food tells the Kubernetes recommendations service to only include pods that have the label version: food as part of its selector definition. Remember, Kubernetes service binds to pods according to the labels that the service and pods have in common, as defined in the spec.selector section of the service.
Another subset named recommendation-music will make the Kubernetes service only include recommendation data from the recommendation-music pod.
Execute the following command to install the service-mesh-demo-destination-rule:
oc apply -f https://raw.githubusercontent.com/redhat-developer-demos/simple-service-mesh-demo/main/service-mesh/destination-rule.yaml
Next, we’ll create a virtual service that uses only the subset named recommendation-food. That subset tells the virtual service to add the label, version: food, (the service’s selector) in addition to any selector labels that are already explicitly defined in the service’s configuration file. You can view the recommendations service’s configuration file here.
Step 4d: Implement a virtual service to enable recommendations filtering
Using a destination rule requires implementing a virtual service that declares a route to a host supported by a destination rule. Remember, in virtual service terminology, the host indicates an underlying Kubernetes service.
The following declares an attribute host with the value recommendation at the spec.http.route.destination attribute. Also, spec.http.route.destination has a sub-attribute named subset that has the value, recommendation-food.
apiVersion: networking.istio.io/v1alpha3
kind: VirtualService
metadata:
  name: virtual-service-food
  namespace: service-mesh-demo
spec:
  hosts:
  - recommendations
  http:
    - route:
      - destination:                    ##############################################
          host: recommendations         # The K8S recommendations service, in addition
          subset: recommendation-food   # to using the labels declared in its
          Port:                         # spec.selector attribute, will bind to pods
            number: 8080                # that also have labels defined in the
        weight: 100                     # recommendation-food subset of the Destination
                                        # Rule.
                                        ##############################################
The virtual service uses recommendations that have been filtered to use only pods with labels defined in the recommendation-food subset of the destination rule.
The meaning of the settings can be expressed as the following: “Whenever a call to the Kubernetes service recommendations is made, go find a Destination Rule that has a subset named recommendation-food defined. Then get the label assigned to that subset and retrieve the pods that have that label defined in its metadata attribute.”
This means that when the orders service calls the recommendations service to get a recommendation, the virtual service named virtual-service-food takes over. The virtual service virtual-service-food , in turn, goes into the service mesh and looks for a destination rule subset named recommendation-food. As you might recall, the subset recommendation-food is defined in the destination rule named service-mesh-demo-destination-rule. The recommendation-food subset declares a label version: food.
Thus, the service mesh will only use pods that have the labels app: recommendations and version: food. (Don’t forget the label app: recommendations is the selector declared in the original K8S recommendations service. The label app: recommendations is declared in the metadata of the K8S deployment named recommendation-food along the label version: food. Hence the binding of the Kubernetes recommendations service to the recommendation-food pod. You can view the recommendations-food deployment on my GitHub page.)
Thus, the logic that is in play when the K8S recommendations service is called is that a recommendation such as "Buy some more excellent pastry" will be emitted by the recommendation-food pod and thus returned by the K8S recommendations service. Logically, the virtual service, virtual-service-food, has a filter in force that only returns recommendations from the K8S pod recommendation-food.
Execute the following command to install the virtual service named virtual-service-food into the OpenShift Service Mesh:
oc apply -f https://raw.githubusercontent.com/redhat-developer-demos/simple-service-mesh-demo/main/service-mesh/virtual-service-food.yaml
To see the destination rule in action execute the following curl command in your terminal window. (Note: Substitute the URL published by your instance of the OpenShift Service Mesh in place of the string <SERVICE_MESH_URL>.)
POSTing order data to the demonstration application:
curl --location --request POST 'http:<SERVICE_MESH_URL>/' \
--header 'Content-Type: application/json' \
--data-raw '{
  "customer": {
    "id": 3,
    "firstName": "Barney",
    "lastName": "Kelly",
    "email": "Barney.Kelly@gmail.com"
  },
  "product": {
    "id": 2,
    "category": "Food",
    "description": "Blue Olives",
    "price": 39.99
  },
  "creditCard": {
    "number": "6767-8196-4877-7940-326",
    "expirationDate": "2023-09-08T01:14:59.686Z",
    "cvv": "851",
    "cardHolder": {
      "id": 3,
      "firstName": "Barney",
      "lastName": "Kelly",
      "email": "Barney.Kelly@gmail.com"
    }
  },
  "purchaseDate": 1669844628249
}'
You’ll get output similar to the following:
{
  "status": 200,
  "order": {
    "payment": {
      "customer": {
        "id": 3,
        "firstName": "Barney",
        "lastName": "Kelly",
        "email": "Barney.Kelly@gmail.com"
      },
      "product": {
        "id": 2,
        "category": "Food",
        "description": "Blue Olives",
        "price": 39.99
      },
      "creditCard": {
        "number": "6767-8196-4877-7940-326",
        "expirationDate": "2023-09-08T01:14:59.686Z",
        "cvv": "851",
        "cardHolder": {
          "id": 3,
          "firstName": "Barney",
          "lastName": "Kelly",
          "email": "Barney.Kelly@gmail.com"
        },
        "authorizationCode": "93d945c8-af67-43cf-9de0-82f2780ed31f"
      },
      "purchaseDate": 1669844628249,
      "id": "b132a95b-6238-45dd-b809-995e8a1d5619"
    },
    "recommendation": {
      "category": "food",
      "recommendation": "Buy some more excellent Pastry"
    },
    "id": "fceadf7f-6f04-469d-9922-9a74cfc8d57a"
  }
}
This is the output from POSTing an order to the demo application when the destination rule subset recommendation-food is in force. Notice that only a food recommendation is returned as part of the response to the request to the demo application.
Applying a different destination rule using a new virtual service
Should you want to use only recommendations from the pods in therecommendations-music deployment you’ll need to delete the Virtual Service named virtual-service-food from the service mesh. Then, you'll apply the Virtual Service named virtual-service-music.
Step 4e: Delete the existing virtual service
Execute the following command in the terminal window to delete the virtual service called, virtual-service-food:
oc delete virtualservice virtual-service-food -n service-mesh-demo
Step 4f: Add a virtual service to enable recommendations filtering according to a version: music
Now it's time to create the a virtual service that will use recommendations coming from the K8S deployment recommendations-music.
The following configuration for the virtual service named virtual-service-music:
apiVersion: networking.istio.io/v1alpha3
kind: VirtualService
metadata:
  name: virtual-service-music
  namespace: service-mesh-demo
spec:
  hosts:
  - recommendations
  http:
    - route:
      - destination:                    ##############################################
          host: recommendations         # The K8S recommendations service, in addition
          subset: recommendation-music  # to using the labels declared in its
          Port:                         # spec.selector attribute, will bind to pods
            number: 8080                # that also have labels defined in the
        weight: 100                     # recommendation-music subset of the
                                        # Destination Rule.
                                        ##############################################
The virtual service uses recommendations that have been filtered to use only pods with labels defined in the recommendation-music subset of the destination rule.
The virtual service logic that filters the Kubernetes recommendations service to use only recommendations from the pods in the Kubernetes deployment recommendations-music is the same as the logic to get the K8S recommendations service to use only recommendations from the pods in the deployment recommendations-food. Only in this case the new virtual service filters for music recommendations.
Execute the following command to install the virtual service named virtual-service-music into the OpenShift Service Mesh:
oc apply -f https://raw.githubusercontent.com/redhat-developer-demos/simple-service-mesh-demo/main/service-mesh/virtual-service-music.yaml
Once the new virtual service is in force, the output from running a POST request against the orders API running within the OpenShift Service Mesh will be similar to the output as follows:
{
  "status": 200,
  "order": {
    "payment": {
      "customer": {
        "id": 3,
        "firstName": "Camille",
        "lastName": "Scott",
        "email": "Camille.Scott@gmail.com"
      },
      "product": {
        "id": 2,
        "category": "Music",
        "description": "Ernie Ball Guitar Strings",
        "price": 39.99
      },
      "creditCard": {
        "number": "6767-8196-4877-7940-326",
        "expirationDate": "2023-09-08T01:14:59.686Z",
        "cvv": "851",
        "cardHolder": {
          "id": 3,
          "firstName": "Camille",
          "lastName": "Scott",
          "email": "Camille.Scott@gmail.com"
        },
        "authorizationCode": "93d945c8-af67-43cf-9de0-82f2780ed31f"
      },
      "purchaseDate": 1669844628249,
      "id": "b132a95b-6238-45dd-b809-995e8a1d5619"
    },
    "recommendation": {
         "category": "music",
         "recommendation": "Buy another album by Foo Fighters"
    },
    "id": "fceadf7f-6f04-469d-9922-9a74cfc8d57a"
  }
}
Wrap up
We have covered a lot of information in this article. I described the nature and use of the OpenShift Service Mesh and explained details about gateways, virtual service, and destination rules. Then, I demonstrated the steps to get the demo application up and running in an OpenShift Cluster under an OpenShift Service Mesh.
At this point, it would be beneficial to take another look at the diagram in Figure 3 that describes how the various components of an OpenShift Service Mesh work together.
There are four important concepts to remember:
- Once an application is bound to an OpenShift Service Mesh by adding the application’s namespace the service mesh’s
ServiceMeshMemberRollresource, the service mesh is in control of access to and activity within the application. - A gateway enables access to the application within the service mesh.
- Virtual services route requests to the application to the underlying Kubernetes services within the OpenShift cluster.
- Destination rules define policies and filtering rules that apply to a given virtual service. A subset is a rule within a destination rule.
Service mesh technology is complex. The tradeoff in accommodating this complexity is that using a service mesh makes it easier to control an application at a global level. But, as with any complex technology, working with an OpenShift Service Mesh takes time to master. There are numerous details to juggle. Hopefully, this article has provided the knowledge and hands-on experience required to make it easier to get up and running with OpenShift Service Mesh.
Last updated: September 19, 2023