Accelerating the software development life cycle while ensuring the quality and performance of applications is a challenging task. GitHub Actions makes it easy to automate all required CI software workflows for your GitHub repository.
GitHub Actions Runner is an application that runs a job from a GitHub Actions workflow. GitHub Actions also provides a self-hosted runner that allows you to run continuous integration (CI) tests that require actual hardware. End-to-end testing (E2E testing) is a popular methodology to test an application's functionality and performance under real-life conditions. Still, it often demands actual hardware, rendering it infeasible to run on the public cloud.
In this article, we'll delve into our experience performing E2E testing for an open source project on-premises using a containerized self-hosted runner. The self-hosted runner container image used in this tutorial is available for download from the quay.io registry.
Self-hosted runner container on Red Hat Enterprise Linux
First, we'll create a self-hosted runner container on Red Hat Enterprise Linux (RHEL).
Build and download the containerized runner image
The whole procedure is covered in https://github.com/redhat-eets/gitaction.
To build the containerized runner for a given runner version, enter the following:
podman build --build-arg RUNNER_VERSION=2.301.1 --tag quay.io/gitaction/runner:2.301.1
To see what runner releases are available to use for RUNNER_VERSION, check on https://github.com/actions/runner/releases.
Alternatively, you can download a specific self-hosted runner container image for the 2.301.1 release:
podman pull quay.io/gitaction/runner:2.301.1
The GitHub runner will check if a newer version is available on startup. It will self-update and restart with the latest version. However, it is worth using the latest version for the container image. Note that the runner's self-update takes time and may not always be successful.
GitHub token protection
In order to generate a registration token, the container requires you to enter a GitHub personal access token (PAT) when starting. The PAT has to belong to the target repository owner for the container to register successfully.
From a security perspective, using the PAT directly with the Podman command is not a good idea. Instead, a Podman secret should be created for the PAT:
echo "your github access token" > token && podman secret create github_token token && rm -rf token
In the above step, github_token must be used as the secret name, as this is the default secret filename that the script inside the container will look for. If you want to choose a different secret name, you can use the environment variable GH_TOKEN_PATH to specify the secret file path when running Podman to start the container.
With all the information we have so far, run the self-hosted runner with Podman:
podman run --secret github_token --name runner -it --rm --privileged -e GH_OWNER='<your github id>' -e GH_REPOSITORY='<repo name>' quay.io/gitaction/runner:2.301.1
If using a different Podman secret name, say some_github_token, use the extra environment variable GH_TOKEN_PATH:
podman run --secret some_github_token --name runner -it --rm --privileged -e GH_OWNER='<your github id>' -e GH_REPOSITORY='<repo name>' -e GH_TOKEN_PATH=/run/secrets/some_github_token quay.io/gitaction/runner:2.301.1
Pass in extra information
In reality, E2E CI workflows often require extra information outside of the target GitHub repository.
For illustrative purposes, we use the RHEL SR-IOV test suite as an example throughout this article. Its E2E CI workflow requires testbed information. The testbed information is not checked into the GitHub repository. For the runner container to access this information, a volume mount can be used. You can apply the same technique in Red Hat OpenShift.
To set up the volume mount for this purpose, first create a folder on the host and copy the required files into this folder. For the RHEL SR-IOV E2E CI, the required files are testbed.yaml and config.yaml, so copy these files into the folder and start the container with the volume mount:
sudo mkdir -p /opt/E2E-config
sudo cp testbed.yaml  /opt/E2E-config
sudo cp config.yaml  /opt/E2E-config
sudo chown -R nobody:nobody  /opt/E2E-config
podman run --secret github_token --name runner -it --rm --privileged -e GH_OWNER='redhat-partner-solutions' -e GH_REPOSITORY='rhel-sriov-test' -v /opt/E2E-config:/config quay.io/gitaction/runner:2.301.1
In the above sample step, the volume is mounted to /config inside the container. That means the E2E CI workflow needs to go to this folder to retrieve these YAML files. Interested readers can take a look at the following E2E CI workflow for reference.
Label the runner
A GitHub repo can have multiple containerized runners on the same server using different labels. This is useful if various tests have different hardware requirements; for example, 800-series and 700-series Intel NICs:
podman run --secret github_token --name runner810 -it --rm --privileged -e RUNNER_LABEL='810' -e GH_OWNER='redhat-partner-solutions' -e GH_REPOSITORY='rhel-sriov-test' -v /opt/E2E-config-810:/config quay.io/gitaction/runner:2.301.1
podman run --secret github_token --name runner710 -it --rm --privileged -e RUNNER_LABEL='710' -e GH_OWNER='redhat-partner-solutions' -e GH_REPOSITORY='rhel-sriov-test' -v /opt/E2E-config-710:/config quay.io/gitaction/runner:2.301.1
You can refer to the runners above as runs-on: [self-hosted, 810] or runs-on: [self-hosted, 710] in a GitHub workflow.
How to use the runner label will be explained later in the How to trigger the CI section.
Self-hosted runner as a systemd service
Directly using the Podman command line to start the runner container primarily serves the purpose of proof of concept. For production use, you can use a systemd service to manage the self-hosted runner. Here is the systemd unit file that was used by the RHEL SR-IOV E2E CI:
[Unit]
Description=github self runner in container
After=network.target

[Service]
Type=simple
ExecStart=/usr/bin/podman run --secret github_token --name runner --rm --privileged -e GH_OWNER='redhat-partner-solutions' -e GH_REPOSITORY='rhel-sriov-test' -v /opt/E2E-config:/config quay.io/gitaction/runner:2.301.1
ExecStop=/usr/bin/podman stop runner

[Install]
WantedBy=multi-user.target
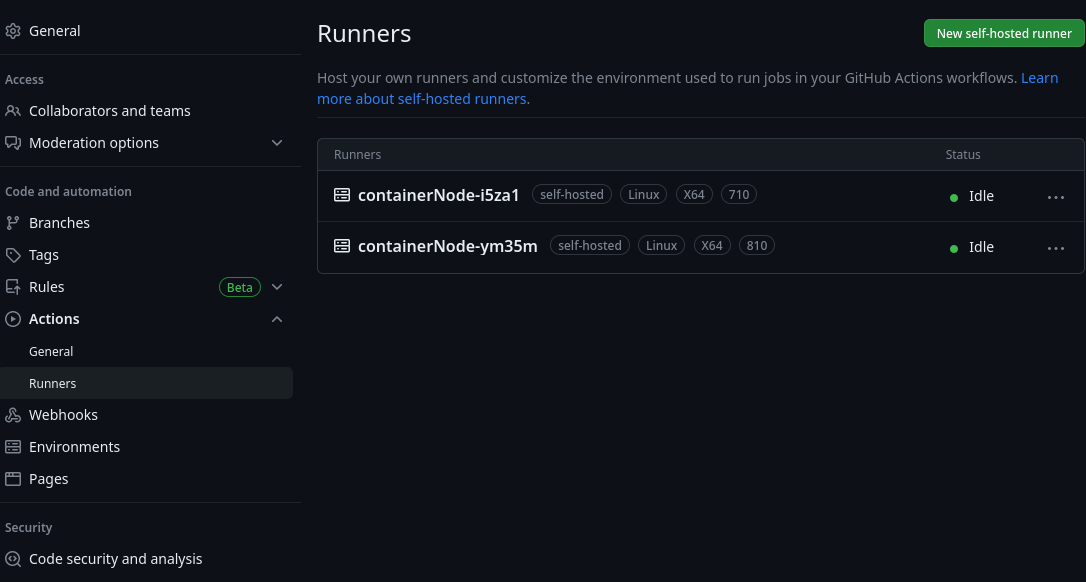
After the container starts and successfully registers with the target GitHub repository, the self-hosted runner can be found under the target repository's Actions/Runners, as shown in Figure 1:

How to trigger the CI
Here is the sample code for using the runner label:
name: sriov-e2e-test
run-name: sriov-e2e-test initiated by ${{ github.actor }}
on:
  pull_request:
    types: [ labeled ]
  workflow_dispatch:
    inputs:
      tag:
        description: 'NIC hardware'
        required: true
        default: '810'
        type: choice
        options:
        - 810
        - 710
jobs:
  prepare-label:
    runs-on: ubuntu-latest
    outputs:
      label: ${{ steps.step1.outputs.label }}
    steps:
      - name: Check label
        id: step1
        run: |
          if [ ${{ github.event.label.name }} == 'e2e-test' ]; then
            echo "label=810" >> $GITHUB_OUTPUT
          elif [ ${{ github.event.label.name }} == 'e2e-test-710' ]; then
            echo "label=710" >> $GITHUB_OUTPUT
          elif [ -n ${{ github.event.inputs.tag }} ]; then
           echo "label=${{ github.event.inputs.tag }}" >> $GITHUB_OUTPUT
          fi
Using a label to trigger an E2E CI action
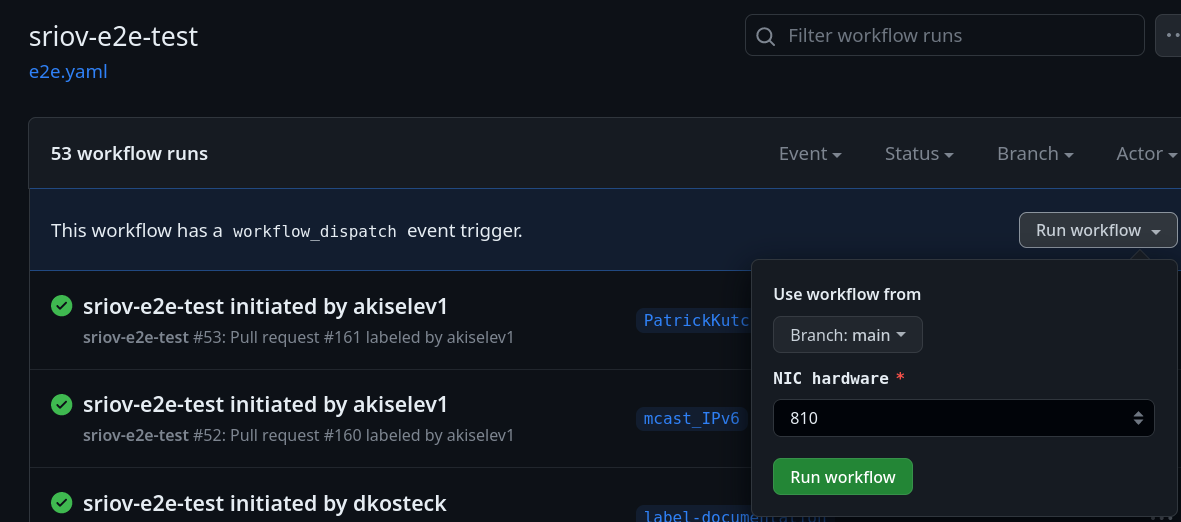
As illustrated in the above sample code, one option to trigger the E2E test is to use the appropriate label, e2e-test or e2e-test-710 (see Figure 2). This labeling mechanism serves as a way to limit who can trigger the E2E runs due to hardware resource constraints. Only repo users with write permission can set a pull request label and trigger the E2E test execution.

The labels double as a flag showing which PRs have been tested.
On-demand triggering
In addition to the labeling above, we can also trigger this E2E action on demand. NIC hardware labels (810 or 710) are collected from the user input, in this case, and used to trigger the appropriate runner.

Self-hosted runner as an OpenShift Workload
If the test environment already has an OpenShift/Kubernetes cluster installed, and the user does not plan to add an extra RHEL server to host the runner systemd service, the runner container can be hosted on the OpenShift/Kubernetes cluster instead. In this situation, the self-hosted runner will be a workload in the pod format.
To use the runner container as an OpenShift workload for controlling an on-premise E2E CI testbed, the OpenShift cluster needs to be on-premise and have connectivity to the E2E CI testbed.
We will need to take steps to protect the user's PAT and pass in extra test configuration, similar to the runner container.
GitHub token protection
In OpenShift, create a secret for the PAT:
kubectl create secret generic gh-token --from-literal=github_token=<your github token>
In the above command, the name github_token is used for the same reason explained earlier in the podman usage.
The secret gh-token will be mounted as a volume later in the runner pod YAML spec.
Pass in extra information
Once again using the RHEL SR-IOV test suite repository for demo purposes, its E2E CI workflow requires testbed.yaml and config.yaml files, which can be passed to the runner pod via a volume map.
First, create a folder and store the required files under this folder:
ls /opt/E2E-config
config.yaml
testbed.yaml
Create a ConfigMap from this folder:
oc create configmap test-config --from-file=/opt/E2E-config
This ConfigMap, test-config, will be used in the volume map of the runner pod YAML spec.
Self-hosted runner in deployment
We will let OpenShift take care of the runner pod lifecycle management using a deployment. Here is the self-hosted runner deployment YAML spec:
apiVersion: apps/v1
kind: Deployment
metadata:
  name: runner-deployment
  labels:
    app: runner
spec:
  replicas: 1
  selector:
    matchLabels:
      app: runner
  template:
    metadata:
      labels:
        app: runner
    spec:
      volumes:
      - name: secret-volume
        secret:
          secretName: gh-token
      - name: config-volume
        configMap:
          name: test-config
      containers:
      - name: runner
        image: quay.io/gitaction/runner:2.301.1
        securityContext:
          privileged: true
        env:
        - name: GH_OWNER
          value: "redhat-partner-solutions"
        - name: GH_REPOSITORY
          value: "rhel-sriov-test"
        - name: GH_TOKEN_PATH
          value: "/etc/gh_secrets/github_token"
        volumeMounts:
        - name: secret-volume
          readOnly: true
          mountPath: "/etc/gh_secrets"
        - name: config-volume
          mountPath: "/config"
Notice in the above YAML spec the OpenShift secret gh-token is mounted to the path /etc/gh_secrets, so the environment variable GH_TOKEN_PATH is used to tell the container to retrieve the secret from this path.
The extra information for the E2E CI testbed is mounted under /config. As explained earlier, the E2E workflow will look for the extra information in that folder inside the container.
Summary
We reviewed E2E CI building blocks which allow real hardware test execution for a GitHub open source project. Lightweight GitHub Actions CI, along with the containerized GitHub Actions runner, allow minimizing system footprint while maintaining CI functionality. Furthermore, this CI implementation fits well into corporate IT security policy for lab access: nothing extra gets exposed to the internet.
Feel free to comment below if you have questions. We welcome your feedback!
Last updated: September 19, 2023