In this article, we will demonstrate how to use the Red Hat Ansible Automation Platform command-line interface (CLI) to create a virtual machine on Microsoft Azure. We will walk you through the steps required to get started with Ansible Automation Platform and Azure, including setting up the necessary resources and creating a VM using the Azure module and Ansible Automation Platform.
This series covers the end-to-end process of creating a Virtual Machine(VM) on Azure using Ansible Automation Platform. This 3-part series includes:
- Part 1: How to automate VM creation on Azure with Ansible CLI
- Part 2: How to use Ansible to create a VM on Azure
- Part 3: How to use Ansible to create a VM on Azure via workflow
By the end of this article, you'll have a better understanding of how to use Ansible Automation Platform CLI to manage VMs and how this streamlines your infrastructure management workflows.
Prerequisites
Before you begin this tutorial, complete the following:
- Make sure Ansible Automation Platform is installed on your system.
- Create a Microsoft Azure account.
- Install Ansible content collection for Azure on your system.
How to use the Ansible CLI to create a VM
Follow these steps to create a virtual machine using Ansible Automation Platform CLI:
- Create a service principal and give permissions in Azure.
- Generate the client secret for service principal.
- You should now have a subscriptionid, tenantid, clientid and client secret that you can use to access your Azure Account and launch a VM.
- Open any text editor on your local machine and copy the following yml into it:
--- # Get facts for the user

- name: Create a Virtual Machine on Azure Using Ansible

  hosts: localhost


  vars:

    vm_name: "Test-Ansible"

    vm_size: "Standard_B1ls"

    vm_image: "RedHat:RHEL:8-LVM:latest"

    vm_username: "testansible"

    vm_password: "my-password@1234"

    rg_name: "test-ansible"

    vnet_name: "test-ansible"

    subnet_name: "test-ansible"

    location: "centralindia"

    subscription_id: <YOUR SUBSCRIPTION ID>

    tenant: <YOUR TENANT ID>

    client_id: <YOUR CLIENT ID>

    secret: <YOUR SECRET>


  tasks:

    - name: Create a Resource Group

      azure.azcollection.azure_rm_resourcegroup:

        subscription_id: "{{ subscription_id }}"

        tenant: "{{ tenant }}"

        client_id: "{{ client_id }}"

        secret: "{{ secret }}"

        name: "{{ rg_name }}"

        location: "{{ location }}"

      register: rg


    - name: Create a Virtual Network

      azure.azcollection.azure_rm_virtualnetwork:

        subscription_id: "{{ subscription_id }}"

        tenant: "{{ tenant }}"

        client_id: "{{ client_id }}"

        secret: "{{ secret }}"

        resource_group: "{{ rg_name }}"

        name: "{{ vnet_name }}"

        address_prefixes: "10.0.0.0/16"

      register: vnet


    - name: Create a subnet

      azure.azcollection.azure_rm_subnet:

        subscription_id: "{{ subscription_id }}"

        tenant: "{{ tenant }}"

        client_id: "{{ client_id }}"

        secret: "{{ secret }}"

        resource_group: "{{ rg_name }}"

        virtual_network_name: "{{ vnet_name }}"

        name: "{{ subnet_name }}"

        address_prefix: "10.0.0.0/24"

      register: subnet


    - name: Create a public IP address

      azure.azcollection.azure_rm_publicipaddress:

        subscription_id: "{{ subscription_id }}"

        tenant: "{{ tenant }}"

        client_id: "{{ client_id }}"

        secret: "{{ secret }}"

        resource_group: "{{ rg_name }}"

        allocation_method: static

        name: "{{ vm_name }}-public-ip"

      register: public_ip


    - name: Create a network security group and configure the security group

      azure.azcollection.azure_rm_securitygroup:

        subscription_id: "{{ subscription_id }}"

        tenant: "{{ tenant }}"

        client_id: "{{ client_id }}"

        secret: "{{ secret }}"

        resource_group: "{{ rg_name }}"

        name: "{{ vm_name }}-nsg"

        rules:

          - name: "AllowSSH"

            protocol: Tcp

            direction: Inbound

            priority: 1000

            access: Allow

            source_address_prefix: "*"

            source_port_range: "*"

            destination_port_range: "22"

            destination_address_prefix: "*"

      register: nsg


    - name: Create a Virtual Network Interface Card

      azure.azcollection.azure_rm_networkinterface:

        subscription_id: "{{ subscription_id }}"

        tenant: "{{ tenant }}"

        client_id: "{{ client_id }}"

        secret: "{{ secret }}"

        resource_group: "{{ rg_name }}"

        name: "{{ vm_name }}-nic"

        virtual_network: "{{ vnet_name }}"

        subnet_name: "{{ subnet_name }}"

        public_ip_name: "{{ vm_name }}-public-ip"

        security_group: "{{ vm_name }}-nsg"


    - name: Create a vm_image

      azure.azcollection.azure_rm_virtualmachine:

        subscription_id: "{{ subscription_id }}"

        tenant: "{{ tenant }}"

        client_id: "{{ client_id }}"

        secret: "{{ secret }}"

        resource_group: "{{ rg_name }}"

        name: "{{ vm_name }}"

        vm_size: "{{ vm_size }}"

        admin_username: "{{ vm_username }}"

        admin_password: "{{ vm_password }}"

        image:

          offer: "CentOS"

          publisher: "OpenLogic"

          sku: "7.5"

          version: "latest"

        os_disk_caching: ReadWrite

        os_disk_name: "{{ vm_name }}-os-disk"

        network_interface_names:

          - "{{ vm_name }}-nic"

        network_interfaces:

          - name: "{{ vm_name }}-nic"

            properties:

              primary: True

        availability_set: null

        ssh_public_keys: []

        ssh_password_enabled: true
- Save and close the file.
- Open the terminal in the directory where the file is located on your local machine.
- Run the following command:
ansible-playbook <filename>.ymlThis is the output:
Figure 1 shows the the Microsoft Azure VM.ansible-playbook -i inventory azure_cli.yml PLAY [Create a Virtual Machine on Azure Using Ansible] ************************************************************************************************************************************************************ TASK [Gathering Facts] ******************************************************************************************************************************************************************************************** ok: [localhost] TASK [Create a Resource Group] ************************************************************************************************************************************************************************************ changed: [localhost] TASK [Create a Virtual Network] *********************************************************************************************************************************************************************************** changed: [localhost] TASK [Create a subnet] ******************************************************************************************************************************************************************************************** changed: [localhost] TASK [Create a public IP address] ********************************************************************************************************************************************************************************* changed: [localhost] TASK [Create a network security group and configure the security group] ******************************************************************************************************************************************* changed: [localhost] TASK [Create a Virtual Network Interface Card] ******************************************************************************************************************************************************************** [DEPRECATION WARNING]: Setting ip_configuration flatten is deprecated and will be removed. Using ip_configurations list to define the ip configuration. This feature will be removed in version [2, 9]. Deprecation warnings can be disabled by setting deprecation_warnings=False in ansible.cfg. changed: [localhost] TASK [Create a vm_image] ****************************************************************************************************************************************************************************************** [WARNING]: Both option network_interface_names and its alias network_interfaces are set. changed: [localhost] PLAY RECAP ******************************************************************************************************************************************************************************************************** localhost : ok=8 changed=7 unreachable=0 failed=0 skipped=0 rescued=0 ignored=0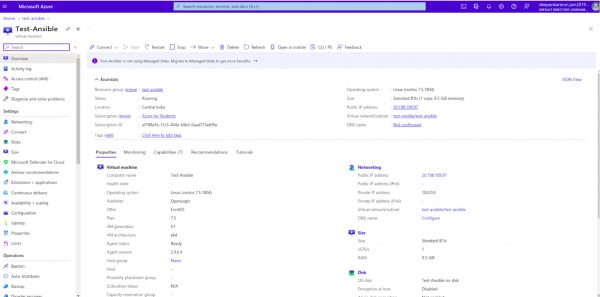
Figure 1: The Microsoft Azure virtual machine.

What’s next?
In this article, we demonstrated how to create a VM using Ansible Automation Platform. If you followed this step-by-step guide, you should now have a good understanding of how to use Ansible Automation Platform to automate the creation of a VM.
In our next article in this series, we will explore how Ansible Automation Platform further eases the process of creating VMs by defining infrastructure as code, tracking infrastructure changes, and enforcing compliance policies.
Get started with Ansible Automation Platform by exploring interactive hands-on labs. Download Ansible Automation Platform at no cost and begin your automation journey. You can refer to An IT executive's guide to automation e-book for a better understanding of the Ansible Automation Platform.
Last updated: January 11, 2024