In the articles, How to migrate your Java applications to Red Hat OpenShift and How to deploy JBoss EAP applications with OpenShift Pipelines, we covered the technologies utilized to build and deploy Red Hat JBoss Enterprise Application Platform images on OpenShift. These technologies include Source to Image (S2I), Helm charts, build configs, deployment configs, tekton pipelines, and ingress routes. While these technologies will be familiar to developers experienced with Kubernetes and containerization, a Jakarta EE developer coming from a traditional JBoss EAP background may be new to these tools.
To help bridge the gap between traditional EAP deployments and OpenShift deployments, Red Hat has created a series of OpenShift quick starts focused on the tools and techniques involved with building and deploying JBoss EAP images on OpenShift. These quick starts provide step-by-step instructions for deploying a JBoss EAP application on OpenShift. They will also explain what is happening at each stage and how to validate each stage you complete.
The first quick start released is a simple JBoss EAP "Hello World" application deployment using Helm charts. This quick start includes the following tasks:
- Creating a JBoss EAP 7 application with Helm.
- Viewing the Helm release.
- Viewing the associated code.
- Viewing the build status.
- Viewing the pod status.
- Running the JBoss EAP 7 application.
We will demonstrate quick start in this article.
Prerequisites
- OpenShift CLI tool (optional)
- Openshift 4.x cluster with cluster admin permissions
Note: The quick start will be available with OpenShift 4.14. In the mean time, you can add it by following the instructions below.
Install the quick start using OpenShift CLI
To download the OpenShift CLI, follow these steps:
- Click on the ? in the top right hand corner of the OpenShift UI.
- Select Command line tools.
- Download and install the command line client for your OS.
- Log in as cluster admin.
- Run the following command:
oc apply -f https://raw.githubusercontent.com/jboss-eap-up-and-running/openshift-console-quickstarts/main/jboss-eap7-with-helm.yaml
Install the quick start using the OpenShift UI
After logging in to OpenShift as cluster administrator, follow these steps:
- To create the quick start via the OpenShift UI, click on the + icon in the top right hand corner of the UI.
- Paste the contents of this link: https://raw.githubusercontent.com/jboss-eap-up-and-running/openshift-console-quickstarts/main/jboss-eap7-with-helm.yaml
- Click on Create to create the quick start.
Deploy JBoss EAP 7 using quick start
In the OpenShift developer UI, click +Add and select View all quick starts.
In the search field, enter eap.
When you see the Get started with JBoss EAP 7 using a Helm Chart quick start listed (Figure 1), select this quick start to begin.

When a panel opens with instructions, click Start to begin (Figure 2).
In this initial panel, you will follow the steps required to locate and install the JBoss EAP 7.4 Helm chart. You don't need to change any default settings presented by the Helm configuration.
Once you click Install, the user interface will switch to the Topology view and show the Release notes from the Helm chart, as shown in Figure 2.

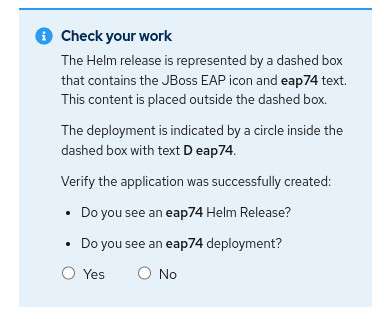
Click Next to open the Check your work panel, as shown in Figure 3. This panel contains questions about the results. It gives you the opportunity to review your work and confirm that you successfully completed the task before advancing to the next task in the quick start.

This is where the quick start helps you understand what was created by the Helm chart. You will be able to identify the Helm release and the eap74 deployment. Click Yes and then click Next to move onto the next section.
This section will guide you through locating the Helm release we just installed. You will be able to view the list of resources (Figure 4).

It will prompt you to verify the results again. Validate that you can see the deployed label next to the Helm release and click Next to move to the next section.
You will now be guided through viewing the source code associated with the quick start. There is another verification to confirm that you have successfully completed this step.
Move on to the next section, which describes how the Helm release created two builds. The build process for JBoss EAP applications utilizes two builds, an artifact build and a runtime build. The artifact build performs a maven build to create the application artifact. The runtime build deploys the output of this build to an instance of EAP. This results in a much smaller footprint for the runtime image containing the minimum file necessary to run the application.
Once you have completed this check, click Yes to move on to the next check where you will be directed back to view the topology and the running pod status. Follow the instructions to check the status of the pod and complete the check.
Finally, you will be shown how to open the application by clicking on the external URL. Once you have completed this stage, you can complete the final check.
Viewing the external URL will open up a new browser window shown in Figure 5:

You have now completed the quick start. You should see the completed stages of the quick start listed, as shown in Figure 6:

The new quick starts simplify JBoss EAP deployment
In this article, we demonstrated the new JBoss EAP quick start, designed to guide developers familiar with traditional JBoss EAP deployments through the steps to build and deploy application images on OpenShift. The quick start helps developers understand how to use Helm to create the build configs, deployment configs, and external routes required to build and deploy JBoss EAP applications on OpenShift. This quick start uses a sample Git repo with a sample EAP application. Developers will be able to use the same approach to use their own sample applications.
Last updated: October 31, 2023