Apache Camel has been a massively successful tool for integrating heterogeneous systems for more than a decade. You have probably dealt with a situation where you have two systems that were not designed to communicate with each other but still need to exchange data. That's exactly the kind of situation where Camel and its integration pipelines can help. This article shows how Quarkus uses Camel.
Figure 1 shows Camel's basic operation: Data from one system passes through a transport designed for that system to a transport designed for the recipient system.
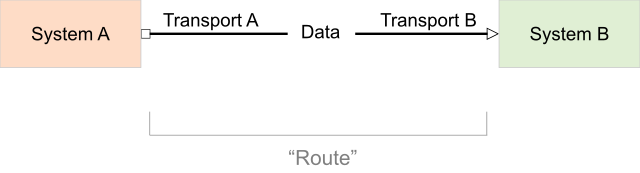
Traditionally, Camel integrations have been deployed on various Java platforms, such as Spring Boot, Karaf, and Red Hat JBoss Enterprise Application Platform (JBoss EAP). Thanks to work done in the Camel Quarkus community project, it is now possible to run Camel integrations on Quarkus. The main benefit is that integrations start faster and consume less RAM. But Quarkus dev mode also brings developer-productivity benefits. The container-first ethos is also not to be forgotten.
This article shows how to use Camel with Quarkus on Red Hat OpenShift.
Defining Camel routes
Let's go through all the parts of a Camel integration and see them in more detail through an example. The source code of the example is available on GitHub.
Say that you need to process CSV files stored in a local directory by an external system. Those files contain book records consisting of a book title, author name, and genre. You want to split the records into separate CSV files by genre and store them on a remote SFTP server.
To accomplish this project, define a few Camel routes. The first route is ancillary, to simulate the external system that produces the CSV files containing the book data:
import org.apache.camel.Exchange;
import org.apache.camel.builder.RouteBuilder;
import org.apache.camel.model.dataformat.BindyType;
import org.apache.camel.processor.aggregate.GroupedBodyAggregationStrategy;

public class Routes extends RouteBuilder {

    @Override
    public void configure() throws Exception {
        // Route 1: Generate some book objects with random data
        from("timer:generateBooks?period={{timer.period}}&delay={{timer.delay}}")
                .log("Generating randomized books CSV data")
                .process("bookGenerator")
                // Marshal each book to CSV format
                .marshal().bindy(BindyType.Csv, Book.class)
                // Write CSV data to file
                .to("file:{{csv.location}}");

        // More route definitions come here...

    }
}
The second route parses the discovered CSV files into a list of plain old Java objects (POJOs) using Camel Bindy. That list is split into individual Book objects via split(body()) and passed to another Camel endpoint called direct:aggregateBooks:
        ...

        // Route 2: Consume book CSV files
        from("file:{{csv.location}}?delay=1000")
                .log("Reading books CSV data from ${header.CamelFileName}")
                .unmarshal().bindy(BindyType.Csv, Book.class)
                .split(body())
                .to("direct:aggregateBooks");

        // More route definitions come here...
The third route picks the Book objects produced by the previous route, does the aggregation (producing a list of Books per genre), and passes them to the last route:
        ...

        // Route 3: Aggregate books based on their genre
        from("direct:aggregateBooks")
                .setHeader("BookGenre", simple("${body.genre}"))
                .aggregate(simple("${body.genre}"), new GroupedBodyAggregationStrategy()).completionInterval(5000)
                .log("Processed ${header.CamelAggregatedSize} books for genre '${header.BookGenre}'")
                .to("seda:processed");

        // One more route definition comes here...
The fourth route serializes aggregated lists of Book records back to CSV and stores them on a remote SFTP server:
        ...

        // Route 4: Marshal books back to CSV format
        from("seda:processed")
                .marshal().bindy(BindyType.Csv, Book.class)
                .setHeader(Exchange.FILE_NAME, simple("books-${header.BookGenre}-${exchangeId}.csv"))
                // Send aggregated book genre CSV files to an FTP host
                .to("sftp://{{ftp.username}}@{{ftp.host}}:{{ftp.port}}/uploads/books?password={{ftp.password}}")
                .log("Uploaded ${header.CamelFileName}");
The pom.xml file
For a plain Camel project, you would have to list the Camel component artifacts (camel-bindy, camel-seda, etc.) as dependencies in your pom.xml file. For a Camel Quarkus project, you'll have to list their Camel Quarkus counterparts (camel-quarkus-bindy, camel-quarkus-seda, etc.). Import org.apache.camel.quarkus:camel-quarkus-bom to manage the versions of the dependencies:
<project>
    ...

    <properties>
        <camel-quarkus.version>1.6.0.fuse-jdk11-800006-redhat-00001</camel-quarkus.version>
        <quarkus.version>1.11.6.Final-redhat-00001</quarkus.version>
        ...
    </properties>

    <dependencyManagement>
        <dependencies>
            <!-- Import BOM -->
            <dependency>
                <groupId>org.apache.camel.quarkus</groupId>
                <artifactId>camel-quarkus-bom</artifactId>
                <version>${camel-quarkus.version}</version>
                <type>pom</type>
                <scope>import</scope>
            </dependency>
        </dependencies>
    </dependencyManagement>

    <dependencies>
        <dependency>
            <groupId>org.apache.camel.quarkus</groupId>
            <artifactId>camel-quarkus-bean</artifactId>
        </dependency>
        <dependency>
            <groupId>org.apache.camel.quarkus</groupId>
            <artifactId>camel-quarkus-bindy</artifactId>
        </dependency>
        <dependency>
            <groupId>org.apache.camel.quarkus</groupId>
            <artifactId>camel-quarkus-direct</artifactId>
        </dependency>
        <dependency>
            <groupId>org.apache.camel.quarkus</groupId>
            <artifactId>camel-quarkus-file</artifactId>
        </dependency>
        <dependency>
            <groupId>org.apache.camel.quarkus</groupId>
            <artifactId>camel-quarkus-ftp</artifactId>
        </dependency>

        ...

    </dependencies>

    ...
</project>
Runtime prerequisites
To run the example, you need an SFTP server. For testing, you can use a Docker container as follows:
$ docker run -ti --rm -p 2222:2222 \
-e PASSWORD_ACCESS=true \
-e USER_NAME=ftpuser \
-e USER_PASSWORD=ftppassword \
-e DOCKER_MODS=linuxserver/mods:openssh-server-openssh-client \
linuxserver/openssh-server
Quarkus dev mode
Having all that in place, you can build the project and start Quarkus in dev mode:
$ mvn clean compile quarkus:dev
This mode lets the Quarkus tooling watch for changes in your workspace and recompile and redeploy the application upon any change. Please refer to the development mode section of the Camel Quarkus user guide for more details.
You should start to see log messages appearing on the console, like the following:
[route1] (Camel (camel-1) thread #3 - timer://generateBooks) Generating randomized books CSV data
[route2] (Camel (camel-1) thread #1 - file:///tmp/books) Reading books CSV data from 89A0EE24CB03A69-0000000000000000
[route3] (Camel (camel-1) thread #0 - AggregateTimeoutChecker) Processed 34 books for genre 'Action'
[route3] (Camel (camel-1) thread #0 - AggregateTimeoutChecker) Processed 31 books for genre 'Crime'
[route3] (Camel (camel-1) thread #0 - AggregateTimeoutChecker) Processed 35 books for genre 'Horror'
You can try changing something in Routes.java and see that the application gets live-reloaded after saving the file.
Packaging and running the application
Once you are done with development, you can package and run the application:
$ mvn clean package -DskipTests
$ java -jar target/*-runner.jar
Deploying to OpenShift
To deploy the application to OpenShift, run the following command:
$ mvn clean package -DskipTests -Dquarkus.kubernetes.deploy=true
Check that the pods are running:
$ oc get pods

NAME READY STATUS RESTARTS AGE
camel-quarkus-examples-file-bindy-ftp-5d48f4d85c-sjl8k 1/1 Running 0 21s
ssh-server-deployment-5c667bccfc-52xfz 1/1 Running 0 21s
Tail the application logs, and you should see messages similar to those in dev mode:
$ oc logs -f camel-quarkus-examples-file-bindy-ftp-5d48f4d85c-sjl8k
About Camel Quarkus technology preview
Camel Quarkus is available as a technology preview (TP) component in Red Hat Integration 2021 Q2. Technology preview features provide early access to upcoming product innovations, enabling you to test functionality and provide feedback during the development process. As we move towards general availability (GA) later this year, each preview release will focus on key use cases.
The following Quarkus extensions are included in this technology preview:
camel-quarkus-beancamel-quarkus-bindycamel-quarkus-corecamel-quarkus-directcamel-quarkus-filecamel-quarkus-ftpcamel-quarkus-logcamel-quarkus-maincamel-quarkus-microprofile-healthcamel-quarkus-mockcamel-quarkus-sedacamel-quarkus-timer
These extensions are supported in JVM mode only.
Note that more Camel Quarkus extensions are provided by the Apache Camel community. These extensions can be combined with the extensions provided by Red Hat Integration.
For more details, please refer to the release notes.
Your feedback is welcome via the Red Hat Support Portal.
Last updated: September 19, 2023

