Red Hat OpenShift is a leading container application platform in building, deploying, and handling containerized applications at a large scale. The OpenShift tooling is built around the GitOps approach for continuous delivery using Git as a single source of truth for declarative infrastructure. All this can be achieved by using Red Hat OpenShift GitOps, Argo CD, and Red Hat Advanced Cluster Management for Kubernetes.
Deploying OpenShift on the Microsoft Azure Platform utilizing OpenShift GitOps makes it not only easier but enables you to achieve faster time to market, better collaboration, more efficient workflows, and ensures access to the cloud's scalability, flexibility, and reliability.
This is the first of two articles that demonstrates how to get your OpenShift cluster up and running in Azure quickly and easily without numerous failures in the process. This article demonstrates the steps to deploy OpenShift on Azure using the Red Hat Advanced Cluster Management. The following steps detail the prerequisites, setup, and deployment process utilizing a GUI.
[ Learning path: Getting started with Microsoft Azure Red Hat OpenShift (ARO) ]
Step 1: Set up the prerequisites
Follow these steps to configure Azure.
First, we have to be sure our quote is enough to deploy a Red Hat OpenShift Container Platform cluster.
- Go to the Azure Portal.
- Click Subscription.
- Click Usage and Quotas to filter using Region.
- Locate the Standard DSv3 Family vCPUs and check the quota.
- We need at least 24 Cores for a small cluster.
Second, we need a resource group containing a DNS zone to deploy the cluster.
- Select Create Resource Group and fill in the name and region. Then click Create.
- To create the DNS zone in the newly created resource group, select Create DNS_Zone and Create.
- Then select Fill_Name and Create.
Now we should have a Resource Group with a DNS zone ready to use, as shown in Figure 1:

Step 2: Recover the Azure values
We need to recover the credentials of the cloud provider, as shown in the following snippet:
Your Azure environment details:
Resource Group: openenv-5d9g3
DNS Zone: 5d9g3.azure.example.io
Application: openenv-5d9g3
Application/Client/Service Principal ID: f4993d25-3cce-49f4-a68a-24bc1c166bd6
Password: 2Ci7Ba-boz.mK69c6m0wO5SLMtsuZpGUjy
Tenant ID: example.onmicrosoft.com
Subscription ID: 1d6c0f82-8e30-423a-9a1b-36fde35ab59c
Step 3: Create additional resources (optional)
We can also create resource groups for the virtual network/subnets and a network security group.
First, we create two resource groups for the networks and the cluster.
Create a resource group for the networks as follows:
- Create Resource Group.
- Fill in the Name and Region.
- Click Create.
- Inside the resource group, create a virtual network.
- Fill in the name and select Create.
- In the virtual network, select subnets from the left menu.
- Then select new subnet.
- Fill in the name (masters) and select Create.
- Repeat this process again for the workers' subnet.
- Go back to the resource group to create a network security group.
- Fill in the name and select Create.
- In the network security group, select Inbound Security Rules in the left menu.
- Add a new one for port 80.
- Repeat this for these ports 443/6443/22623.
- In the network security group, select subnets in the left menu, then associate the workers subnet.
- Repeat this for the masters subnet.
Create a resource group for the cluster as follows:
- Create Resource Group.
- Fill in the Name and Region.
- Select Create.
Step 4: Install Red Hat Advanced Cluster Management via OpenShift GitOps
Before installing the Red Hat Advanced Cluster Management operator, we need to deploy the ArgoCD first. We can do this by using this repository. Deploy the OpenShift GitOps ArgoCD by running the following command:
oc apply -k bootstrap/argocd
Then install the Red Hat Advanced Cluster Management and integrate it with ArgoCD by running the following command:
oc apply -k bootstrap/deploy/00-applicationset-acm
Step 5: Set up credentials for Azure via GUI
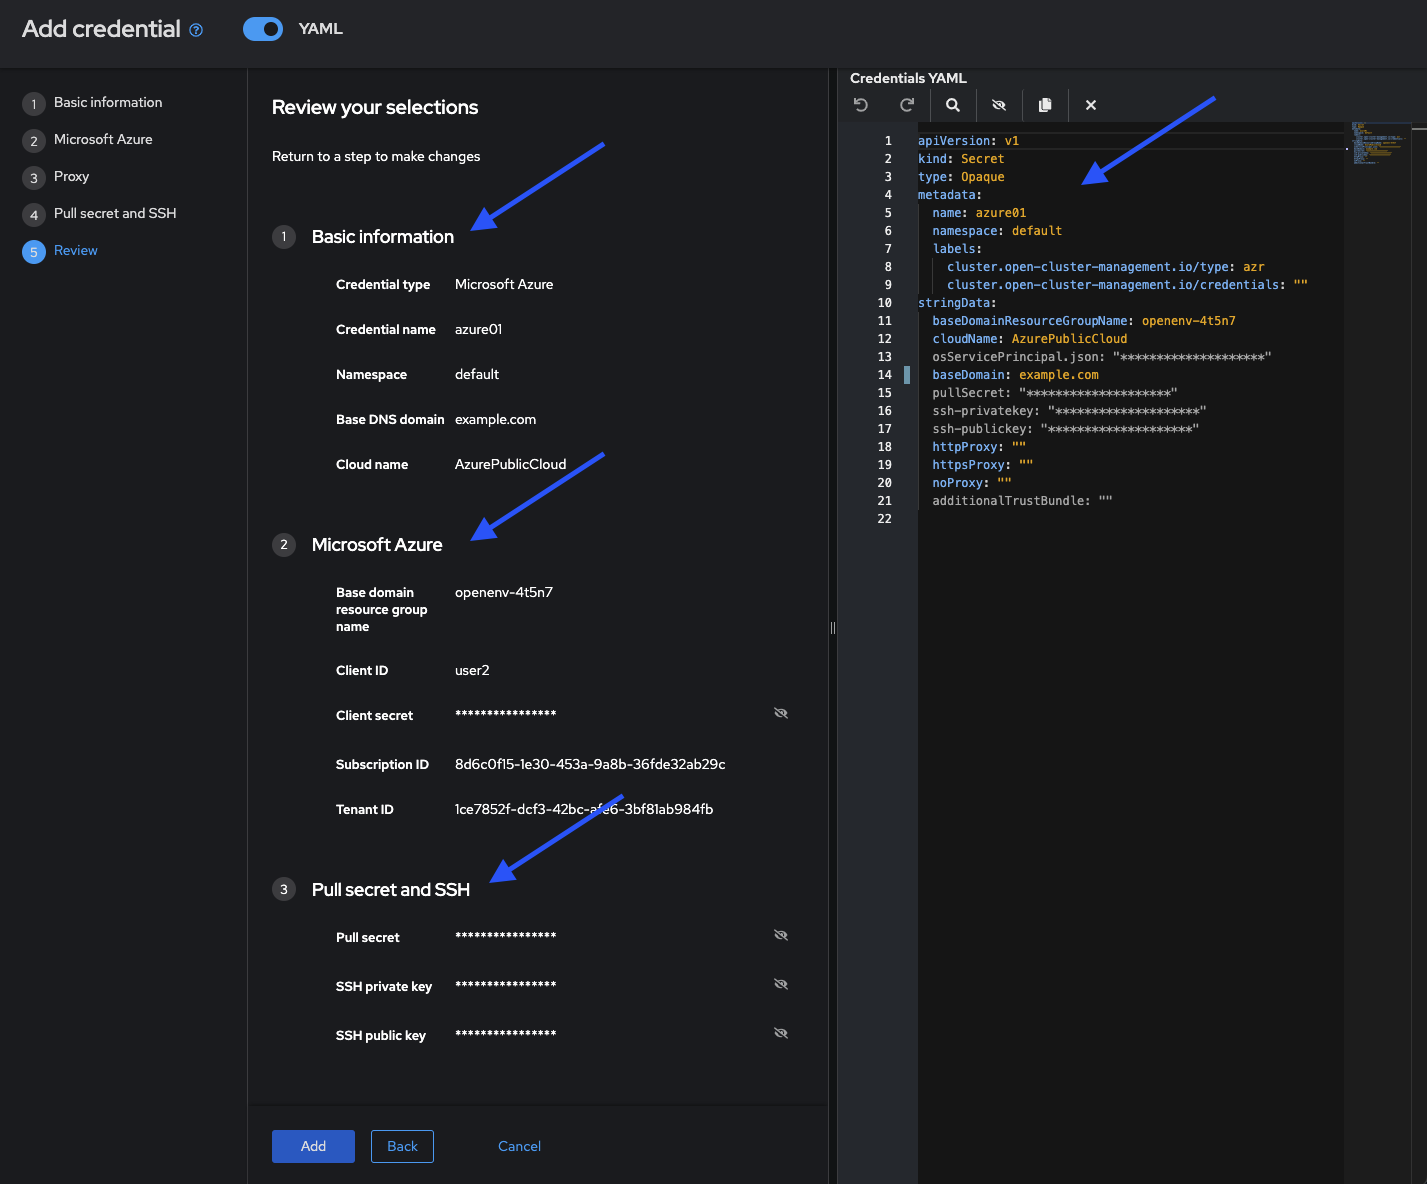
Once we have those values, we need to create the credentials for the Azure network. We will set up the credential type, credential name, namespace, and cloud name with default values:
- Credential Name = Azure
- Namespace = Default
- Base DNS domain = DNS Zone
Click next and then fill in the following values:
- Client ID = Application/Client/Service Principal ID
- Client Secret = Password
- Subscription ID = Subscription ID
- Tenant ID = Tenant ID
We do not have to set any value for the proxy unless we have a customer proxy installation.
Now we need to get the pull secret and keys. You can generate the keys using the following command:
ssh-keygen -t rsa
Review the information for our credentials to use for the installation, as shown in Figure 2.
Step 6: Installing OpenShift cluster via the GUI
We need to recover the following field:
DNS Zone = Base DNS Domain
We will establish the OpenShift release version, a name for the cluster, and a cluster set. We can create a new cluster set for all the Azure clusters or use the default.
The following description corresponds to the numbers in the screenshot of the Red Hat Advanced Cluster Management GUI in Figure 3:
We can also change the cluster resources by adding extra values using the Yaml view (1), and edit the configuration using the deploy (2) cluster-install (3) buttons. For example, you can add custom resource groups containing the base DNS (4) or a virtual network (5) with two subnets for masters (6) and workers (7), network security group, and the cluster (8).

Next, set up the Nodes Size for the cluster and disk type (see Figure 4):
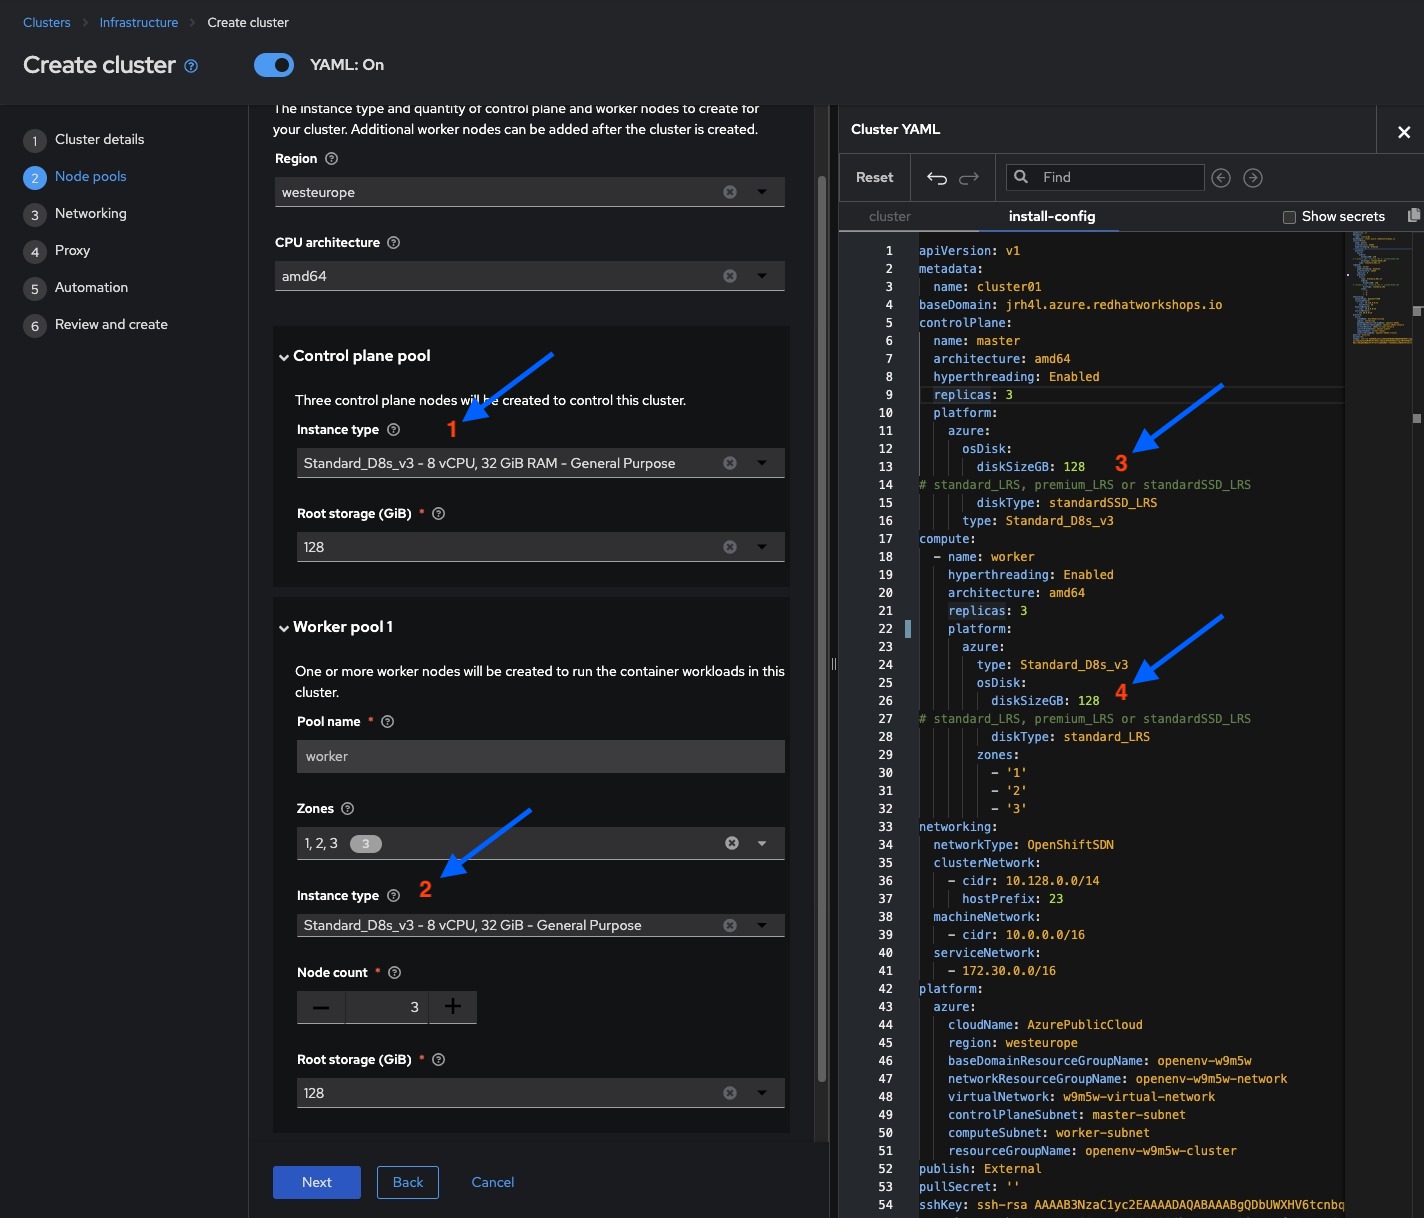
For networking, we have to define if we are going to use SDN or OVN and if we want to use custom values, as shown in the following snippet:
Cluster network CIDR * 	: 	10.128.0.0/14
Network host prefix * 	:	23
Service network CIDR * 	: 	172.30.0.0/16
Machine CIDR * 		: 	10.0.0.0/16
We will use default values for the proxy and automation.
Finally, you can review and install the cluster information as shown in Figure 5.
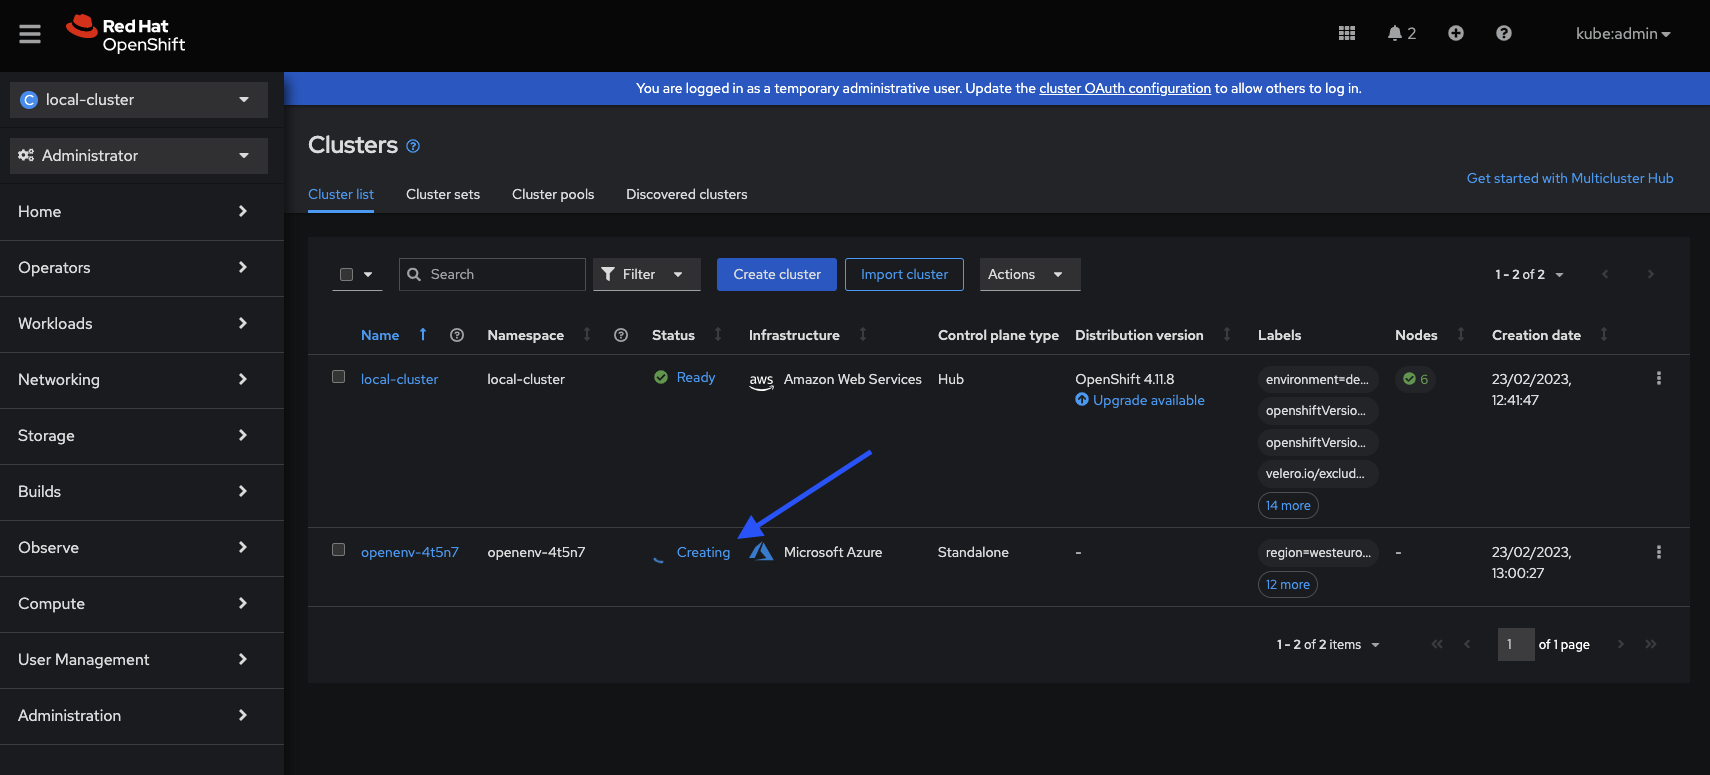
Deploying OpenShift on Azure is easy
In this article, we demonstrated how to install an OpenShift cluster on Azure using a GUI. In the next article, you will learn a different method for installing OpenShift on Azure utilizing GitOps. If you have questions, feel free to leave a comment below. Your feedback is welcome.
Last updated: October 26, 2023