I'm a developer. Well, I like to think that I am; I spent twenty-odd years as a software engineer before joining Red Hat ten years ago, and since then, I've been evangelizing the company's tools and products from a developer perspective. I've seen the agile revolution and the rise of containers, and I was there when Kubernetes crawled out of the sea and into our hearts.
Developing locally in the container era
But for the last four or so years, I've found developing containers locally a bit of a challenge. I'm used to being able to just log onto an OpenShift cluster and do my builds, normally through Source-2-Image or just by pointing the system at a Git repo with a Containerfile. But this isn't an option for a lot of developers.
I also used Docker a lot in the early days, but had a problem when I switched to developing on my Mac instead. To get around that problem, I actually hosted a Fedora virtual machine (VM), amusingly named 'builder', on which I did all my Docker builds. I would prepare all my source, create a Git repo, fire up the VM, ssh into it, clone the repo, build, test. Any problem I had, I would have to drop back to my Mac desktop, fix the code, git add, git commit, rinse and repeat.
Podman benefits for developers
Then along came Podman. Podman is, put simply, Docker with some security enhancements—it solves the old problem of having to run your containers as root, which was always a worry for me when using Docker. The Podman project actually defines Podman as "a daemonless container engine for developing, managing, and running OCI Containers on your Linux System. Containers can either be run as root or in rootless mode."
As I mentioned, I use a Mac for development, and fortunately, there's a spin of Podman for the Mac. In fact, it's actually a pre-configured Fedora VM that is executed on the Mac, with appropriate privileges to connect to the host file system.
Podman gives me all the functionality I need to build, pull, push, and test containers. It is a command-line utility; some people prefer to use those rather than UX-based systems. I sit in both camps; I like to drop to the CLI when doing operations that need it, but I also like a nice, opinionated, rich UX. And that's where Podman Desktop comes in (Figure 1).
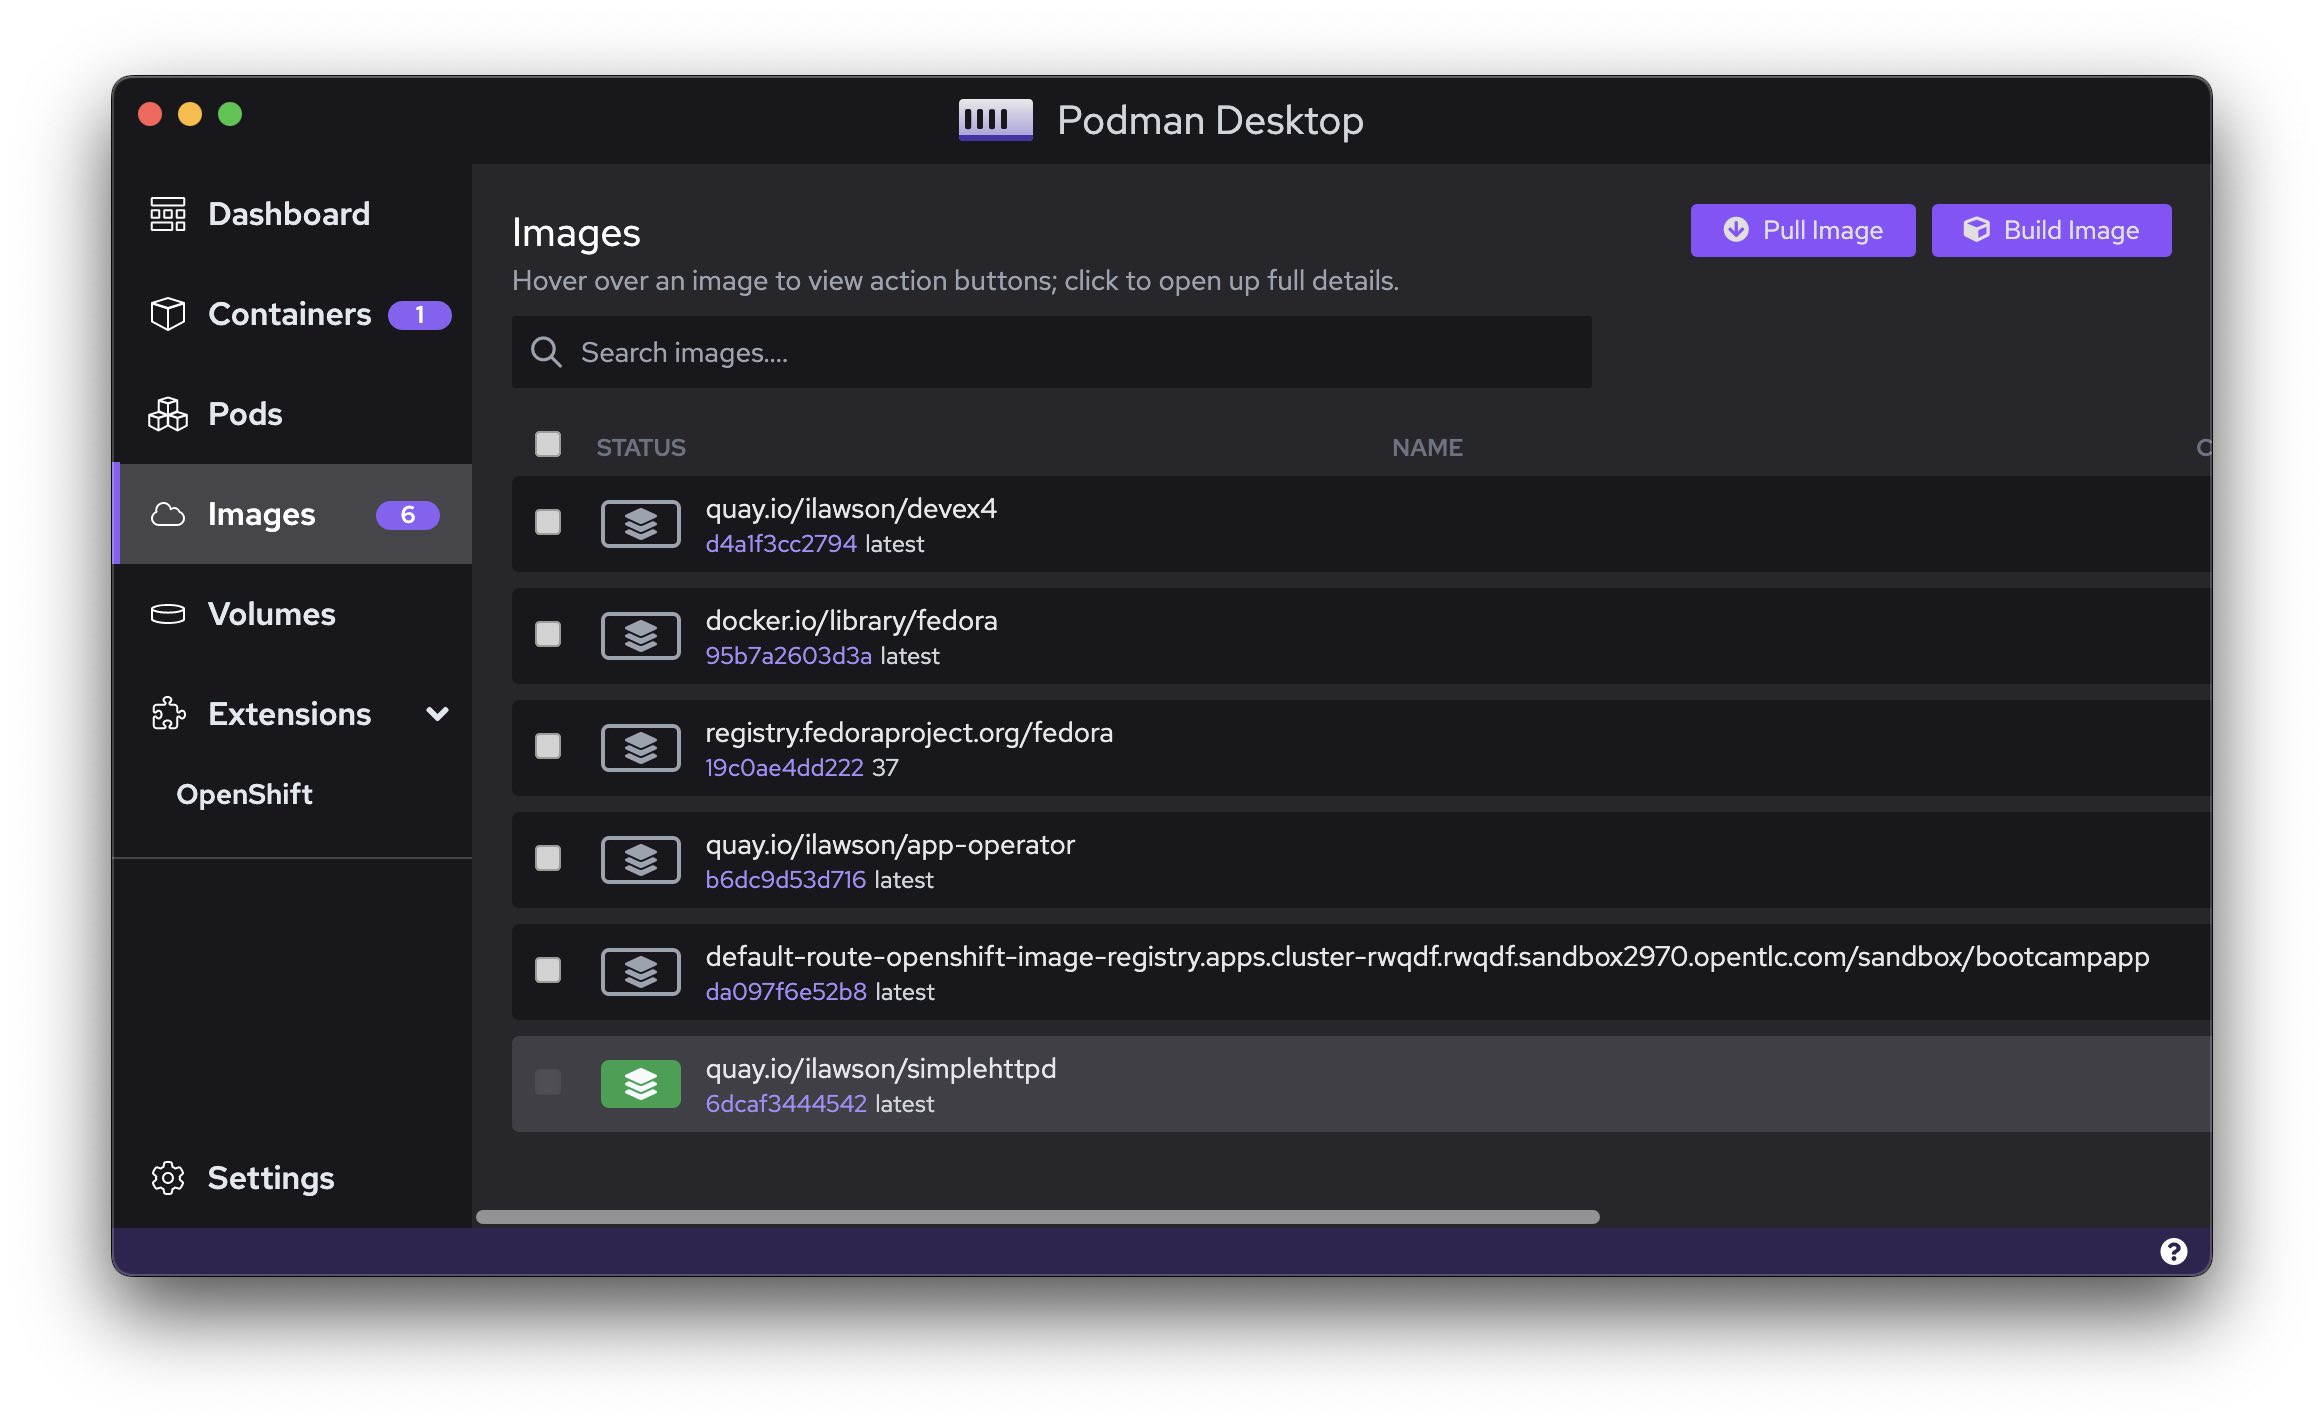
The website describes Podman Desktop as "an open source graphical tool enabling you to work with containers and Kubernetes from your local environment seamlessly."
These definitions of Podman and Podman Desktop do not do either of the projects justice. Being able to (natively) build and run containers on my MacBook is a huge advantage for me when it comes to building demos for Kubernetes and Red Hat OpenShift. I don't need to have a cluster up and running anywhere, and, in certain scenarios, I don't need internet connectivity either.
So, let's get started on a quick developer's introduction to using Podman Desktop.
Installation and setup
First, you need to get Podman installed on your machine. There are two distinct ways of doing this: If you go to https://podman.io/getting-started/installation and follow the instructions depending on your machine. As mentioned, I have a Mac; I originally installed Podman manually and then switched to Homebrew. Or, nicely, if you install Podman Desktop and Podman is not present, it offers to install it for you.
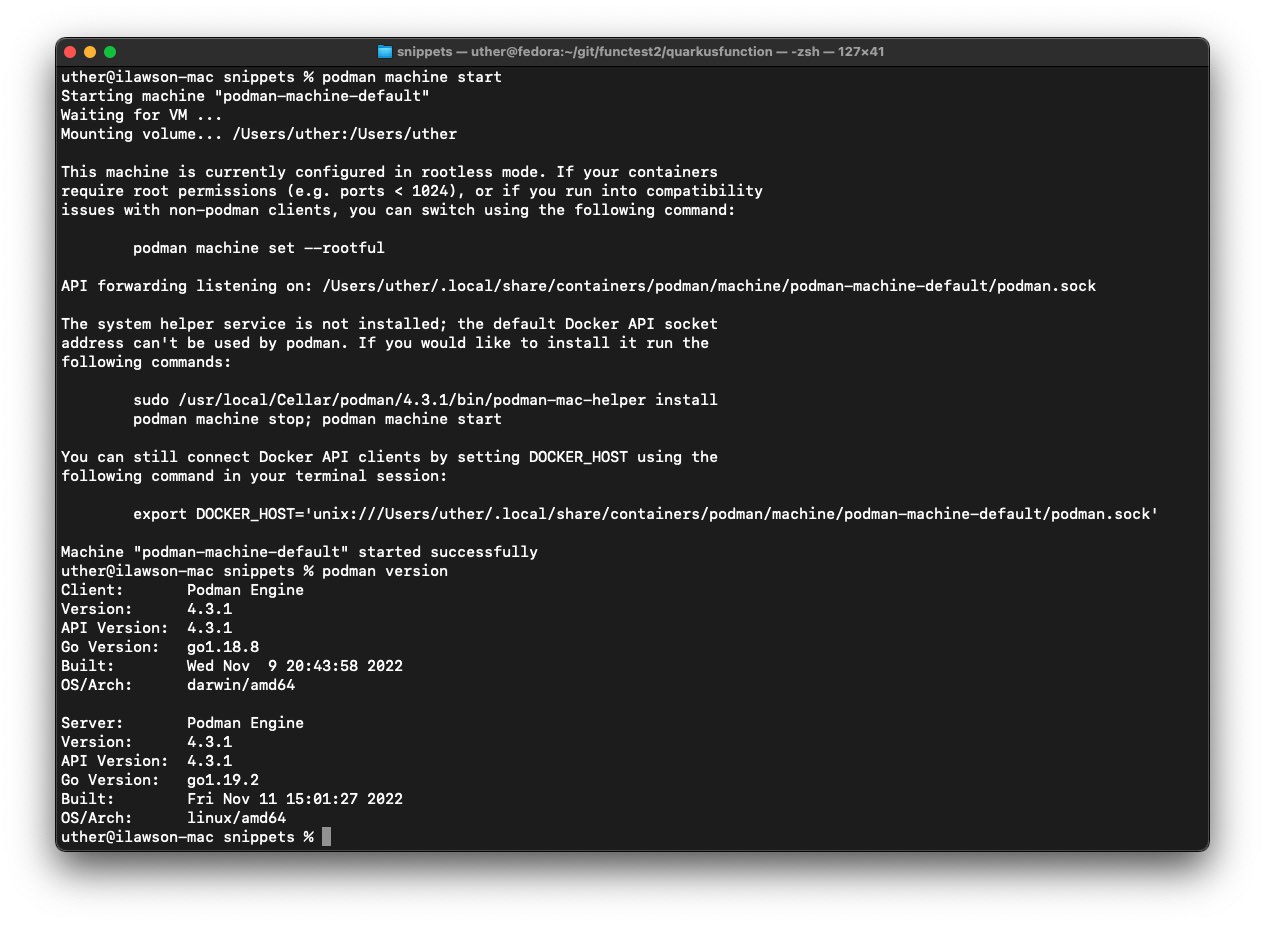
Once you have installed Podman, if you are using a Mac, you have to initialize and start the Podman engine (a step that isn't necessary on a native Fedora/CentOS/Red Hat Enterprise Linux installation). When using Podman and Podman Desktop, you might get occasional issues with the VM; you can fix these by restarting the Podman engine.
In an initial installation case, you enter podman machine init and podman machine start. Once the machine has started, do a podman version to check the client and server are running at the same version (as shown in Figure 2).
Now head to https://podman-desktop.io/docs/Installation and follow the instructions for installing Podman Desktop to your appropriate operating system (OS). Once the installation has finished, start the application.
Let’s talk registries
Let's go over the absolute basics before we get onto registries. A container is actually a physical instance of an image. An image is a set of file-layers that are applied, in sequence, to the target file system of a container runtime host to instantiate a container. The concept of the file-layers in images is where it gets interesting.
Real-world example: Let's say I build an image that is made up of the base image of Fedora 37. I add the httpd service (using dnf install httpd -y). I copy the content of my web-app into the appropriate directory for the httpd. I add a CMD ["httpd", "-DFOREGROUND] to get the container to execute the httpd service. This is all done using a Containerfile (which is the agnostic way of saying Dockerfile). When the build is created, it actually creates a set of file layers that are combined into an image.
It's one of those fun things to say: Images don't actually exist, they are a temporal map of file-layers. A registry contains a set of the "images," which are metadata maps of the versioned file-layers attached to a tag (often :latest, but this is bad practice as you lose all previous maps).
When you pull an image from a registry, what you are actually doing is pulling each of the file-layers that are listed as a map (the "image"). This makes images and containers very efficient in the way they are stored—for instance, if you have two images built from the same base image (set of file-layers), those shared file-layers exist just once in the registry.
Registries in Podman and Podman Desktop
From a Podman and Podman Desktop perspective, you can pull and push to registries, both local and remote. Registries are referred to using a Uniform Resource Identifier (URI). For example, the official Red Hat registry is located at registry.redhat.io. Images are referenced using the format (registry)/(...optional subdirectories)/repo:tag; for instance, quay.io/ilawson/devex4:latest refers to an image called devex4 with the tag latest in the ilawson repo at the quay.io registry.
In Podman, you work locally, pulling images from repos and pushing Images to repos. Any image you pull is written, using the file-layers, into your local pool, and when you push, the file-layers are transferred from your local pool to the target repo/image/tag.
Out in the real world, most of the registries have security—this is essential, to be honest, and when interacting with them from Podman, you need to have logged on to the registry. In the case of most of the popular registries, it is useful to create a "robot" at the registry for authenticated interactions; there's a great article on how to create one of these, a "service account", for registry.redhat.io.
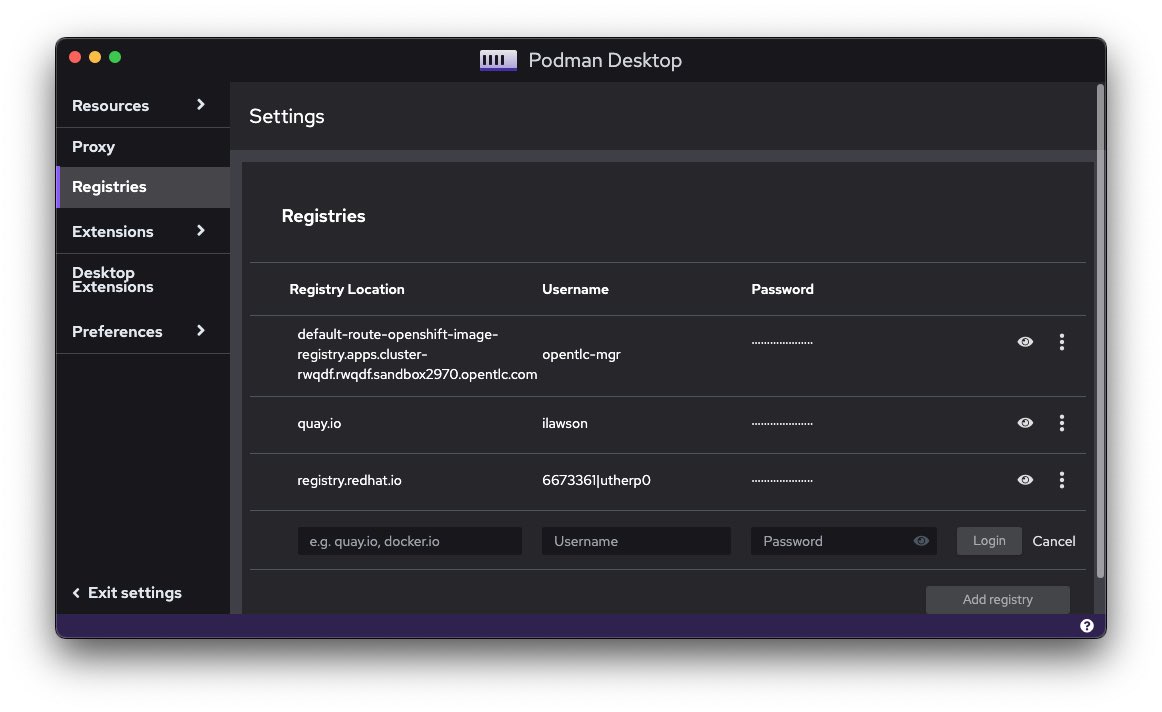
When using Podman Desktop, it interacts with the underlying Podman—Podman Desktop is a very good user experience that uses the Podman API. When using Podman Desktop to pull images from a registry that requires authentication, you can either pre-empt the calls by logging on to the registry through the Podman CLI, or usefully the Podman Desktop allows you to setup registry connections.
In Figure 3, you can see that I have logged Podman onto quay.io using my username and password, onto registry.redhat.io using a service account, and even into an active OpenShift cluster's internal registry using a username and a generated API token. By clicking on Add registry, I can add others. Any interaction you then make to those registries (which are keyed by the URI discussed earlier) then use the authentication setup within Podman.
Building images locally
As I said, in the old days, I had to dump my source—a Dockerfile plus the local content—onto a Git repo, push it, log into my VM, and build it. Now, even on my Mac, I can run a "local" build directly.
In the following example, I have a directory on my machine that contains a Containerfile with the following content:
FROM registry.fedoraproject.org/fedora:37

RUN dnf install -y httpd

COPY content/* /var/www/html/

EXPOSE 80

CMD ["httpd", "-DFOREGROUND"]
It's a simple image containing the base fedora image at version 37, the httpd engine, and some source locally copied from the subdirectory content into the target directory /var/www/html.
Using Podman Desktop, I can build this image directly into my local storage. In this case, I am going to name it appropriately to target an existing repo on quay.io; I won't build on or to quay.io, but the naming convention means I can build it locally and then push it directly to my repo when I need to.
By going to the Images tab in Podman Desktop and then choosing Build Image, I get the dialog shown in Figure 4:
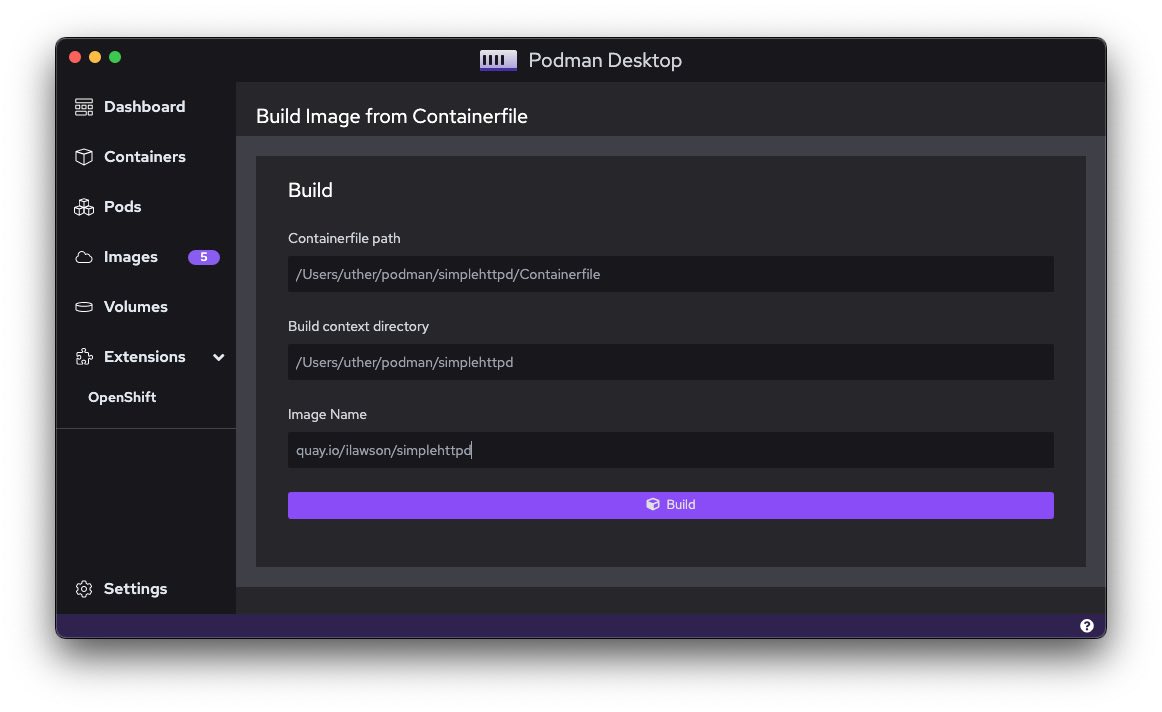
I provide a path to the Containerfile, as shown. I also provide a context directory; this allows the build to find and process the content directory mentioned in the Containerfile. And I add an image name to store the composite file-layers upon build.
When the build completes, I now have an image in my local storage that I can test.
At the top right of the panel are several useful icons that let me update the image to a registry, run the image locally as a container, delete the image, and inspect the file-layers/operations executed to build the image.
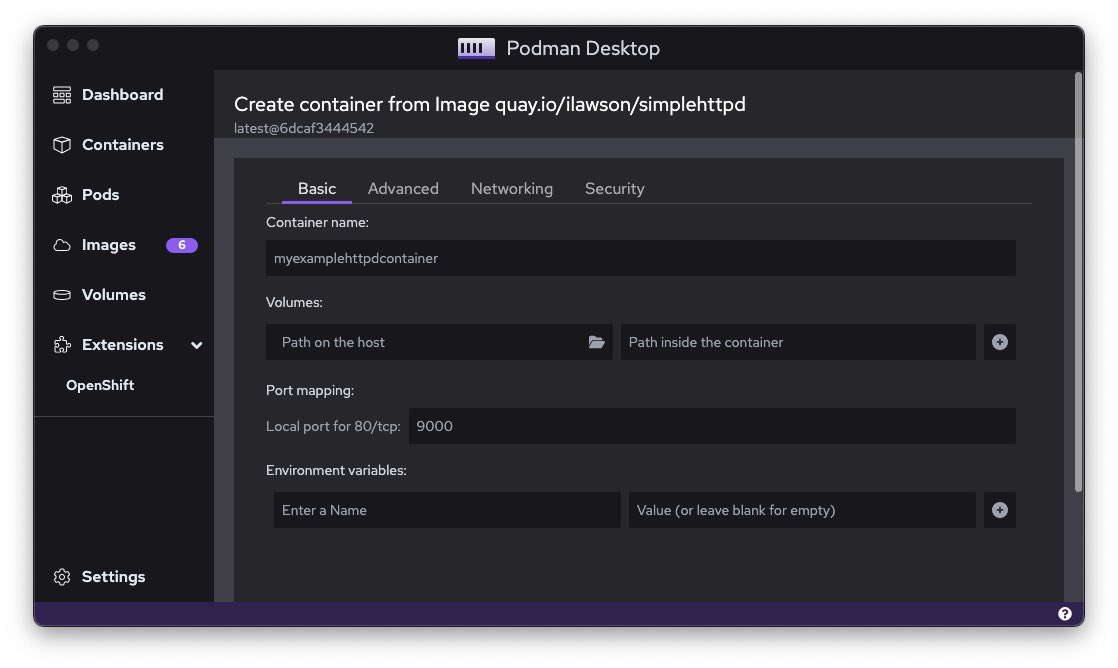
By clicking on the run icon, I am presented with a full dialog for executing the image as a container, as shown in Figure 5. The basic dialog allows me to set the container name, map host volumes into the container, map a local port on my machine against the exposed port in the container. (In this case, run the container with access through port 9000 on the local machine into port 80 within the container, and specify some environment variables to be expressed into the container, which is a great way to inject configuration information for your application to process.)
Once running, I have a superb overview of the active container (plus any others I have running). This gives me direct access to the state of the container and the ability to generate Kube object definitions, deploy it to Kubernetes (more in a sec), open the port in a browser, open a terminal directly into the container and force a restart.
All of these are available via the command line, but having them easily reachable in a graphical fashion makes interacting with the containers so much easier. If I open a terminal from the UI, I can interact directly with the container and its file-system (Figure 6).
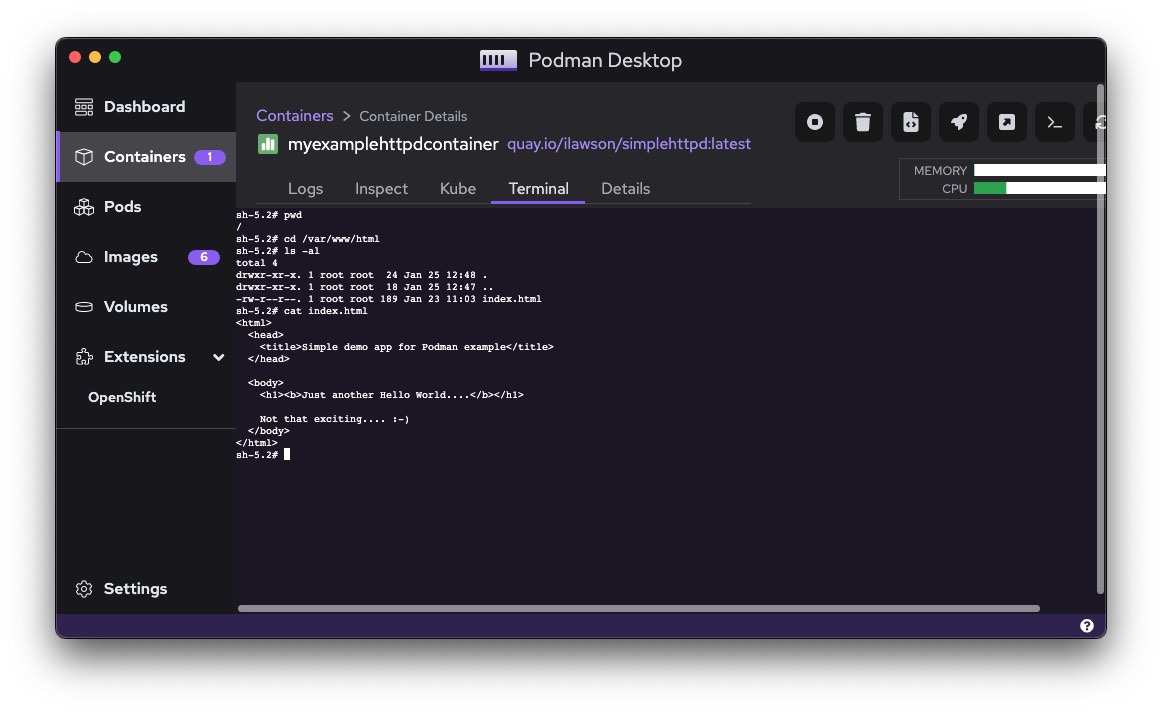
This is the source of the web content I wrote into the image using the Containerfile. As you can see from the left-hand panel, Podman Desktop gives a real-time overview of the Images and containers currently active.
If you now choose Images on the left-hand side of the application, you will get a full list of the Images currently accessible locally on your machine.
Using the OpenShift extension in Podman
What is nice about this is that, as stated, all of this is currently local to my machine. As part of the test, I added the OpenShift extension to Podman Desktop, which allows me to interact directly with an OpenShift cluster.
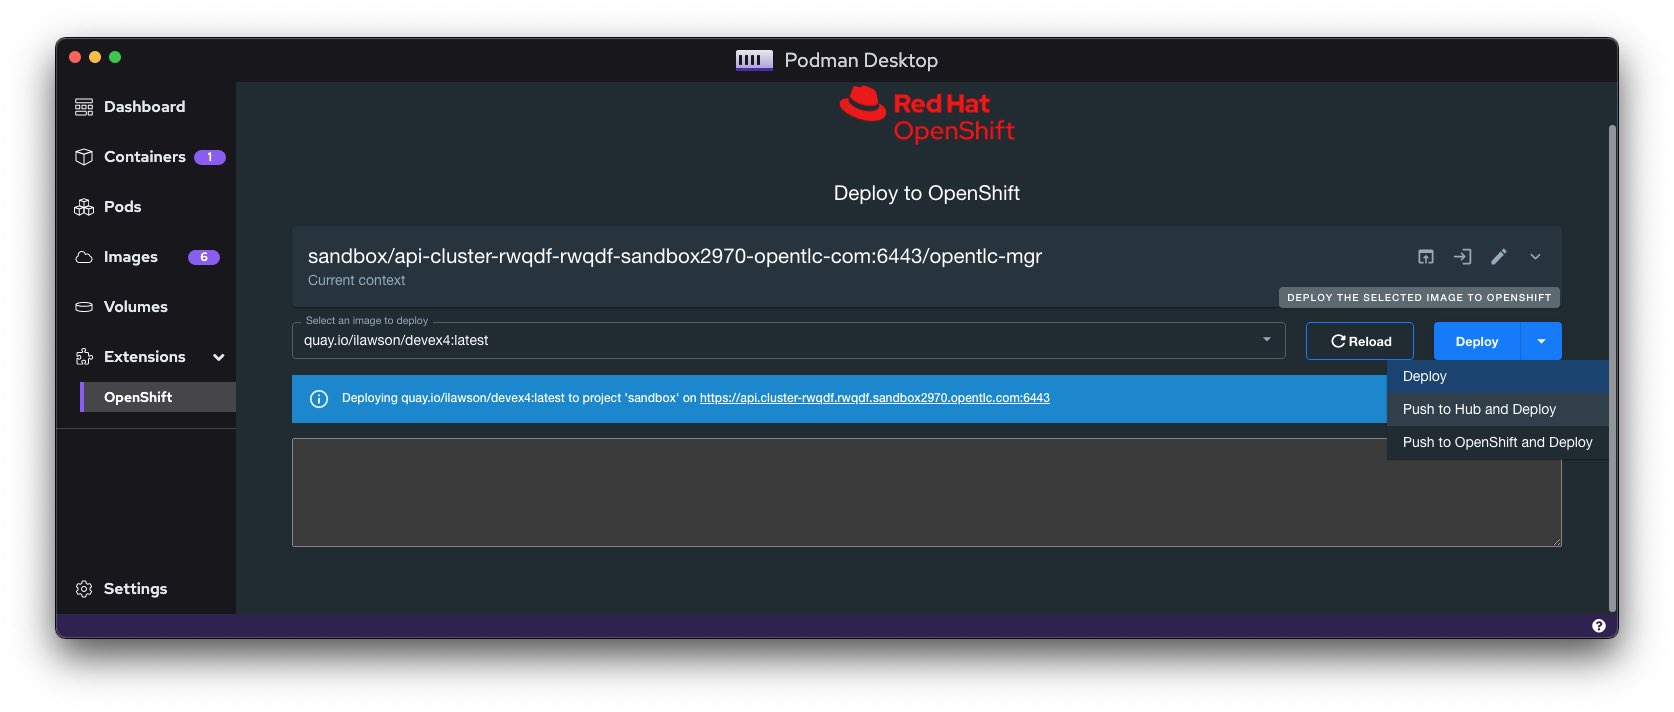
The OpenShift extension uses my current Kube config as a route into OpenShift. Having logged on locally (via oc) I can now see and interact with any of the projects I have rights to on the target cluster. In addition, I can push any of my local images as deployments to the cluster, meaning I can develop and test an image/container locally, then upload and test on my target OpenShift. By default, Podman Desktop also provides connectivity to Red Hat OpenShift Local, a locally instantiated small OpenShift instance. OpenShift Local used to be called Red Hat CodeReady Containers, and, as of January 2023, Podman Desktop still refers to it as such.
The other really nice feature of the OpenShift extension is that I can choose an Image and not only deploy it to the target cluster, but also either push to a remote registry and then deploy or push to the integrated registry in OpenShift, assuming I have access, and then deploy. This is shown in Figure 7.
Conclusion
From a developer perspective, Podman Desktop really eases the pain of building images and hosting containers locally. The product is constantly evolving, with some great features around more OpenShift integration coming soon, and the fact it now runs happily on my Mac makes me a happy developer for a change.
New to working with Podman? Download our Podman Cheat Sheet, which covers basic commands for managing images, containers, and container resources.
Last updated: January 29, 2024