Rate limiting is a popular technique to protect services from excessive demand. For example, you can use this strategy to limit how often a user can enter or reset their password. The example in this article builds rate limiting on a per-client basis into a Java-based service for a given time period. The application tracks requests from clients using a Redis in-memory data structure store and limits usage when a client's demand exceeds the quota.
Here is a broad overview of the implementation:
- Boostrap the
ratelimitQuarkus project and use thequarkus-redis-clientextension to connect to a Redis server. - Create a basic rate limiter that allows users to send 15 greeting requests with the same message in 1 minute.
- Test the rate limiter.
- Set up a Redis instance using the Redis template in Developer Sandbox for Red Hat OpenShift.
- Generate and push a native container image for the
ratelimitproject. - Deploy to Developer Sandbox or Kubernetes.
You can obtain the code for the tutorial from its GitHub repository.
Prerequisites
Here's what you'll need to follow along with this tutorial:
- An IDE
- JDK 11+ with
JAVA_HOMEconfigured appropriately - Apache Maven 3.8.1+
To create a native executable, containerize it, and deploy it, you will also need:
- GraalVM version 21.3.0, configured appropriately. Be sure to install support for Java 11.
- A working container runtime, such as Podman.
- Access to a container image registry, such as Red Hat Quay.
- An account on the Developer Sandbox for Red Hat OpenShift.
Bootstrap the Quarkus project
The easiest way to create the Quarkus project is to open a terminal and run the following command:
$ mvn "io.quarkus:quarkus-maven-plugin:create" \
  -DprojectGroupId="org.acme.example" \
  -DprojectArtifactId="ratelimit" \
  -DprojectVersion="1.0.0-SNAPSHOT" \
  -DclassName="GreeterResource" \
  -Dpath="greeting"
If you are a Windows user, collapse the command into one line as follows:
mvn "io.quarkus:quarkus-maven-plugin:create" -DprojectGroupId="org.acme.example" -DprojectArtifactId="ratelimit" -DprojectVersion="1.0.0-SNAPSHOT" -DclassName="GreeterResource" -Dpath="greeting"The generated project contains an endpoint labeled GreeterResource and an associated test class named GreeterResourceTest. To finish the setup, go inside the ratelimit directory and add some Quarkus extensions by running:
$ mvn quarkus:add-extension -Dextensions="quarkus-redis-client,quarkus-container-image-jib,quarkus-kubernetes,quarkus-smallrye-openapi"The project is now using the following extensions:
quarkus-resteasyto create JSON REST services.quarkus-redis-clientto connect to a Redis server. At the time of writing this article, the extension is considered a preview, so please check for improvements.quarkus-container-image-jibto build and push container images.quarkus-kubernetesto generate Kubernetes resources from annotations.quarkus-smallrye-openapito document the exposed API.
To validate the project configuration, you can start your Quarkus application by running the following command in a terminal window:
$ mvn quarkus:devAlthough you did not provide a Redis host configuration yet, Quarkus enables its Redis Dev Service by default. Furthermore, if there is a working runtime that complies with the Open Container Initiative (OCI) specification, Quarkus will try to configure and start an in-memory data store. You can press r to enable continuous testing, which runs tests immediately after you save your code changes.
Assuming that your application started in Dev Mode and exposed its service on port 8080, you can check the state of your server by visiting http://localhost:8080/q/swagger-ui/.
Implement rate limiting
To integrate GreeterResource requests with Redis, inject the Redis synchronous client (RedisClient) using the following code:
package org.acme.example;

import io.quarkus.redis.client.RedisClient;
import org.eclipse.microprofile.config.inject.ConfigProperty;

import javax.inject.Inject;
import javax.ws.rs.*;
import javax.ws.rs.core.MediaType;
import java.util.logging.Logger;

@Path("greeting")
public class GreeterResource {

    private final static Logger LOGGER = Logger.getLogger(GreeterResource.class.getName());

    @Inject
    RedisClient redisClient;

    @ConfigProperty(name = "requests.per.minute", defaultValue = "15")
    int customLimit;

    @GET
    @Produces(MediaType.TEXT_PLAIN)
    public String hello() {
        return "Hello RESTEasy";
    }


}
To leave some flexibility when setting the limit, the requests.per.minute field is configured with the @ConfigProperty annotation and has a default value of 15.
Let's build a rate limiter that allows users to send 15 greeting requests per minute containing the same message. When a user attempts the 16th request in a minute, the endpoint replies with HTTP 429 Too Many Requests. Redis documentation provides a best practice that helps with this rate-limiting scenario by using the INCR and EXPIRE commands.
In the following implementation, the Redis key is the concatenation of the message and the minute when the request is received. If the 15-request limit is reached, the endpoint responds with HTTP 429 TOO MANY REQUEST and sets the time to retry in the X-Rate-Limit-Retry-After-Seconds HTTP header:
@Path("greeting")
public class GreeterResource {

    private final static Logger LOGGER = Logger.getLogger(GreeterResource.class.getName());

    @Inject
    RedisClient redisClient;

    @ConfigProperty(name = "requests.per.minute", defaultValue = "15")
    int customLimit;

    @GET
    @Produces(MediaType.TEXT_PLAIN)
    @Path("{message}")
    public Response limited(@PathParam(value = "message") String message) {
        final LocalDateTime now = LocalDateTime.now();
        String key = message + ":" + now.getMinute();
        io.vertx.redis.client.Response requests = redisClient.get(key);
        int requestNo = (requests != null) ? requests.toInteger(): 0;

        if (requestNo >= customLimit) {
            return  Response.status(javax.ws.rs.core.Response.Status.TOO_MANY_REQUESTS)
                    .header("X-Rate-Limit-Retry-After-Seconds", 60-now.getSecond())
                    .entity(false)
                    .build();
        }
    }
}
If the 15 greeting requests limit was not reached, the application proceeds with the following logic:
- Mark the start of a transaction block with the Redis server using
redisClient.multi(). - Increment the counter for the key by invoking
redisClient.incr(key). - Set the expiration time for the key to 60 seconds from
nowusingredisClient.expire(key, "60"). - Execute all previously queued commands in a transaction with
redisClient.exec().
The endpoint should respond with HTTP 200 OK and the number of attempts left until the limit set in the X-Rate-Limit-Remaining header is reached.
The code for this entire scenario is in the GreeterResource class:
package org.acme.example;

import io.quarkus.redis.client.RedisClient;
import org.eclipse.microprofile.config.inject.ConfigProperty;

import javax.ws.rs.core.Response;

import javax.inject.Inject;
import javax.ws.rs.*;
import javax.ws.rs.core.MediaType;
import java.time.LocalDateTime;
import java.util.logging.Logger;

@Path("greeting")
public class GreeterResource {

    private final static Logger LOGGER = Logger.getLogger(GreeterResource.class.getName());

    @Inject
    RedisClient redisClient;

    @ConfigProperty(name = "requests.per.minute", defaultValue = "15")
    int customLimit;

    @GET
    @Produces(MediaType.TEXT_PLAIN)
    public String hello() {
        return "Hello RESTEasy";
    }

    @GET
    @Produces(MediaType.TEXT_PLAIN)
    @Path("{message}")
    public Response limited(@PathParam(value = "message") String message) {
        final LocalDateTime now = LocalDateTime.now();
        String key = message + ":" + now.getMinute();
        io.vertx.redis.client.Response requests = redisClient.get(key);
        int requestNo = (requests != null) ? requests.toInteger(): 0;

        if (requestNo >= customLimit) {
            return  Response.status(javax.ws.rs.core.Response.Status.TOO_MANY_REQUESTS)
                    .header("X-Rate-Limit-Retry-After-Seconds", 60-now.getSecond())
                    .entity(false)
                    .build();
        }

        redisClient.multi();
        redisClient.incr(key);
        redisClient.expire(key, "60");

        LOGGER.finest(String.format("Request count is %s ", redisClient.exec()));

        return Response.status(javax.ws.rs.core.Response.Status.OK)
                .header("X-Rate-Limit-Remaining", customLimit - requestNo - 1)
                .entity(true)
                .build();
    }
}
Now that we've built the implementation, let's validate it using tests.
Test the rate limiter
For this section, make sure you started Quarkus in Dev Mode and have continuous testing enabled:
$ mvn quarkus:devNext, add the testLimitedEndpoint method to GreeterResourceTest:
package org.acme.example;

import io.quarkus.test.junit.QuarkusTest;
import org.eclipse.microprofile.config.inject.ConfigProperty;
import org.junit.jupiter.api.Test;

import static io.restassured.RestAssured.given;
import static org.hamcrest.CoreMatchers.is;
import static org.hamcrest.CoreMatchers.notNullValue;

@QuarkusTest
public class GreeterResourceTest {

    //inject the limit
    @ConfigProperty(name = "requests.per.minute", defaultValue = "15")
    int customLimit;

    @Test
    public void testHelloEndpoint() {
        given()
          .when().get("/greeting")
          .then()
             .statusCode(200)
             .body(is("Hello RESTEasy"));
    }

    @Test
    public void testLimitedEndpoint() {
        //execute requests within allowed limit
        for (int i=0; i<customLimit; i++) {
            given()
                    .when().get("/greeting/random")
                    .then()
                    .statusCode(200).header("X-Rate-Limit-Remaining", String.valueOf((customLimit - i - 1)))
                    .body(notNullValue());
        }

        //execute request after exceeding limit
        given()
                .when().get("/greeting/random")
                .then()
                .statusCode(429).header("X-Rate-Limit-Retry-After-Seconds", notNullValue())
                .body(notNullValue());
    }

}
The terminal should display the following message:
All 2 tests are passing (0 skipped), 2 tests were run in 3748ms. Tests completed at 13:44:17.
Set up a Redis instance in the Developer Sandbox
To run the ratelimit project in Prod mode, you need a Redis server. You can provision one in your sandbox through the following steps:
In the Developer view, click +Add and go to Developer Catalog - All Services (Figure 1).

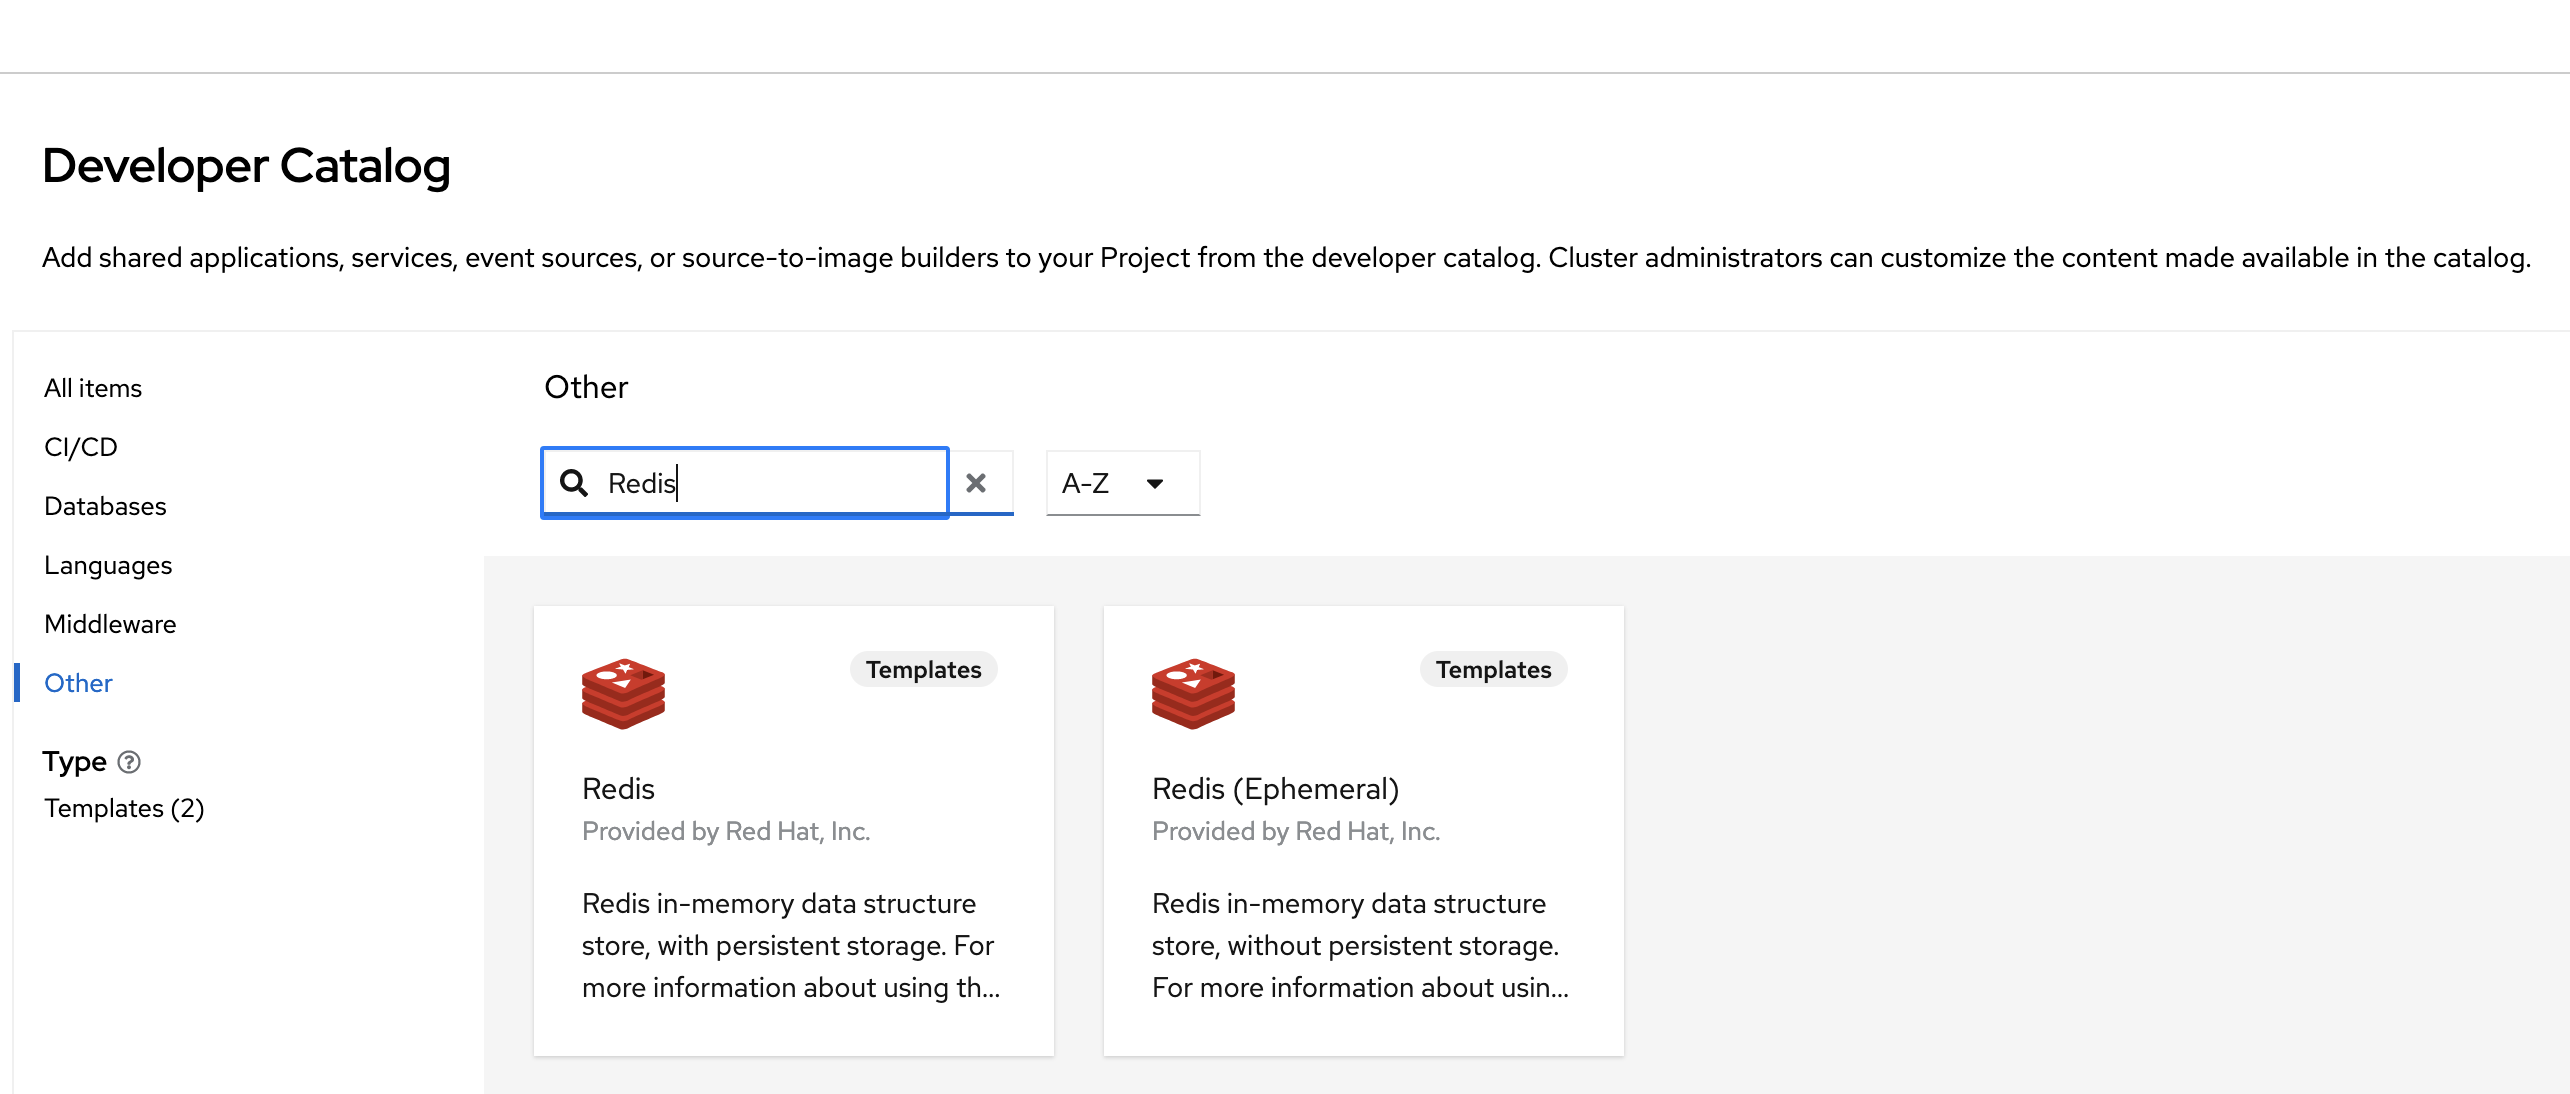
Figure 1: The Developer Catalog lets you load services in Developer Sandbox. In the Developer Catalog search, select Other and type
redis. The results will show two Redis templates (Figure 2). The Redis (Ephemeral) template does not offer persistent storage and should be used only for testing. Click on the Redis template without "Ephemeral" in parentheses.
Figure 2: There are two Redis templates. Choose the one that is not Ephemeral. - Click the Instantiate Template button.
In the template, fill in the database name and password with the string
redis(Figure 3).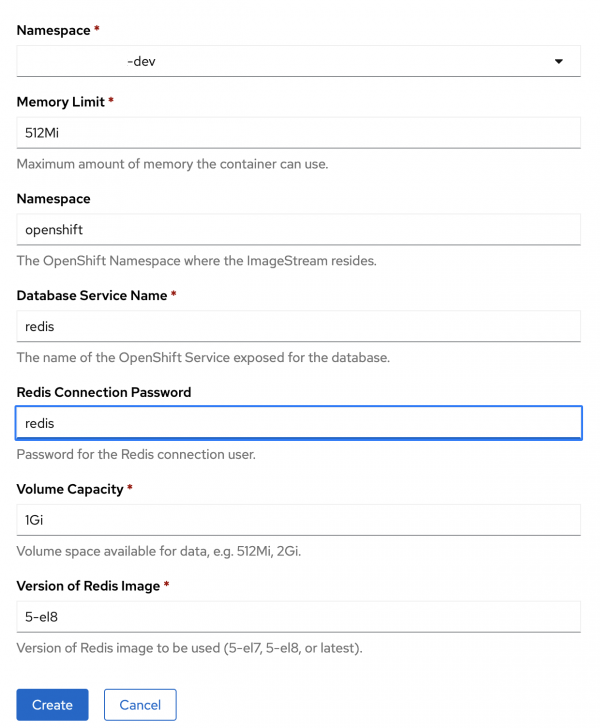
Figure 3: Fill in the database service name and password. - Click the Create button.


The topology view now shows the redis DeploymentConfig resource. You can click on it to see its content (Figure 4).
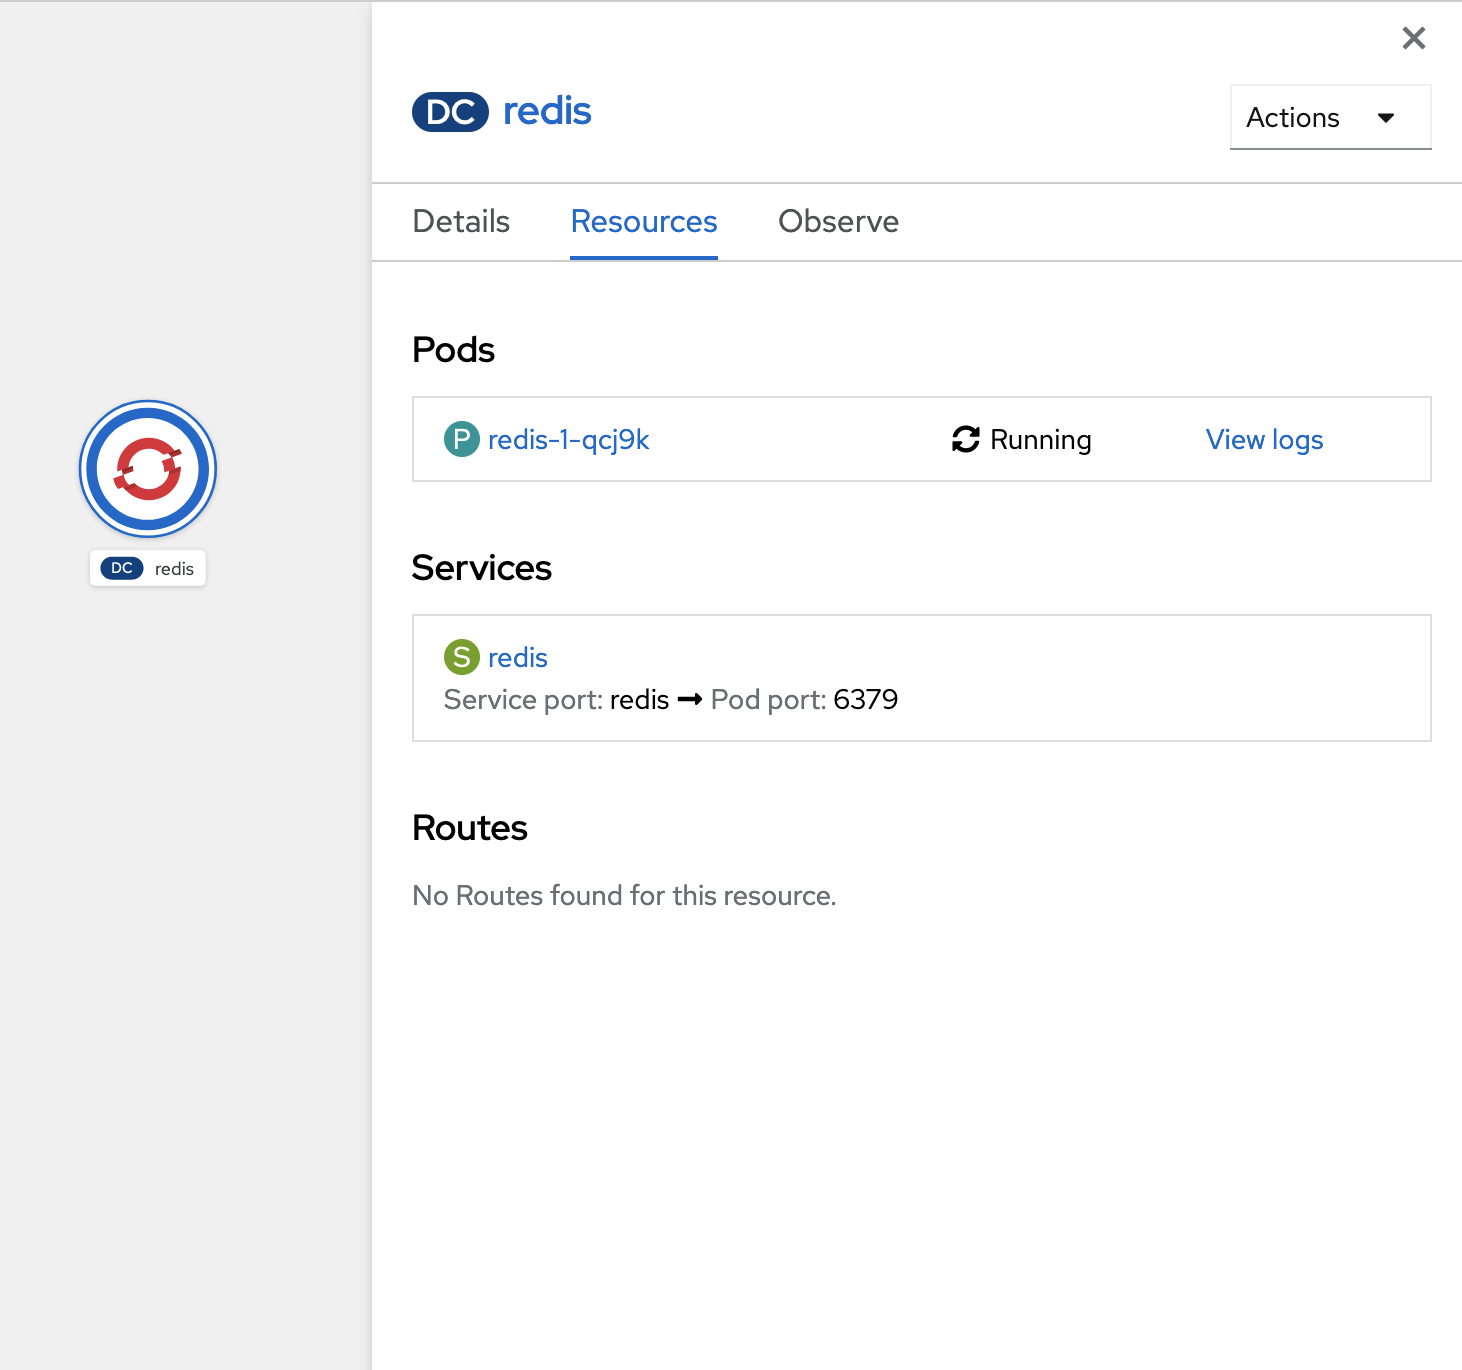
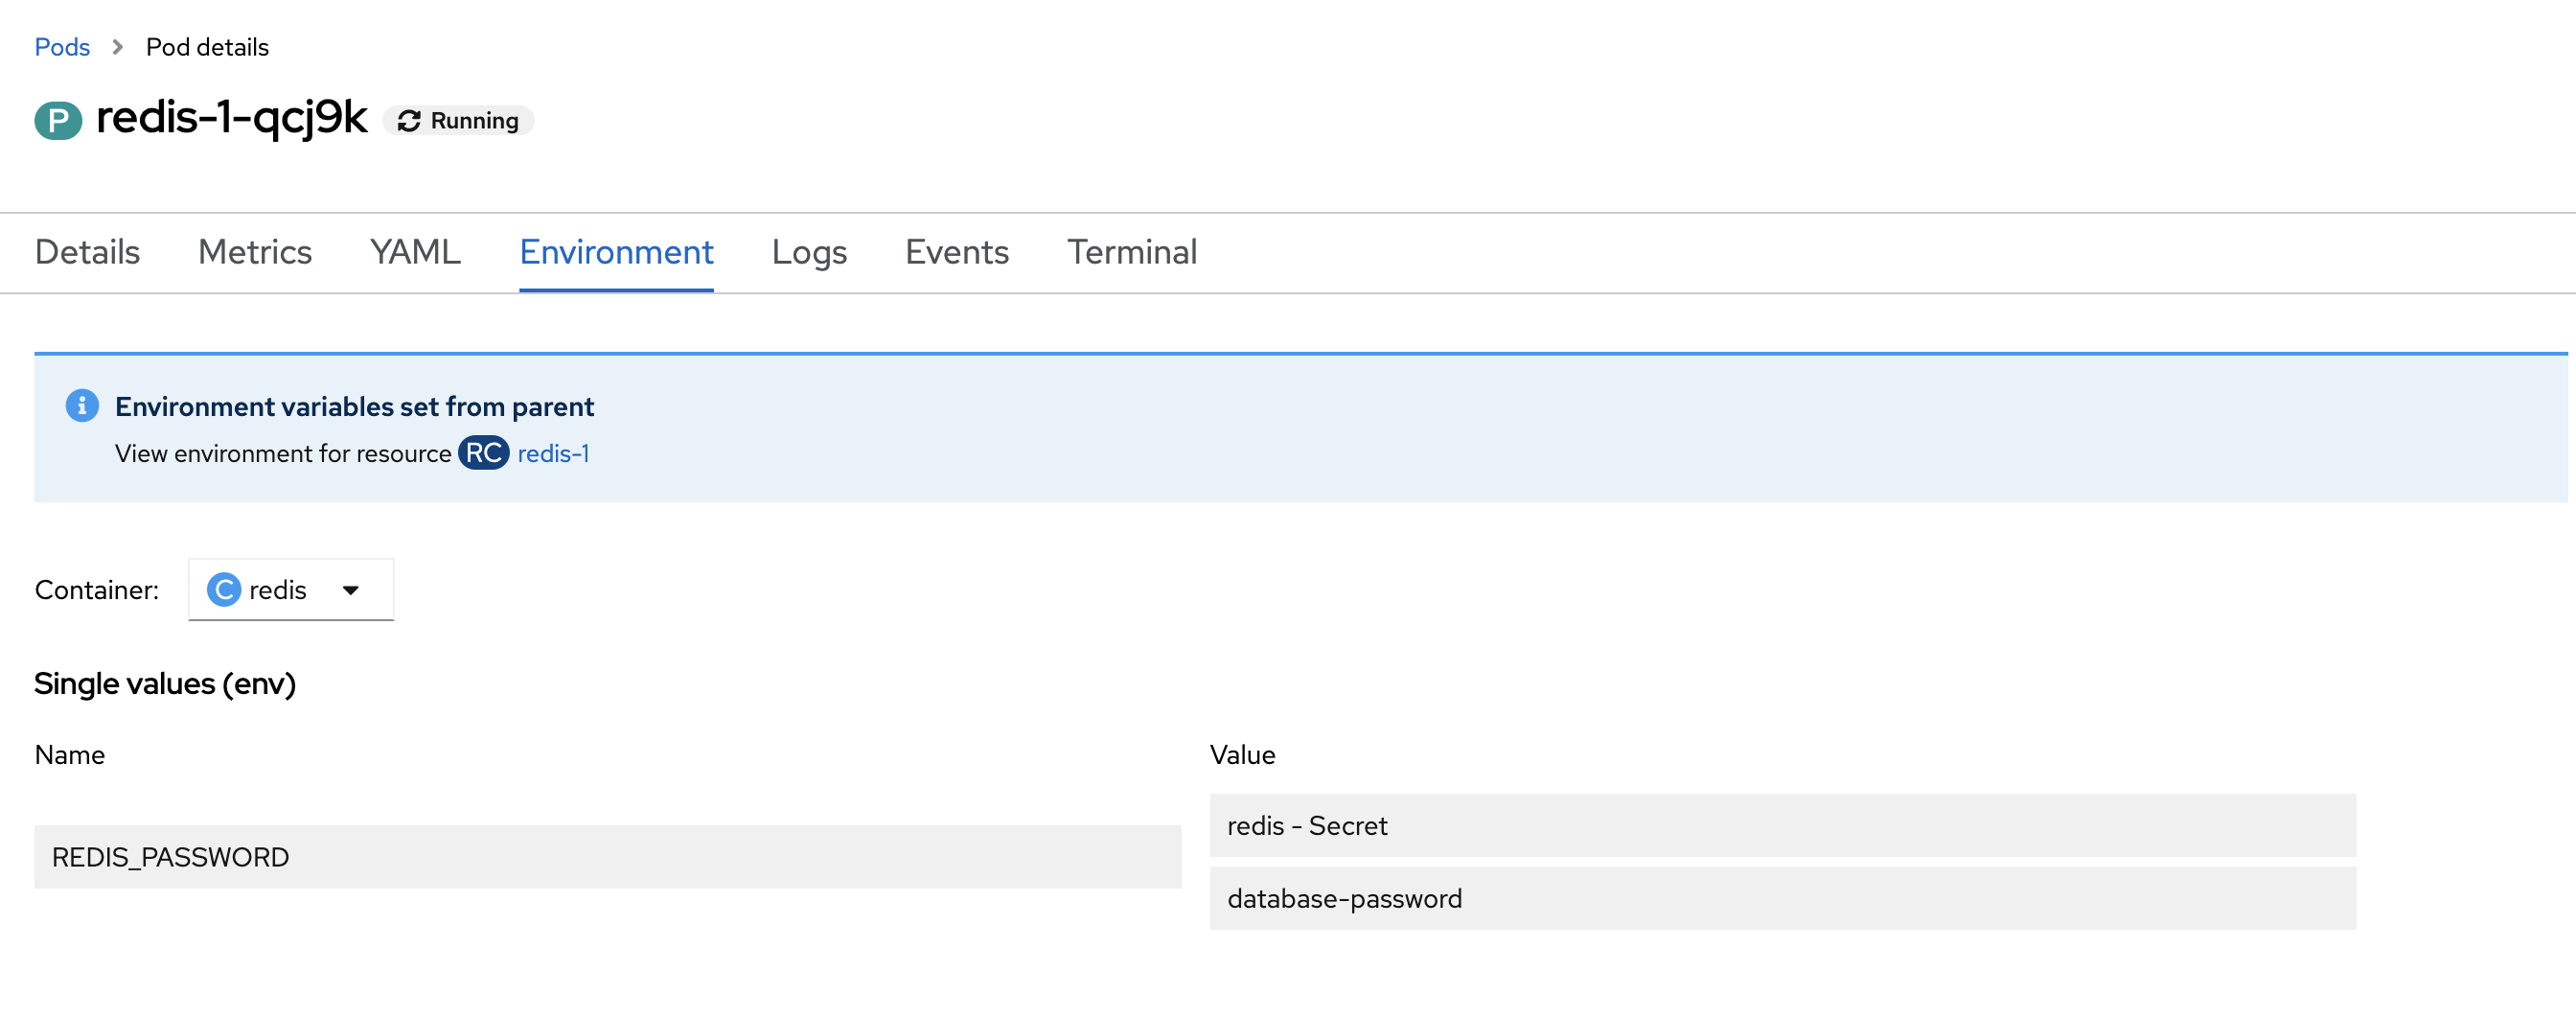
In this view, click on the pod name to view Pod details. In the Pod details view, select the Environment tab to see the Kubernetes secret name that holds the database password (Figure 5). You will use this secret and password in the next section.
Generate and push container images using Jib
Your container will be a Docker image built with Jib. Before building and pushing any container images, you should customize the ratelimit project for production mode. The Redis Dev Service helped when running the application in Dev mode, but you should now add Redis server configurations for Prod mode in src/main/resources/application.properties:
custom.host=${REDIS_HOST:redis}

###use the secret name and key seen in previous section
quarkus.kubernetes.env.mapping.redis.from-secret=redis
quarkus.kubernetes.env.mapping.redis.with-key=database-password

%prod.quarkus.redis.hosts=redis://${custom.host}:6379
%prod.quarkus.redis.password=${quarkus.kubernetes.env.mapping.redis.with-key:redis}Note: When connecting to data sources, avoid hardcoding URLs or passwords in configuration files. Instead, parameterize the data in configuration entries such as $custom.host and $quarkus.kubernetes.env.mapping.redis.with-key. You can overwrite the values when packaging the application.
To build and push the container image for ratelimit to your container registry, customize some details in src/main/resources/application.properties:
#set your registry and image details
quarkus.container-image.registry=quay.io
quarkus.container-image.group=yourrepo
quarkus.container-image.name=greeting-app
quarkus.container-image.tag=1.0.10-native

#automatically pushes the image when packaging the app
quarkus.container-image.push=true


#base native image to be used when producing a container image at jar build
quarkus.jib.base-native-image=registry.access.redhat.com/ubi8/ubi-minimal:8.5
If your local operating system is not based on Linux when packaging to native, you should also specify the docker image to use for the local build:
$ mvn package -Pnative -Dquarkus.native.container-build=true -Dquarkus.native.builder-image=quay.io/quarkus/ubi-quarkus-native-image:21.3-java11
This step is necessary to produce a build for a Linux binary. Without it, you'll get the following error when packaging or running the container:
The native binary produced by the build is not a Linux binary and therefore cannot be used in a Linux container image.Deploy to Kubernetes
Using the quarkus-kubernetes extension, Quarkus can generate Kubernetes resources based on annotations or user-given configurations. By applying the generated manifests, you can deploy the application to a target Kubernetes cluster, such as Developer Sandbox.
Because the ratelimit project integrates with a Redis server, you can customize the generated Kubernetes resources to use Redis details as environment variables in src/main/resources/application.properties:
#expose application via a LoadBalancer Kubernetes service
quarkus.kubernetes.service-type=load-balancer

#associate an ingress with the service
quarkus.kubernetes.ingress.expose=true

#automatically deploy to Kubernetes when packaging the app
quarkus.kubernetes.deploy=true


#use Kubernetes Service named redis
custom.host=${REDIS_HOST:redis}
quarkus.kubernetes.env.vars.redis-host=${custom.host}

#get Redis password from secret with name redis
quarkus.kubernetes.env.mapping.redis.from-secret=redis
quarkus.kubernetes.env.mapping.redis.with-key=database-password


#reuse previously defined values
%prod.quarkus.redis.hosts=redis://${custom.host}:6379
%prod.quarkus.redis.password=${quarkus.kubernetes.env.mapping.redis.with-key:redis}
You can check the resources generated in target/kubernetes/kubernetes.yml and apply those into your cluster via the kubectl command-line interface (CLI) or when packaging the application:
$ mvn package -Pnative -Dquarkus.native.container-build=true -Dquarkus.native.builder-image=quay.io/quarkus/ubi-quarkus-native-image:21.3-java11
After successfully deploying the resources, you can open a terminal within your browser by clicking on the >_ sign in the upper right menu (Figure 6).

The browser terminal has a few CLI tools installed, such as oc, kubectl, and helm. Execute the following line in the terminal to export the URL associated with the recently deployed resources:
$ export URL=$( kubectl get service greeting-app -o jsonpath='{.status.loadBalancer.ingress[0].hostname}')Next, let's invoke the /greeting/{message} endpoint 16 times in the same minute and use the same message value to observe the rate limiter's response:
$ for i in {1..16}; do curl -v $URL/greeting/hello; doneNext up
The quarkus-redis-client extension makes it easier for you to interact with a Redis server and use commands specific to it (GET, MULTI, INCR, EXPIRE). Quarkus Dev Services automatically provisions a data source without any configuration, and you can test the rate-limiting behavior while having Quarkus continuous testing enabled.
Once you've finished this tutorial, you can clean up your sandbox by running the following lines in the browser terminal:
$ curl https://raw.githubusercontent.com/ammbra/ratelimit/master/sandbox-cleaner.sh -o sandbox-cleaner.sh
$ sh sandbox-cleaner.sh
You can further play with the code by changing the limit, pushing the image, and deploying it as many times as you want on your sandbox.
Last updated: September 25, 2024