Want to learn more about developing applications with Quarkus? Download our free e-book Quarkus for Spring Developers, which helps Java developers familiar with Spring make a quick and easy transition.
Many development teams today have adopted test-driven development (TDD). Continuous testing support in Quarkus enables developers to take advantage of this practice. When running Quarkus Dev Mode, you can enable continuous testing with the press of a key, empowering Quarkus to automatically rerun tests affected by a code change in the background.
Quarkus understands which tests are affected by classes and methods within the application. As you make code changes, you get immediate feedback if the change passes your existing test suite. This capability is integrated directly into Quarkus—no IDE or special tooling is required. The future of developer productivity and joy is now!
This article walks you through a TDD approach to building an application and highlights the benefits that Quarkus brings. The completed example you should have after completing the steps in this article can be found in this GitHub repository.
Create a Quarkus project
Getting started with Quarkus is very simple. All that is required is a Java 11+ JDK, Apache Maven 3.8.1+, and a terminal. An IDE (such as IntelliJ, VSCode, or Eclipse) is helpful but not required. You could go to Code Quarkus to create the project, but we are going to use a terminal instead.
Open up a new terminal and execute:
mvn io.quarkus.platform:quarkus-maven-plugin:2.4.1.Final:create -DprojectGroupId=com.redhat -DprojectArtifactId=quarkus-tdd -DclassName="com.redhat.tdd.TDDResource" -Dpath="/tdd" -Dextensions="resteasy-reactive-jackson"
When complete, you should see the following message:
[INFO] ========================================================================================
[INFO] Your new application has been created in /path/to/quarkus-tdd
[INFO] Navigate into this directory and launch your application with mvn quarkus:dev
[INFO] Your application will be accessible on http://localhost:8080
[INFO] ========================================================================================
Run Quarkus Dev Mode
Quarkus Dev Mode enables hot deployment with background compilation. Changes made to an application while Dev Mode is running will automatically take effect without you having to initiate a recompile or redeploy. In most cases, this happens in under a second.
Your turn!
cd into the newly-created quarkus-tdd directory and execute ./mvnw quarkus:dev (or mvnw quarkus:dev on Windows).
When complete, you should see:
__  ____  __  _____   ___  __ ____  ______
 --/ __ \/ / / / _ | / _ \/ //_/ / / / __/
 -/ /_/ / /_/ / __ |/ , _/ ,< / /_/ /\ \
--\___\_\____/_/ |_/_/|_/_/|_|\____/___/
INFO  [io.quarkus] (Quarkus Main Thread) quarkus-tdd 1.0.0-SNAPSHOT on JVM (powered by Quarkus 2.4.1.Final) started in 2.218s. Listening on: http://localhost:8080
INFO  [io.quarkus] (Quarkus Main Thread) Profile dev activated. Live Coding activated.
INFO  [io.quarkus] (Quarkus Main Thread) Installed features: [cdi, resteasy-reactive, resteasy-reactive-jackson, smallrye-context-propagation, vertx]

--
Tests paused
Press [r] to resume testing, [o] Toggle test output, [h] for more options>
The application is now running in Dev Mode.
Enable continuous testing
When enabled, Quarkus continuous testing will run affected tests immediately after code changes have been saved, allowing you instant feedback on the changes just made. Quarkus also understands which tests cover which code so only relevant tests are run when changes are made.
Your turn!
Press r to resume testing. The entire test suite will be run the first time continuous testing is resumed. Doing this allows Quarkus Dev Mode to understand the relationships between the tests and the code they cover.
In this case, there is only one test, so it should execute fairly quickly. When complete, you should see:
All 1 test is passing (0 skipped), 1 test was run in 2739ms. Tests completed at 14:15:25.
Note: The test execution time might vary for you.
Access the Quarkus Dev UI
The Quarkus Dev UI is a landing page that is exposed at the /q/dev URI when running in Dev Mode. The Dev UI allows you to easily browse, visualize, and interact with endpoints offered by extensions currently installed in a project. Each extension can offer its documentation, custom runtime information, full custom pages, and interactive pages with custom actions that can be performed through the Dev UI.
Your turn!
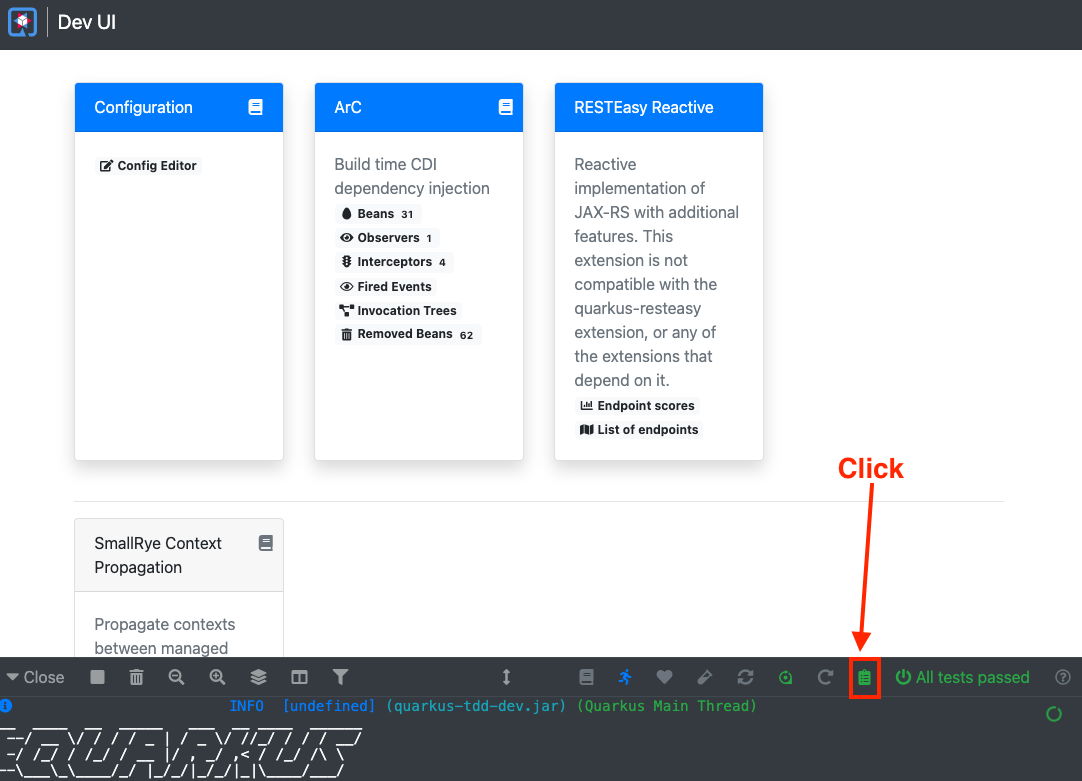
Press d to open the Dev UI in your browser and click the test icon, as shown in Figure 1.
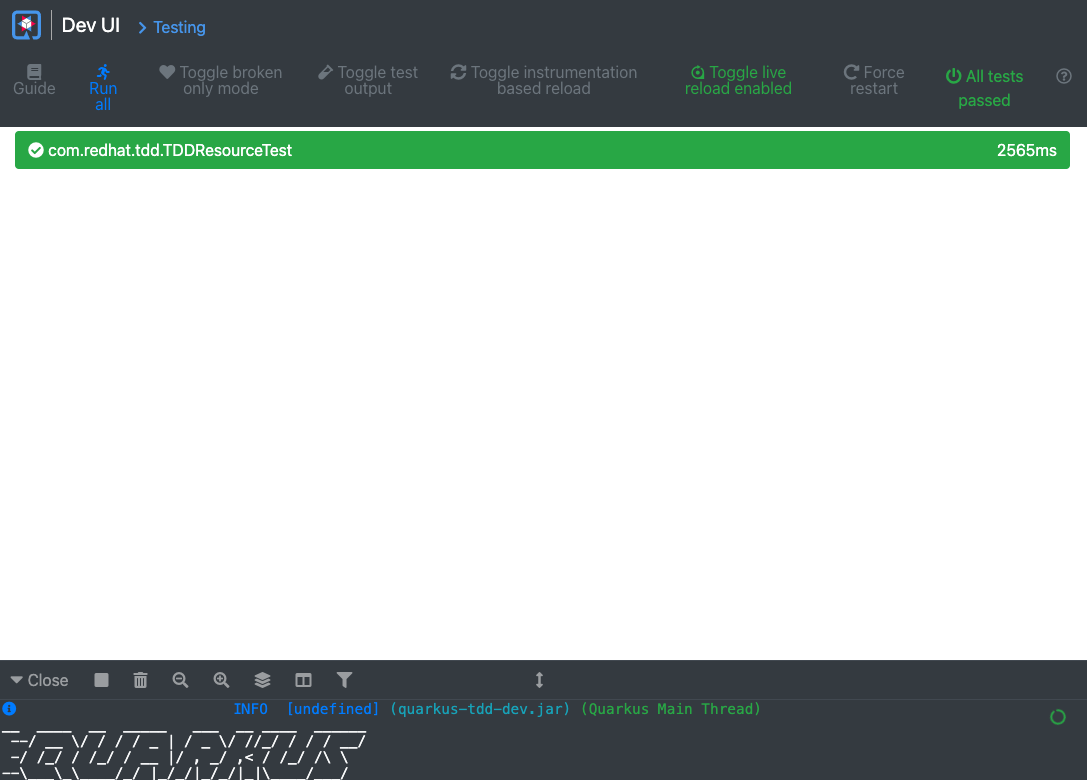
This will open the test UI, as shown in Figure 2.
Test-driven development scenario
The remainder of this article will focus on implementing and modifying scenarios within the current application being developed.
- In the current project, open
src/test/java/com/redhat/tdd/TDDResourceTest.java. - Remove the existing test method in the class.
- Add some new tests:
@Test public void getAll() { given() .when().get("/tdd") .then() .statusCode(200) .body( "$.size()", is(1), "[0].id", is(1), "[0].message", is("Hello") ); } @Test public void getOneFound() { given() .when().get("/tdd/1") .then() .statusCode(200) .body( "id", is(1), "message", is("Hello") ); } @Test public void getOneNotFound() { given() .when().get("/tdd/2") .then().statusCode(404); }- The
getAlltest issues aGETrequest to/tddand expects a status code of200and a body containing a JSON array of size 1 that contains an object having attributesid == 1andmessage == Hello. - The
getOneFoundtest issues aGETrequest to/tdd/1and expects a status code of200and a body containing a JSON object having attributesid == 1andmessage == Hello. - The
getOneNotFoundtest issues aGETrequest to/tdd/2and expects a status code of404.
- The
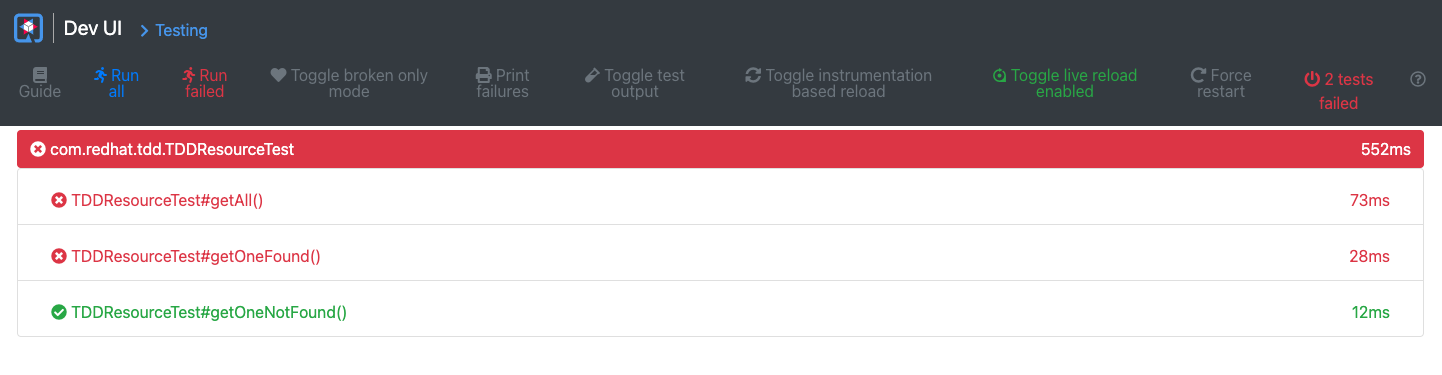
- As soon as you save your editor you should see some new test results in the Test UI, as shown in Figure 3. (You might need to refresh the browser page.) The tests are failing because they are calling endpoints that don't currently exist. The
getOneNotFoundtest is passing because the test is asserting that a particular endpoint doesn't return any results, which currently is the case.
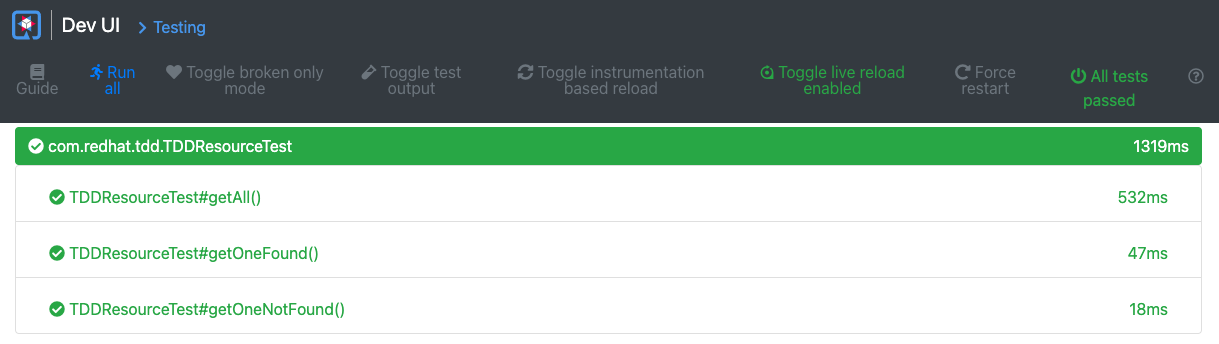
Figure 3. Quarkus test results (1). - Create a new class
src/main/java/com/redhat/tdd/Item.javawith the following contents:package com.redhat.tdd; public class Item { private Long id; private String message; public Item() { } public Item(Long id, String message) { this.id = id; this.message = message; } public Long getId() { return this.id; } public void setId(Long id) { this.id = id; } public String getMessage() { return this.message; } public void setMessage(String message) { this.message = message; } } - Save
Item.java. - Open
src/main/java/com/redhat/tdd/TDDResource.java. - Add a new attribute to the class:
private final List items = List.of(new Item(1L, "Hello")); - Remove all existing methods from the class.
- Add a new method that implements the
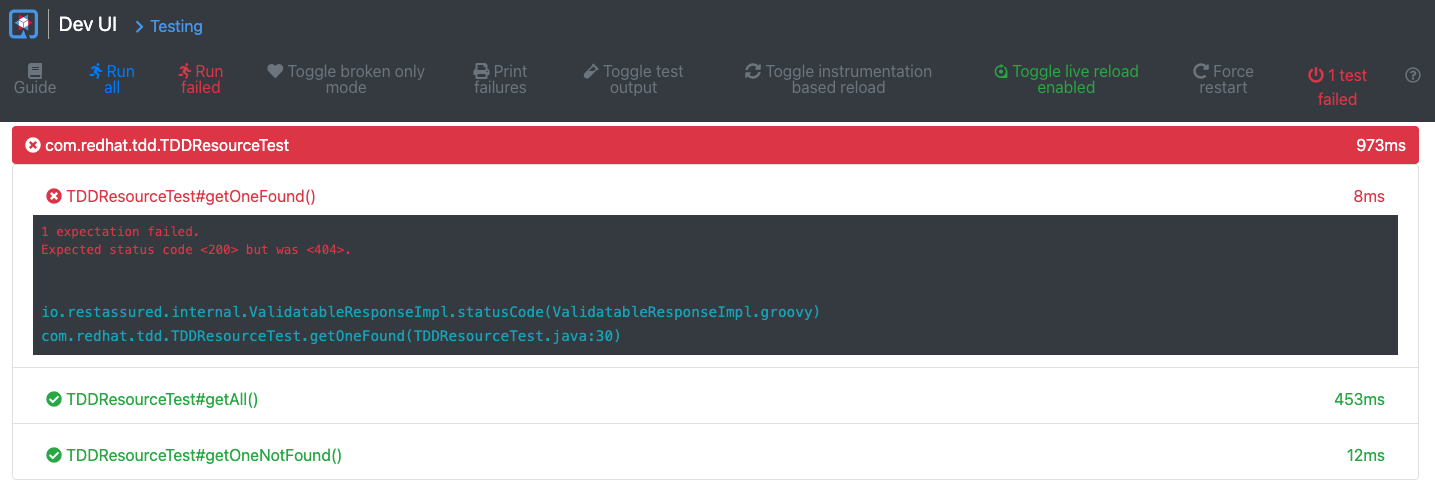
GETto the/tddendpoint:@GET @Produces(MediaType.APPLICATION_JSON) public List<Item> getAll() { return items; } - Save your editor and return to the Test UI to see the updated test results, as shown in Figure 4. You might need to refresh the browser page. The
getAlltest now passes.
Figure 4. Updated test results. - The functionality implemented by the
getOneFoundtest now needs to be implemented. Still in theTDDResourceclass, add an additional method that implements theGETto the/tdd/{id}endpoint. This endpoint should return a200status code with a JSON representation of the object withidequal to{id}, if one exists. If theidis not found, it should return a404status code.@GET @Produces(MediaType.APPLICATION_JSON) @Path("/{id}") public Response getOne(@PathParam("id") Long id) { return items.stream() .filter(item -> id == item.getId()) .findFirst() .map(item -> Response.ok(item).build()) .orElseGet(() -> Response.status(Status.NOT_FOUND).build()); } - Save your editor and return to the Test UI and see updated test results, as shown in Figure 5. The completed
TDDResourceclass should be:package com.redhat.tdd; import java.util.List; import javax.ws.rs.GET; import javax.ws.rs.Path; import javax.ws.rs.PathParam; import javax.ws.rs.Produces; import javax.ws.rs.core.MediaType; import javax.ws.rs.core.Response; import javax.ws.rs.core.Response.Status; @Path("/tdd") public class TDDResource { private final List<Item> items = List.of(new Item(1L, "Hello")); @GET @Produces(MediaType.APPLICATION_JSON) public List<Item> getAll() { return items; } @GET @Produces(MediaType.APPLICATION_JSON) @Path("/{id}") public Response getOne(@PathParam("id") Long id) { return items.stream() .filter(item -> id == item.getId()) .findFirst() .map(item -> Response.ok(item).build()) .orElseGet(() -> Response.status(Status.NOT_FOUND).build()); } }
Figure 5. All tests passing. - Now let's refactor some of the logic into a service class that the resource layer calls rather than the resource layer maintaining the application state. Create a new class
src/main/java/com/redhat/tdd/TDDService.javawith the following contents:package com.redhat.tdd; import java.util.List; import java.util.Optional; import javax.enterprise.context.ApplicationScoped; @ApplicationScoped public class TDDService { private final List<Item> items = List.of(new Item(1L, "Hello")); public List<Item> getAllItems() { return items; } public Optional<Item> getItem(Long id) { return items.stream() .filter(item -> id == item.getId()) .findFirst(); } } - Now let's create some tests for this service. Create a new test class
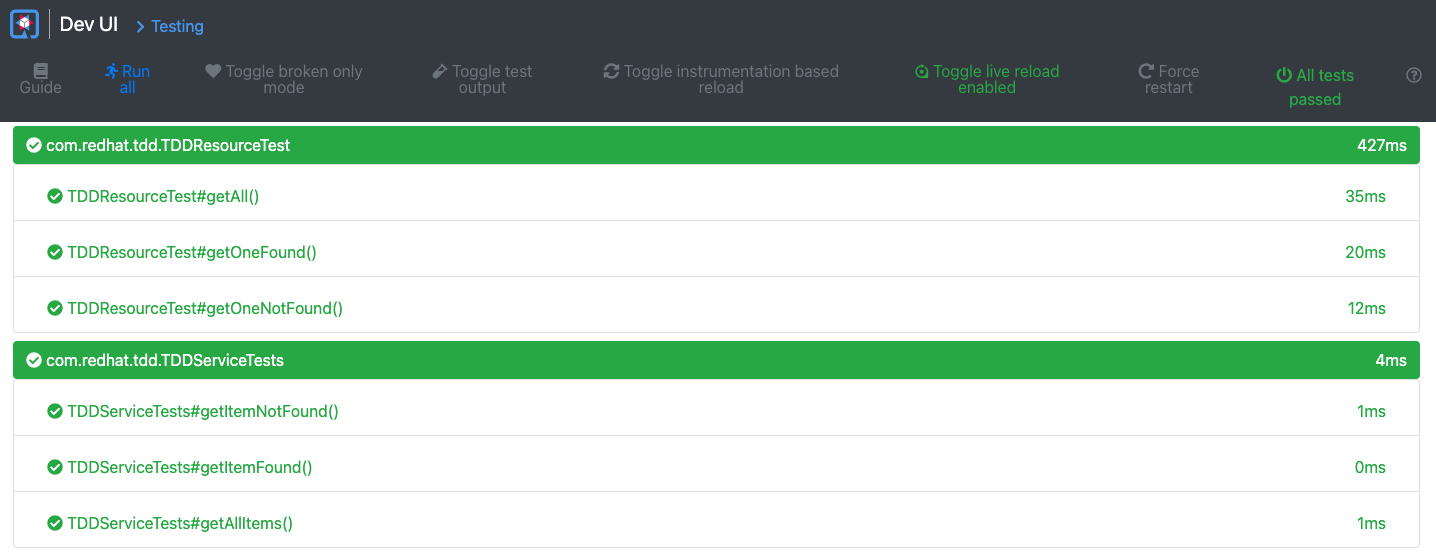
src/test/java/com/redhat/tdd/TDDServiceTests.javawith the following contents:package com.redhat.tdd; import static org.junit.jupiter.api.Assertions.*; import org.junit.jupiter.api.Test; class TDDServiceTests { TDDService service = new TDDService(); @Test public void getAllItems() { var items = service.getAllItems(); assertTrue(items.size() == 1); var item = items.get(0); assertNotNull(item); assertEquals(1L, item.getId()); assertEquals("Hello", item.getMessage()); } @Test public void getItemFound() { var item = service.getItem(1L); assertNotNull(item); assertTrue(item.isPresent()); assertEquals(1L, item.get().getId()); assertEquals("Hello", item.get().getMessage()); } @Test public void getItemNotFound() { var item = service.getItem(2L); assertNotNull(item); assertTrue(item.isEmpty()); } } - Save all editors and return to the Test UI to see updated test results, as shown in Figure 6. You might need to refresh your browser. All tests should be passing.

Figure 6. All service and resource tests passing. - Now we need to refactor the
TDDResourceclass to use the newTDDService. Luckily, we now have a test suite that can make sure our refactoring doesn't affect the application's functionality! Reopensrc/main/java/com/redhat/tdd/TDDResource.javaand update it to the following:package com.redhat.tdd; import java.util.List; import javax.inject.Inject; import javax.ws.rs.GET; import javax.ws.rs.Path; import javax.ws.rs.PathParam; import javax.ws.rs.Produces; import javax.ws.rs.core.MediaType; import javax.ws.rs.core.Response; import javax.ws.rs.core.Response.Status; @Path("/tdd") public class TDDResource { @Inject TDDService service; @GET @Produces(MediaType.APPLICATION_JSON) public List<Item> getAll() { return service.getAllItems(); } @GET @Produces(MediaType.APPLICATION_JSON) @Path("/{id}") public Response getOne(@PathParam("id") Long id) { return service.getItem(id) .map(item -> Response.ok(item).build()) .orElseGet(() -> Response.status(Status.NOT_FOUND).build()); } } - Return to the Test UI. All tests should still be passing.
- Return to the terminal where
quarkus:devis running. You should see the following, indicating that only tests for theTDDResourceclass were run:-- All 6 tests are passing (0 skipped), 2 tests were run in 1255ms. Tests completed at 14:54:44 due to changes to TDDResource.class. - Press
qin the terminal wherequarkus:devis running to quit the application.
As you can see from this quick tutorial, continuous testing works across class creation as well as refactoring within an application. Quarkus understands which tests cover code and only reruns affected tests.
The completed example you should have after completing the steps in this article can be found on GitHub.
Where to learn more
There are many free resources available for learning about and getting started with Quarkus. Why wait for the future? Since its inception in 2019 and continuing today and into the future, Quarkus has provided a familiar and innovative framework for Java developers, supporting capabilities developers need and want today.
Check out these available resources:
- Read Quarkus for Spring Developers to learn about what challenges led to Quarkus and see side-by-side examples of familiar Spring concepts, constructs, and conventions.
- Find out why you should choose Quarkus over Spring for microservices development.
- Discover why organizations believe the developer experience is just as important as the product itself.
- Explore Quarkus quick starts in the Developer Sandbox for Red Hat OpenShift, which offers a free and ready-made environment for experimenting with containerized applications.
- Try free 15-minute interactive learning scenarios.
- Get started with Quarkus on your own.
- Learn about Quarkus's Spring compatibility features.
- Find out why, in some instances, there might not be any code changes needed to run a Spring application on Quarkus.
- Get hands-on converting a Spring Boot application to Quarkus with little-to-no code changes.
- Attend a Quarkus World Tour event when it comes to a city near you. You can even request a private stop.